
Introduction #
In this tutorial, we will learn how to use Agent SOAP Adapter to callout data from salesforce to other systems. There are several features to callout with this adapter, like without response messages, response messages, fault messages, attribute, and copy nodes. Agent SOAP adapter work with both processing modes, such as synchronous and Asynchronous.
I. Handle API message without Response Interface. #
Pre-require
- Create or Upload Message Type SOAP.
- Configuration Agent control board.
- Create Adapter Agent SOAP.
- Create Integration and Outbound Interface.
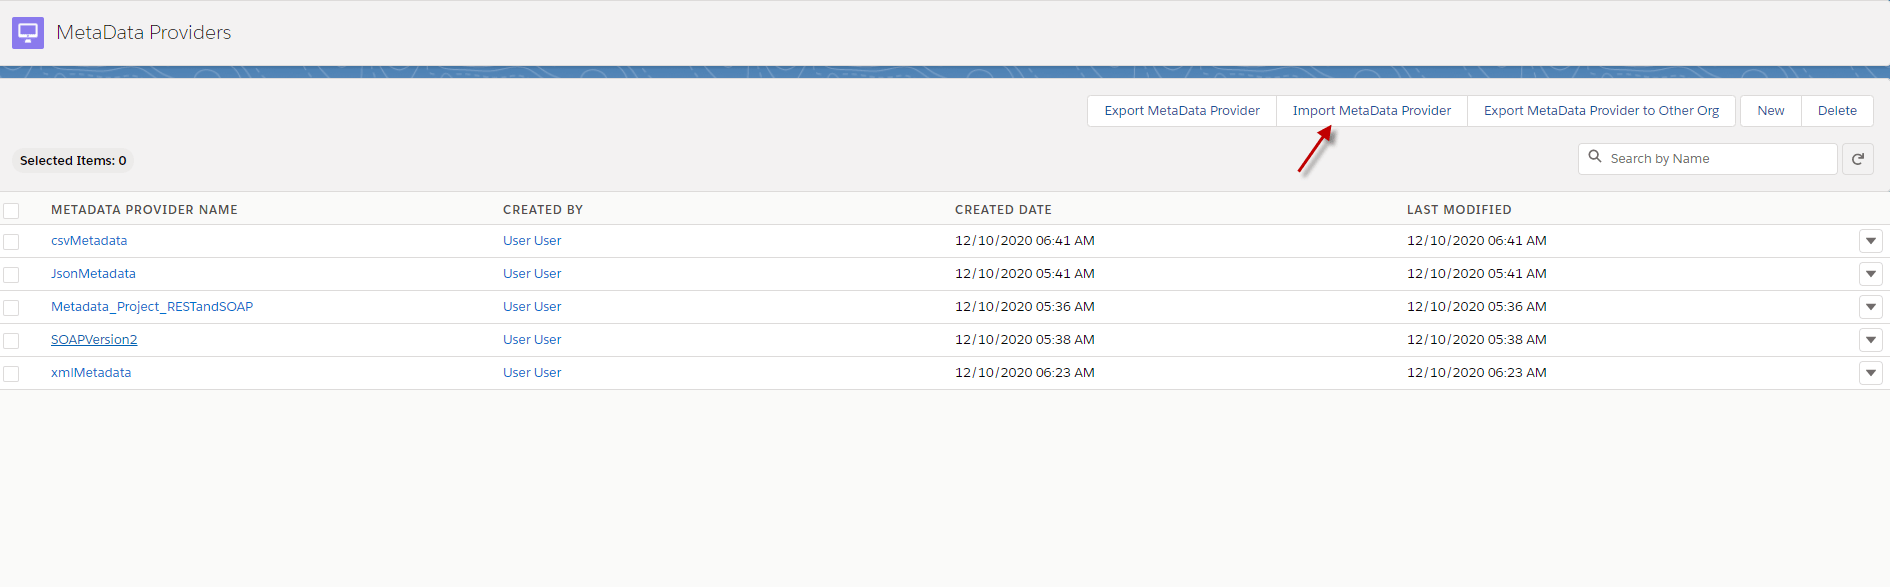
Step 1: Create or Upload Message Type SOAP.
- Go to Metadata-> click button Import MetaData Provider.
- Click upload files (Put metadata and click OK)
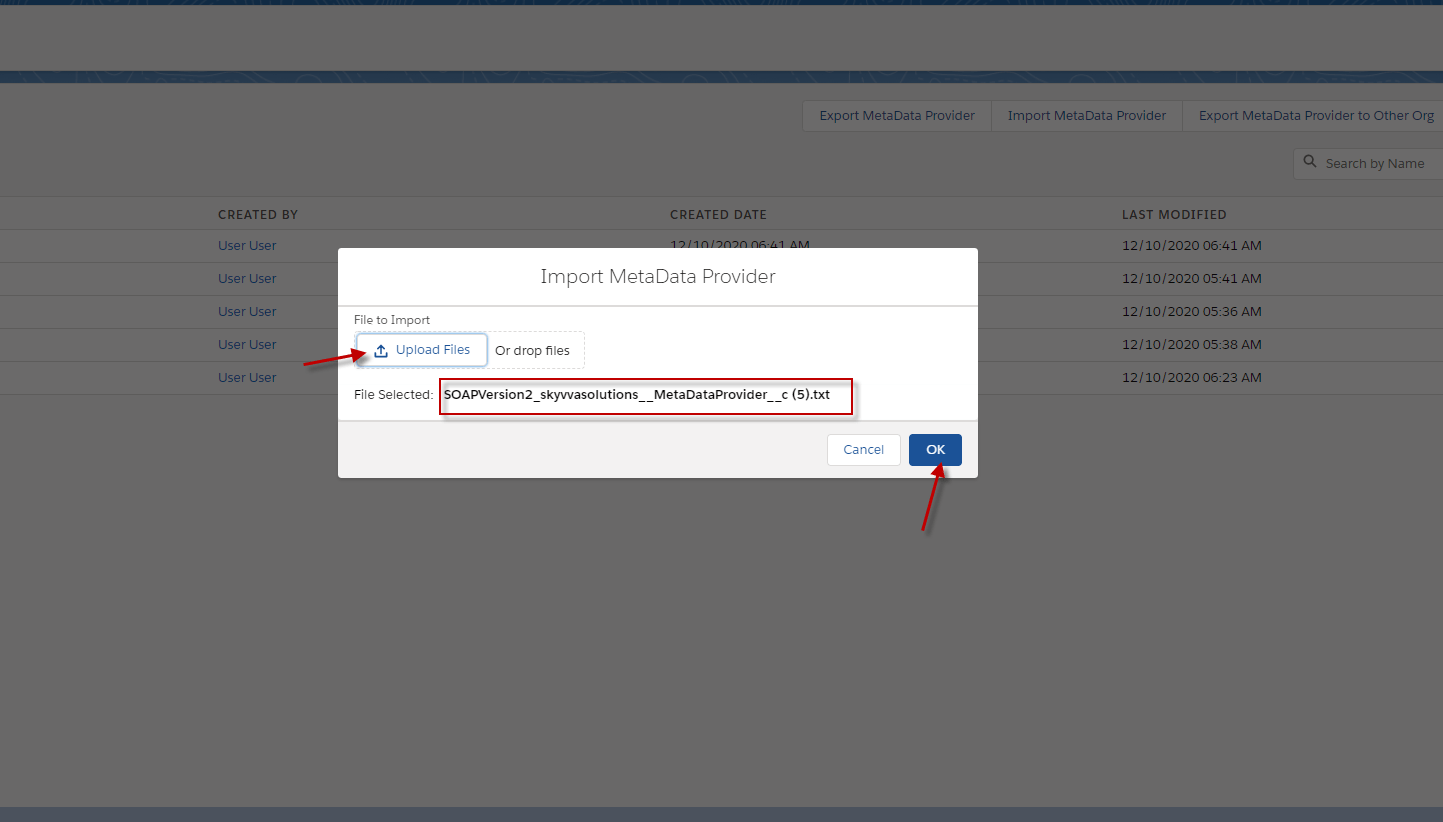
- Here is the SOAP Message Type. Click this to download.
– SOAPVersion2_skyvvasolutions__MetaDataProvider__c (5)
Step 2: Create integration and outbound Interface.
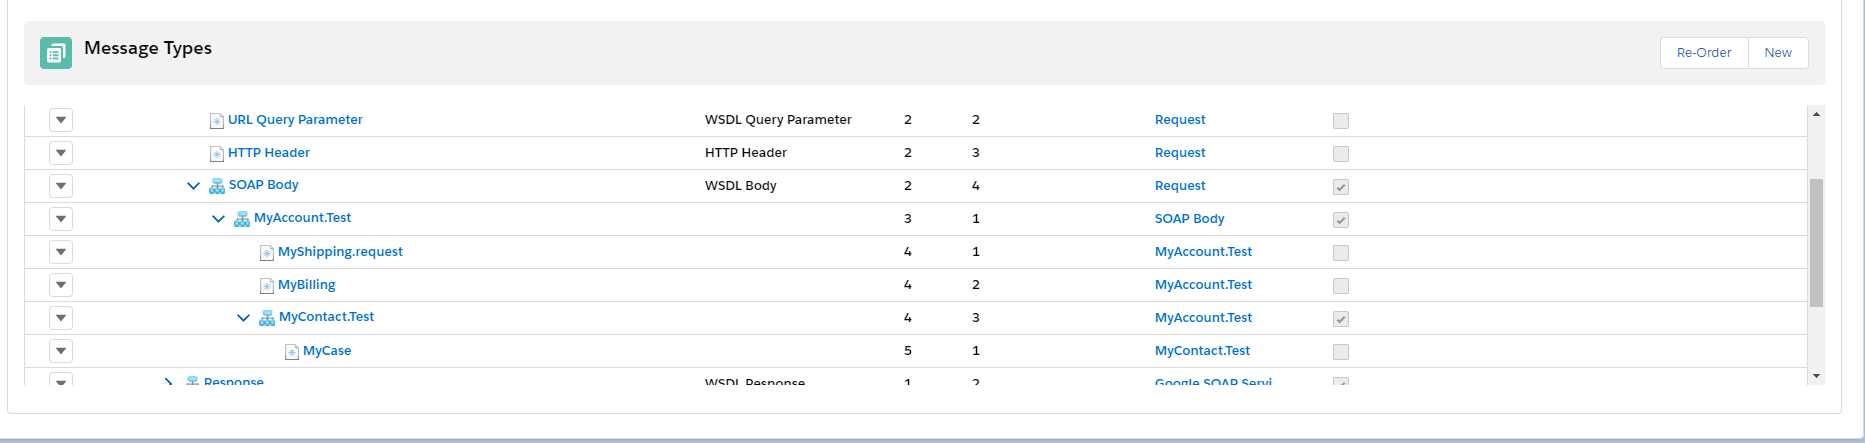
- Create an outbound Interface link with Message Type.

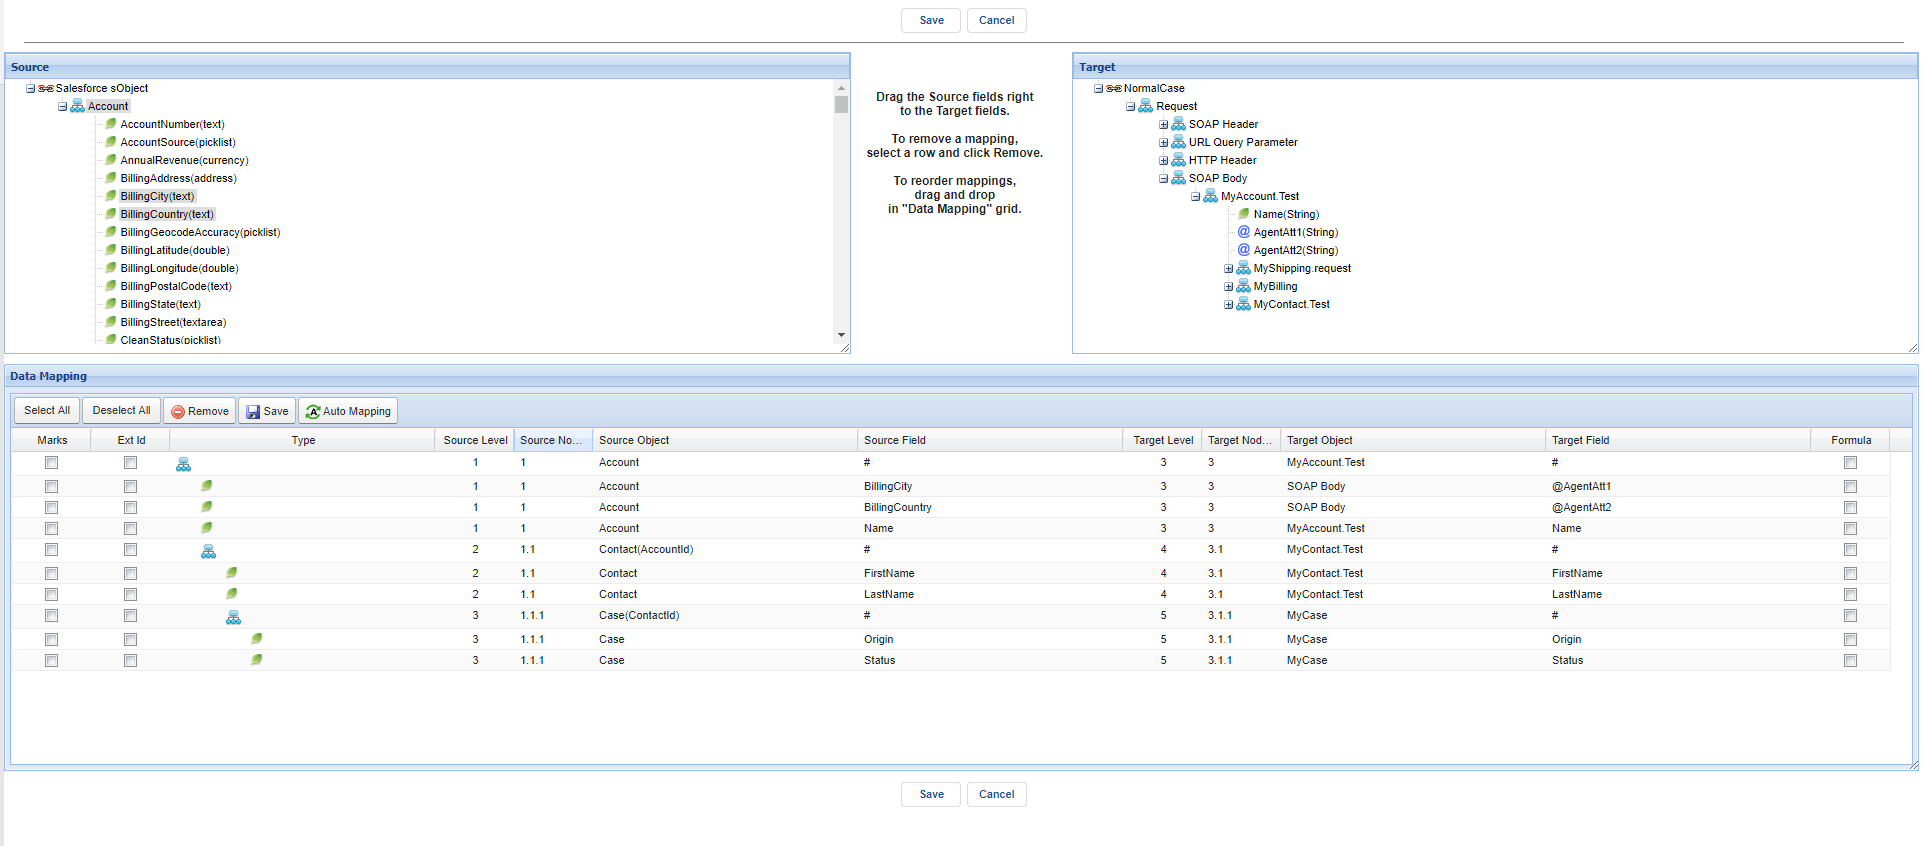
- Do mapping
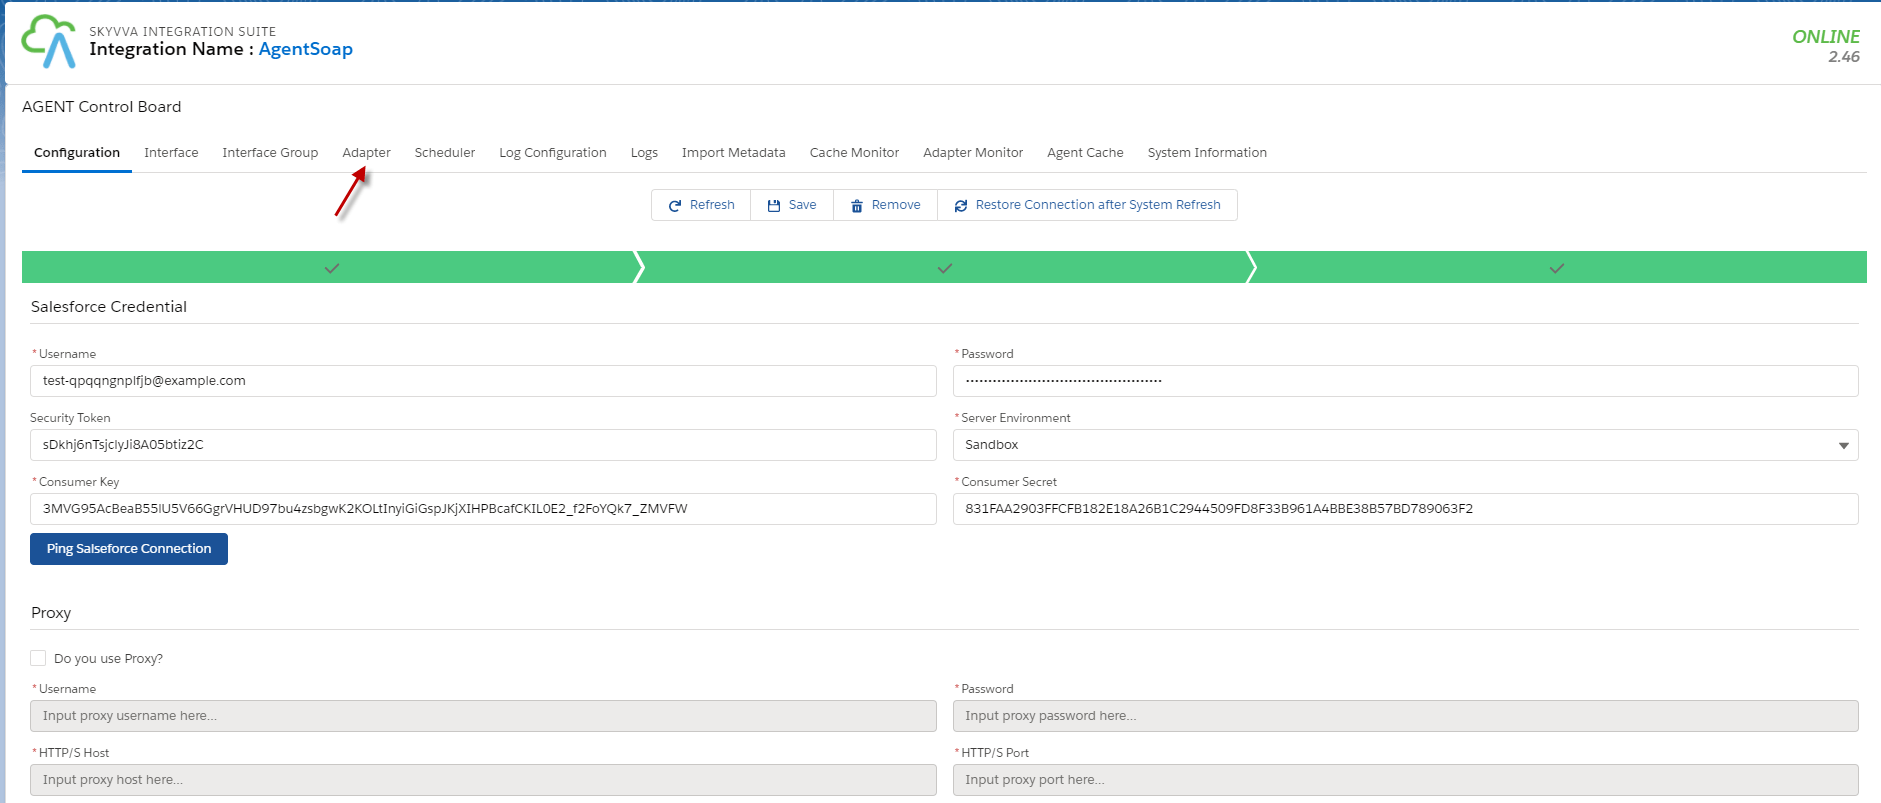
Step 3: Configuration Agent Control Board.
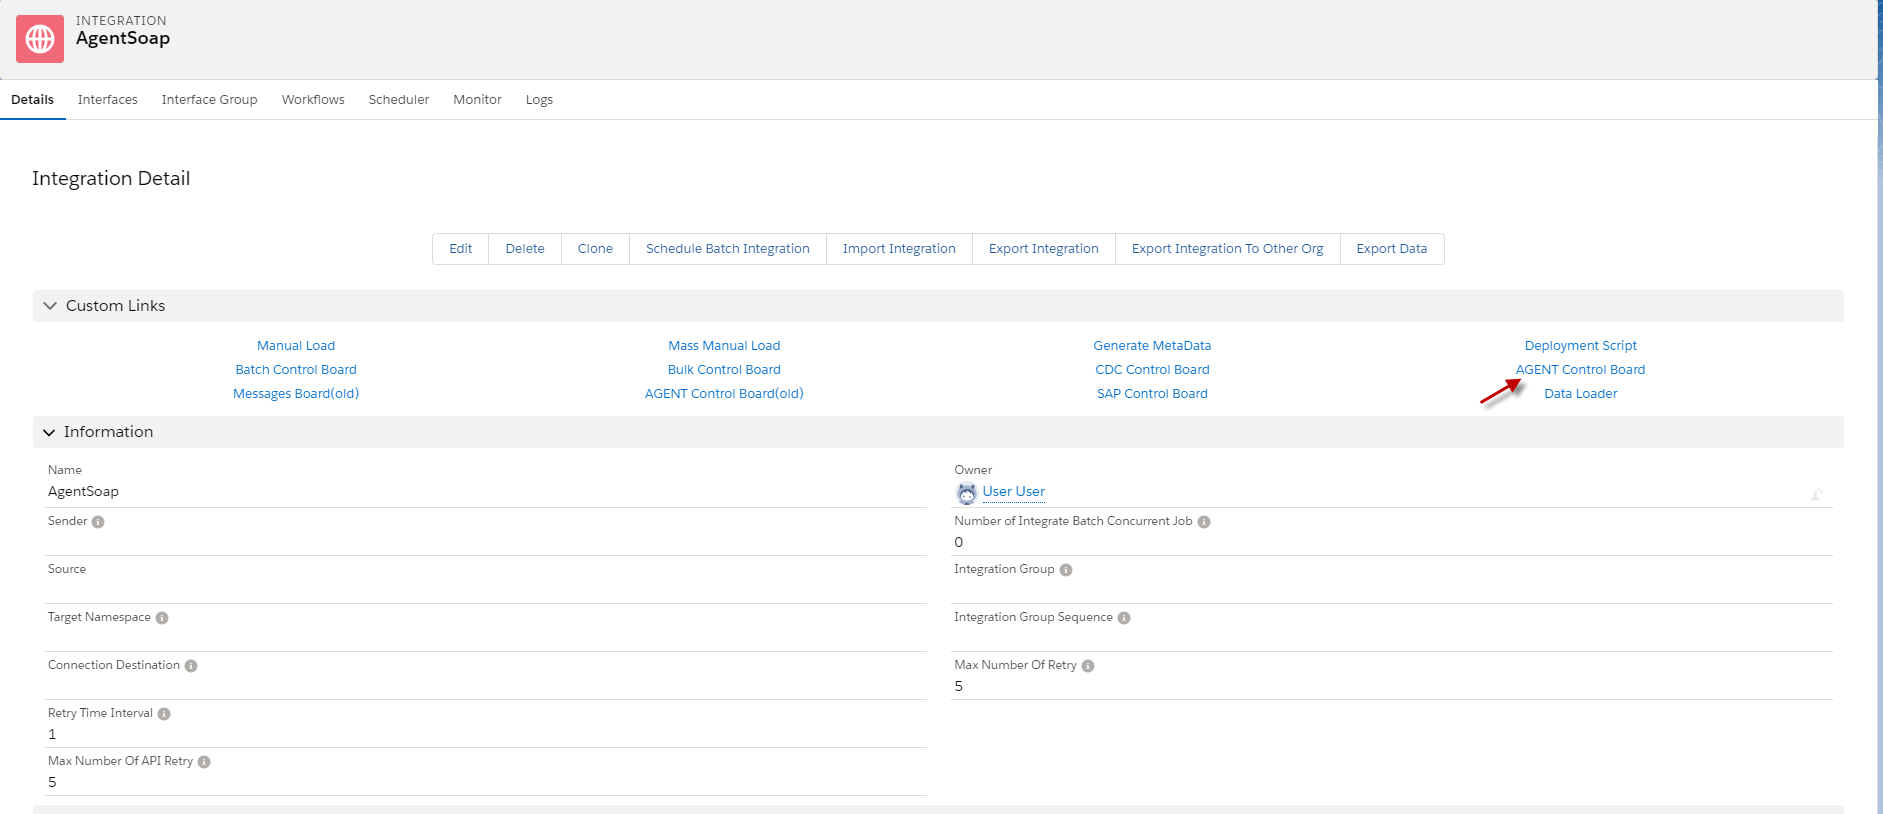
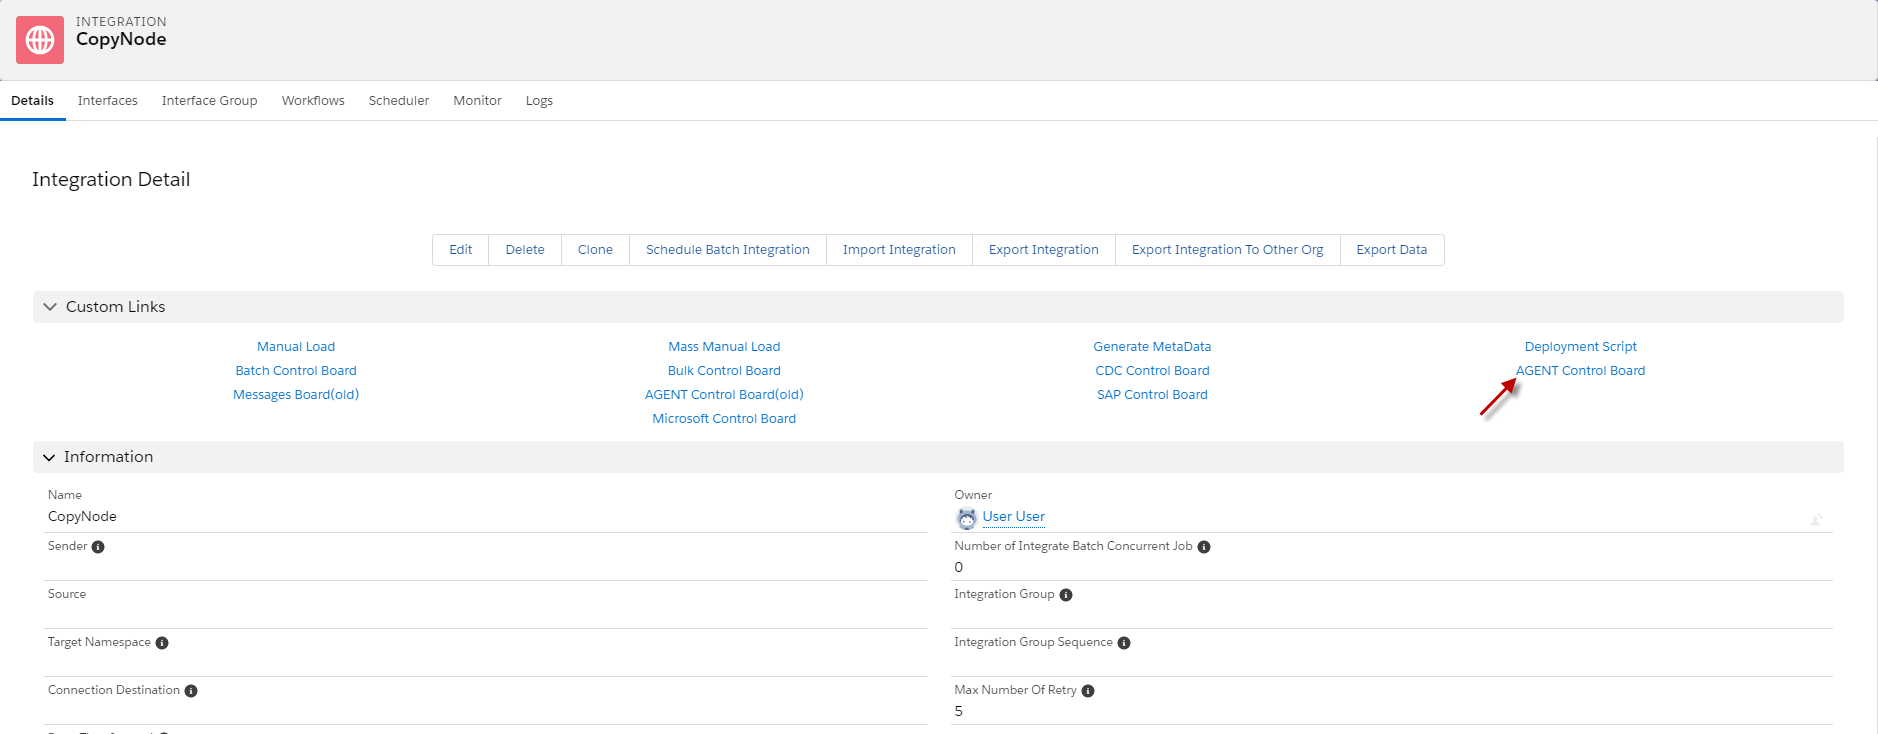
- Go to Integration detail => click AGENT Control Board.
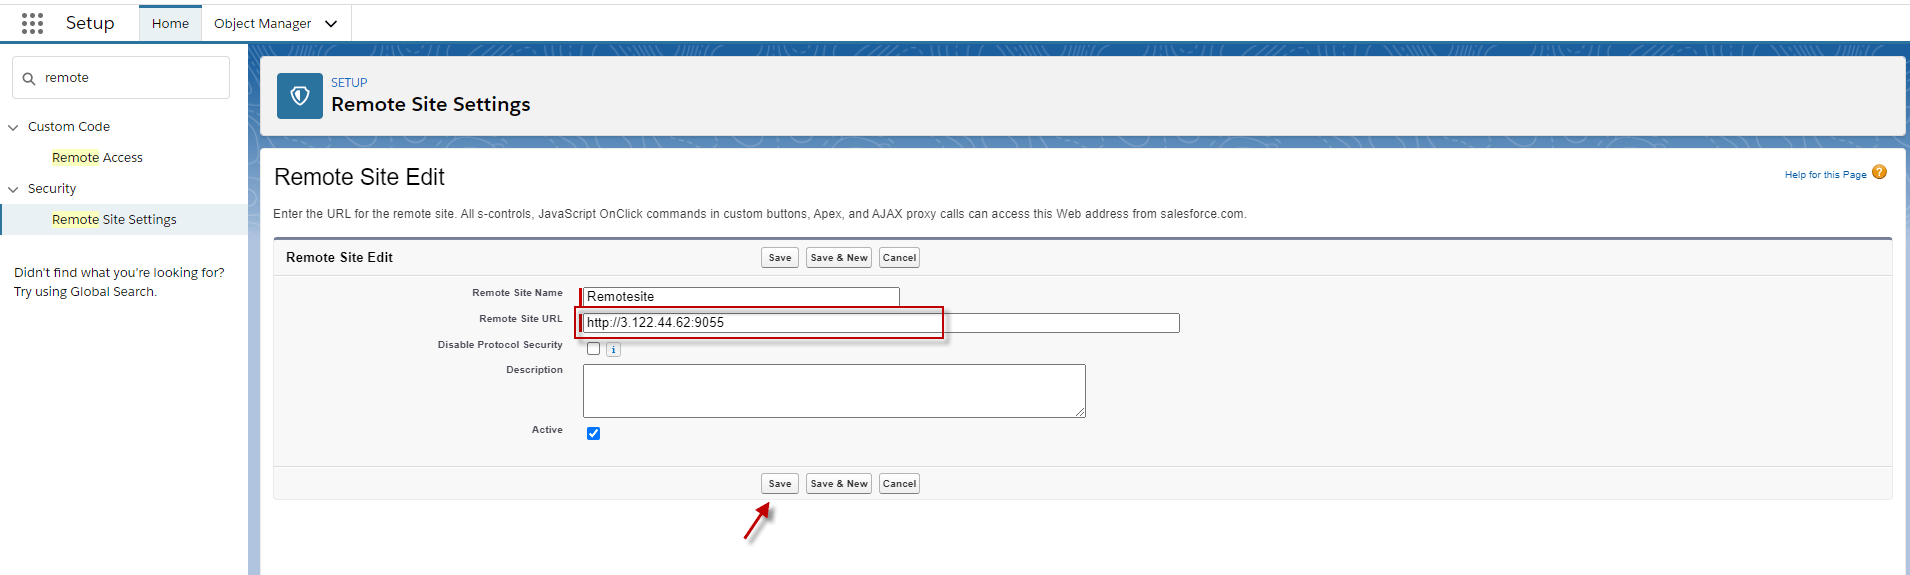
- Put remote site of host URL.
Go to setup => Search ‘Remote site setting’ => click it => click new Remote site.
Here is an example.
Remote site= Url +forward port Example : http://3.122.44.62 + :9095 .
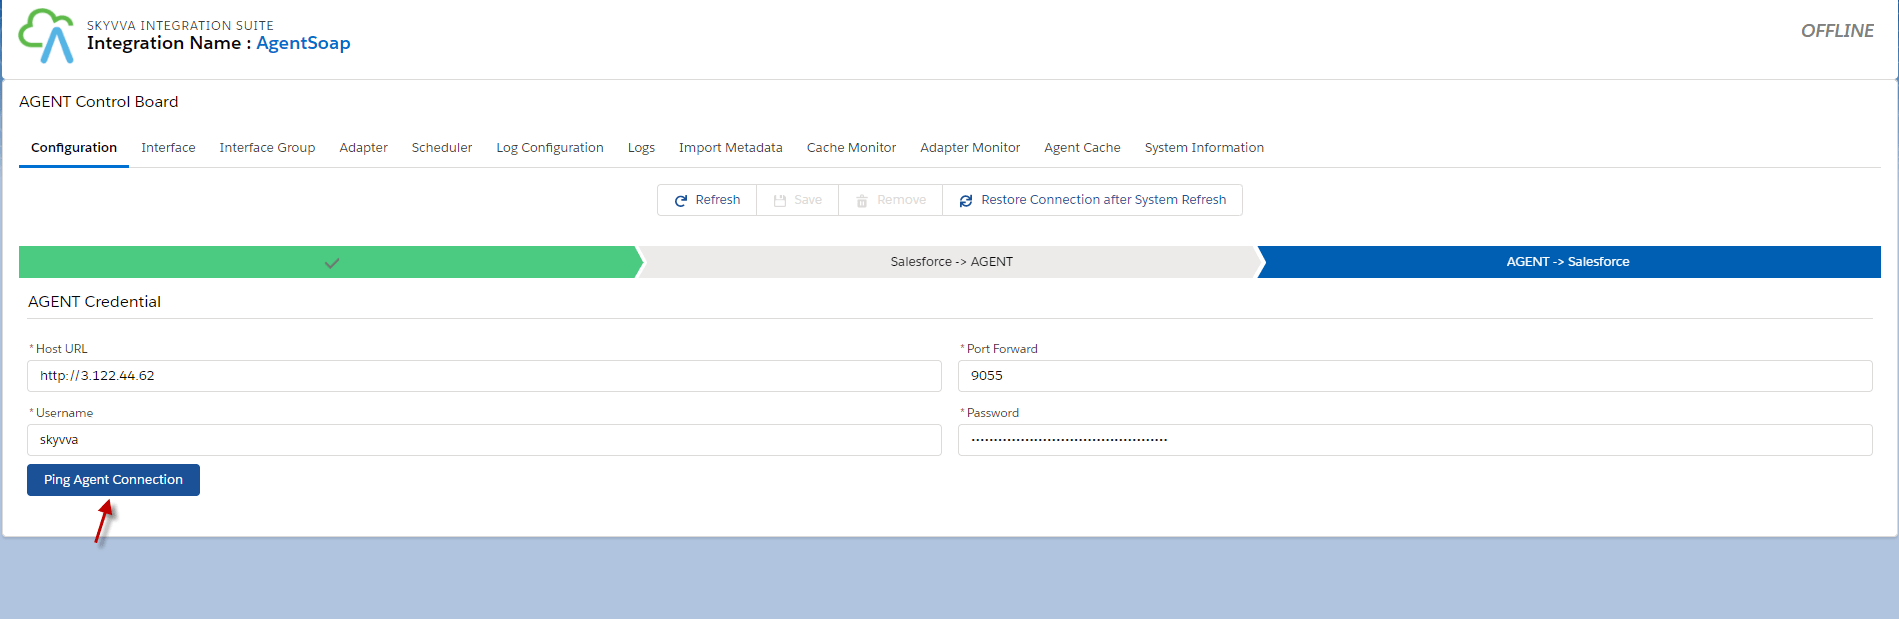
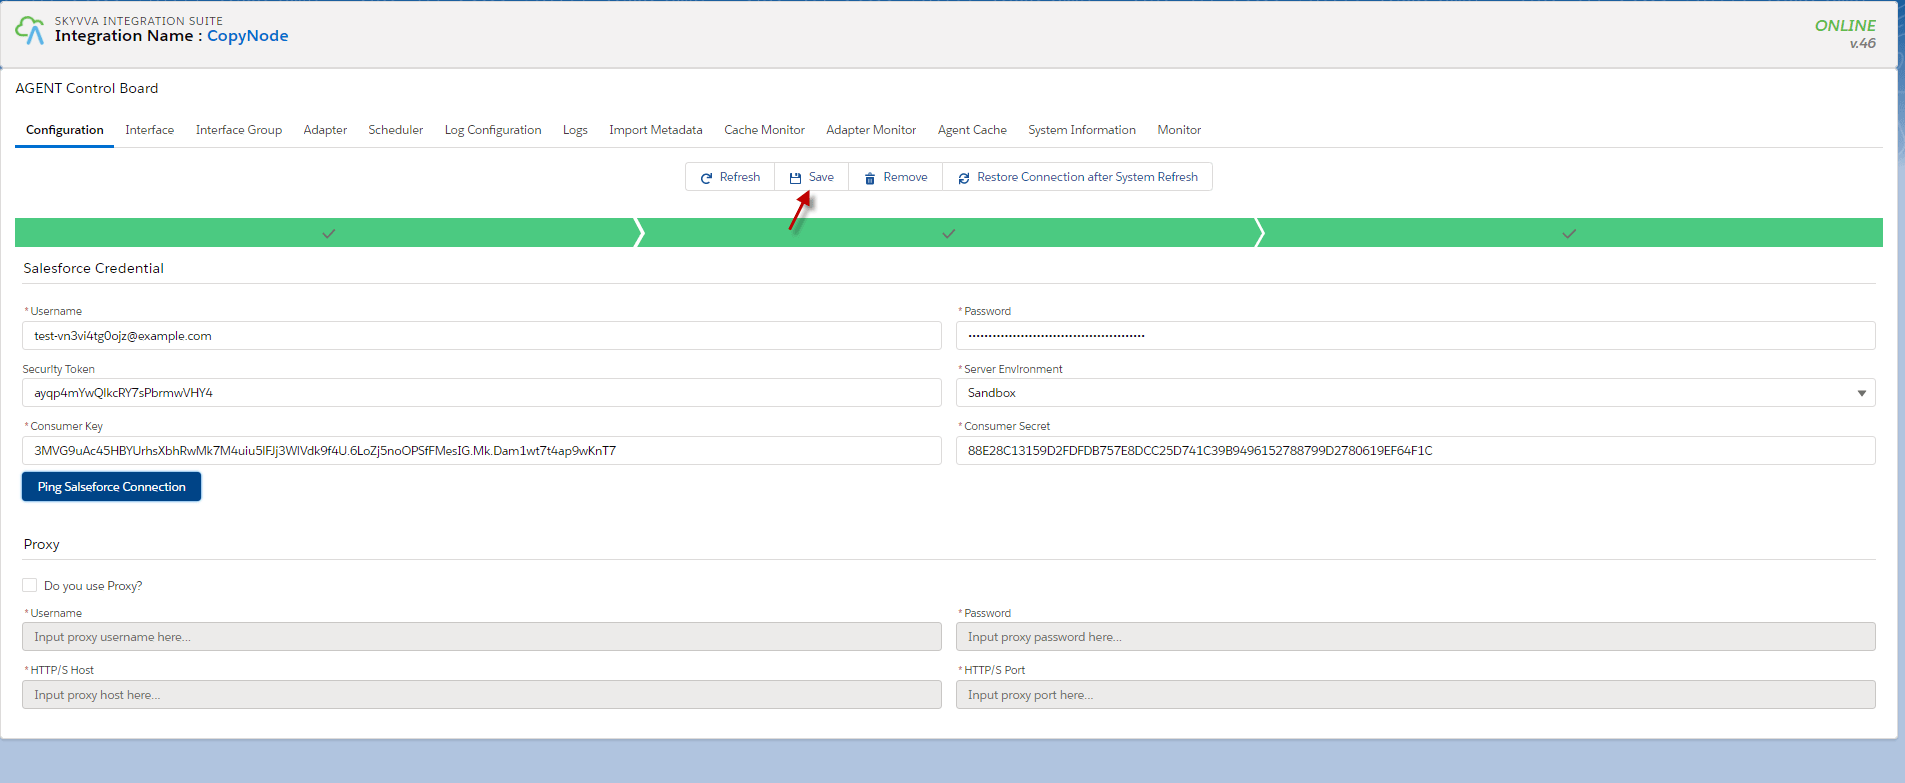
- Configuration Destination => fill AGENT Credential
- Configuration Salesforce Credential.
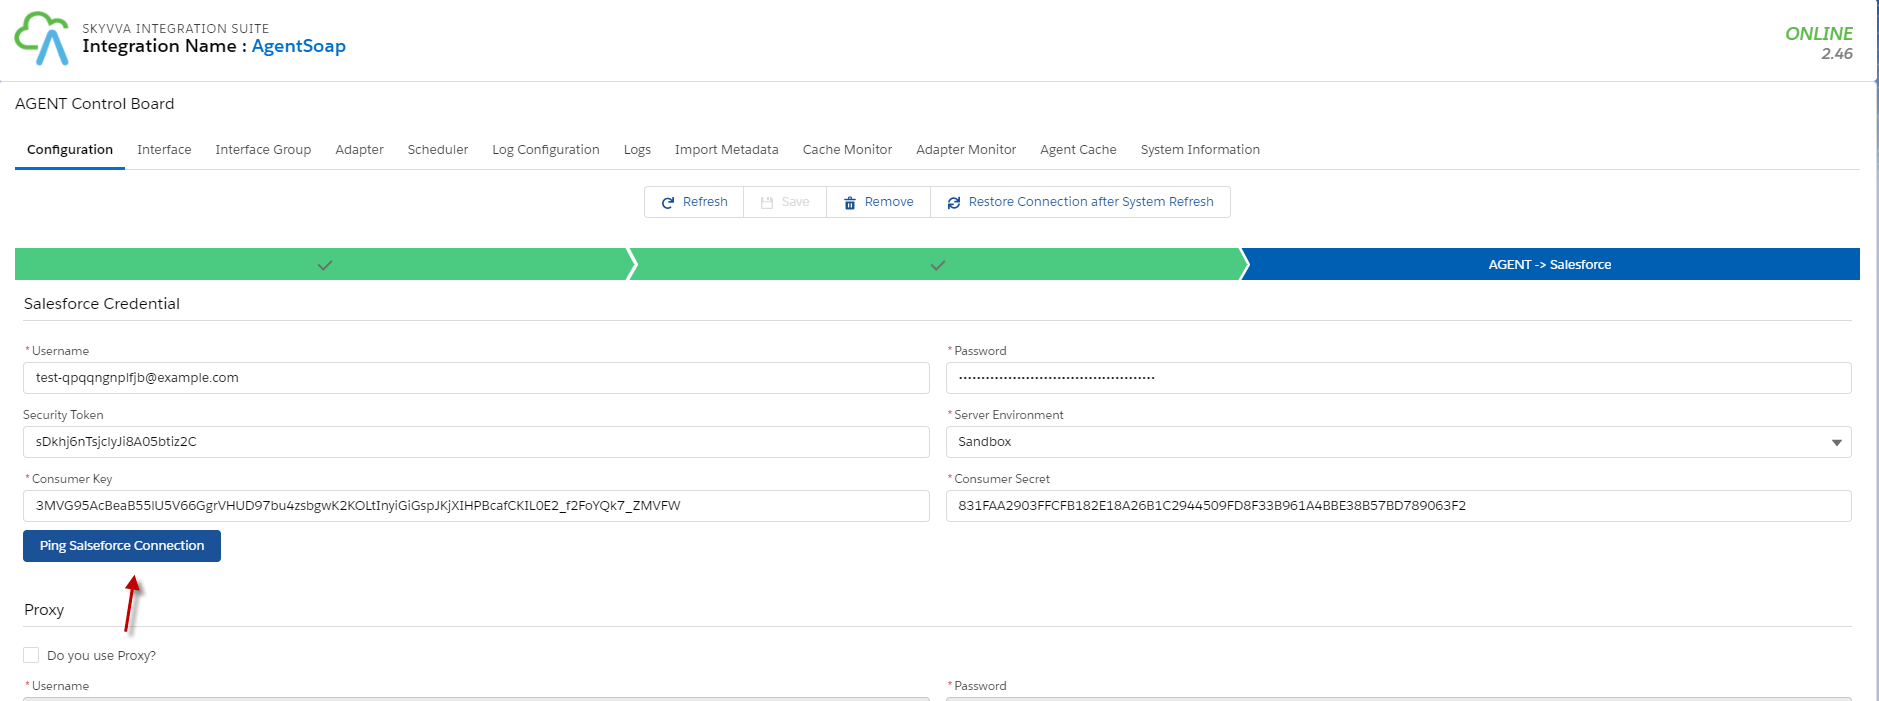
- Click the button Save.

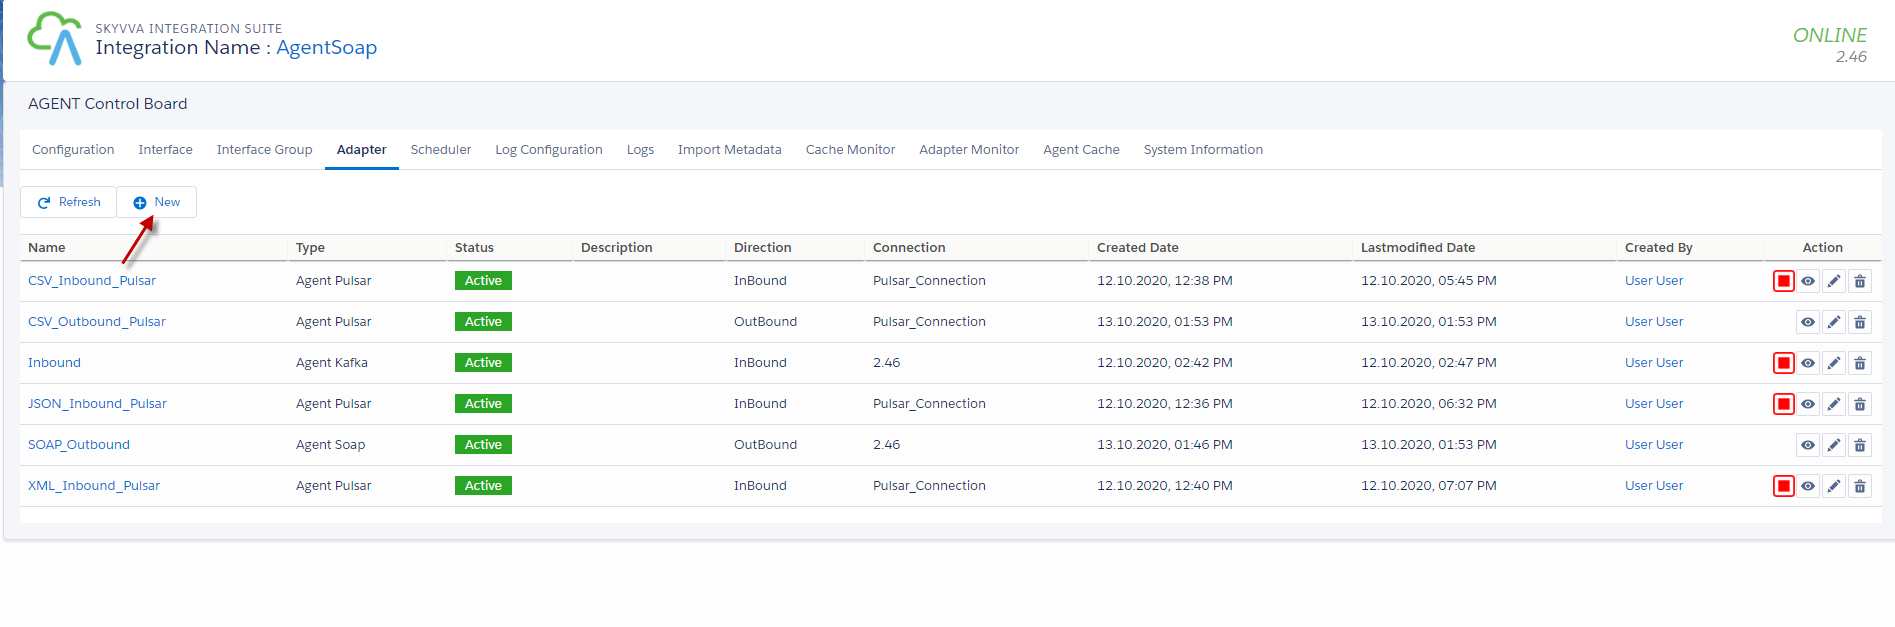
Step4: Create Adapter Agent SOAP
- Click adapter tap on Agent Control Board.
- Click New button
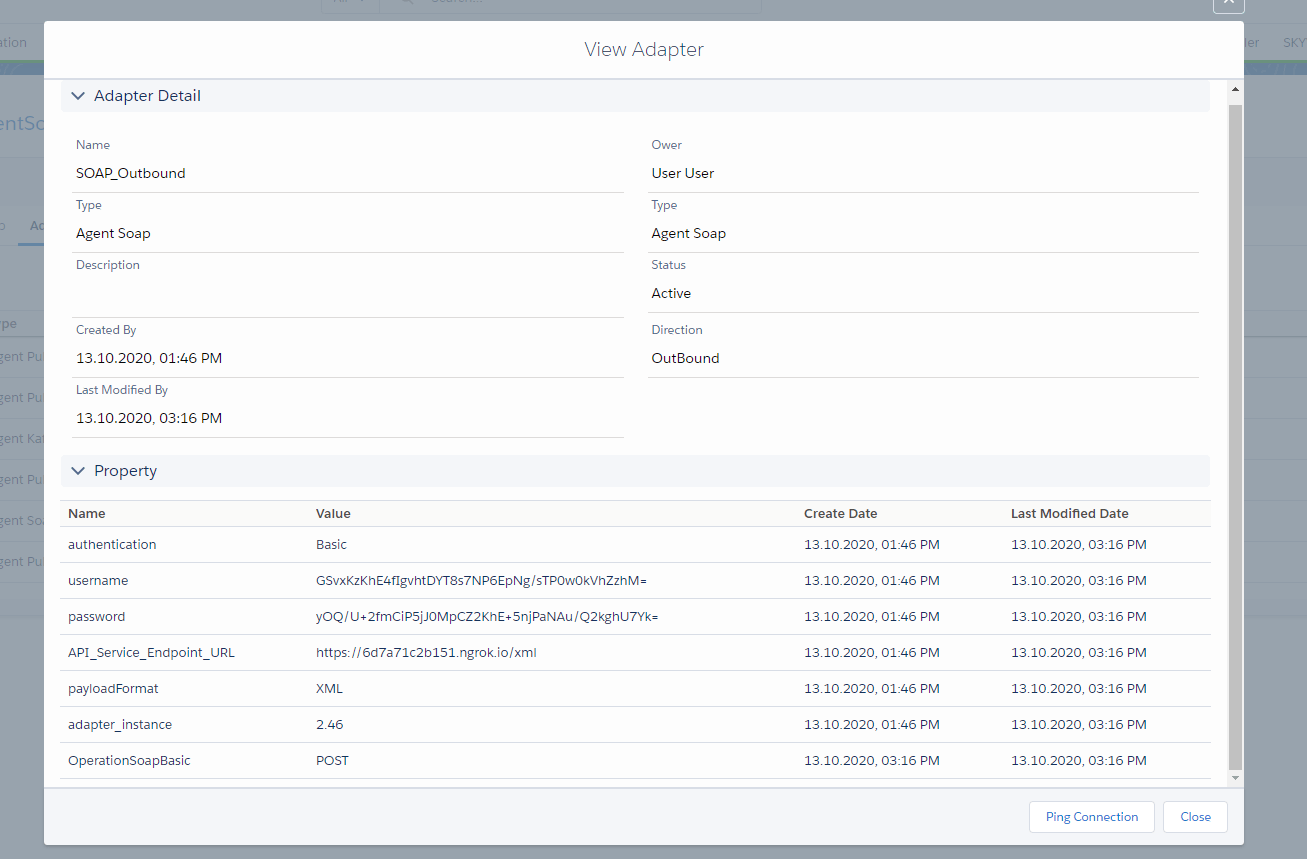
- Configure an Agent Adapter Soap
Fill name, choose Type =Agent Soap, Direction= outbound, choose XML payload, Operation= POST, fill username and password, and choose Adapter_instance.
- Here is an example.
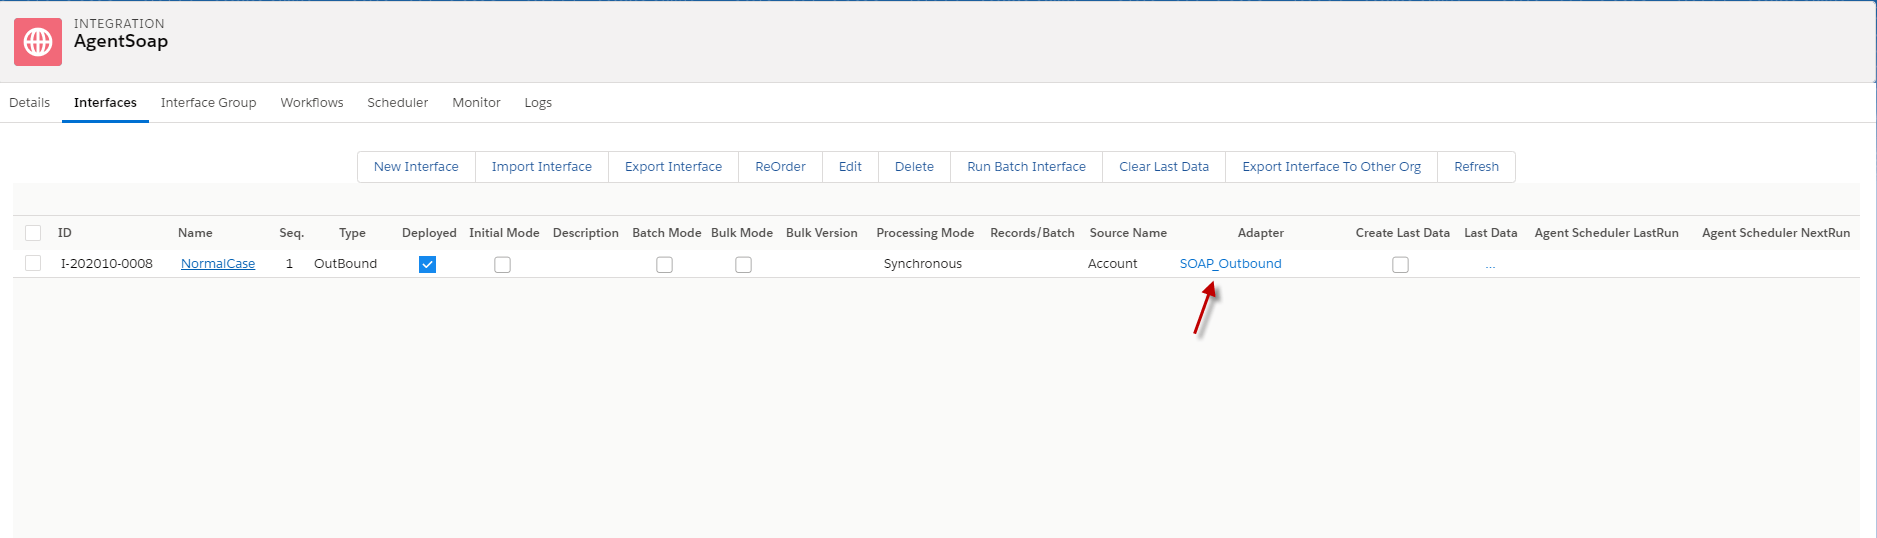
Step 5: put the adapter into Interface.
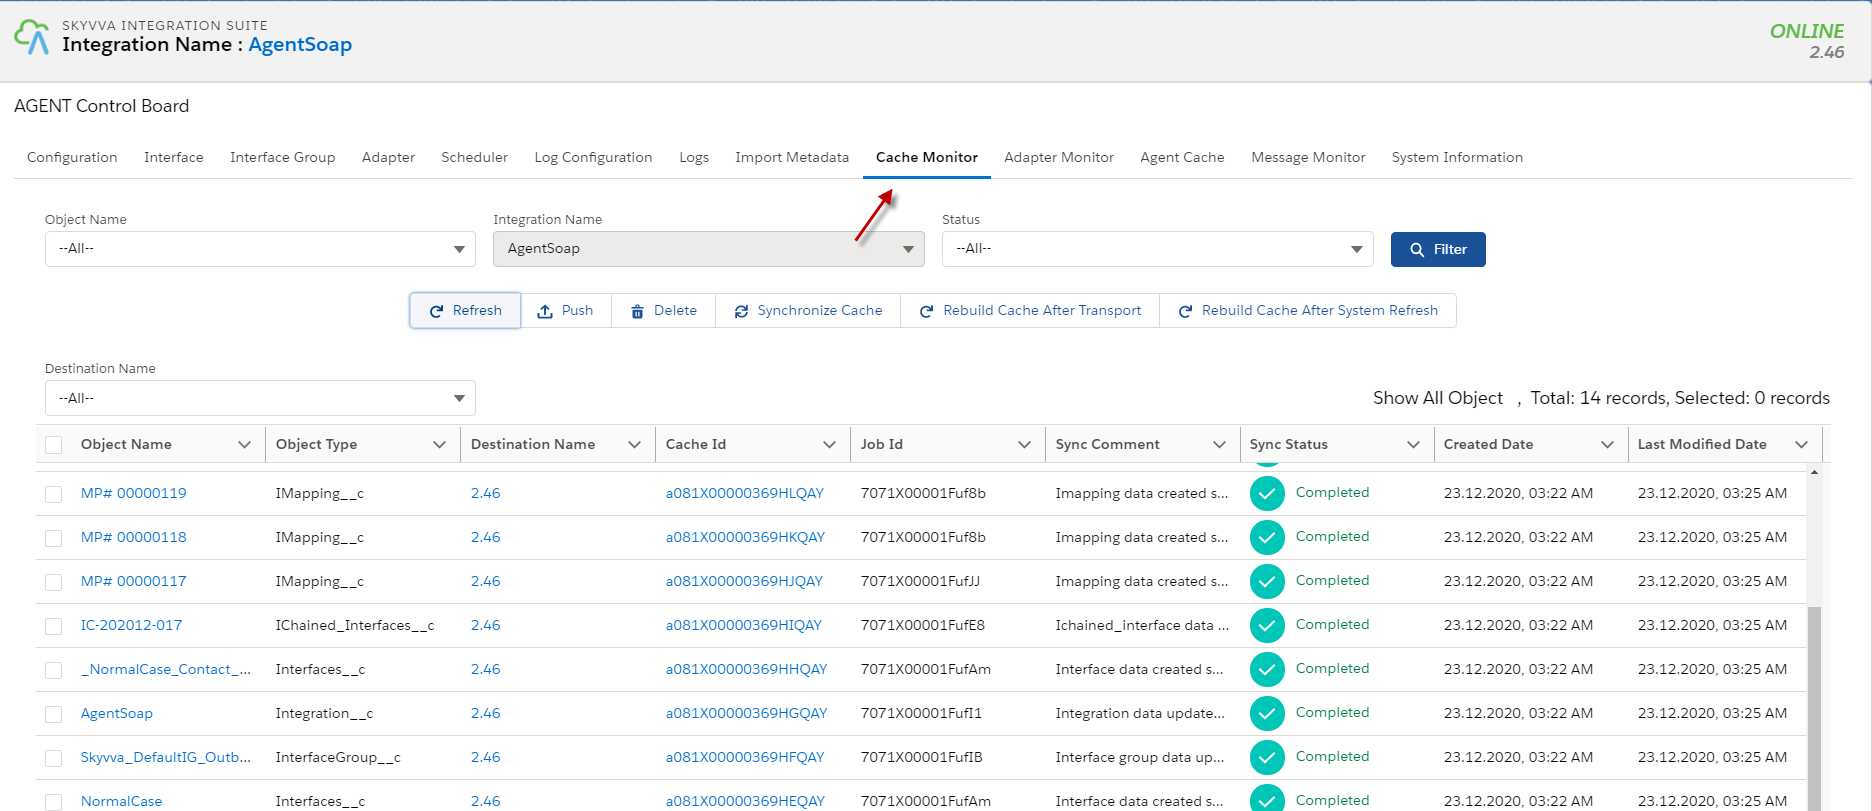
Step 6: checking a cache monitor in the Agent control board.
After we linked the adapter with the interface, we need to check the cache monitor to ensure that Adapter, Integration, Interface group, Interface, Ichain, mapping, or workflow that we set on an interface is cache retrieved.
- Go to Agent control board click Cache Monitor.
If we got status false of object name we need to click Synchronize or Push button Cache to make cache retrieve properties.
Step 7: Callout v3 with Apex code.
- Here is the code callout.
| skyvvasolutions.CallOutControl c = new skyvvasolutions.CallOutControl(); c.returnJSONComplete=true; c.actionDoIntegrate=true; c.isCreateMessage=true; String[] ids= new String[]{‘0011x000015BR30AAG’}; skyvvasolutions.Iservices.invokeCalloutV3(‘IntegrationName’,’InterfaceName’,ids,’SYNC’,c); |
- Go to developer console => Debug => Open Execute Anonymous Window => copy the code above and click Execute.

- Go to Monitor to see the result.
II. Handle API Message with Response Interface. #
In this case, we need to create a Response Interface using Soap Message Type.
Pre requires
- Create or Upload Message Type SOAP. (We have configured in case1)
- Configuration Agent control board. (We have configured in case1)
- Create Adapter Agent SOAP. (We have configured in case1)
- Create Integration and outbound Interface. (We have configured in case1)
- Create Inbound Interface
How to Handle API message with Response Interface?
In this case, we need Inbound Interface one more to make a response. Because of Case 1, we have configuration some pre-required already.
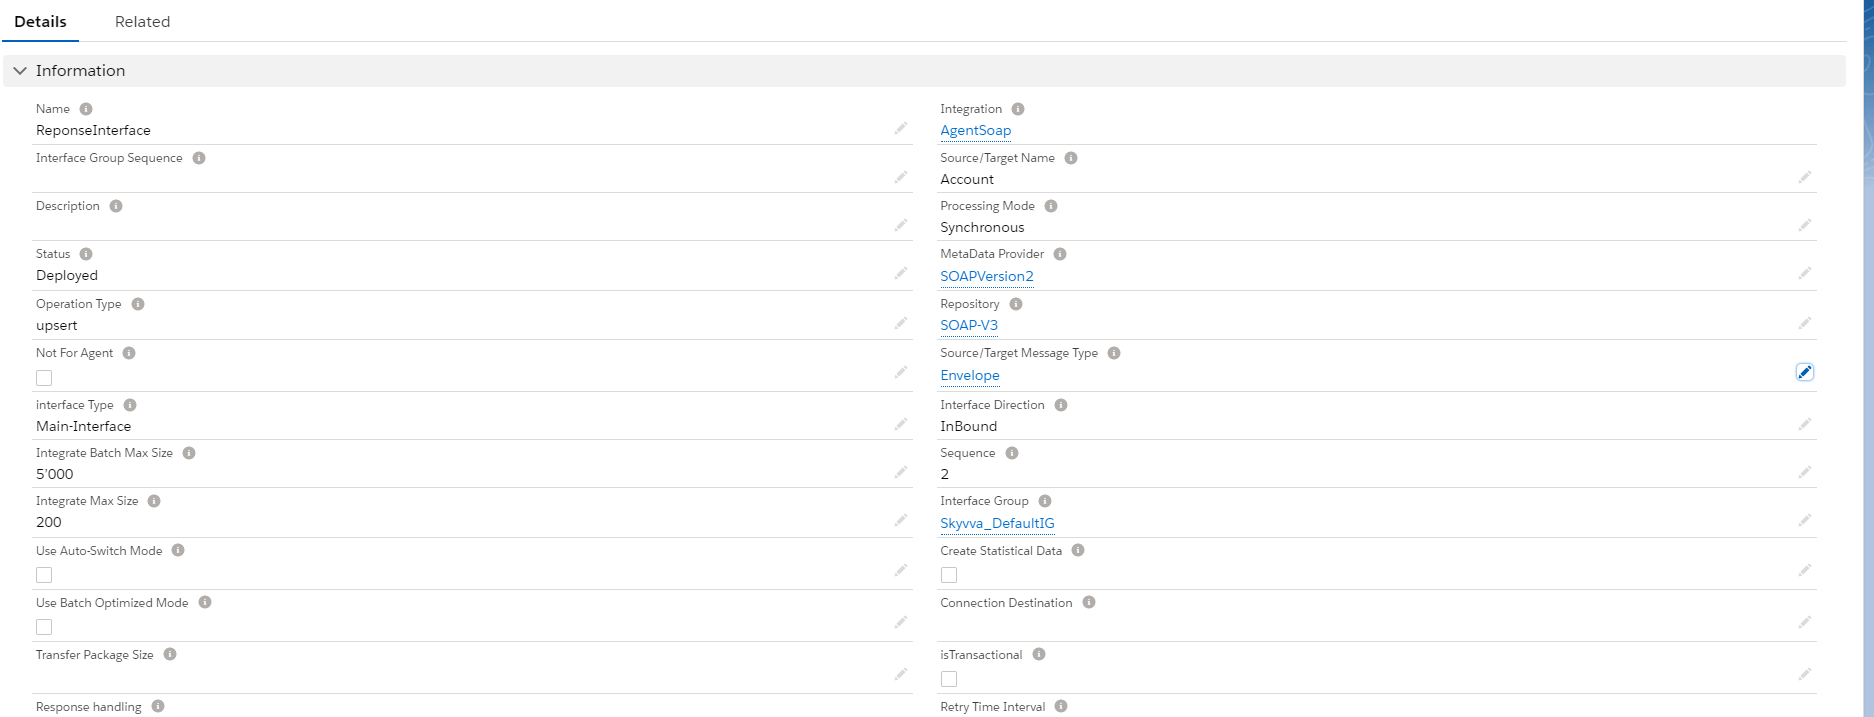
- Create inbound Interface and link Message Type Response
- Here is the response Interface.
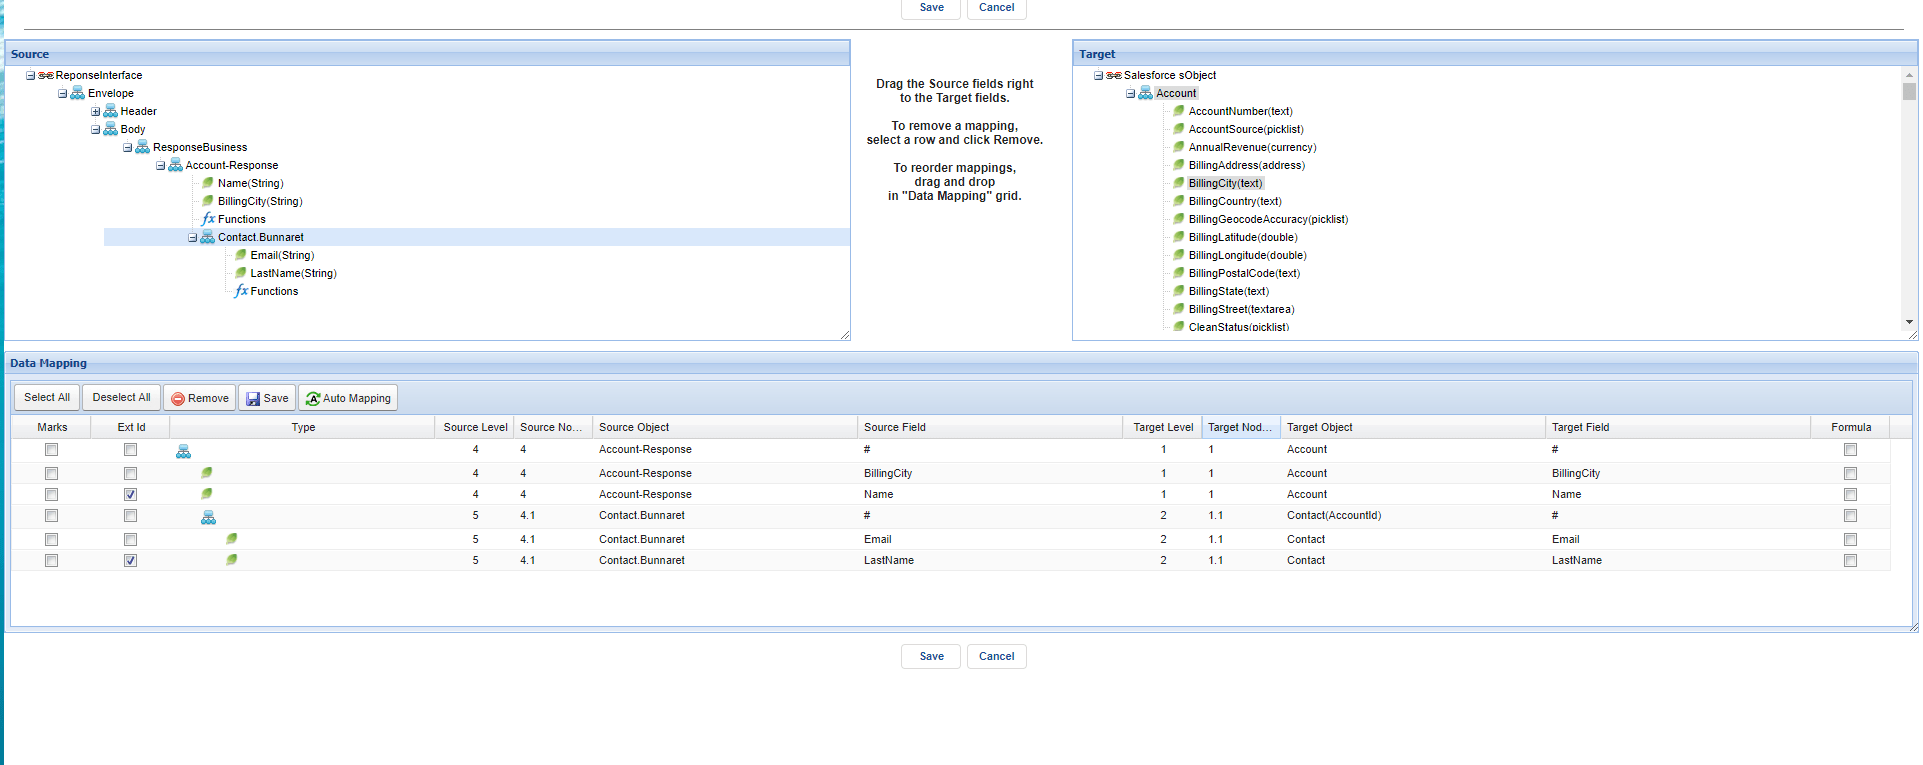
- Do mapping.
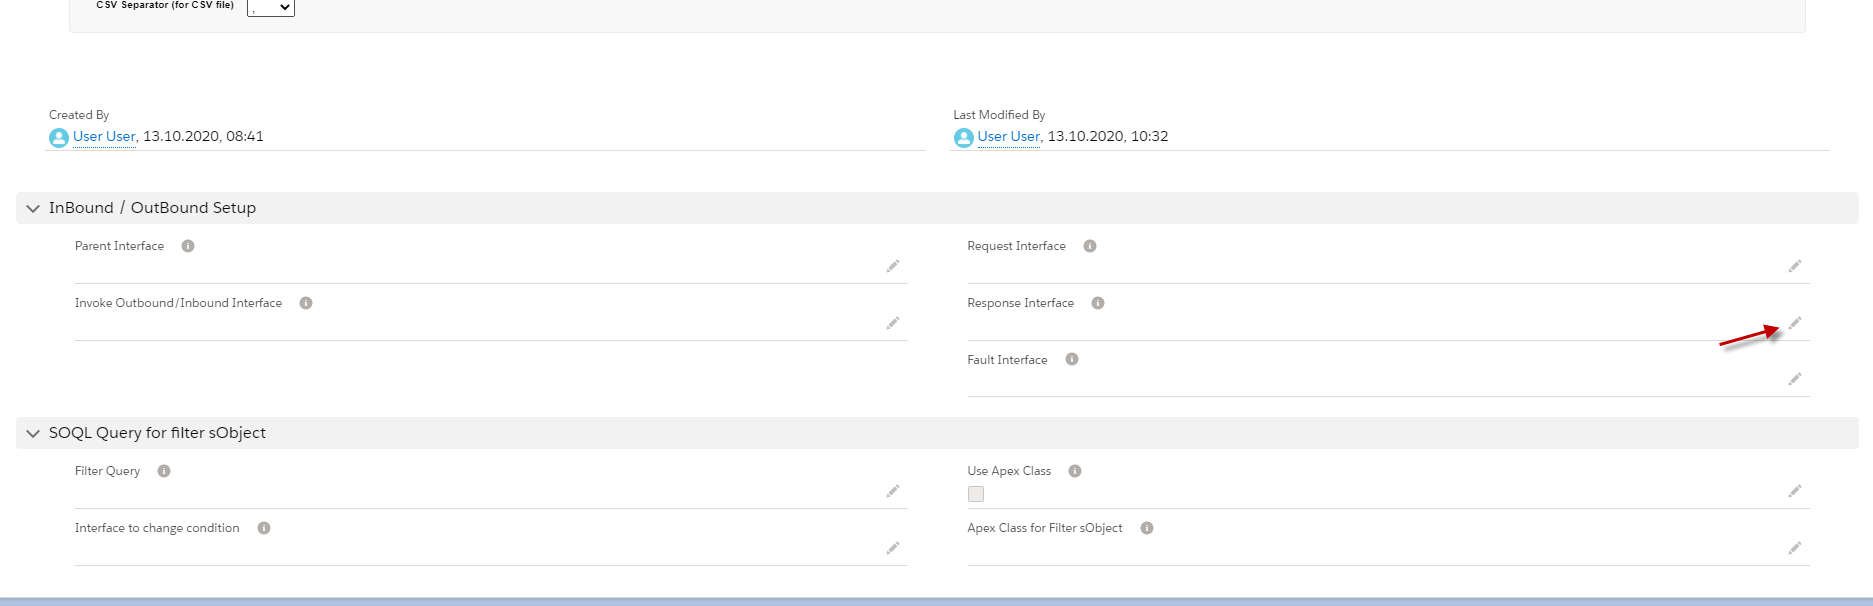
Step 2: Go to Interface Request and put the Response Interface in the field’s response Interface.
- Go to Interface Request.

- Scroll down to see the field’s response Interface. Click this pencil.
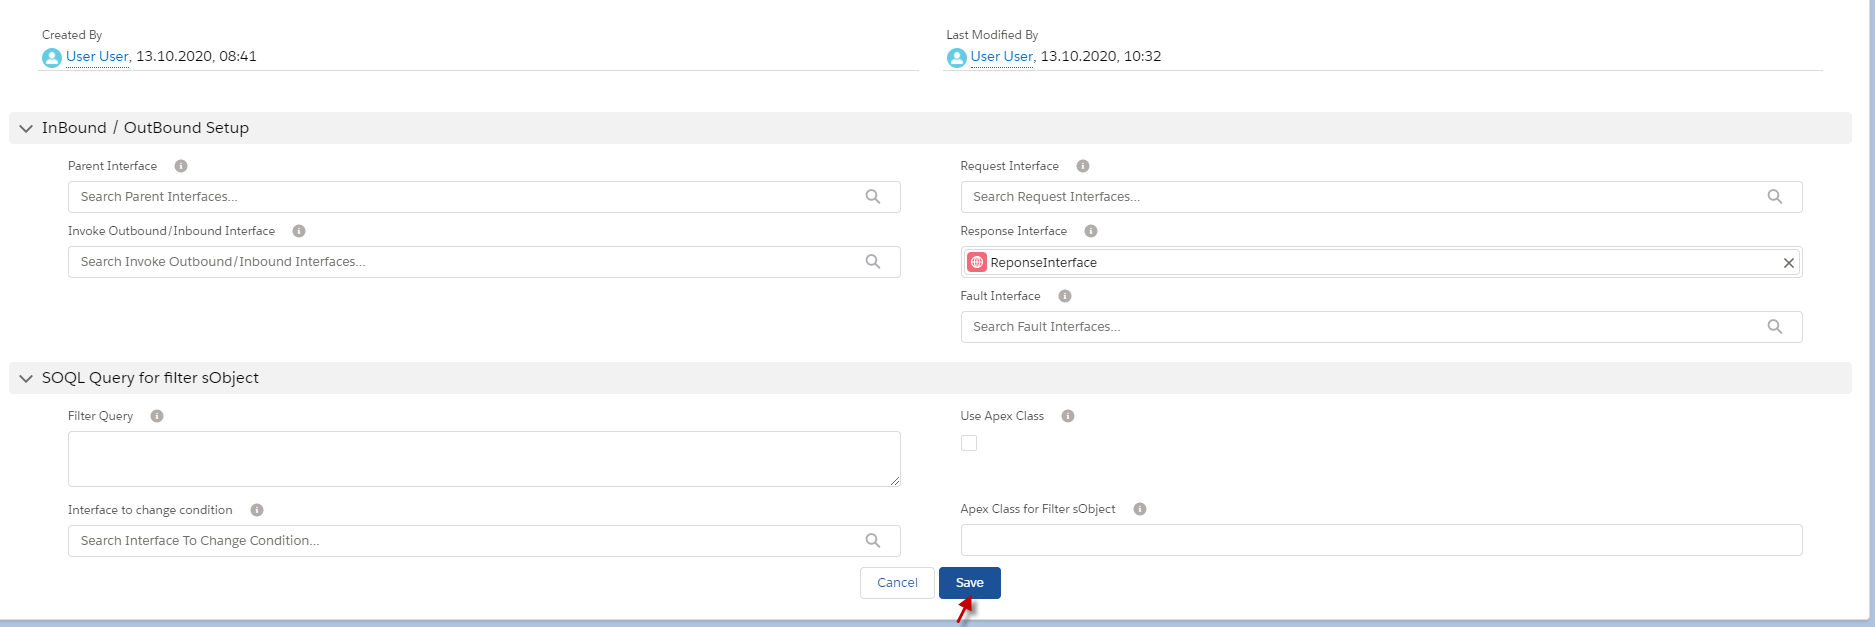
- Put response Interface in it, Example below. Click the save button.
Step 3: Checking cache like above to ensure that Adapter, Integration, Interface group, Interface, Ichain, mapping, or workflow that we set on an interface is cache retrieved.
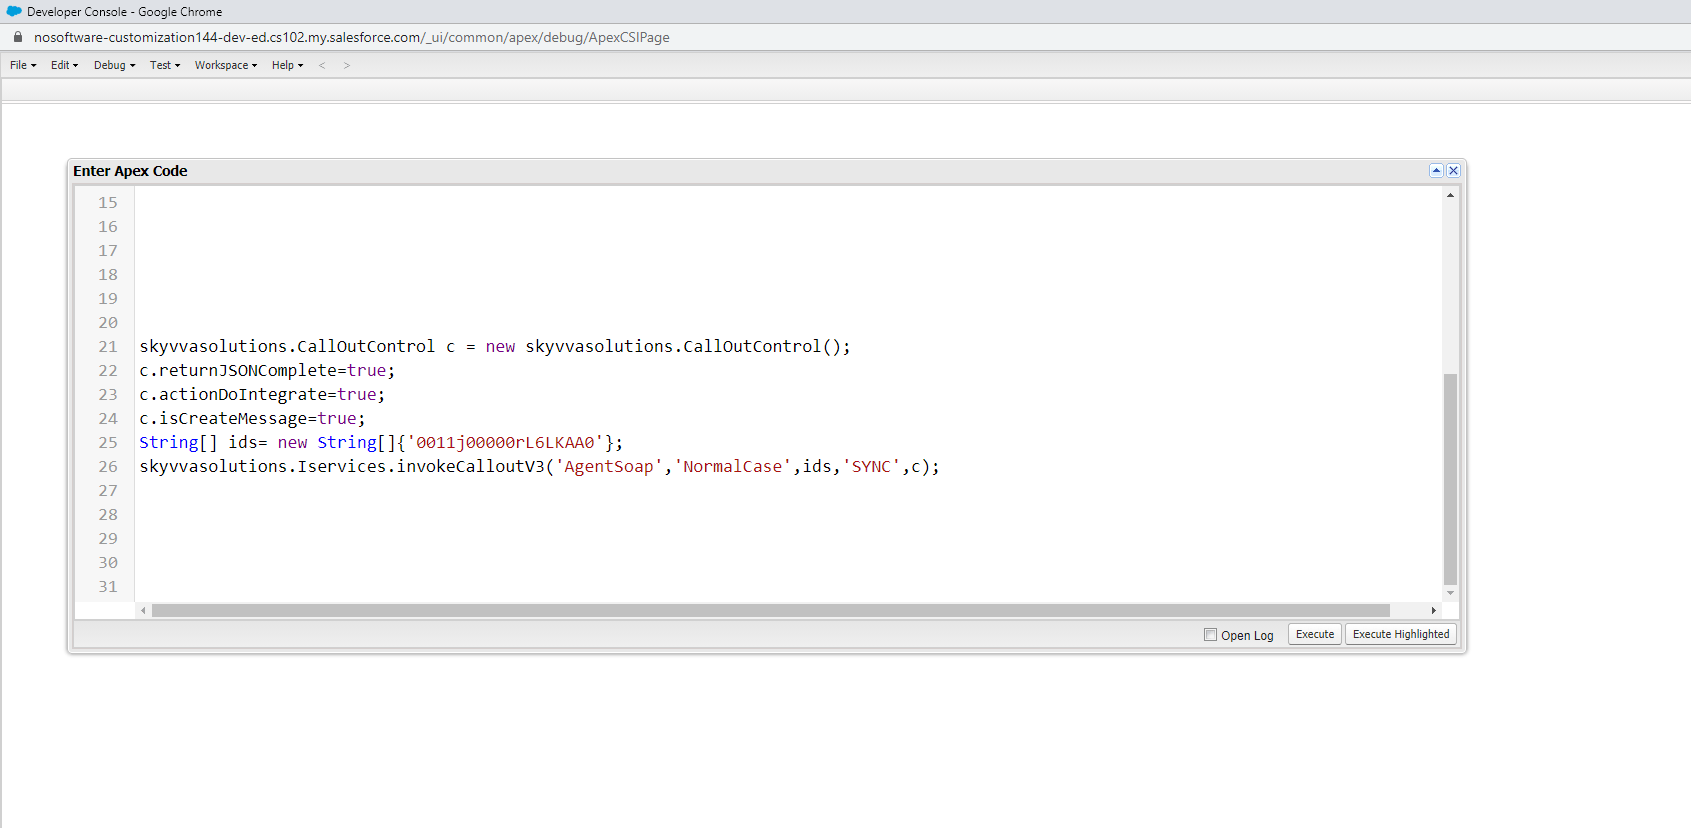
Step 4: Callout v3 with Apex code with Request Interface.
- Here is the code callout.
| skyvvasolutions.CallOutControl c = new skyvvasolutions.CallOutControl(); c.returnJSONComplete=true; c.actionDoIntegrate=true; c.isCreateMessage=true; String[] ids= new String[]{‘0011x000015BR30AAG’}; skyvvasolutions.Iservices.invokeCalloutV3(‘IntegrationName’,’InterfaceName’,ids,’SYNC’,c); |
- Here’s example.
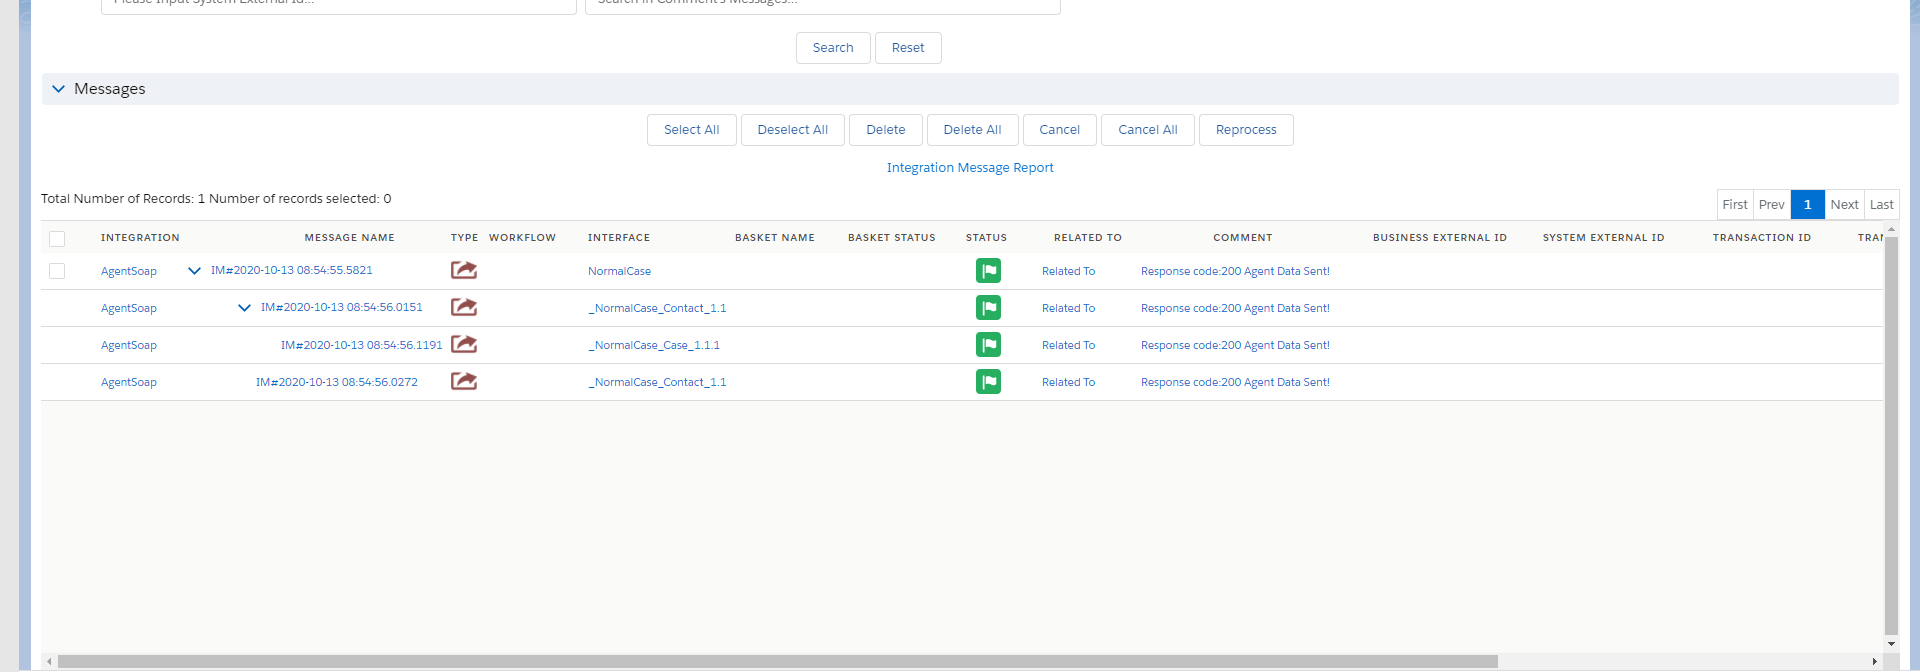
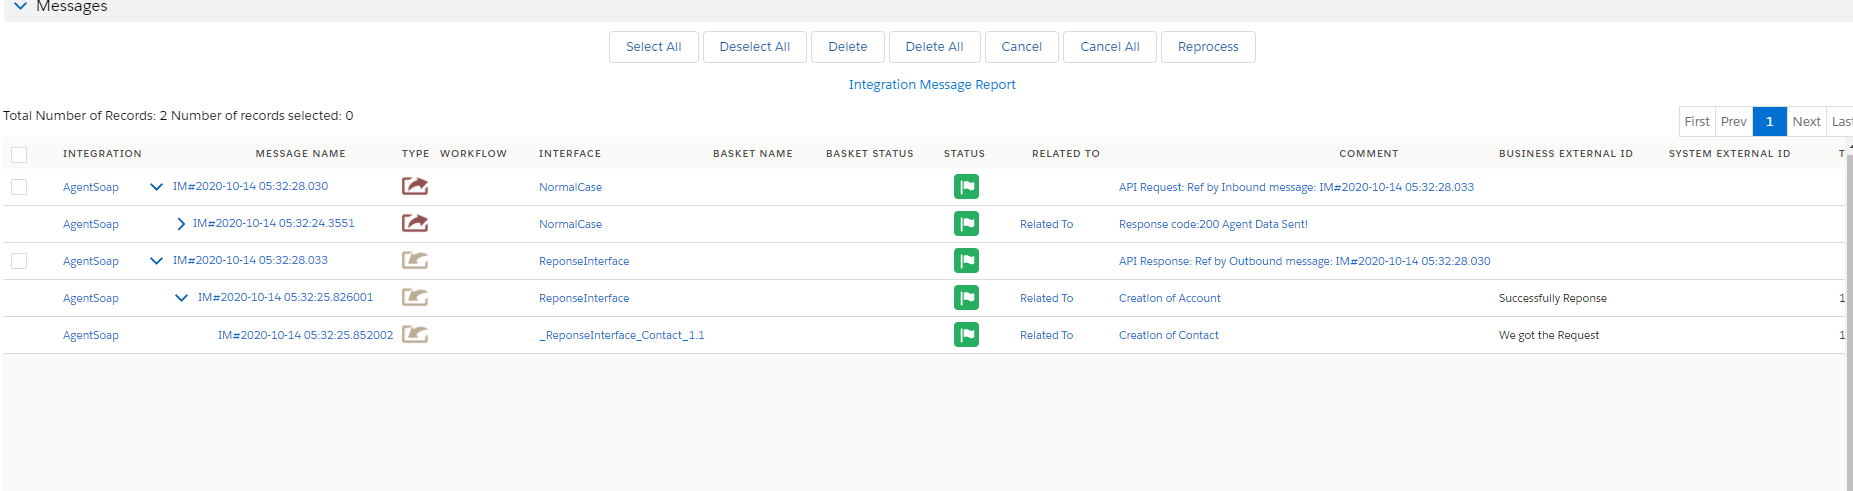
- Go to Monitor to check the result.
III: Handler Over Fault Response. #
In this case, we use two Interfaces like Inbound Interface for Response and Outbound Interface for Request. The process of these cases is to put the Response Interface, which is fault Message Type, into the Request Interface. Example. We have an outbound Interface and put the fault Interface with the message Type fault_SystemError in the outbound Interface. When the callout V3 is met System Error, the Inbound Interface will respond to the fault message to tell the user that the Callout has a problem with the system Error.
- Create or Upload Message Type SOAP with Fault Message Type. (We have configured in case1)
- Configuration Agent control board. (We have configured in case1)
- Create Adapter Agent SOAP. (We have configured in case1)
- Create Integration and outbound Interface. (We have configured in case1)
- Create Inbound Interface as a fault Interface.
Step1: Create an Inbound Interface as fault Interface.
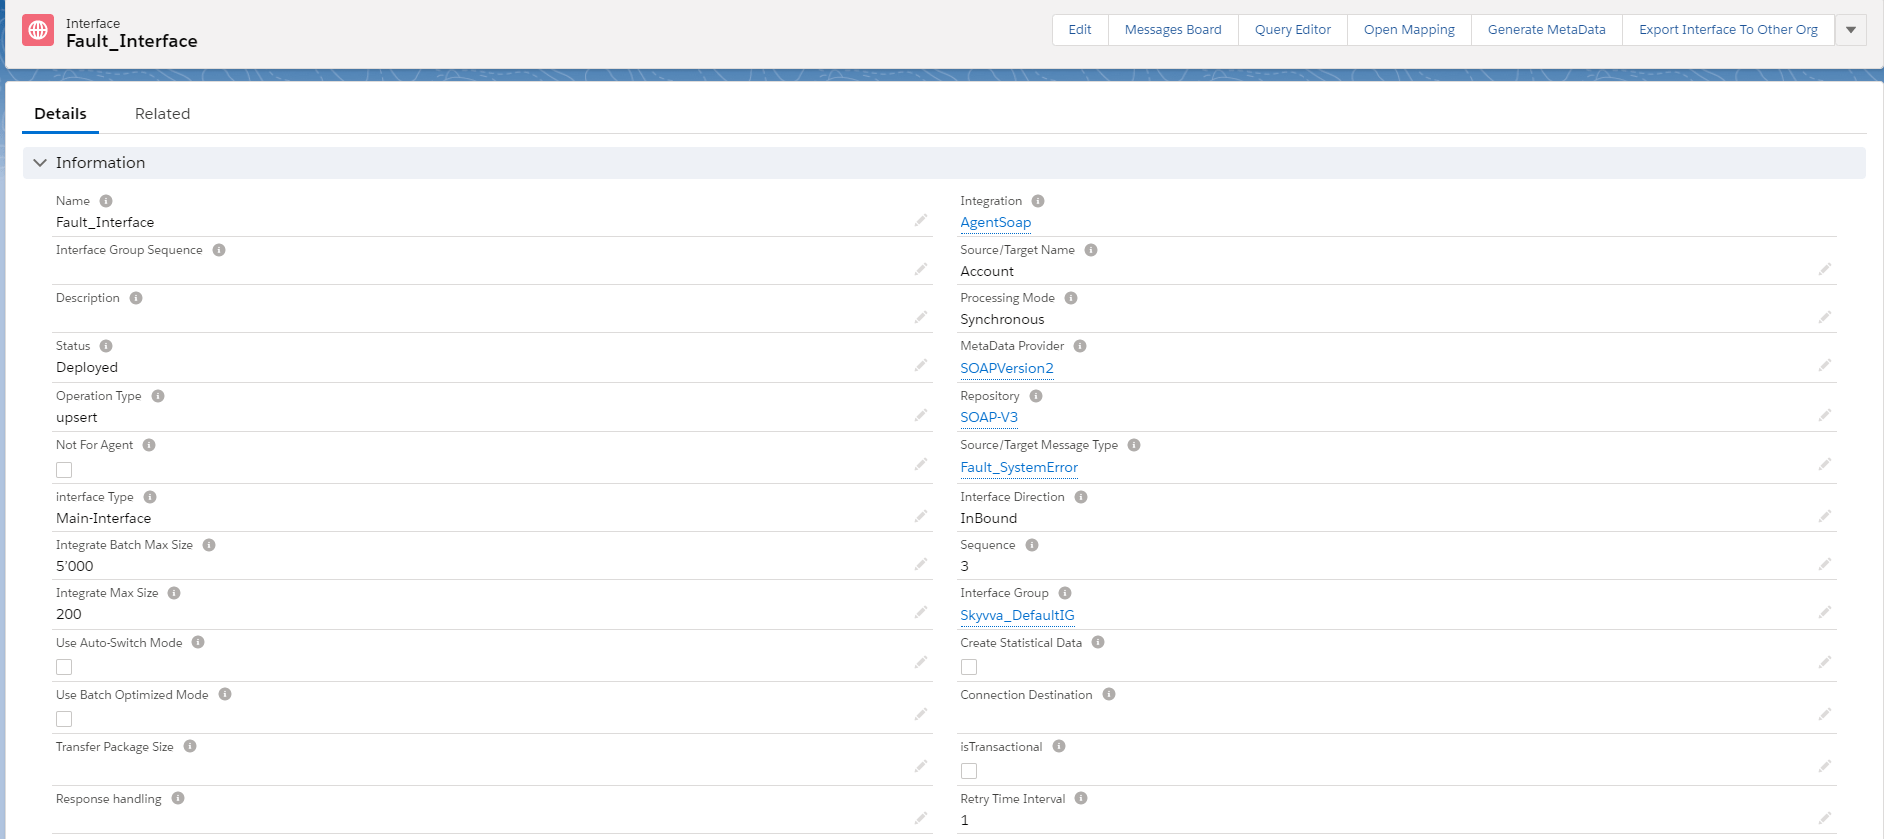
- Go to Integration => create Interface.

- Here is the Inbound fault Interface.
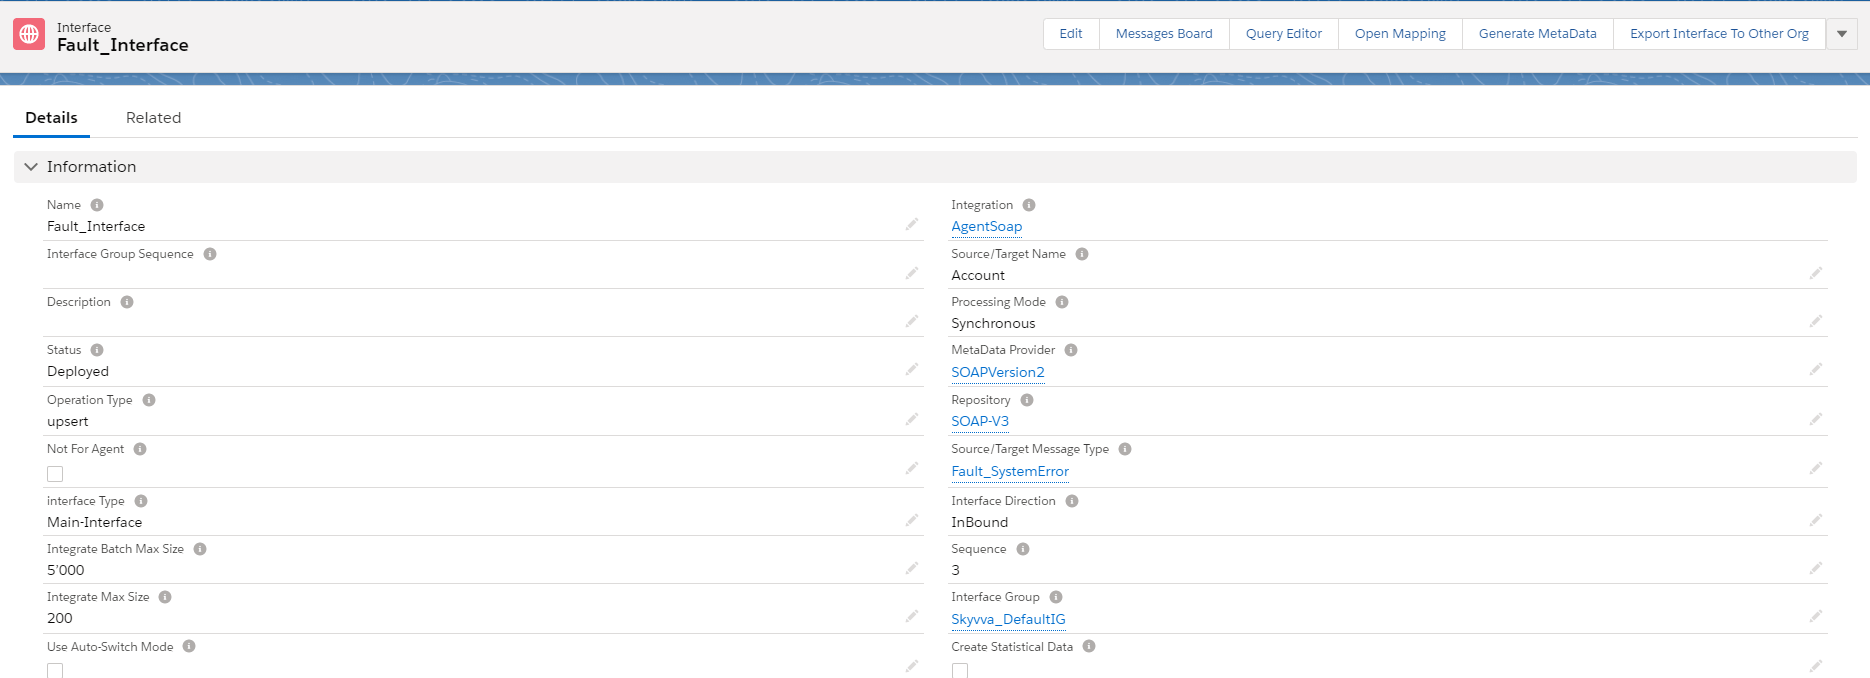
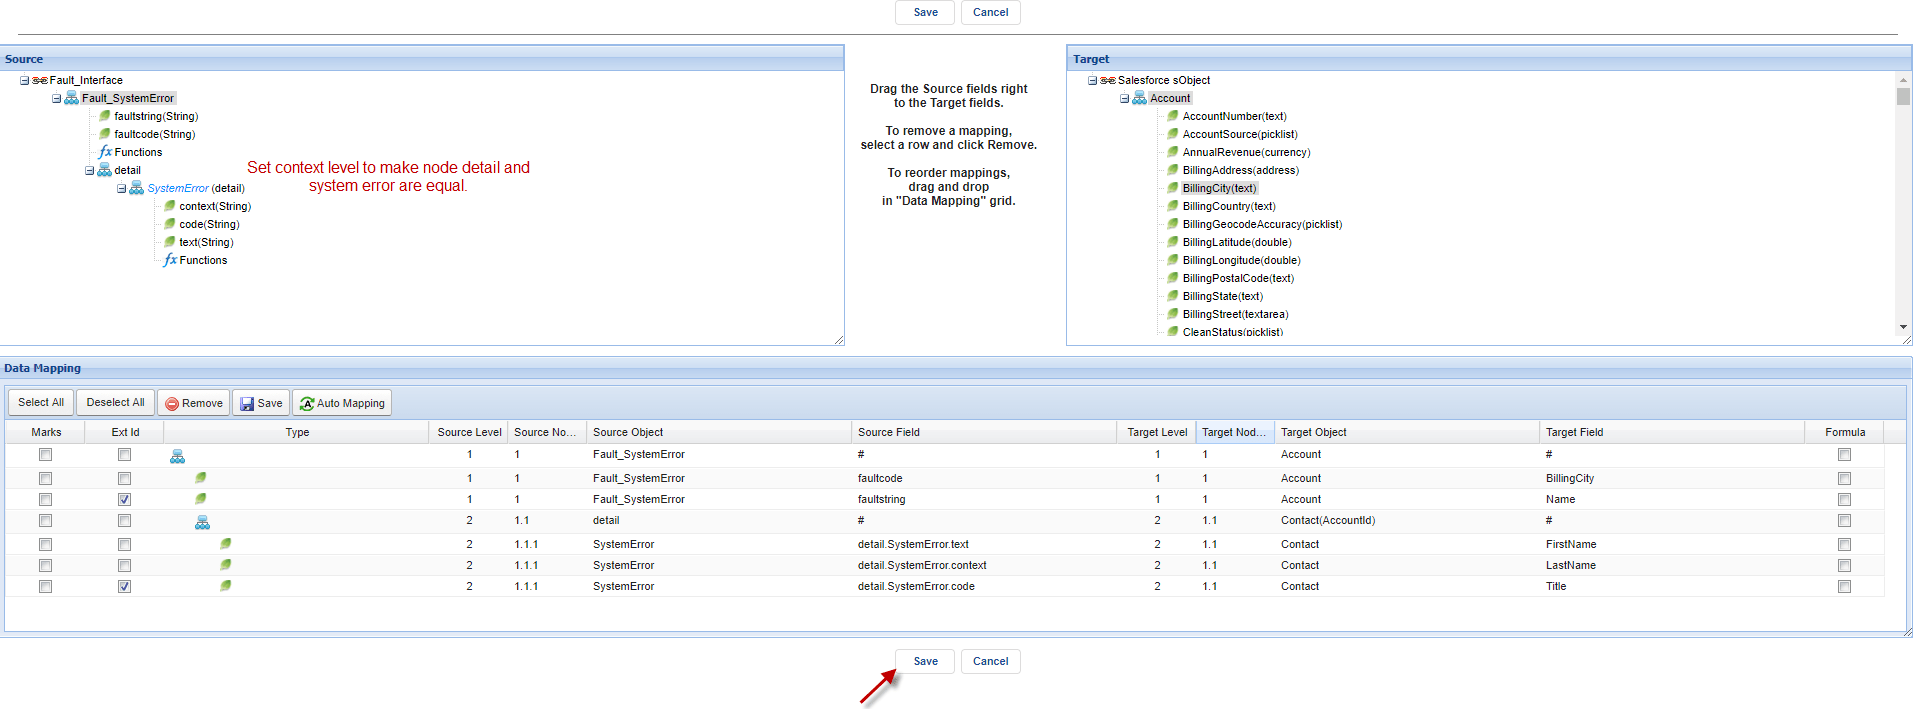
- Do mapping
Step 2: Put fault interface in request interface.
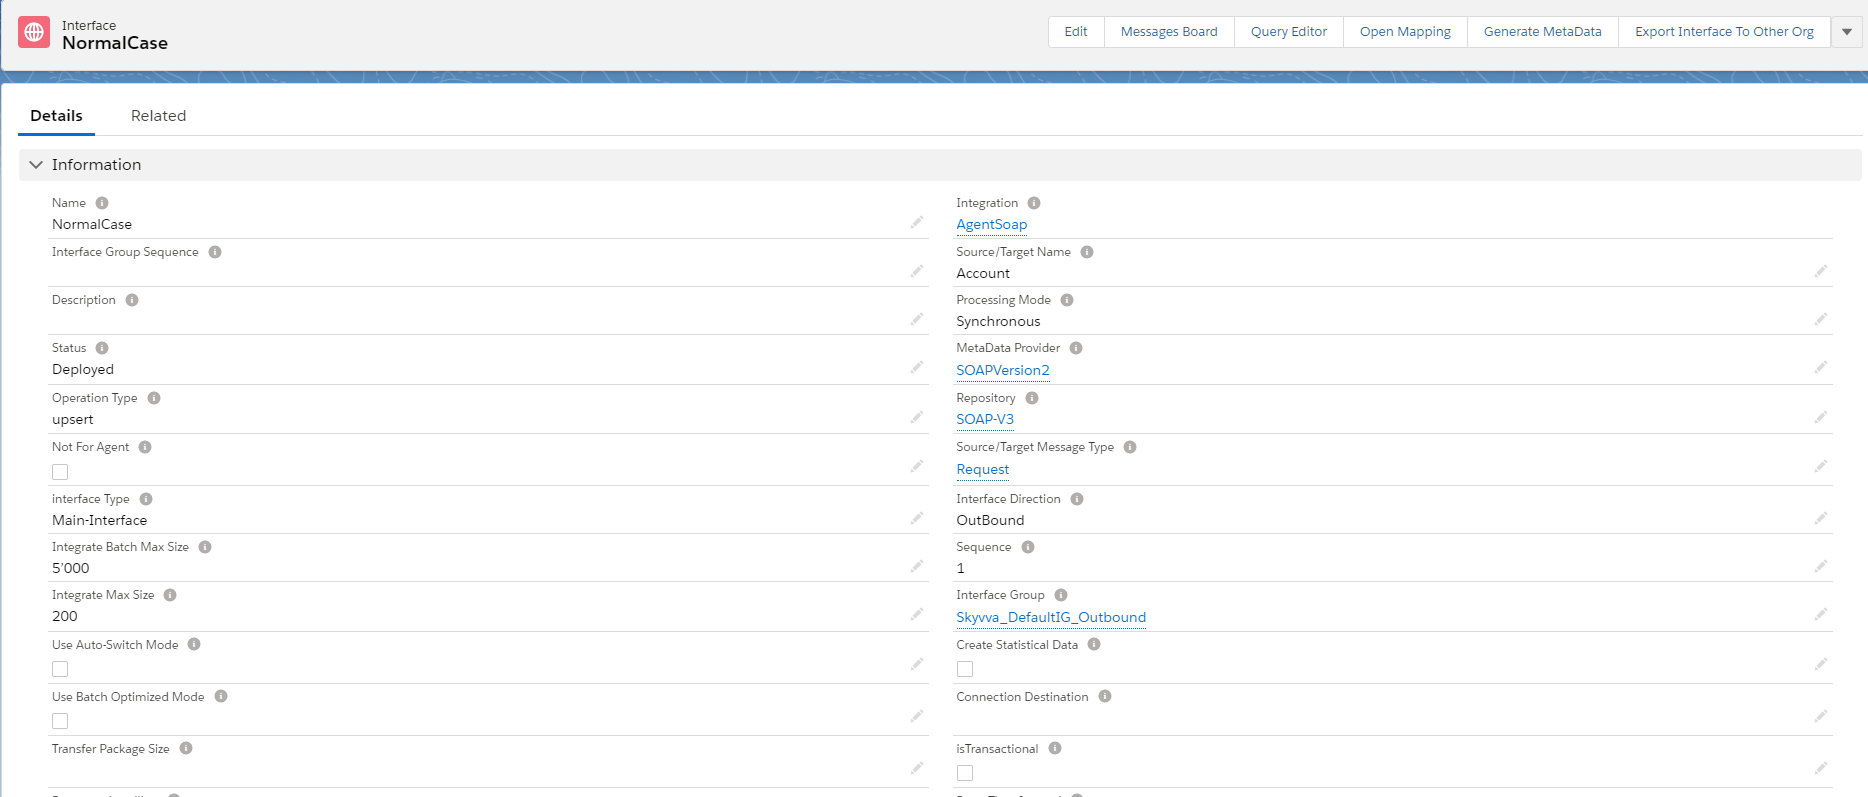
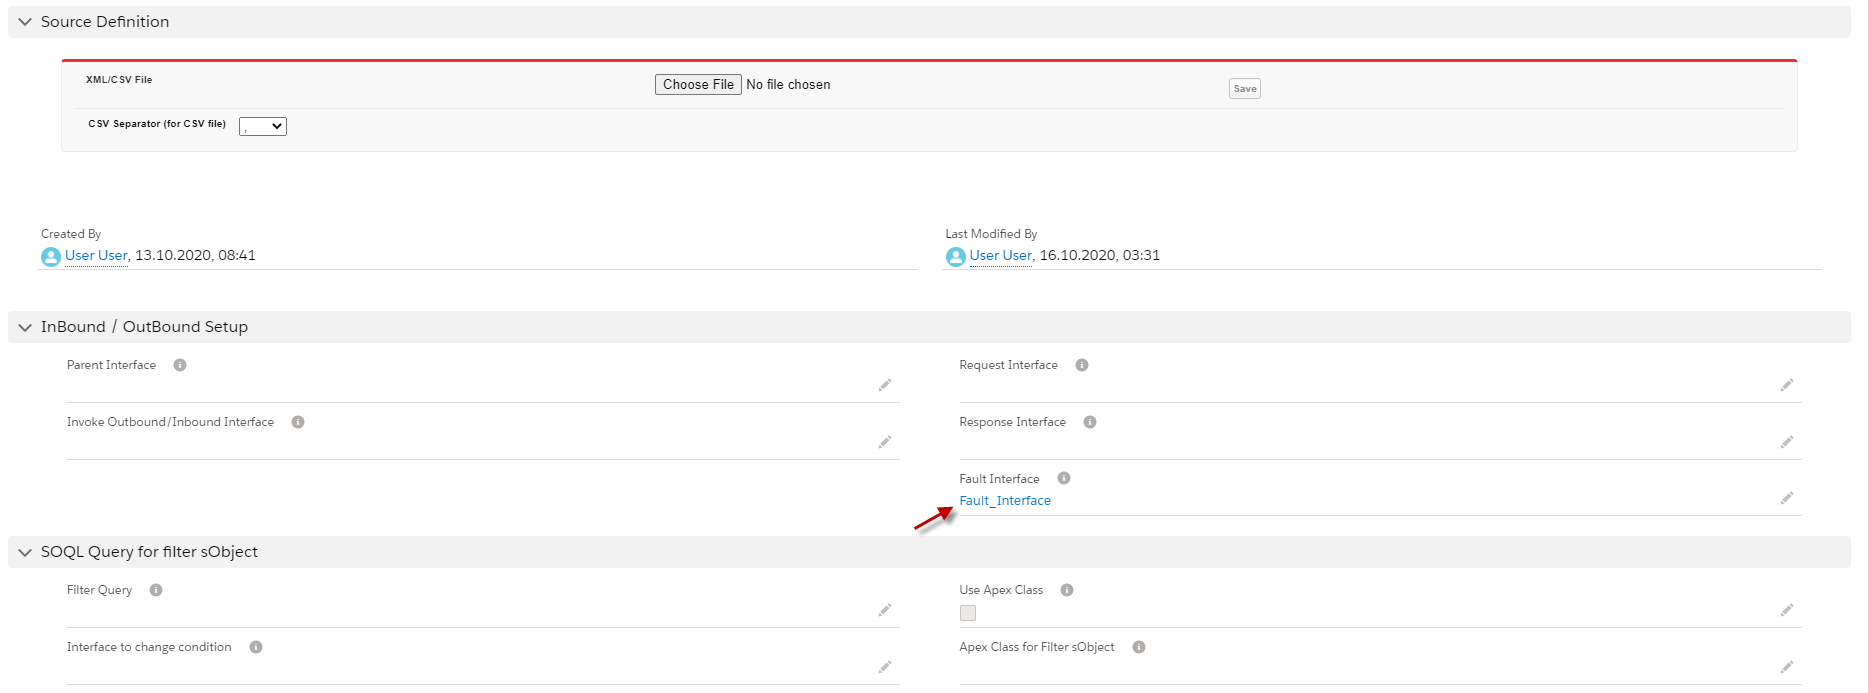
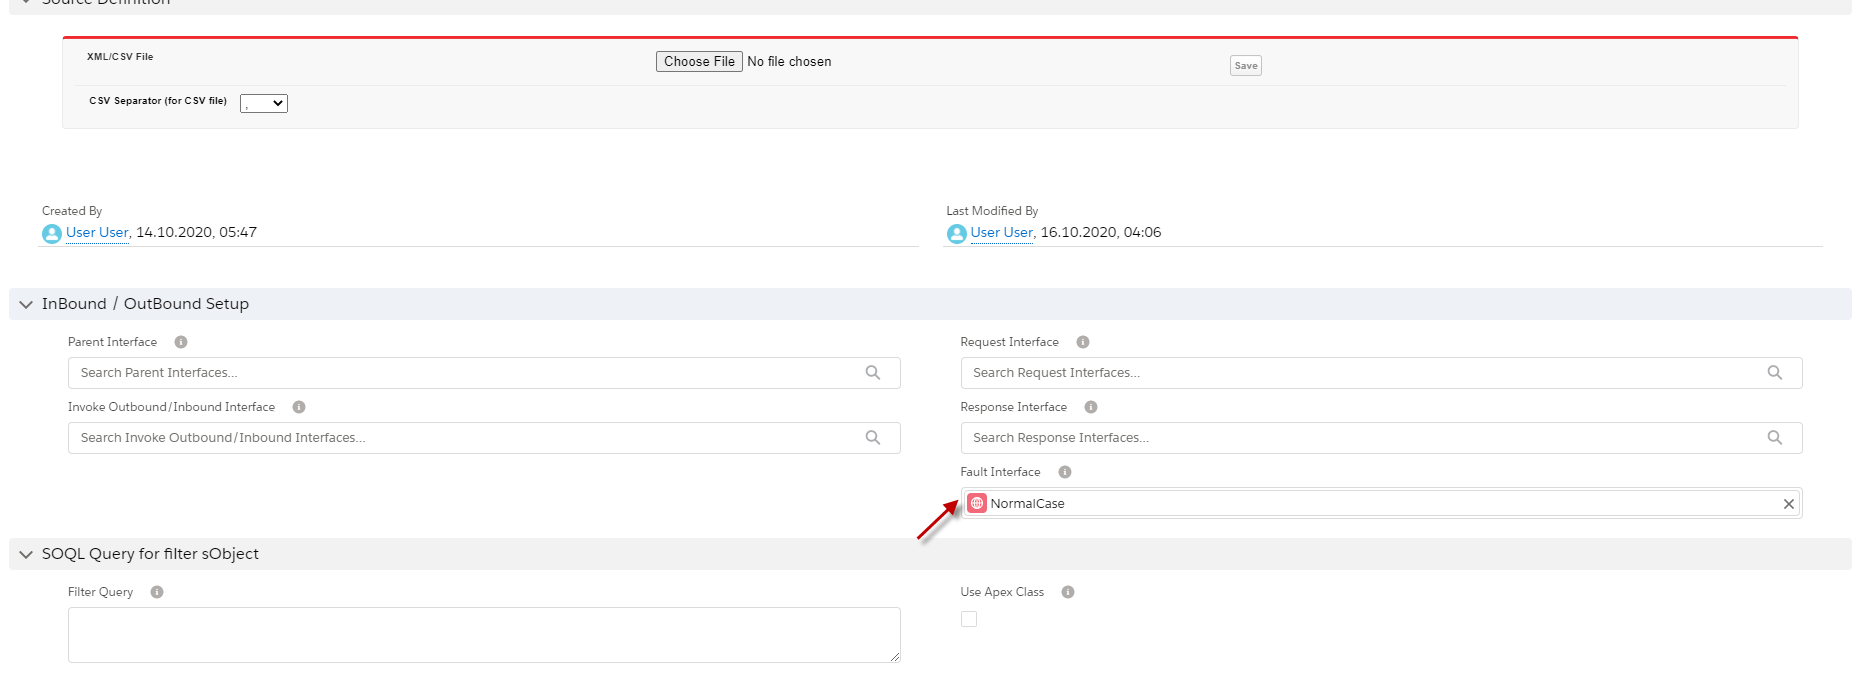
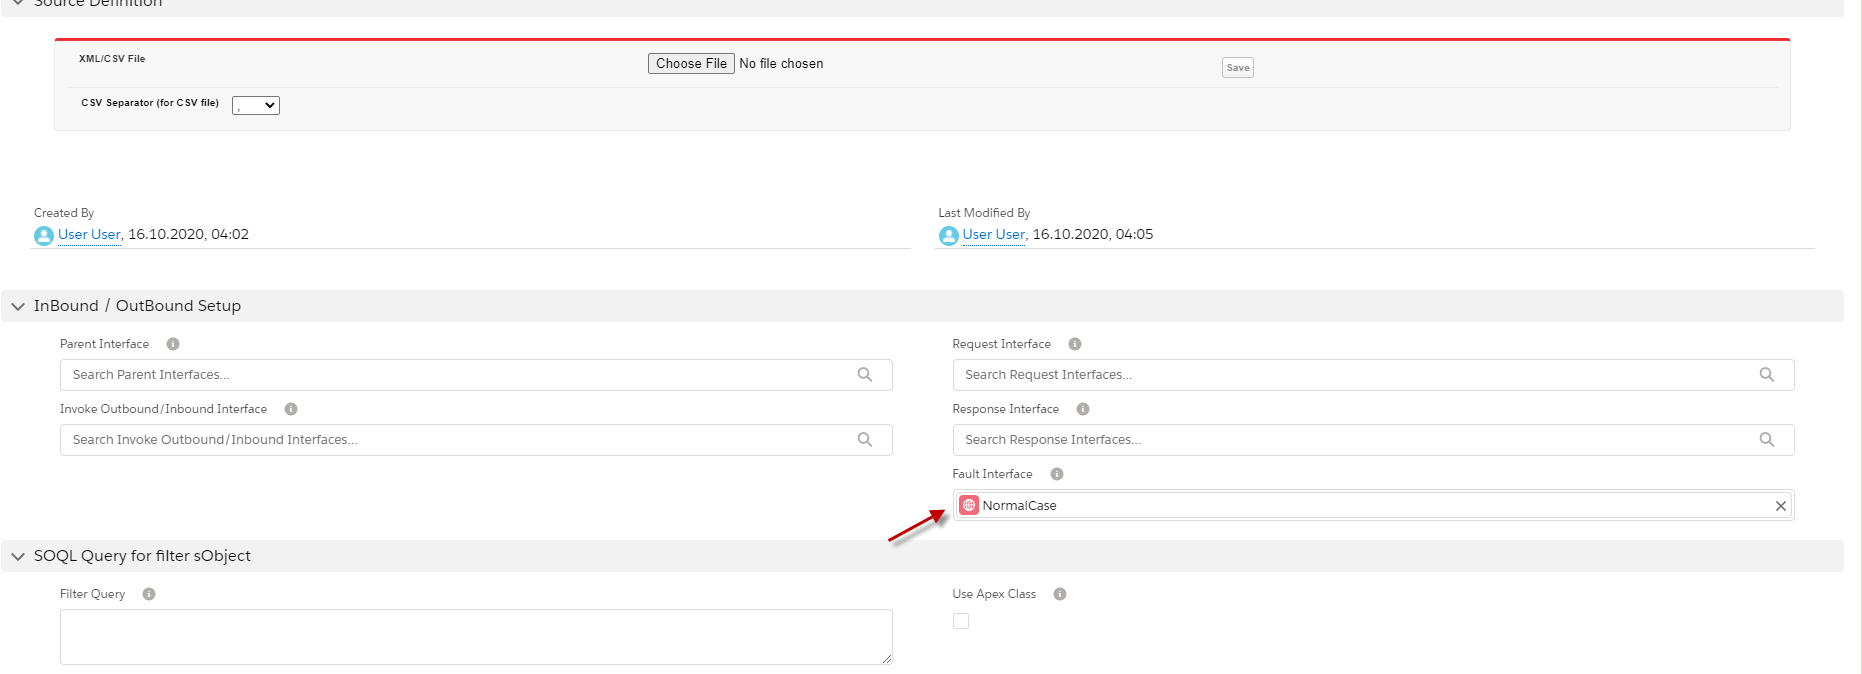
- Go back to request Interface (Normal case)
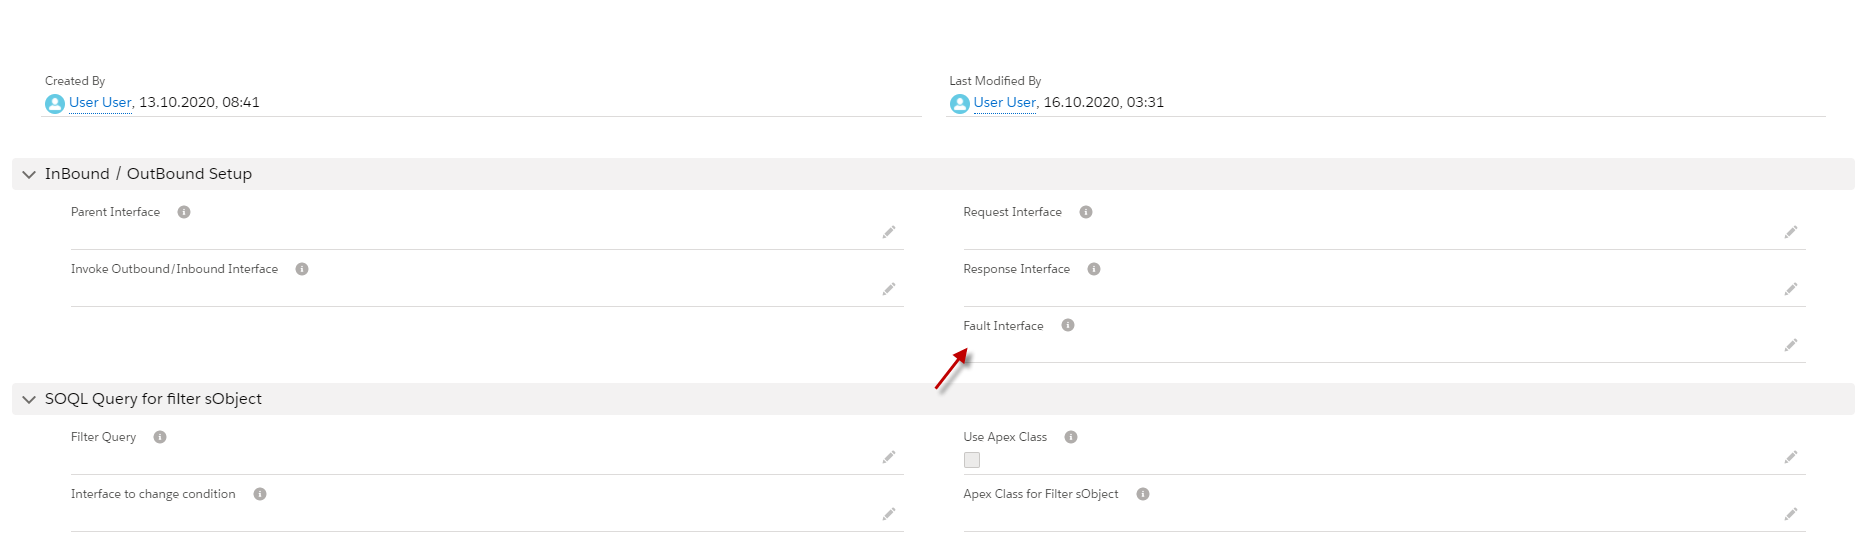
- Scroll down to find the fault Interface field.
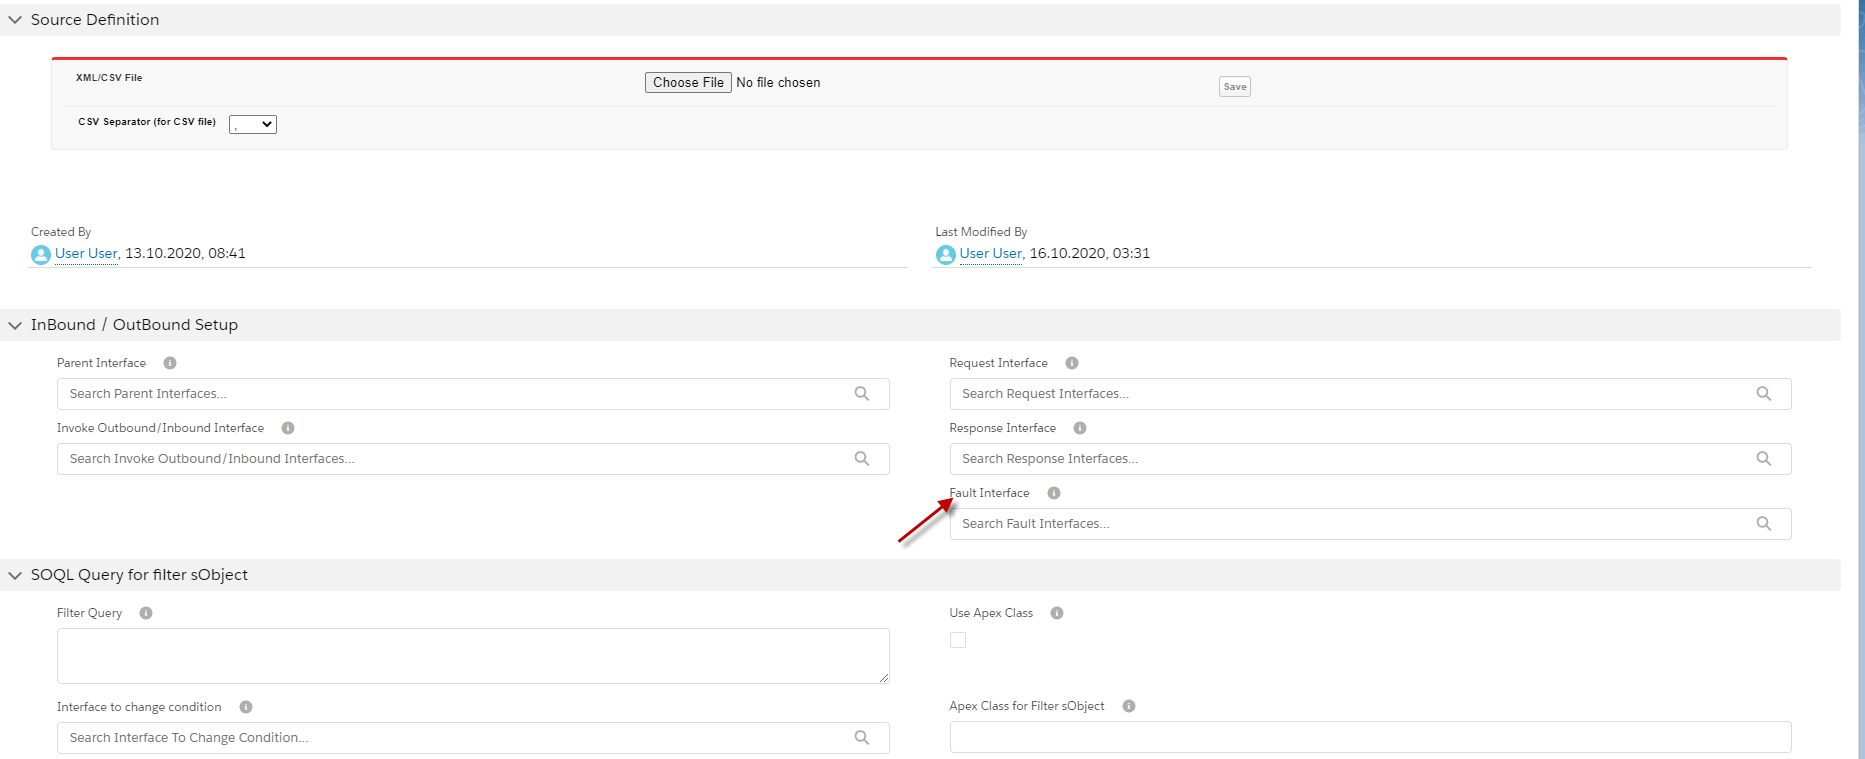
- Put the fault Interface in this field.
Step 3: Checking cache to ensure that Adapter, Integration, Interface group, Interface, Ichain, mapping, or workflow that we set on an interface is cache retrieved.
Step 4: Callout with apex code.
- Here is an example.

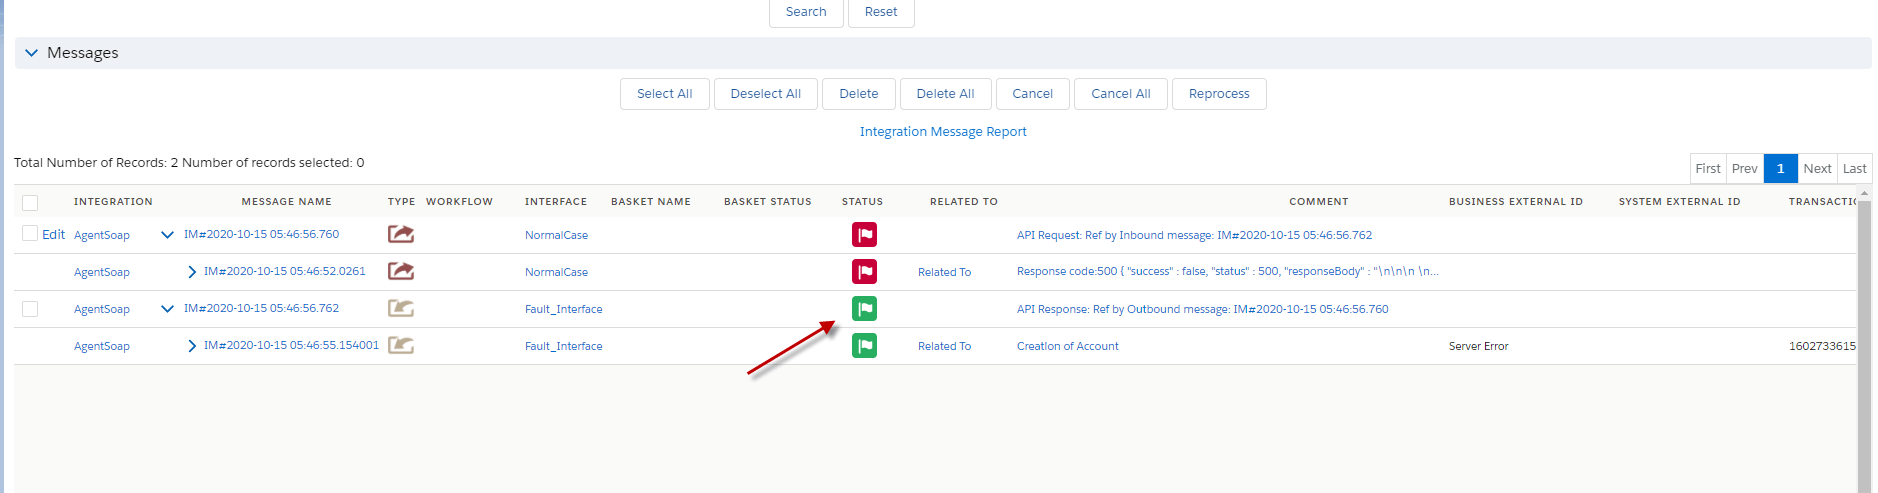
- Go to monitor to check results.
IV. Handle multiple different fault messages #
Pre-require:
- Create or Upload Message Type SOAP with Fault Message Type. (We have configured in case1)
- Configuration Agent control board. (We have configured in case1)
- Create Adapter Agent SOAP. (We have configured in case1)
- Create Integration and outbound Interface. (We have configured in case1)
- Create two Inbound Interfaces for fault interfaces.
We have created a Fault Interface system error already, so we need to create two more fault Interfaces.
Step1: Go to Integration and create Fault interfaces.
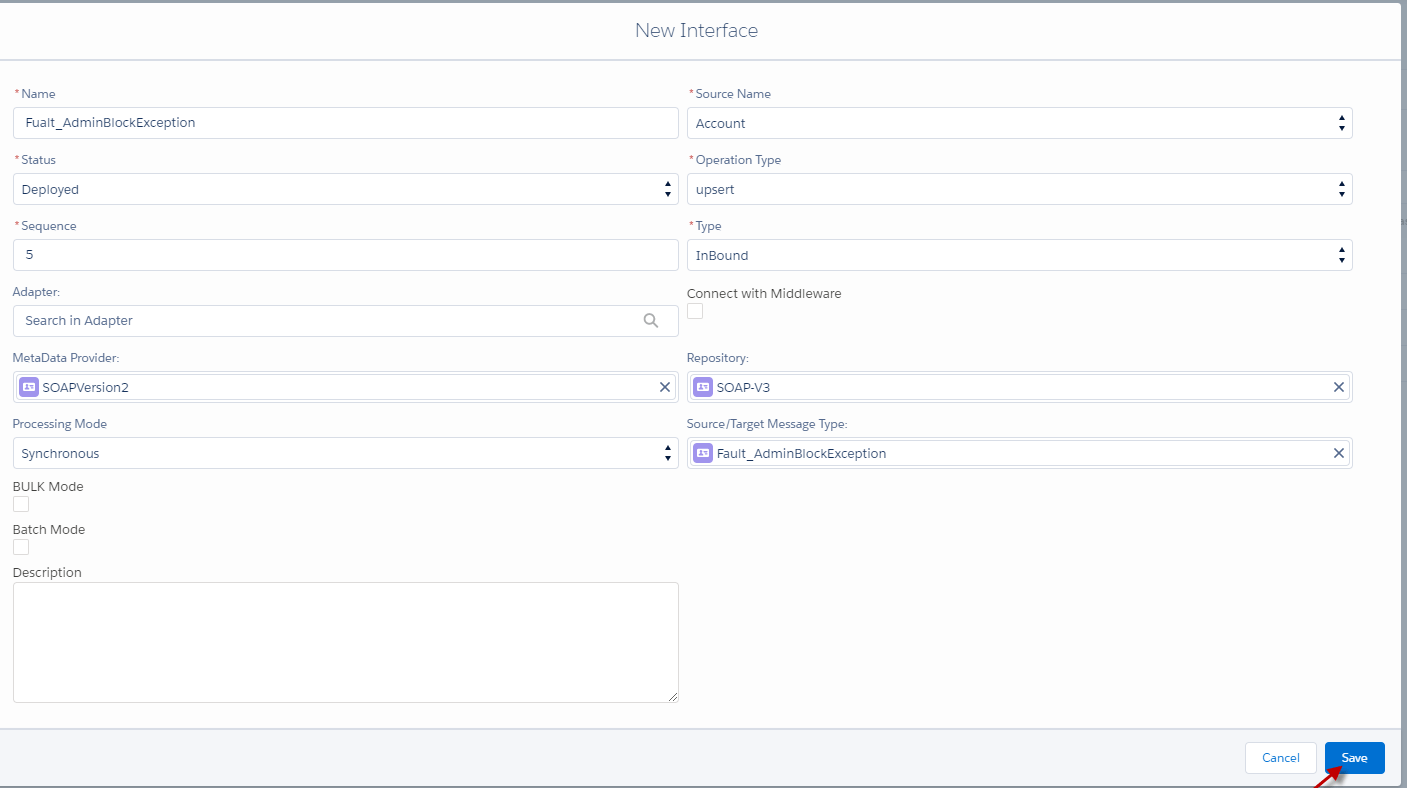
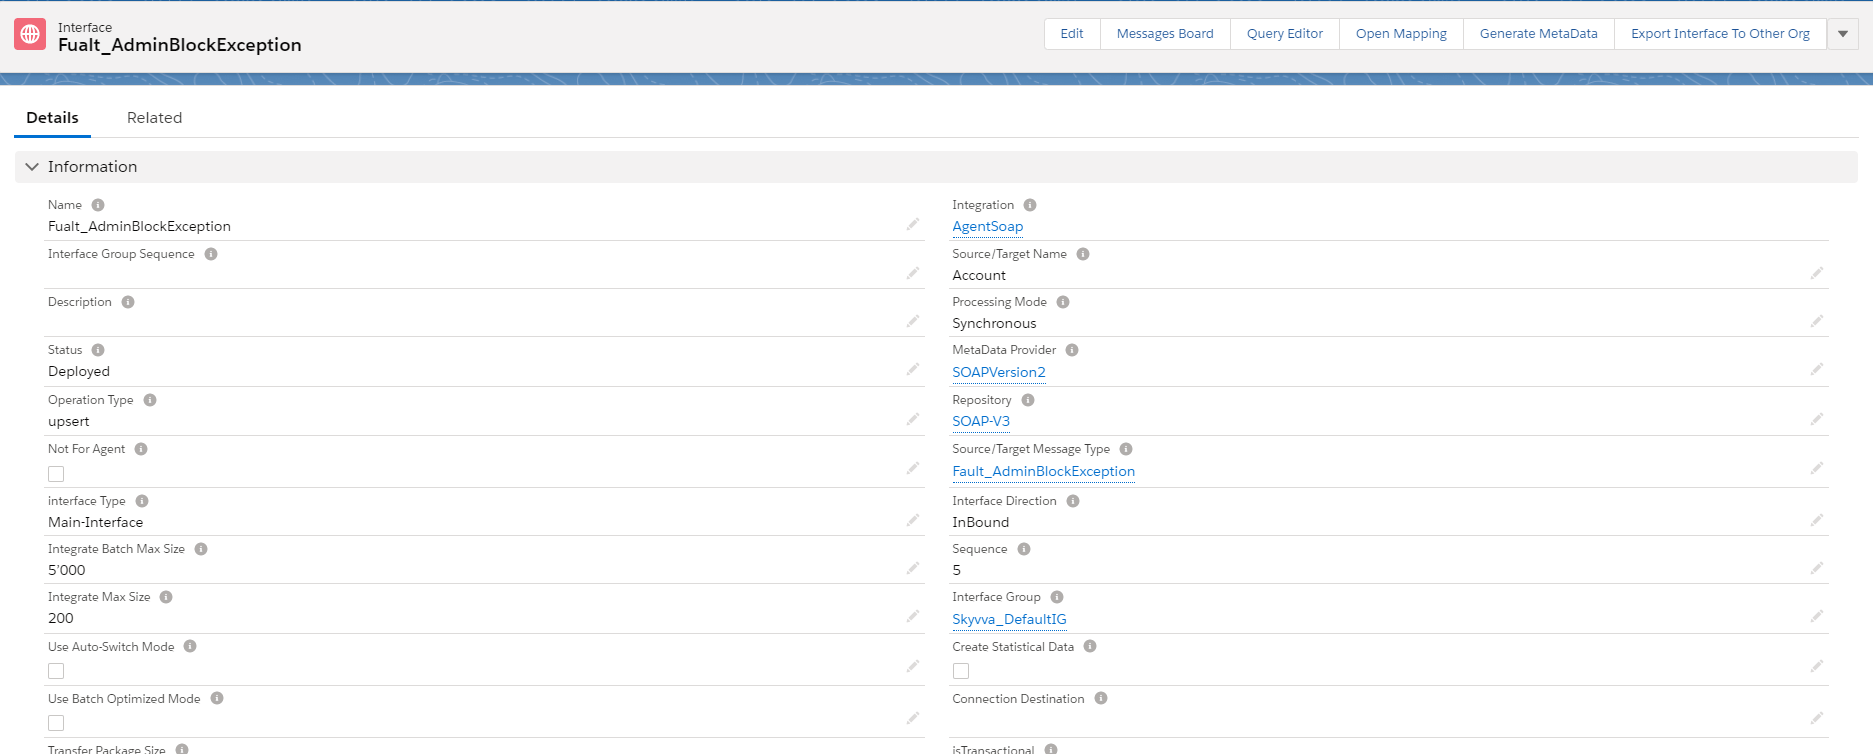
- Create Inbound fault Interface and linked with fault_AdminBlockException and click button save.
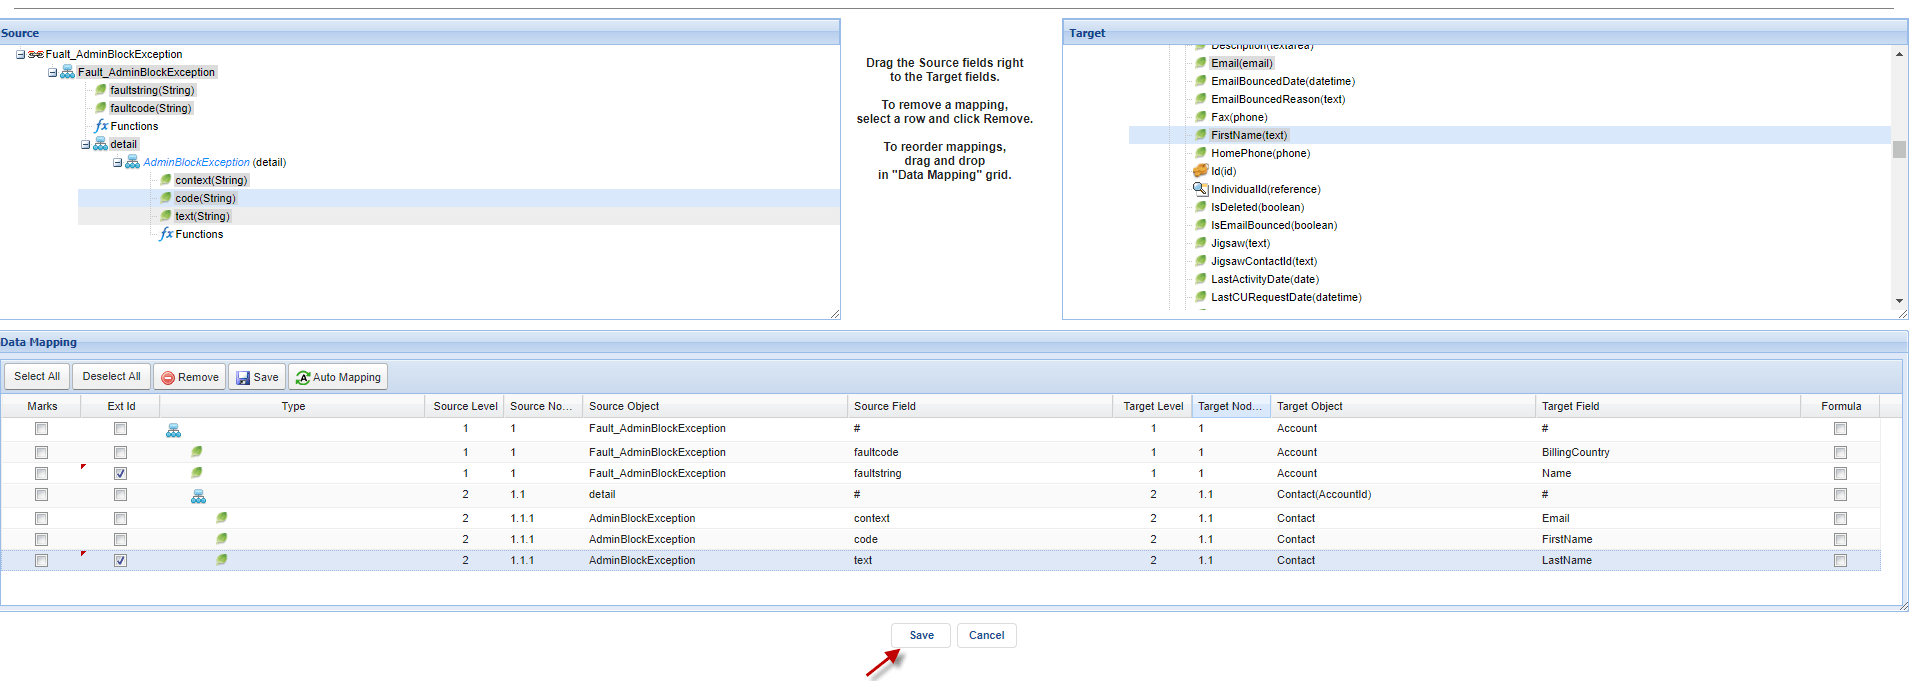
- Do mapping.
Step2: Put Outbound Interface Name in fault Interface of Every Response Interfaces.
- Make sure that the request Interface does not have a fault interface in their field.
- Here is the request Interface.

- Scroll down to make sure that this interface does not have a fault Interface.
- Here is the Response System Error Interface. (That we have created above)
- Scroll down to put the request interface in the field fault Interface.
We need to other Response fault Interface in the same way.
- Here is AdminblockException fault Interface.
- Scroll down to put the request interface in the field fault interface.
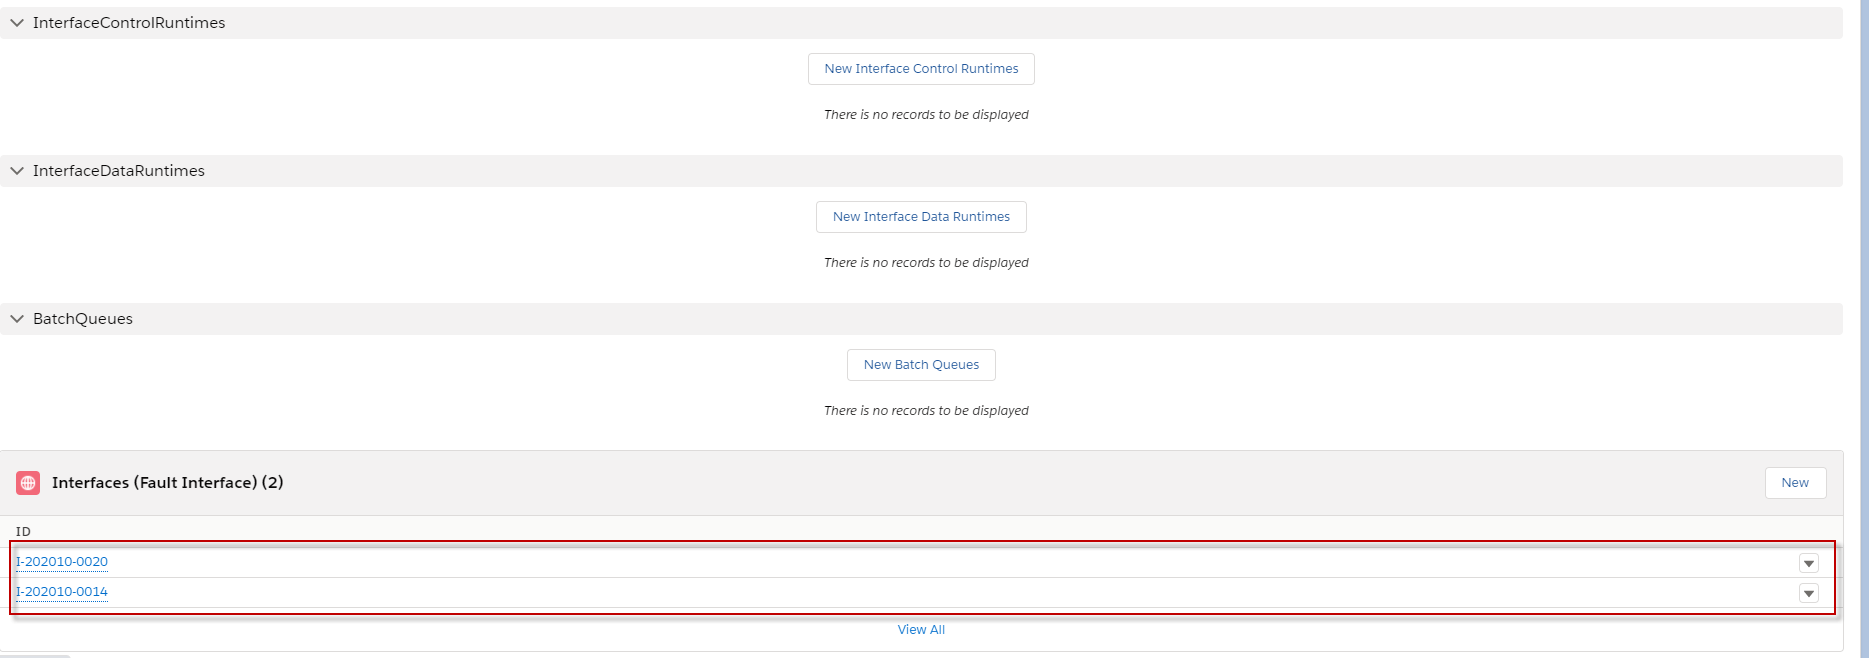
Step 3: Go to Request Interface to see response fault Interfaces related.
- Go to Related Interface of request Interface.
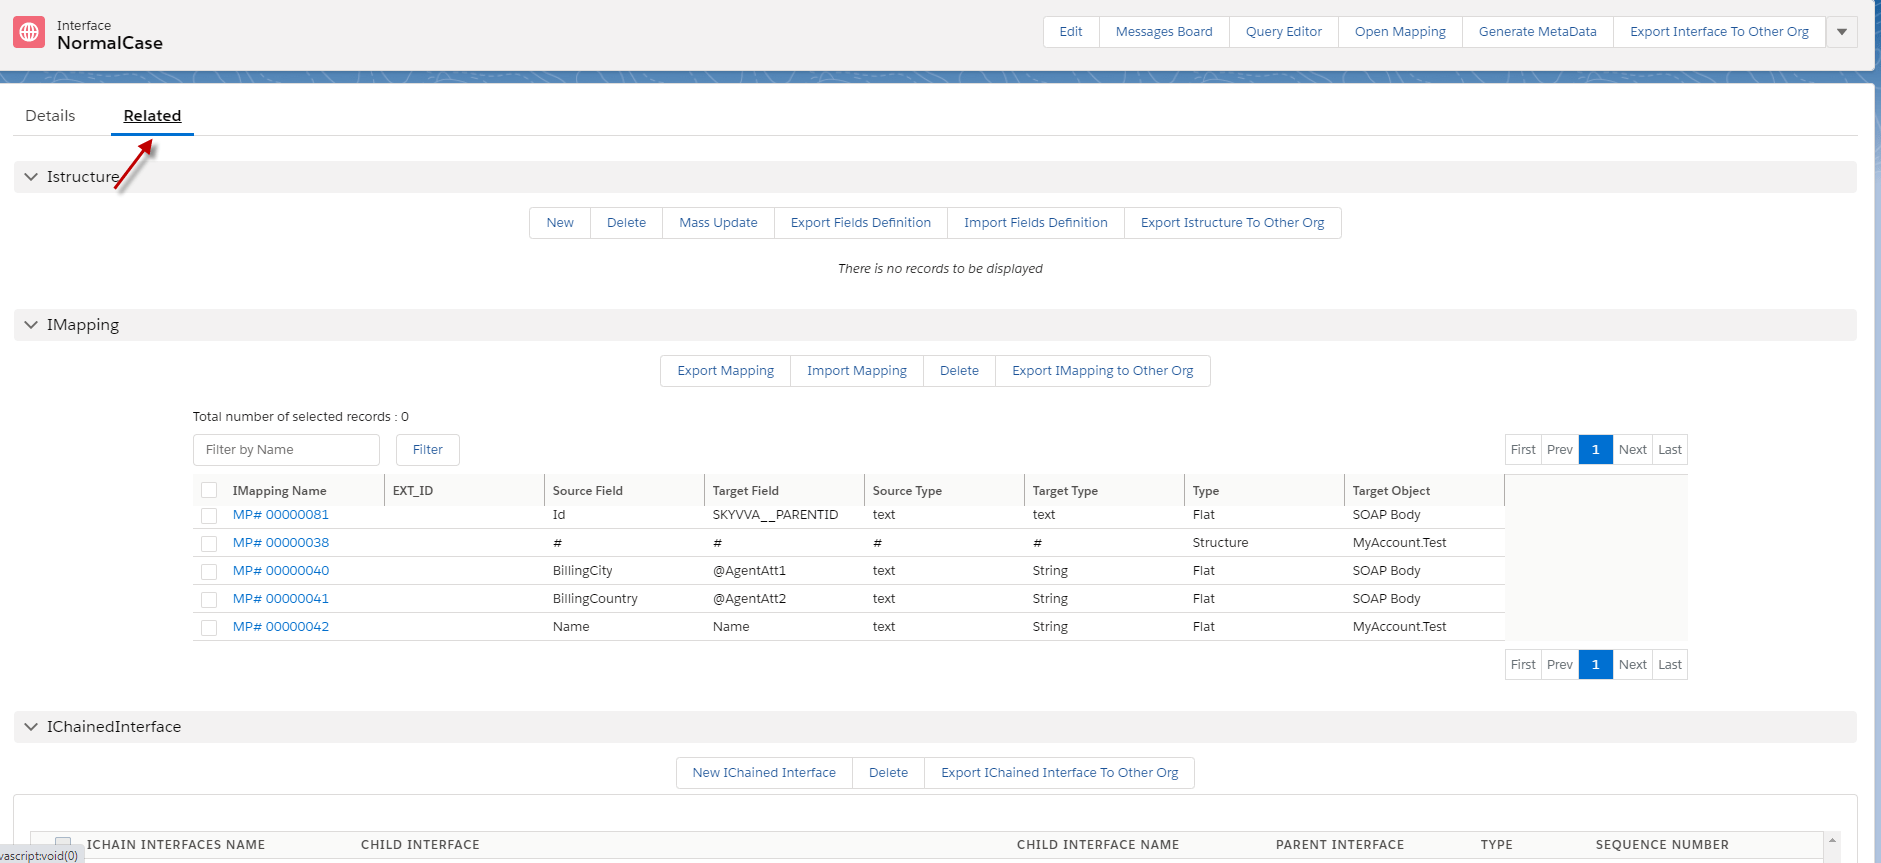
- Scroll down to see both fault Interfaces have related to this request Interface.
Step 4: Checking cache to ensure that Adapter, Integration, Interface group, Interface, Ichain, mapping, or workflow that we set on an interface is cache retrieved.
Step 5: Callout with apex code.

- Go to the message monitor to check the result.

V. callout with feature copy node. #
We use copy nodes to support the requirement for outbound mapping when a node is needed a certain number of times. In this case, We do not need from the source side a sObject instance to create the occurrences of the target node. We can use the data inside the same sObject that occurs multiple times. For example, e.g., We have two types of addresses in the account, like billing and shipping address. We need to create the target node only two times and not n-times as the sObject instance. In this case, we can use the so-called ‘Copy Node’ function to copy the target node two, three, or as many times as you need to have on the target side.
Pre-require:
- Create Integration.
- Interface
- Upload message type and linked with the interface. (do like in case 1)
- Create an Agent soap adapter and link with an interface. ((do like in case 1)
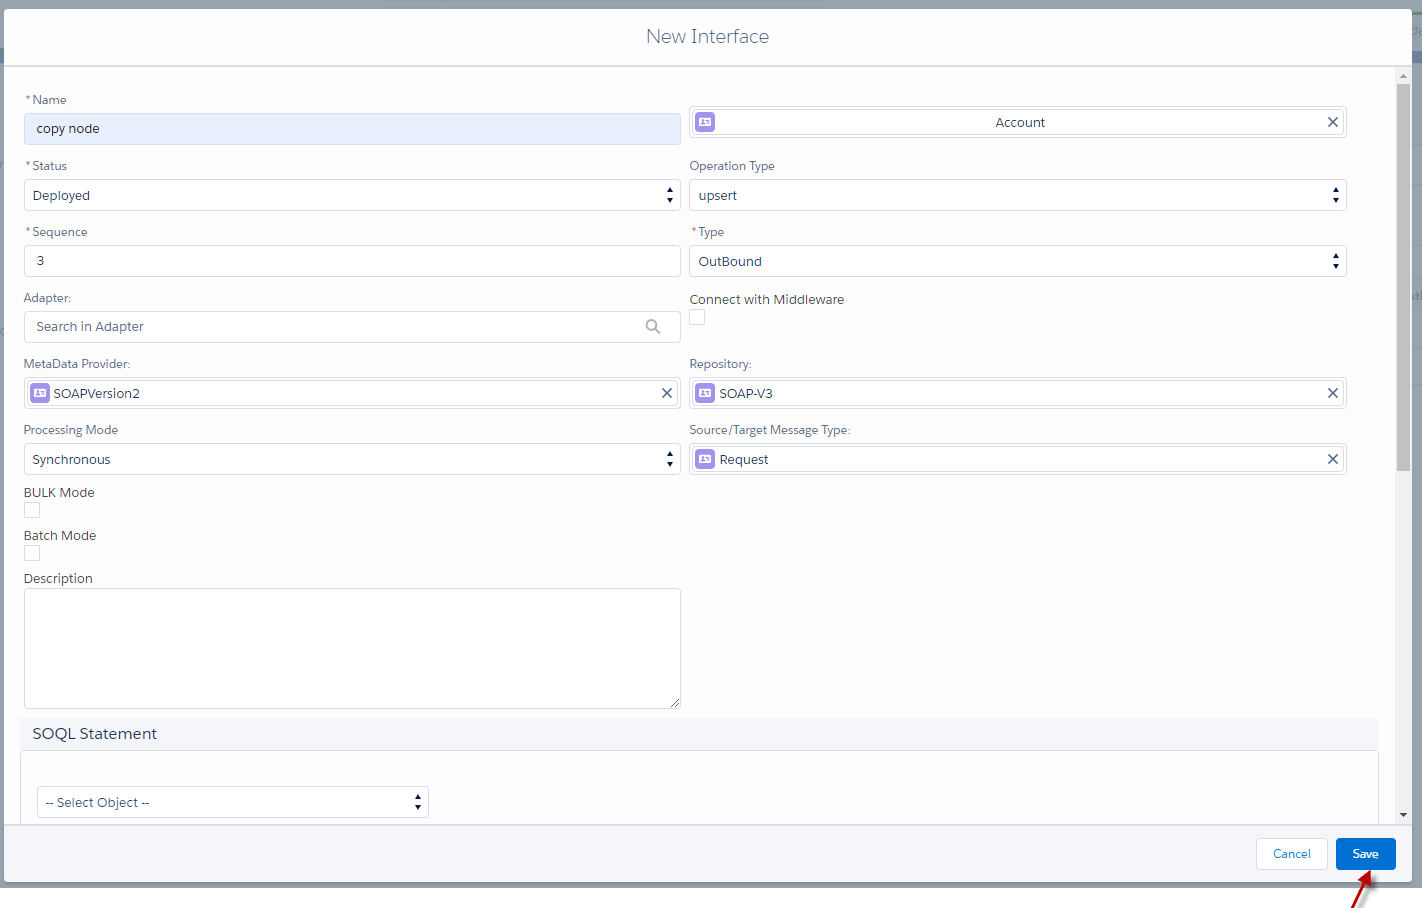
Step 1: create Integration and outbound Interface.
- Go to Integration, click the New Interface button.

- Fill in the name, source name, status, type, and linked message type. See the example below.
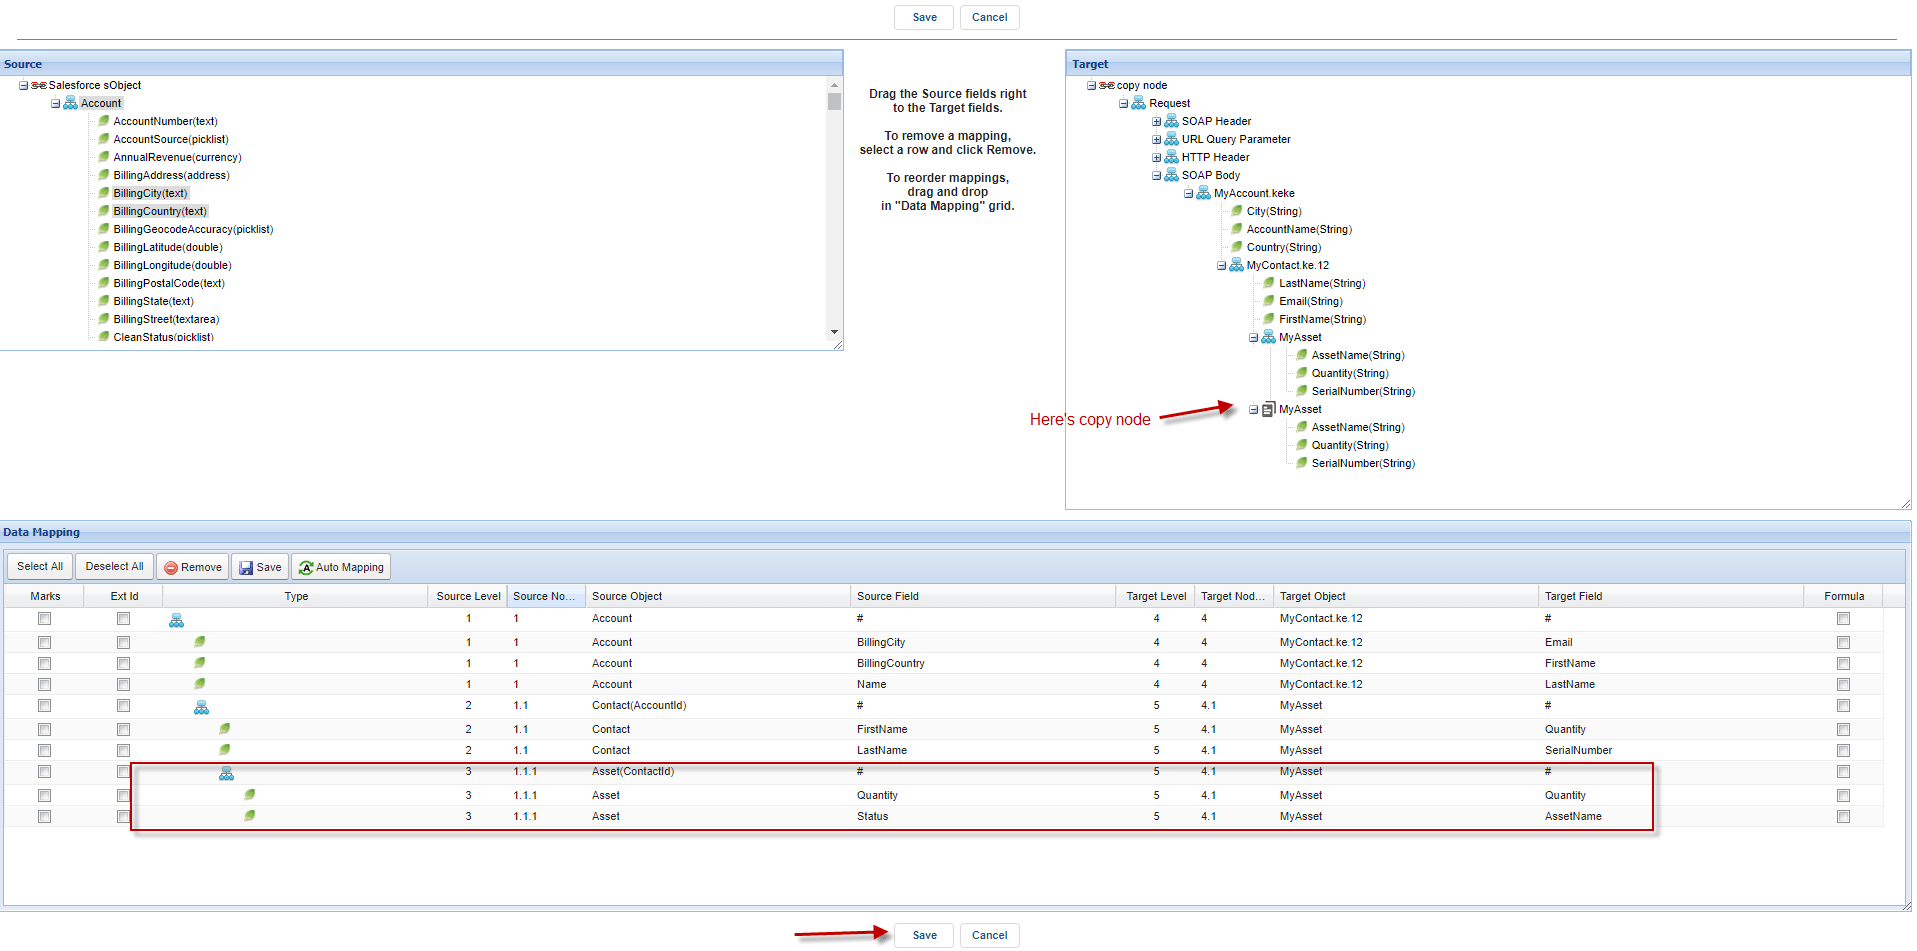
- Do mapping.
To set a copy node, we click the left mouse on a node that we need to copy and then click copy node.
Step2: Go to the Agent control board to create an Agent soap adapter.
- Go to Integration => click Agent control board.
- Connection Agent control board.
- Here is the adapter that we use.
Step 3: link the adapter to the Interface.

- Checking cache Monitor
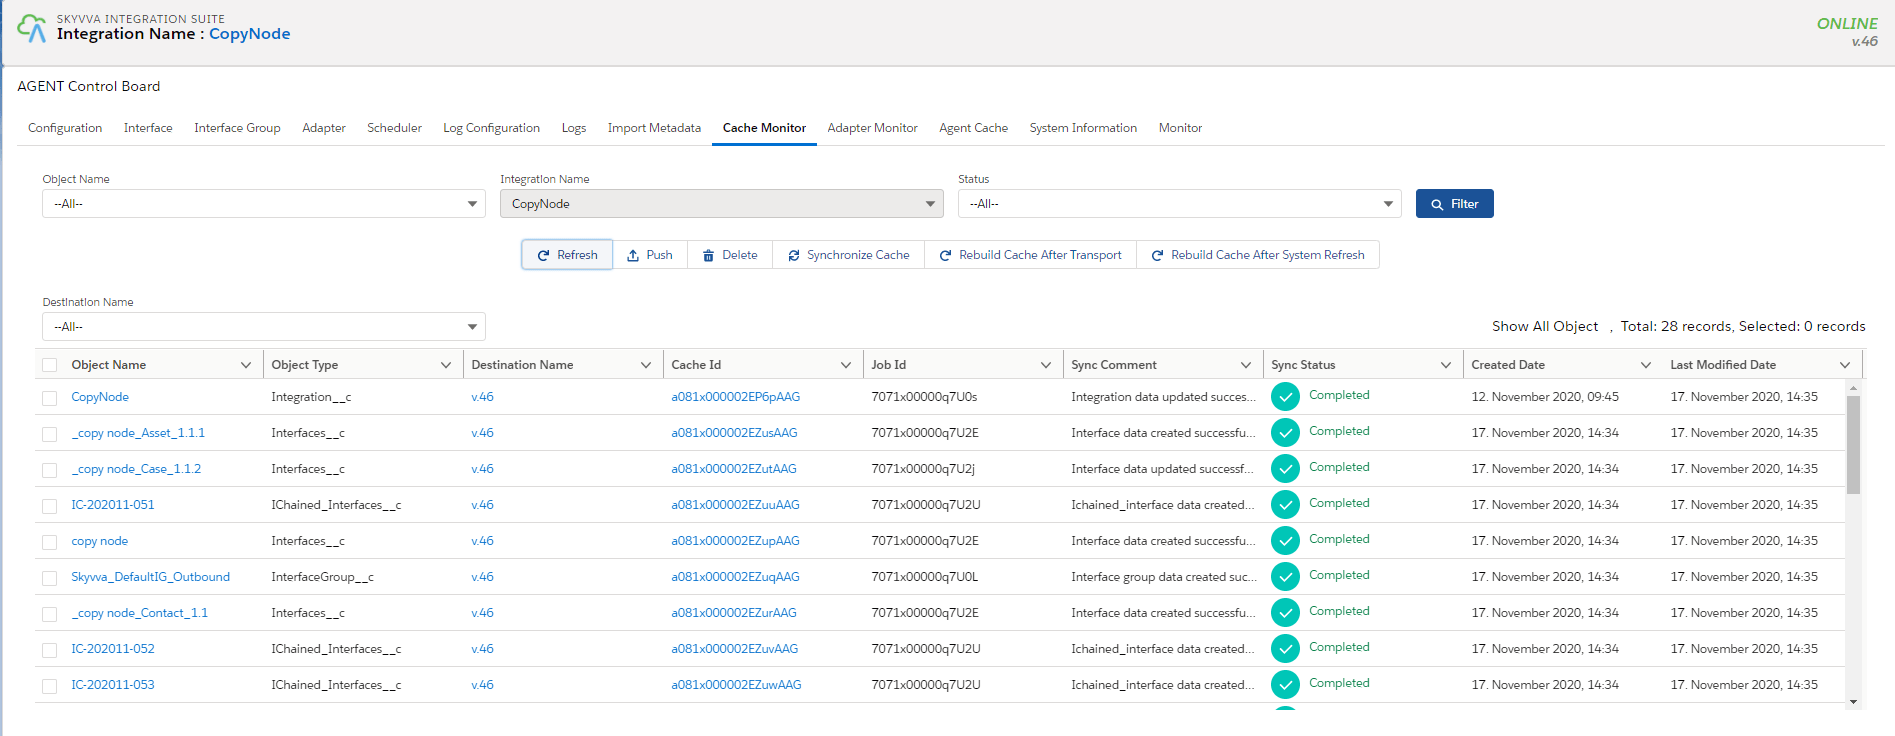
Step 4: checking cache to ensure that Adapter, Integration, Interface group, Interface, Ichain, mapping, or workflow that we set on an interface is cache retrieved.
Step 5: callout with apex code.
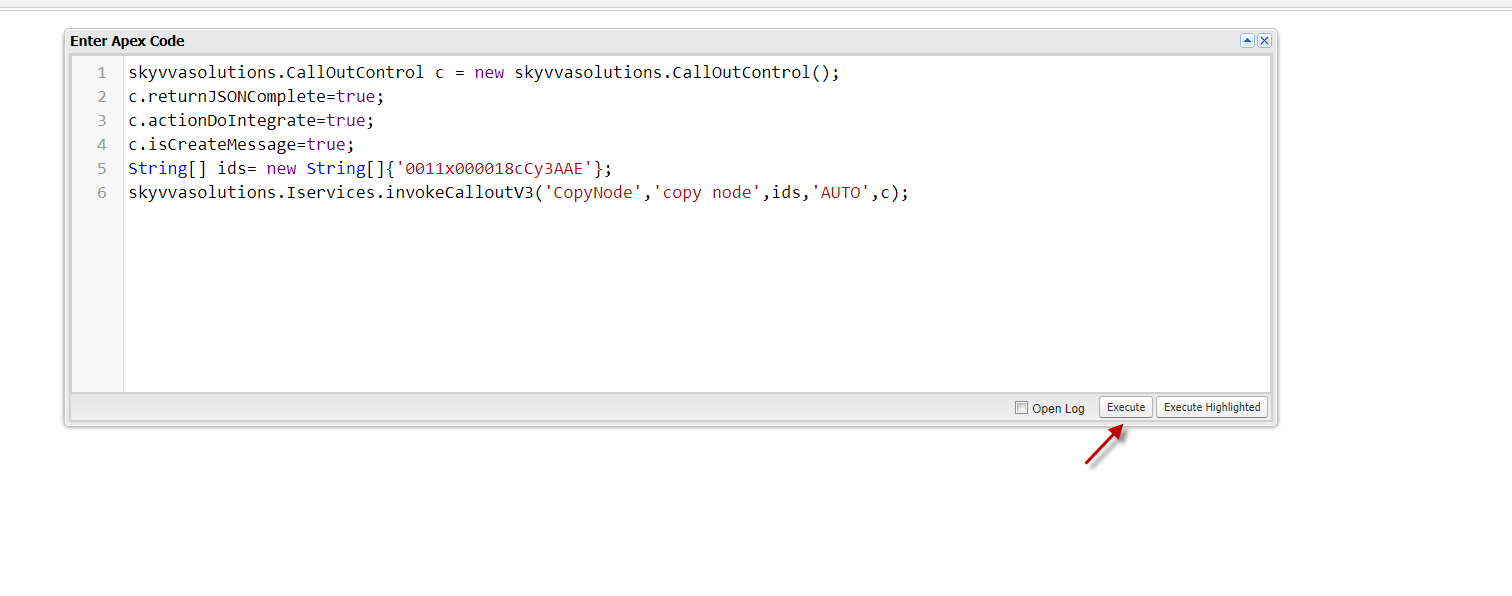
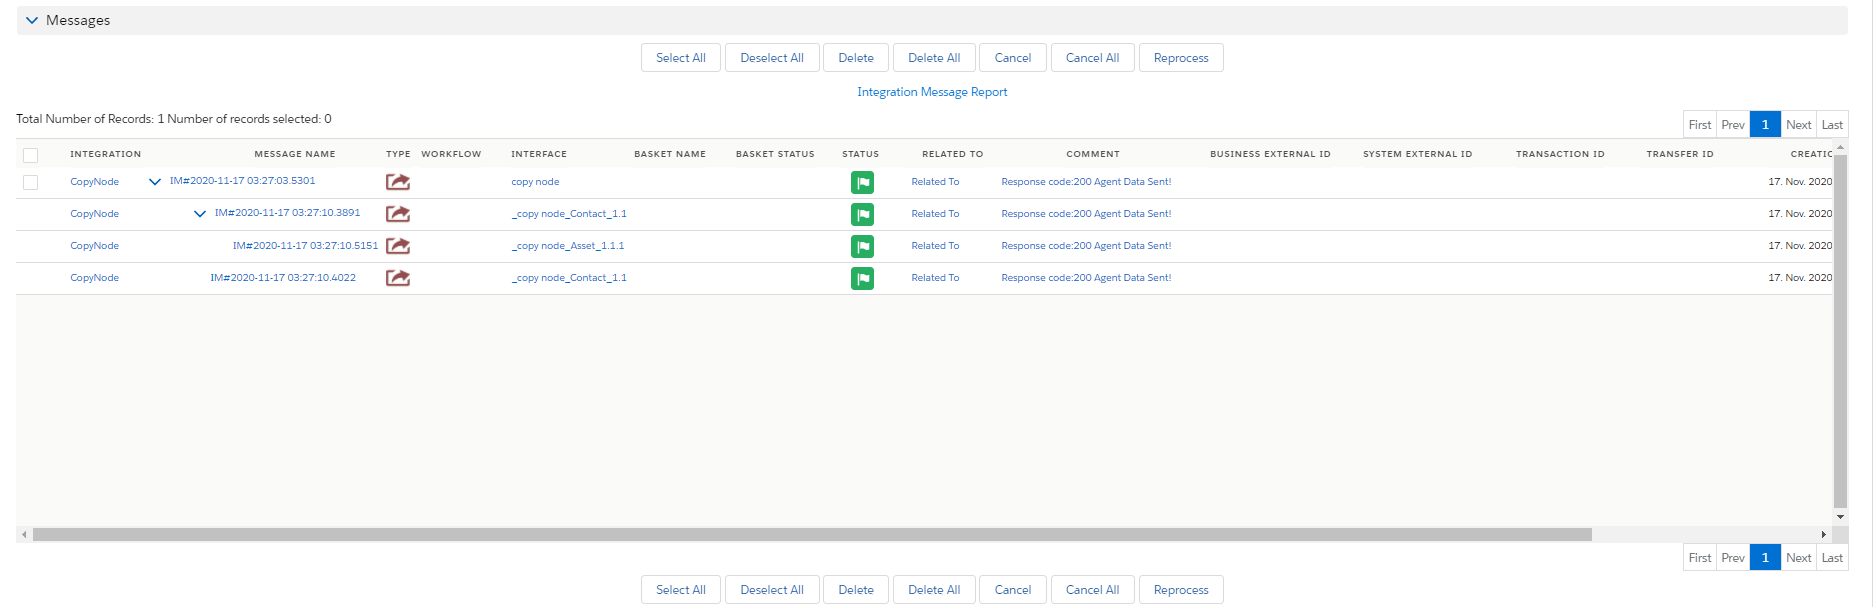
Step 6: Go to message monitor to check the result.
Summary
Finally, we have learned how to use Agent soap to call out other systems with many features shown above, such as Callout with the response and without response, fault message, attribute, and copy node. This Agent soap Adapter is useful for users who want to process with internal and external systems.


