This document describes how to create an inbound IntegrateSynchronous interface with SAP-PO java single stack. When talking about the inbound interface in this document the direction SAP to Salesforce is meant e.g. Salesforce Interface will be called from SAP-PO. The development of an inbound interface involves steps to be done in Salesforce and in PO. This document does not describe the work at SAP-Backend e.g. developing business logic in SAP-Backend with ABAP.
- SKYVVA software landscape and building blocks
SKYVVA Integration Suite enables the integration between Salesforce and SAP-Backend over SAP-PO with less effort and without programming neither in SAP nor in Salesforce. It bases on the generation and customized approach to reduce effort and to accelerate the development of interfaces between those systems.
In order to be able to provide such a toolset and framework some component (green) has been developed by SKYVVA and has to be deployed on Salesforce and SAP-PO of the customer. On the SAP-Backend e.g. SAP ECC 6.0 there is no software installation needed.

Creating an inbound interface is only possible when the SKYVVA solution framework is set up correctly. When talking about the direction we have to clearly define the perspective from which platform we are looking for. Since we are coupling two platforms Salesforce and SAP together we have to clearly define from which view we are referencing when talking about direction outbound or inbound.
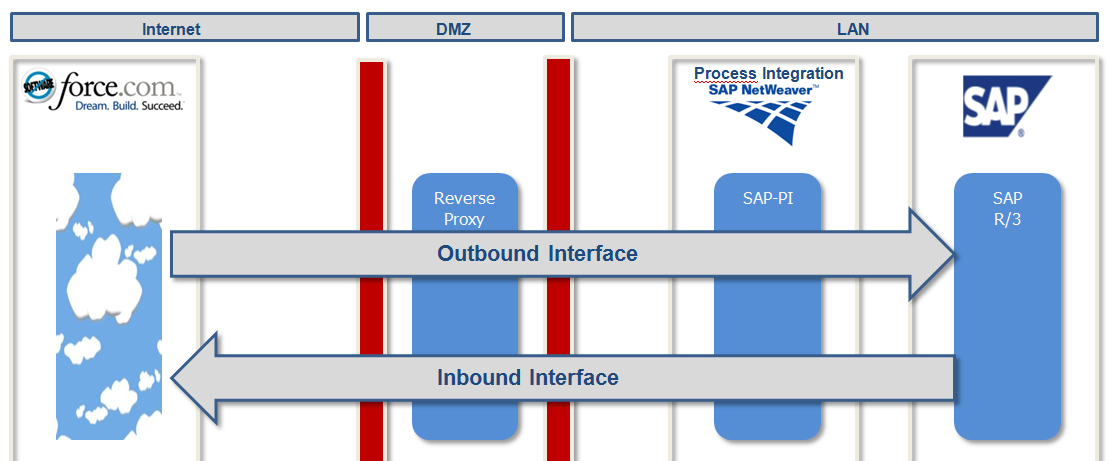
- Outbound and Inbound Interface
The term outbound is used when data is sent out from Salesforce to SAP. Therefore we will call interfaces for sending data out of Salesforce to SAP “Outbound Interface”. For the other direction, we will call the interfaces “Inbound Interface” when data is sent from SAP to Salesforce. So, the reference point is set to Salesforce.
- Prerequisite for creating an inbound interface
- The SKYVVA solution framework has to be installed into your Salesforce instance.
- An integration instance has been created
- SAP-PO has been installed and set up correctly
- Your workstation needs an internet browser IE or Firefox of the new release.
- Creating Inbound Synchronous Interface
Create a synchronous inbound interface when you want to query data from Salesforce over SAP-PO and need a result back to SAP e.g. query all account in Salesforce which has the status active. By this way, you can pull data from Salesforce by providing query parameter as a search criteria
- Overview of the steps to create an Inbound interface
The figure below depicts which steps to be followed to create an inbound interface with SAP PI/PO.
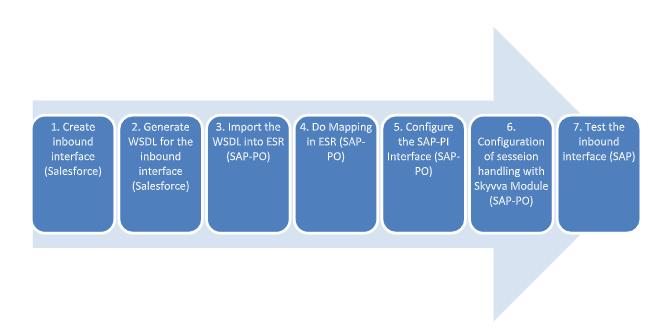
Steps to create a synchronous inbound interface
Step 1. Creating an inbound synchronous interface (Salesforce)
Login to the Salesforce org and then select SKYVVA Integration Cloud.
Go to Integration Tab and create New Integration under that go to the interfaces tab and then create New interface as shown below.
In this example, I have created the interface under “Skyvva_SAP_Salesforce” integration

Now we have to fill the following fields:
- Name
- Source Name
- Status
- Sequence
- Operation Type
- Connect with Middleware
- External Mapping
- Interface Mode
Then click on button “Save” to save your interface.
Now we have to specify some required fields and other optional fields for defining the inbound interface. Following all fields related to creating an inbound interface for connecting to Salesforce are described. Note that there are also fields in the screen which is not needed for the SAP-PI coupling but needed for other couplings e.g. the SAP direct coupling.
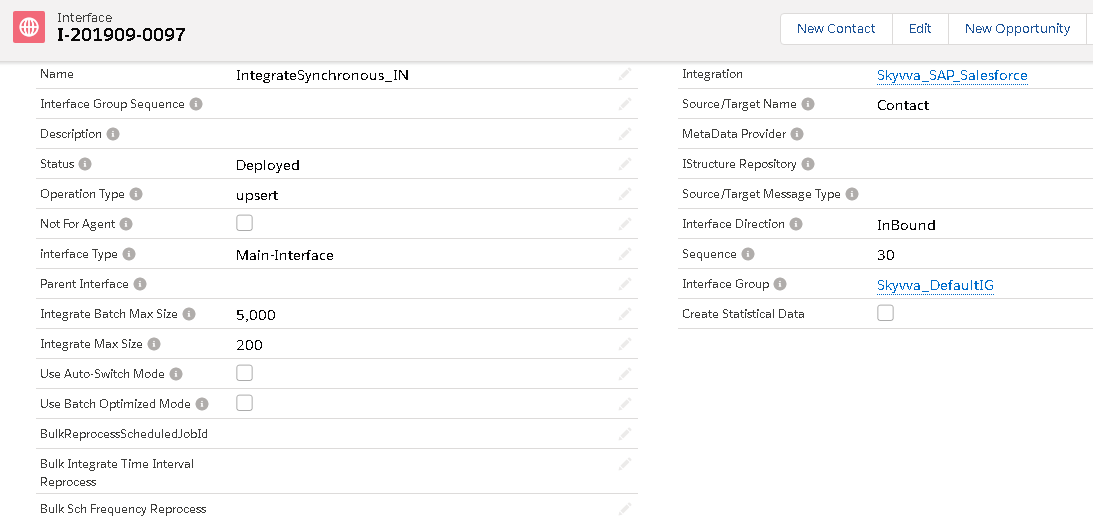
4.1 Name
- It represents the Interface Name that we are going to create and also we have to provide a meaningful description in the Description label.
- Since we are creating an Inbound interface. So, here we recommend you to follow the naming convention as for example IntegrateSynchonous_IN for the inbound interface as shown below.
![]()
4.2 Status
Initially, it will be in the “Development” status. When we want to run the interface then we have to set it as “Deployed” as shown below.

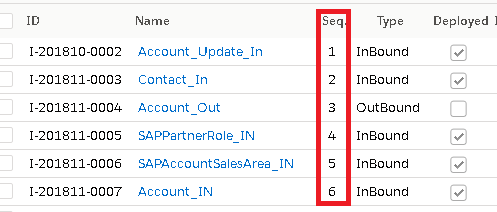
4.3 Sequence
Enter a number in this field. This field is for numbering the interface to be shown in the logical order on screen
4.4 Operation Type
This field contains the SQL statement for an interface. For inbound interface, we need to specify an operation since this is an updated interface.
In this case, you can specify the value “Upsert”.

4.5 Field Type
Here we are specifying the direction of the interface e.g. Inbound or Outbound. Since we have created an inbound interface. So, We have to specify the value as “InBound”.

4.6 Interface processing mode
Here we have to specify the processing mode as Synchronous.

4.7 Connect with Middleware
We have to check this flag because we use SAP-PO as a middleware component. This is just to
indicate Skyvva runtime service that it is not connected directly to an SAP-Backend.

4.8 External Mapping
Since we are using SAP PO as a middleware component and as a developing a tool for mapping. This is just to indicate Skyvva runtime service that mapping will be done in SAP-PO and that you don’t need to do mapping in Skyvva framework.
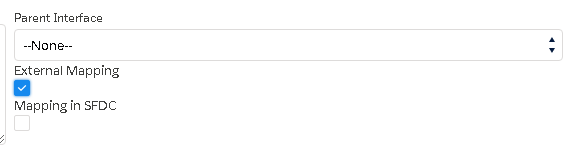
If our business case needs that you want to map both in SAP-PO and in Skyvva framework then you have to
check the “Mapping in SFDC” also. But normally in most of the cases, we don’t need to do mapping in Skyvva
framework again.
Step 2 – Generate WSDL for the Inbound interface
Now we have to generate the WSDL for this inbound interface. This is needed to do mapping in SAP PO and to generate the WSDL. Go to Integration under that select details tab and then click on “Manage Middleware WSDLs” as shown below.
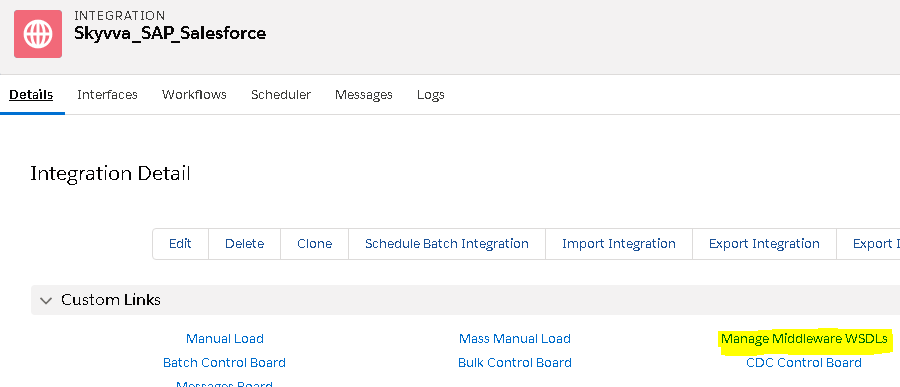
Click on the link “Manage Middleware WSDLs”
Now download the WSDL for both inbound and outbound response interface as shown below.
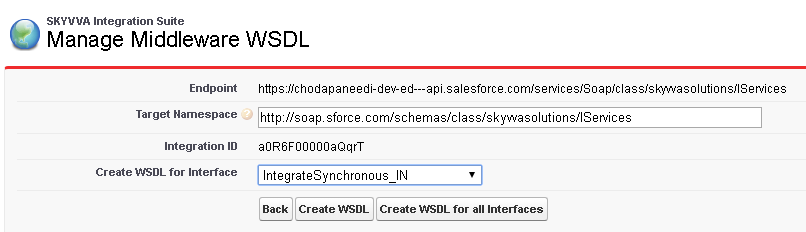
Now select the interface you want to export as WSDL.
After selection of an interface now click on the button “Create WSDL”. Scroll down to see the generated
file.
![]()
Now click on the Link “View“ and then WSDL will be downloaded.
![]()
Rename the downloaded file as D_190910_SFDC_InBound_IntegrateSynchronous_IN.wsdl. Now we can import this WSDL into ESR in SAP PO for mapping.
Step 3 – Import WSDL into ESR
First, we have to create a namespace in ESR like “urn:skyvva: IntegrateSynchronous“.
Now create an external definition for Contact request under the namespace like below. Here the WSDL is for Contact. So, we can give the name as ED_SFContact.

Now import the WSDL and Save and activate it.
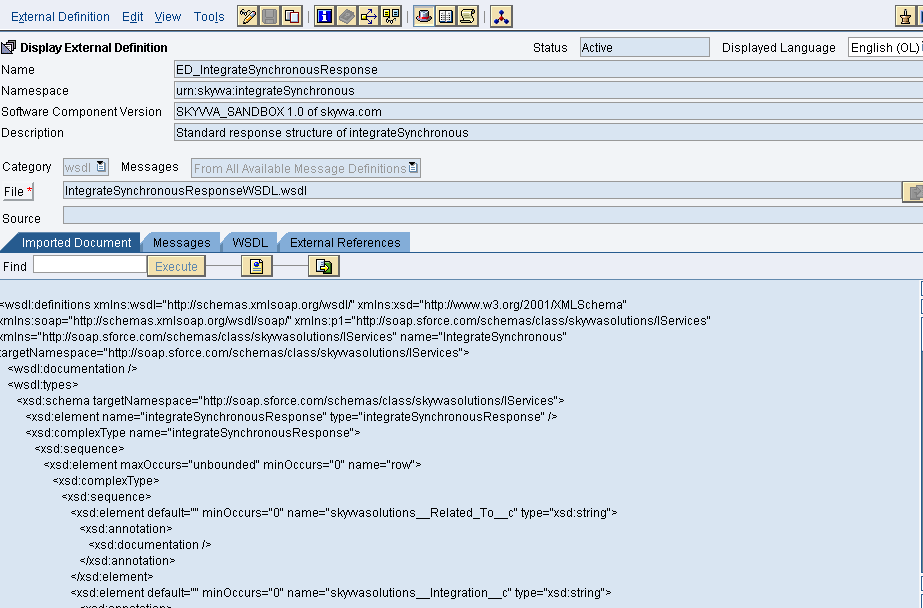
Now create an external definition for IntegrateSynchronous response under the namespace like below. Here the WSDL is for Contact. So, we can give the name as ED_IntegrateSynchronousResponse
Since in this example, we are sending data from SOAPUI to Salesforce. So, we need to create data types for request and response as shown below.
DataType for Request –
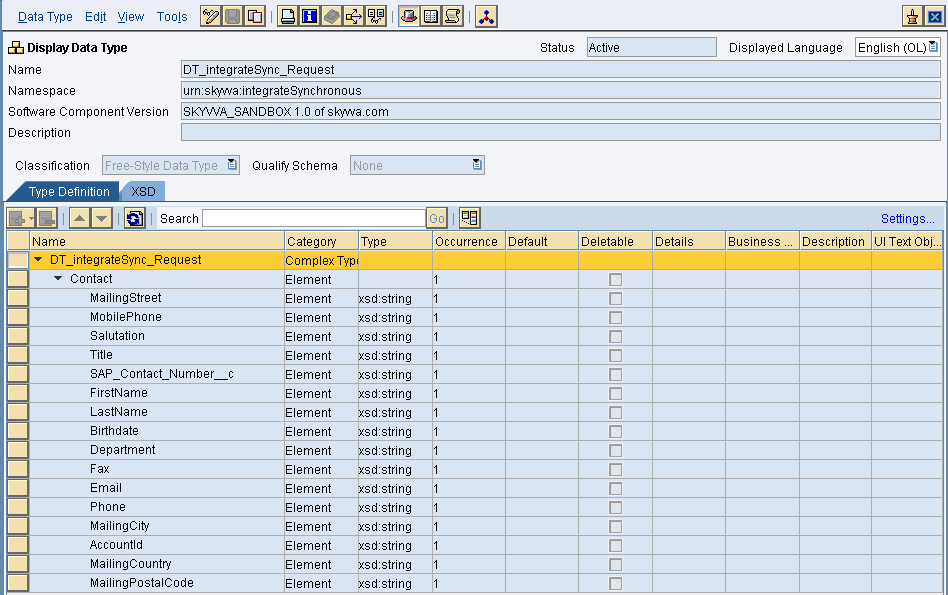
Save and activate the request data type.
DataType for Response–
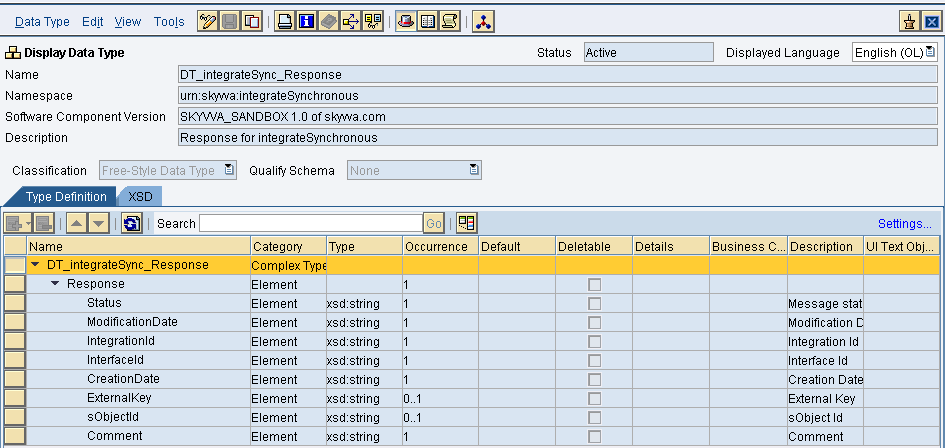
Save and activate the response data type.
Now create Message type for both Request and Response as shown below.
Request Message type –
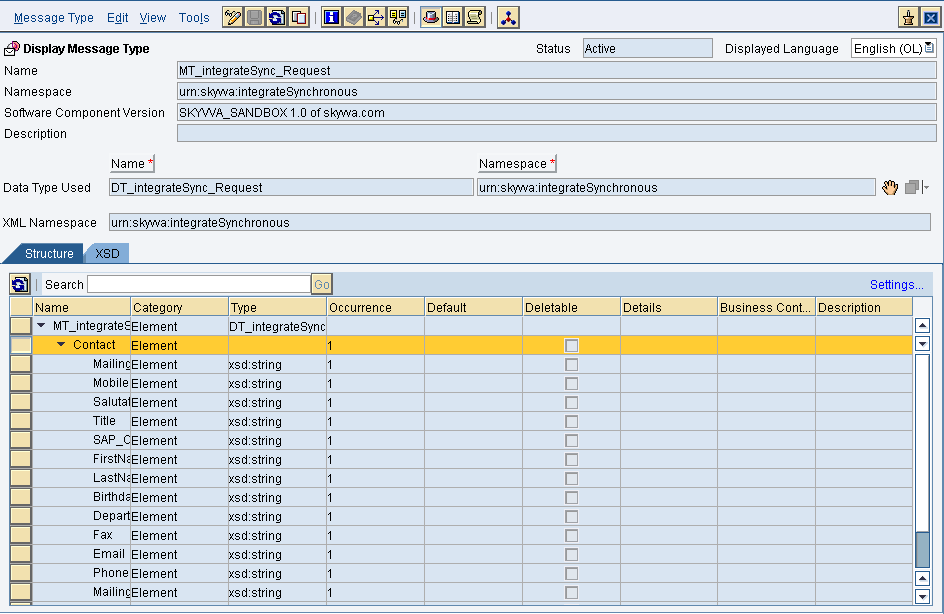
Save and activate the request message type.
Response Message type –
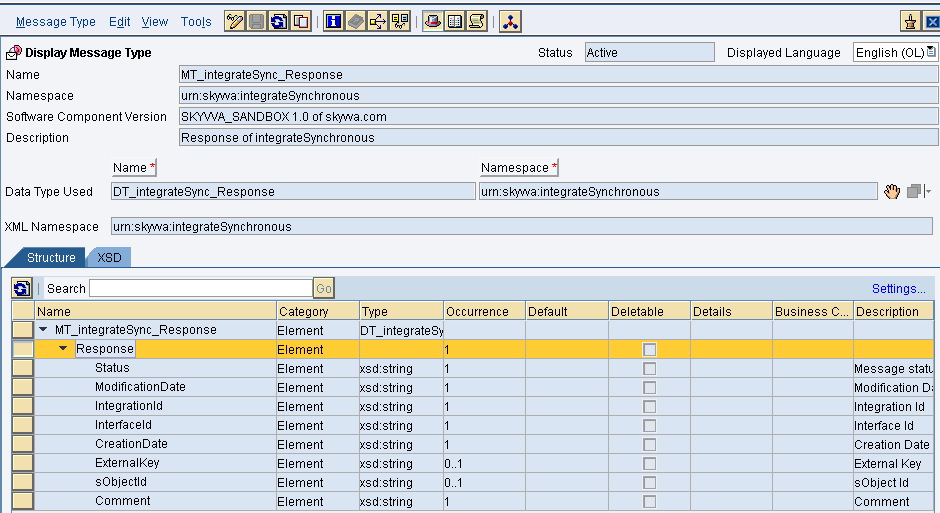
Now Save and activate the response message type.
Create Outbound and inbound service interfaces as shown below.
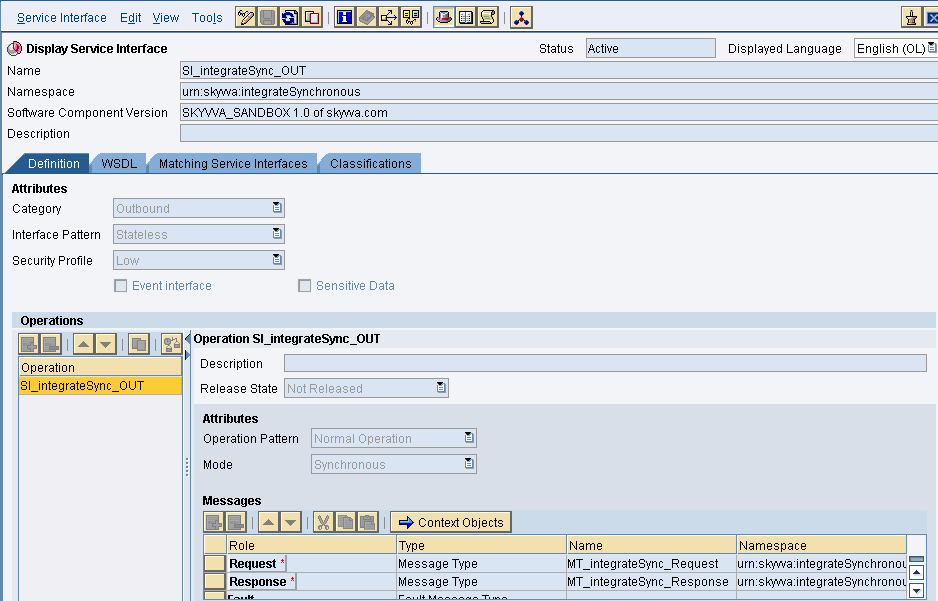
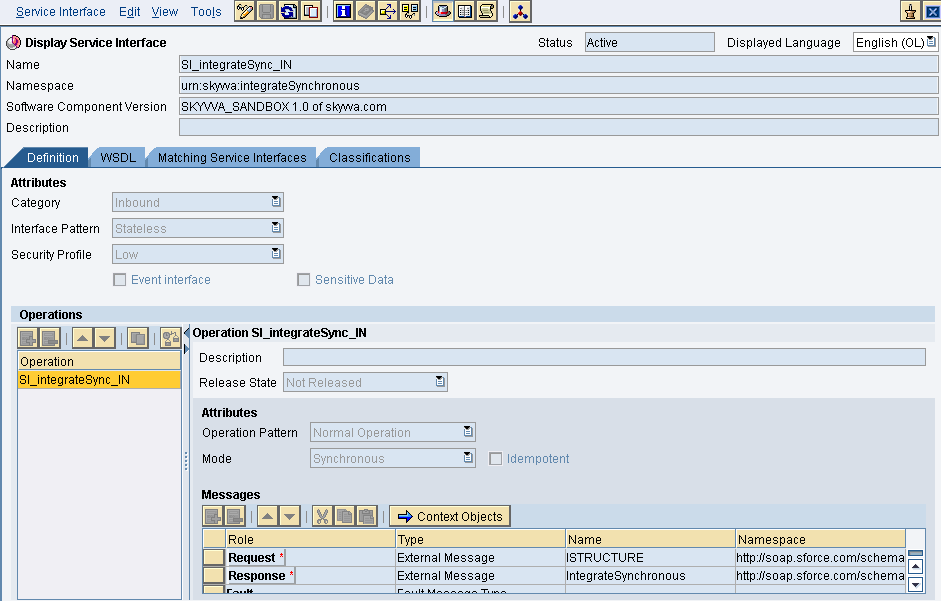
Provide the necessary details as shown and then save and activate it.
- Message mapping
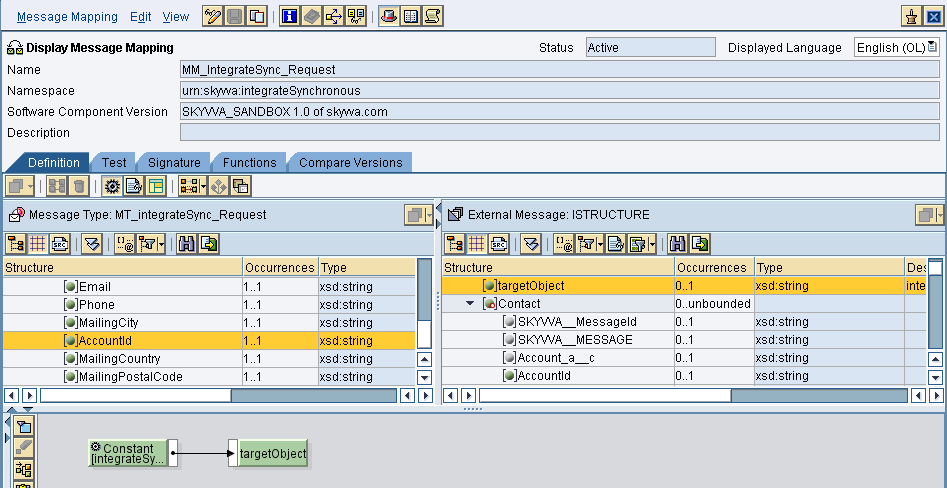
Create request and response message mapping as shown below.
Request Mapping –
Select the Source structure and target structure and complete the mapping.
Response Mapping –
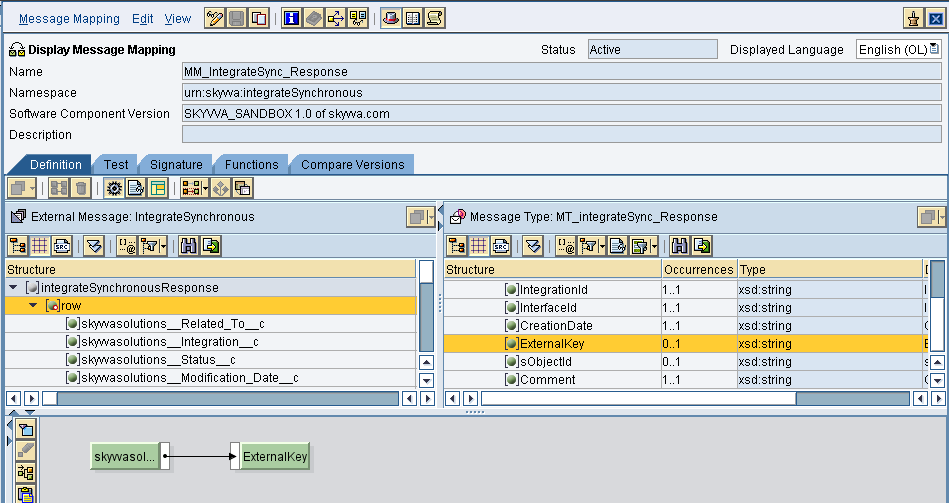
Now save and activate both the mappings
- Operation Mapping
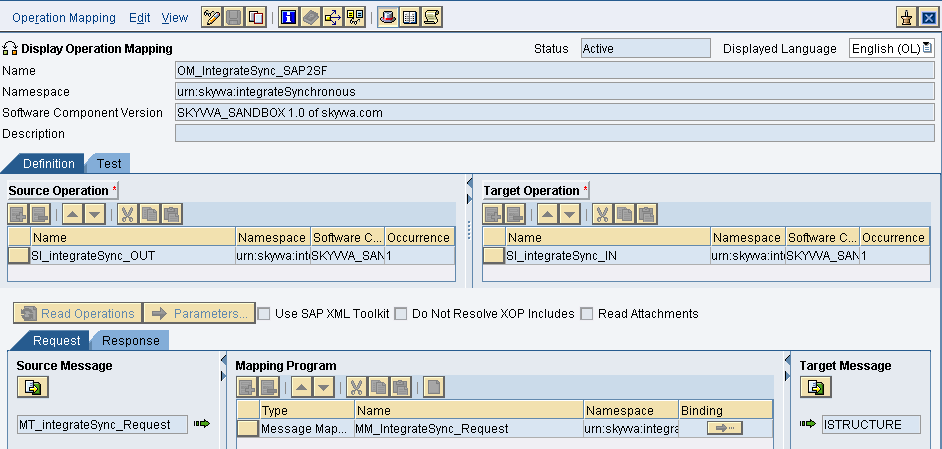
Create Operation mapping as shown below.
This is for request mapping
Response Mapping:
Here in the response mapping, we need java mapping to convert the JSON response to XML.
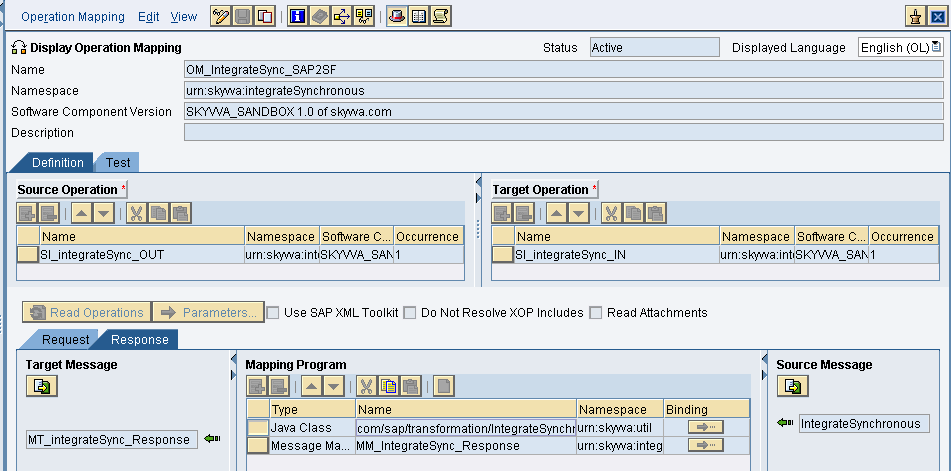
Now select the inbound and outbound service interfaces and the respective request and response mappings.
Then save and activate the operation mapping.
- Creation of Integrated Configuration Objects
After creating the objects in ESR. We have to configure these objects in the integration directory.
First, we have to create Configuration Scenario.
An Integration scenario has the following objects.
- Business System for Sender and Receiver
- Sender and Receiver Communication channel
- Integrated Configuration
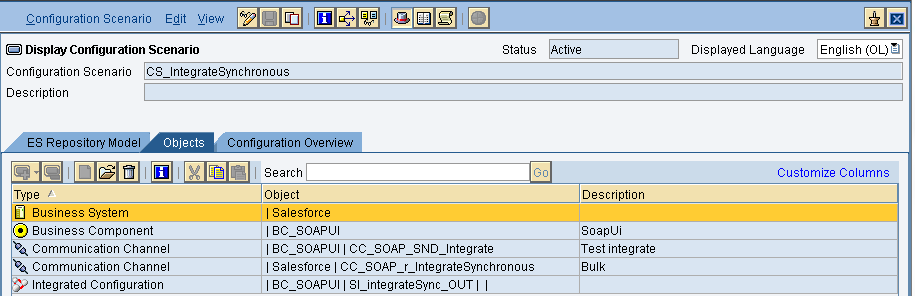
These are the objects we should create. We have to define our business system e.g. for the SAP-Backend. For Salesforce you can use our proposal “Salesforce” as the business system. We have to import these business systems from SLD.
- Configuring the Sender SOAP communication channel
Create sender communication channel as shown below.
Since we are using SOAPUI as a source. So, here we are using SOAP adapter in the sender channel.
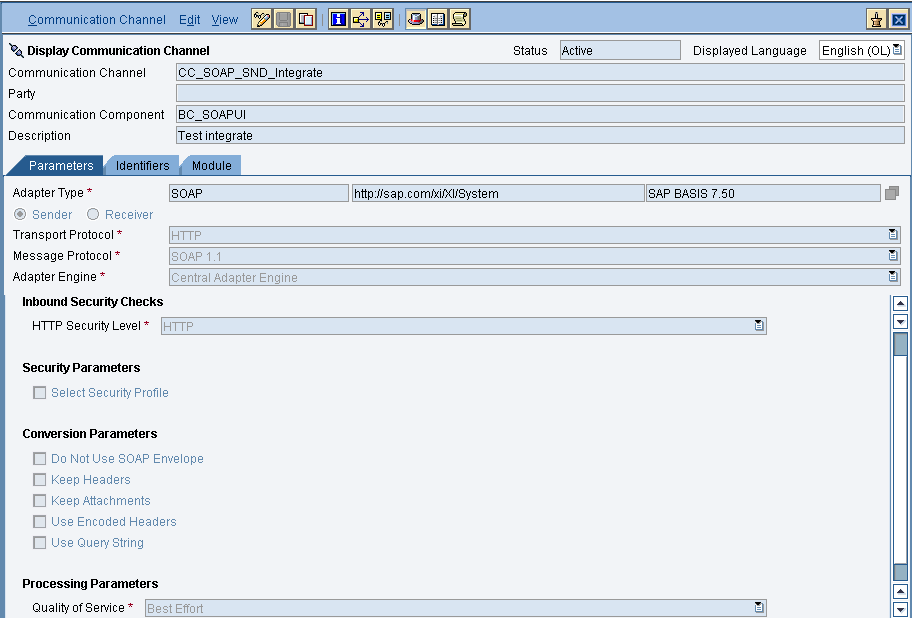
Provide the necessary details. After that save and activate the channel.
- Configuring the SOAP receiver channel
Configuration for Tab “General”
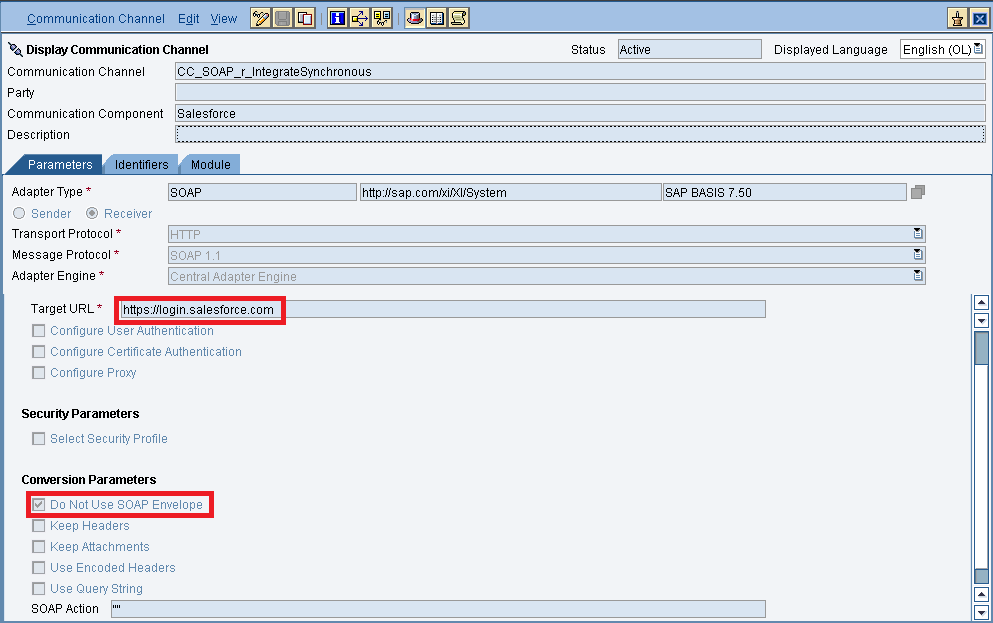
Specify the parameters as shown in the above screenshot.
Below is the configuration for the “Advanced” Tab.
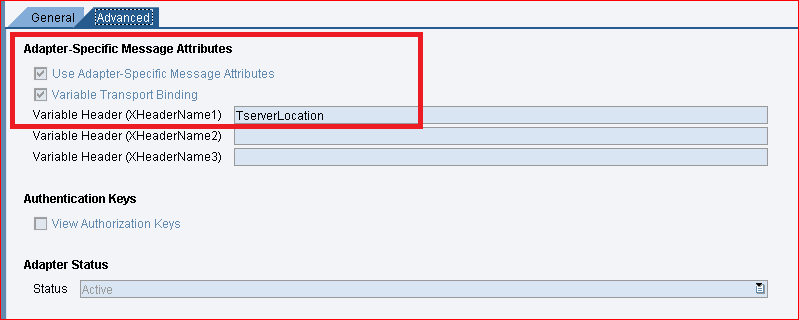
The value “TserverLocation” has to be entered for the parameter Variable Header (XHeaderName1).
Below are the settings for Tab “Module”. Here, the SKYVVA module containing the logic for session handling and transformation logic must be specified.
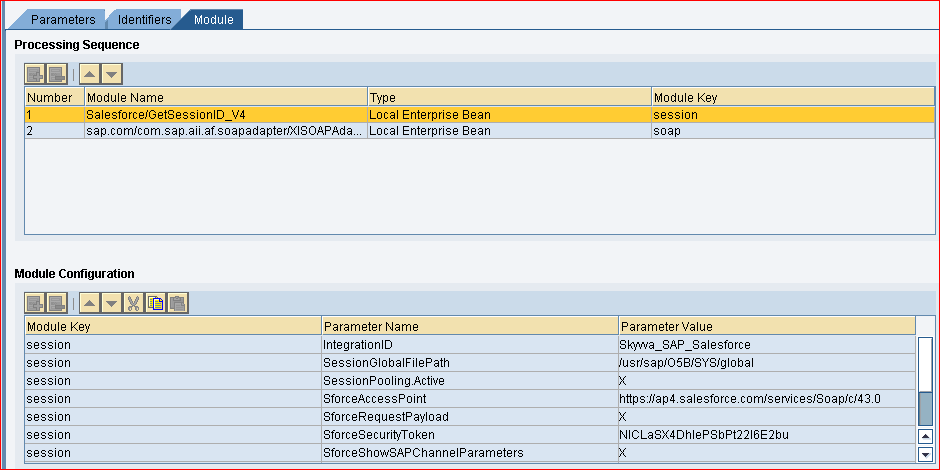

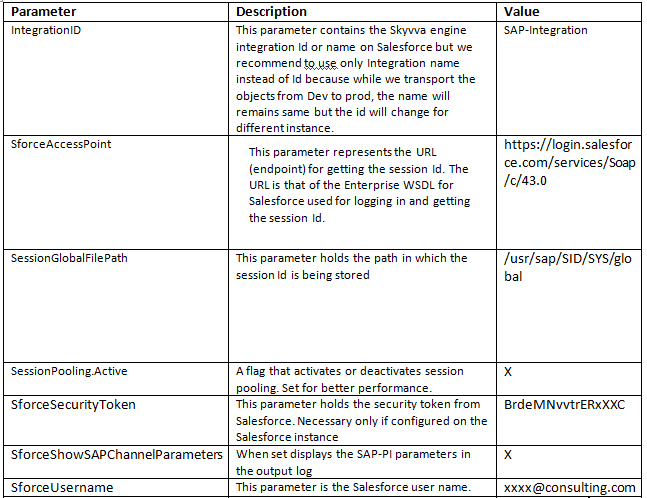
Configuration of module parameters are described in detail below
- Skyvva Module Parameters
Starting from version 2.27 Skyvva provides a single module, “Salesforce/GetSessionID_V4”, to be used with SOAP receiver channels. Module parameters are outlined below

- Integrated Configuration
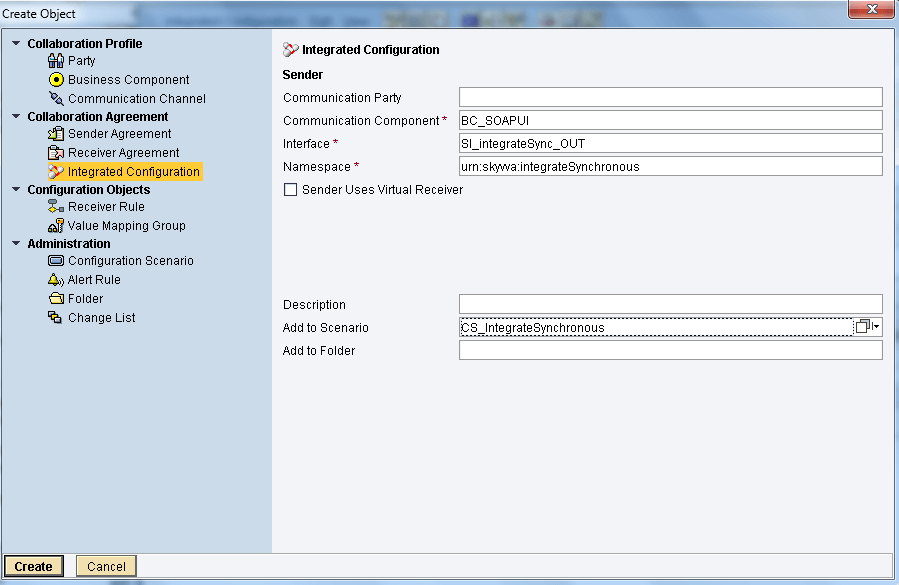
Create integrated configuration objects as shown below.
Enter the required data e.g. the Communication Component, Interface and Namespace and then click on create button to create an ICO.
Now go through the tabs from left to right to configure the relevant objects. In this first tab “Inbound Processing” here we have to specify the sender communication channel.

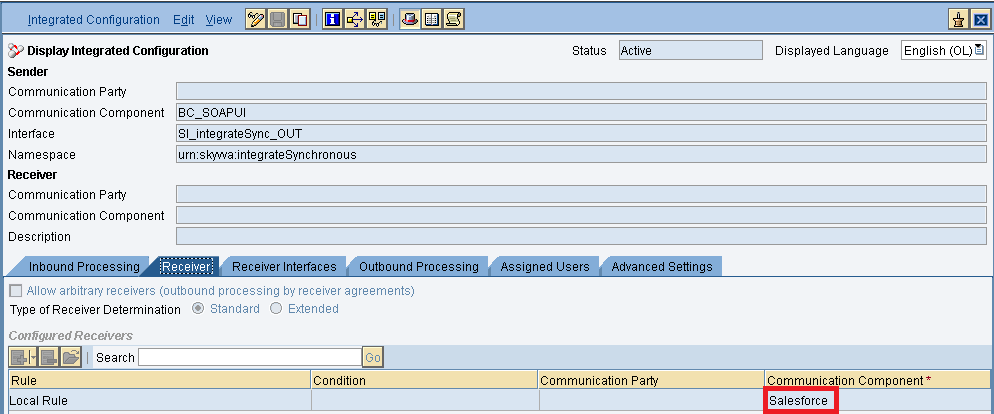
Here in the “Receiver” tab, we have to specify the receiver business system.
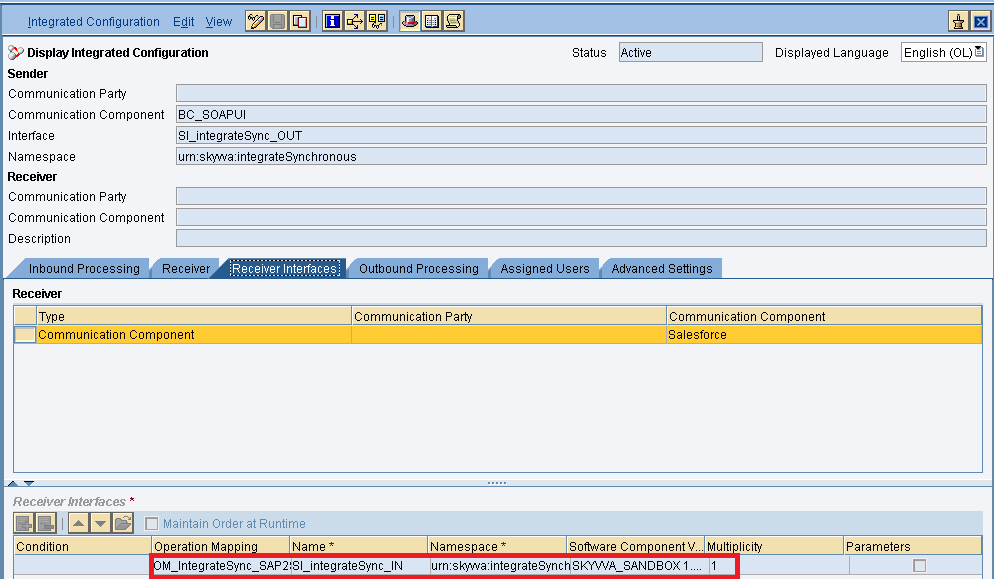
In Receiver interfaces tab specify the operation mapping.
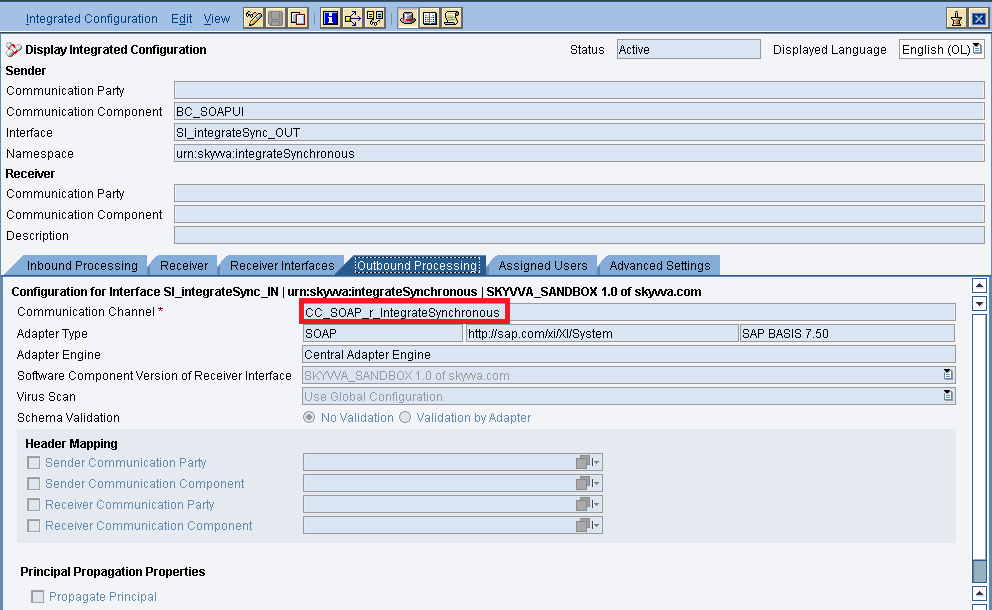
In the “outbound processing” tab, we have to specify the receiver channel.
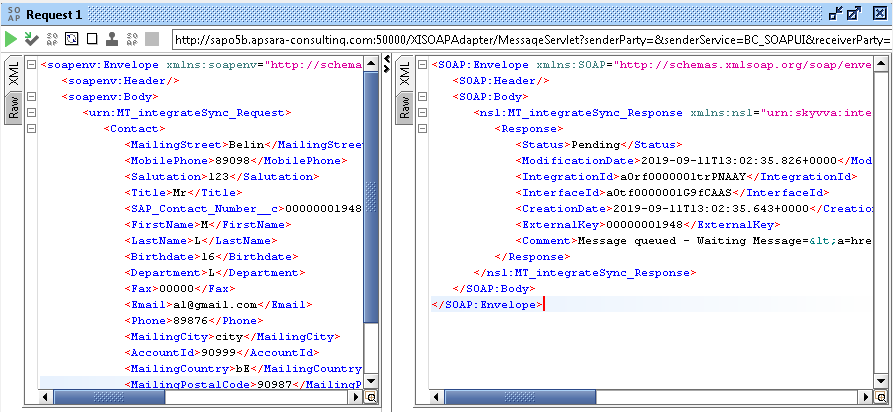
- Testing the inbound synchronous Interface.
I am sending the data from SOAPUI. We are getting the JSON Response from Salesforce. Again we are converting the JSON response to XML with Java mapping, which we have used in response mapping in SAP PO.