
Introduction to Bulk SKYVVA and SFDC Bulk Mode #
Both SKYVVA and Salesforce Bulk API’s are based on REST principles and are optimized for working with large sets of data. Use them to insert, update, upsert, or delete many records asynchronously, meaning that you submit a request and come back for the results later. Salesforce processes the request in the background. Any data operation that includes more than 2,000 records is a good candidate for Bulk mode to successfully prepare, execute, and manage an asynchronous workflow that makes use of the Bulk framework. Jobs with fewer than 2,000 records should involve “Batch mode” asynchronous calls in REST (for example, Composite) or SOAP. Using the either Skyvva Bulk or SFDC Bulk API requires basic familiarity with software development, web services, and the Salesforce user interface.
What’s the Difference Between Skyvva Bulk Mode and SFDC Bulk Mode #
Skyvva Bulk Mode’s predecessor, “SFDC Bulk mode”, is available, Skyvva Bulk mode can process hierarchical and flat data but SFDC Bulk mode process flat data only, use Skyvva Bulk mode instead of SFDC Bulk Mode if you want a more streamlined workflow. Skyvva Bulk Mode provides a simple interface to load large amounts of data into your Salesforce org and to perform bulk queries on your org data. Its design is more consistent and better integrated with other Salesforce APIs. Skyvva Bulk mode also has the advantage of future innovation.
Introduction(Skyvva):
This document describes how data can be transferred to Salesforce within your own programs. The Multi-Itab-Adapter allows you to transfer data of different RFC/BAPI or Structures (DDIC), which you have filled before in your own FM/Report, within one SKYVVA FM Call. The routing to the different Salesforce Objects is implemented with workflow in Skyvva-Integration Suite on Salesforce.
When talking about inbound interface in this document the direction SAP to Salesforce. Interface will be called from sap to Salesforce. The development of an interface involved steps to be done in salesforce. This document does not describe the work at SAP-Backend e.g. developing business logic in SAP-Backend with ABAP.
SKYVVA integrations connect Salesforce to your backend systems (SAP), whether by referencing through a call, or replicating the data into Salesforce. While SKYVVA provides a rich suite of pre-built integrations for SAP->Salesforce process integration, the SKYVVA Integration App gives you the ability to quickly and easily create your own integrations. The SAP integrations support S/4HANA in addition to SAP ECC, and we can also integrate with other systems via REST, SOAP, and OData web services.
Prerequisite:
SKYVVA Package installed at SAP Side
SKYVVA Package installed at Salesforce Side
Check the SKYVVA Service active or not in SAP using transaction SICF
To Develop Inbound Interface below steps we need to done step by step.
- Develop Function Module in SAP
- Create Integration in Salesforce
- Create Connection Destination and Adapter
- Create Metadata Provider and Create Repository
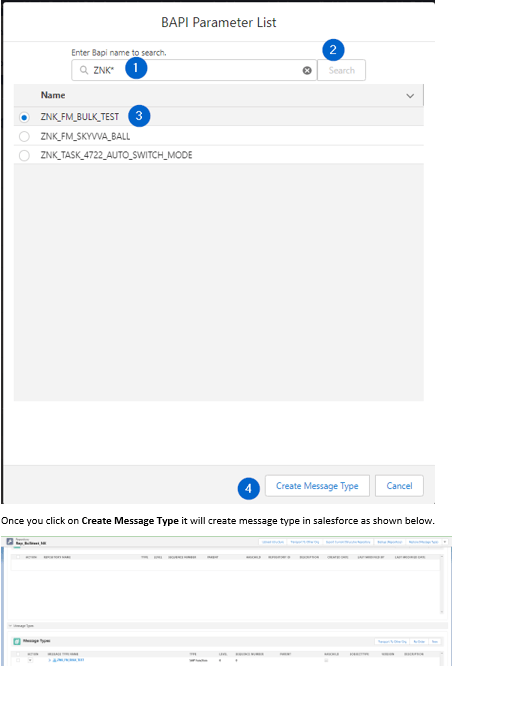
- Create the Message Type using Import SAP Metadata
- Creating Inbound Interface
- Test – Send SAP Data using FM Execute FM which is developed in the previous step)
The above steps detail explanation and screenshots to be continued.
1. Develop Function Module in SAP #
Prerequisites to develop FM
Please use repository-based typing instead of program internal types for the RFC /BAPI Definitions and structure definition (DDIC). Otherwise, we may encounter problems at runtime.
- Implement a sender module for the transfer of internal tables (ITAB)
Here the sender module is ‘ZNK_FM_BULK_TEST’. But in the below screenshot we have shown the ZNK_TEST_MULTI_ITAB.
The same we used in salesforce for metadata provider in salesforce to create message type in sales force on the interface definition of this module.
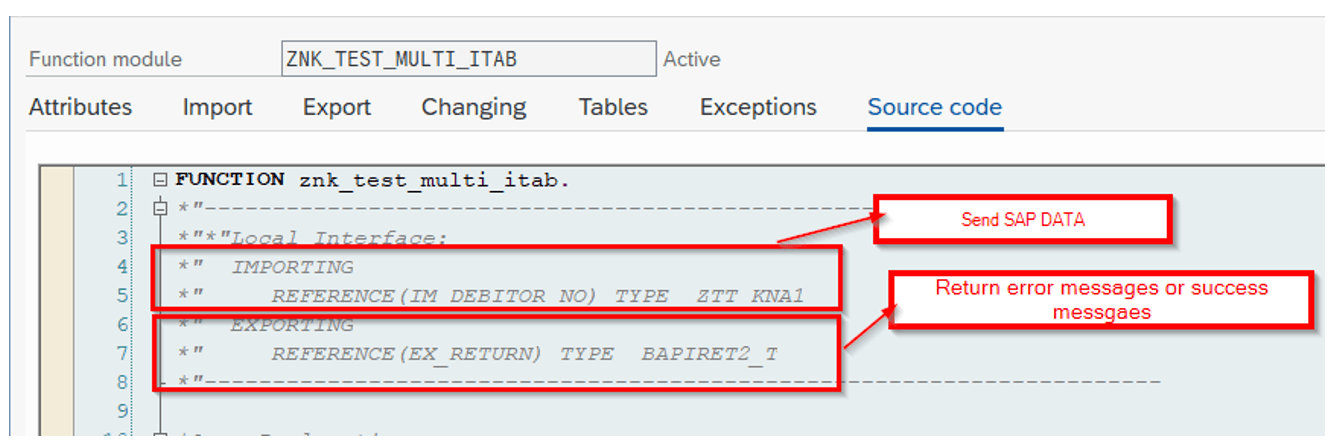
In the above FM you can see Importing and Exporting parameters
IM_DEBITOR_NO: This is the importing parameter in the above FM which will be used for the send the SAP data to Salesforce. Here in this example, we are sending General data customer master
EX_RETURN: This is the exporting parameter in the above FM which will be used for the get the response either error messages nor success messages from the Salesforce after sending the data SAP to Salesforce.
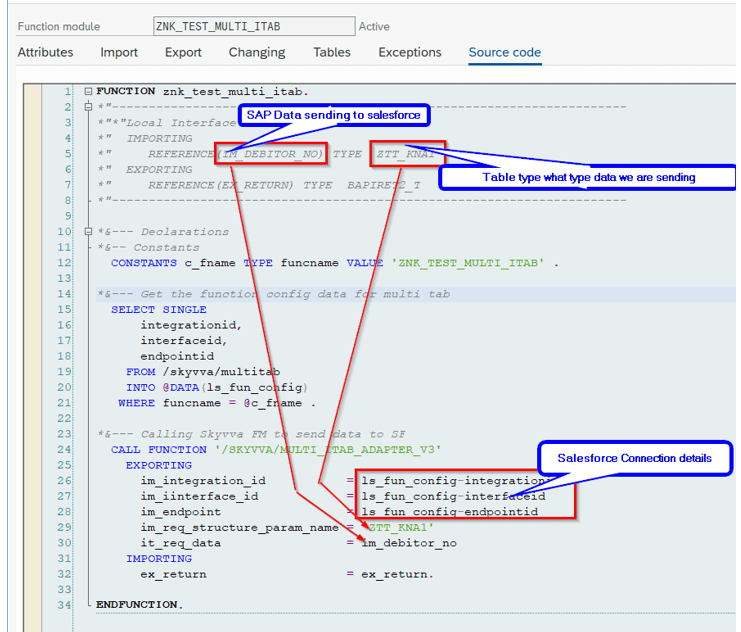
Here we have used select query for the /SKYVVA/MULTITAB with the funcname condition.
The Function name(funcname) above mentioned as ‘ZNK_FM_BULK_TEST’ you can configure in salesforce side that you can see later steps. If you can configure this salesforce the entry will be automatically store in the /SKYVVA/MULTITAB Table.
In the above example we can see an example for call SKYVVA Interface in a synchronous mode and the response.
SKYVVA Interface explanation:
Exporting Parameters of SKYVVA Interface:
IM_INTEGRATION: Passing Salesforce Integration ID(Mandatory)
IM_INTERFACE: Passing Salesforce Interface ID(Mandatory)
IM_ENDPOINT: Passing Salesforce Endpoint name is nothing but salesforce login details (Mandatory)
IM_RESP_PARAM_NAME: Passing Response Param Name is nothing but data type (Optional)
IM_REQ_PARAM_NAME: Passing Request Param Name is nothing but data type (Mandatory)
IM_REQ_DATA: Passing Request Data in the internal table format (Mandatory)
Importing Parameters of SKYVVA Interface:
EX_RETURN: Success / Errors Messages
IM_SF_RESPONSE: Salesforce response
Selecting function config data for multi-tab / FM logic explanation
Function Module Logic:
CONSTANTS c_fname TYPE funcname VALUE ‘ZNK_FM_BULK_TEST’.
*&— Get the function config data for multi tab
SELECT SINGLE
INTEGRATIONID,
INTERFACEID,
ENDPOINTID
FROM /SKYVVA/MULTITAB
INTO @DATA(LS_FUN_CONFIG)
WHERE FUNCNAME = @C_FNAME .
*&— CALLING SKYVVA FM TO SEND DATA TO SF
CALL FUNCTION ‘/SKYVVA/MULTI_ITAB_ADAPTER_V3’
EXPORTING
IM_INTEGRATION_ID = LS_FUN_CONFIG-INTEGRATIONID “Salesforce Integration ID
IM_IINTERFACE_ID = LS_FUN_CONFIG-INTERFACEID” Salesforce Interface ID
IM_ENDPOINT = LS_FUN_CONFIG-ENDPOINTID ” Salesforce Connection name
IM_REQ_STRUCTURE_PARAM_NAME = ‘ZTT_KNA1′” Request Parameter Structure
IT_REQ_DATA = IM_DEBITOR_NO ” Business Data
IMPORTING
EX_RETURN = EX_RETURN.” Salesforce response
In the above source code select query we have used for the get the function config data for multi tab from /SKYVVA/MULTITAB table.
SKYVVA Interface is /SKYVVA/MULTI_ITAB_ADAPTER_V3.
Note: The importing or exporting structure must be defined in salesforce as a Message Type
In the above example SKYVVA Interface we are not passing the response parameter ‘IM_REQ_PARAM_NAME’ (Importing Parameter) and ‘IM_SF_RESPONSE’ (Exporting Parameter) in an Asynchronous mode.
2.Creating Integration in Salesforce
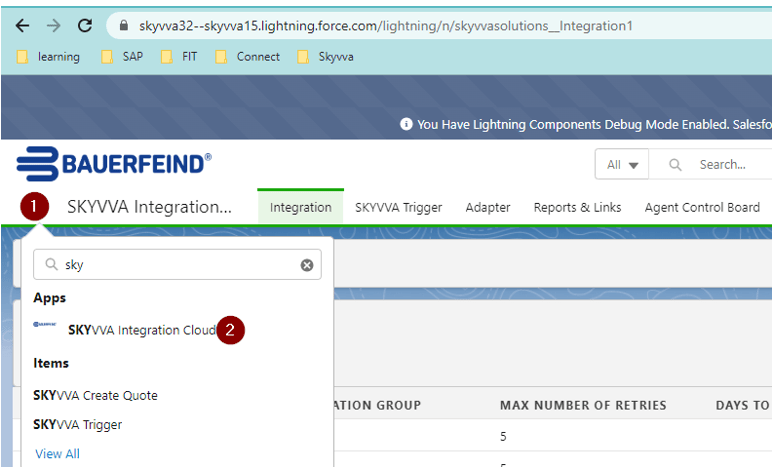
Login to the test.salesforce.com with your credentials.
Go to the and type SKYVVA in search and choose SKYVVA Integration Cloud
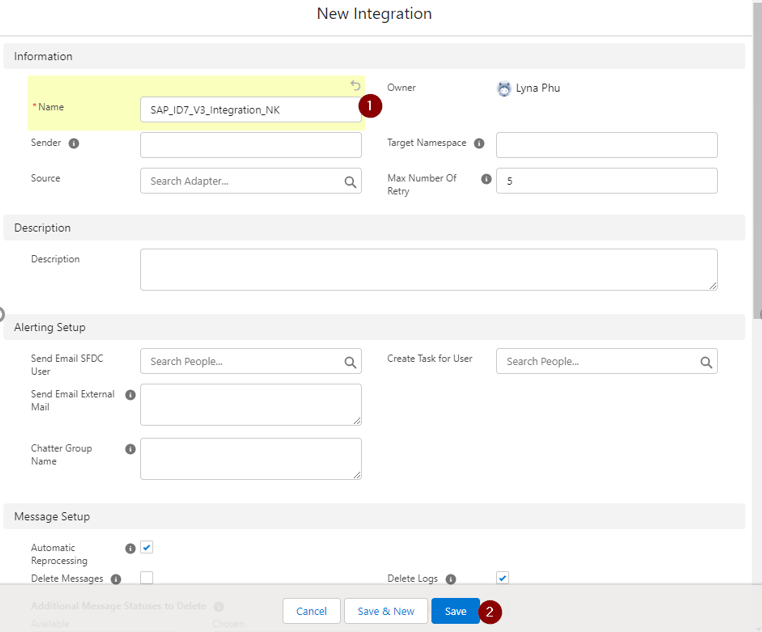
It’s Navigate to the Integration tab. Here you can click on the new and give the Integration name as shown in the below screenshot or Search for existing Integration.
Then you can see the newly created integration in the separate tab as shown below.
 3.Create Connection Destination and Adapter
Create Connection Destination:
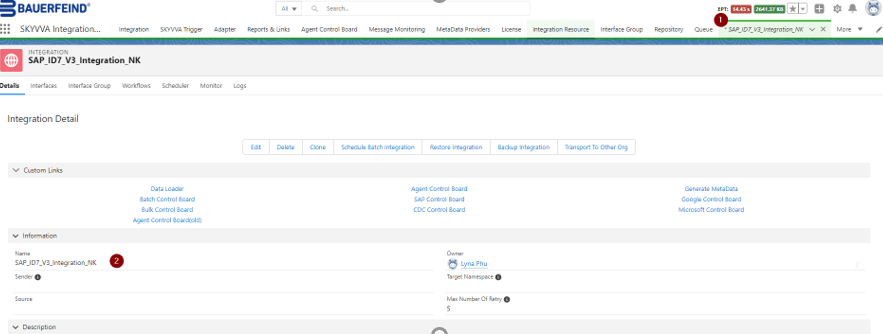
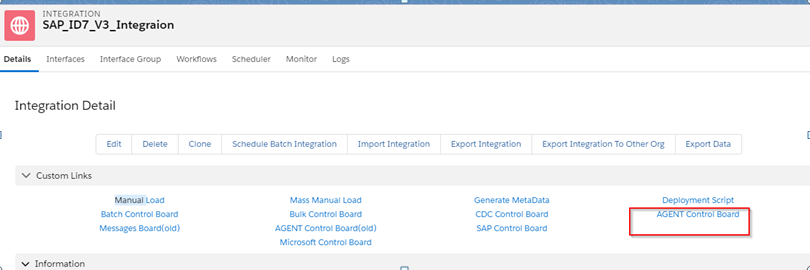
In the above step you can see the Integration tab in the details section you can find the custom links choose ‘Agent Control Board’ as shown below screenshot.
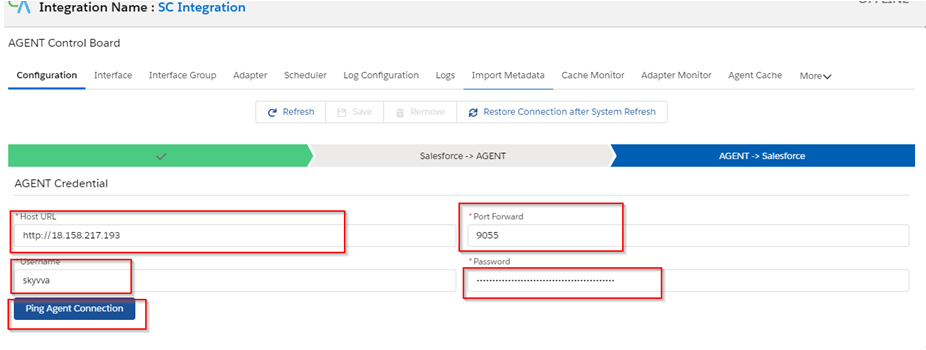
You can open below screen and you are in the Configuration Tab. Provide all the necessary details and click on continue as shown below screenshot.
Destination – New (As you are creating new destination)
Type – Agent SAP ERP (Here you can choose SAP ERP as we are checking with the SAP ERP System – Mandatory Field)
Logical System: Given SAP Logical System name (Mandatory Field)
Name – Give any name (Mandatory Field)
Description – Give any details description of your connection (Optional Field)
SKYVVA App Version – SKYVVA Version you can provide (Optional Field)
After clicking the continue button now you will navigate to the Salesforce -> SAP S/4 HANA Tab section. Here you will provide the all the necessary details to connect with the SAP S/4 HANA System.
In this screen you are giving SAP credentials
Host URL: SAP ERP system server URL (Mandatory Field)
SAP URL for Ex: https://demo.app.cnsint.de
Port Forward: Above server port number (Mandatory Field)
SAP URL port for Ex: 443
Username: SAP ERP System username of yours (Mandatory Field)
SAP Username for Ex: *****(Sensitive Information)
Password: SAP ERP System password of yours (Mandatory Field)
SAP Password for Ex: ******(Sensitive Information)
Client: What is the client we are using in SAP S/4 HANA System (Mandatory Field)
SAP Client for Ex: *** (Sensitive Information)
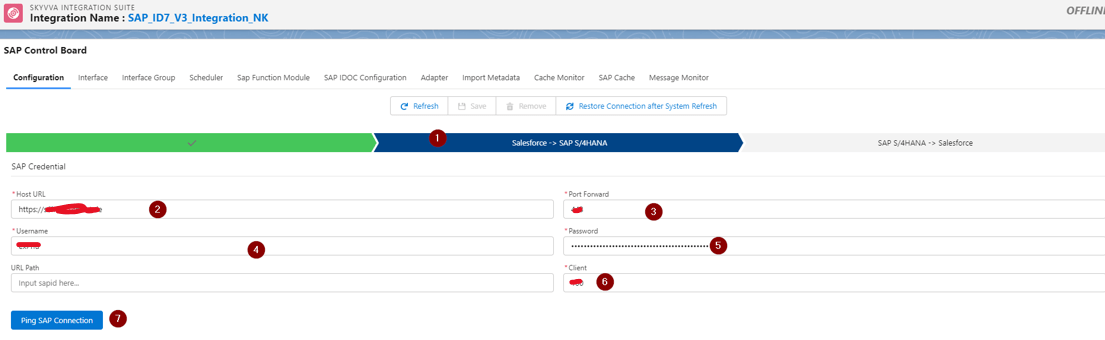
Then Click on Ping SAP Connection it will navigate to the next tab which is SAP S/4HANA->Salesforce if it is everything you mentioned correct details and also you can see success message popup on the screen.

After seeing above pop up you are navigated below screen, here you will provide the all the necessary details to connect with the Salesforce System from SAP.
Username: Salesforce username of yours (Mandatory Field)
Password: Salesforce password of yours (Mandatory Field)
Service Environment: Choose your environment (Mandatory Field)
Consumer Key:
Consumer secret:

Then click on Ping Salesforce Connection. if it is everything you mentioned correct details you can see success message popup on the screen.

After this you can save the connection.
Create Adapter:
To create an adapter, click on adapter tab in the same integration click on new button follow the below screen shot numbering
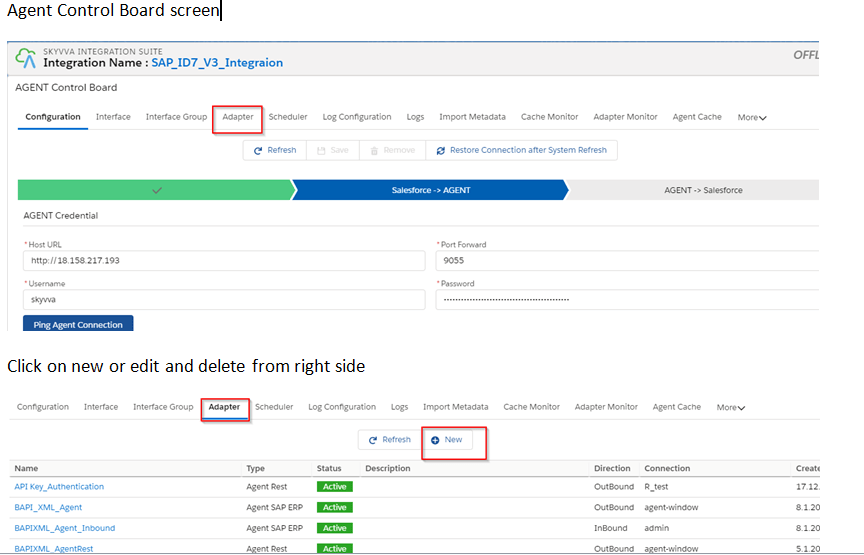
If you are navigating from beginning/home screen, go to integration tab, choose your integration which is created earlier and then click on integration and choose SAP Control Board on the Custom links sections then it will open previous steps screen there you can choose Adapter tab and click on new button follow the screens below.


Then you can see following screen for the create a new adapter.
Name: You can give any name for the Adapter (Mandatory Field)
Type: Choose SAP ERP as we are checking with the SAP ERP System (Mandatory)
Direction: Choose Inbound as we are checking Inbound Interface from SAP to SF (Mandatory)
Status: Choose an Active (Mandatory)
Integration Protocol: BAPI (Mandatory)
Connection Destination: Choose Destination connection which created earlier steps (Mandatory)
Note: In the below screen Description and Salesforce Id Handling are Optional parameters so if you wish to give any data you can give.
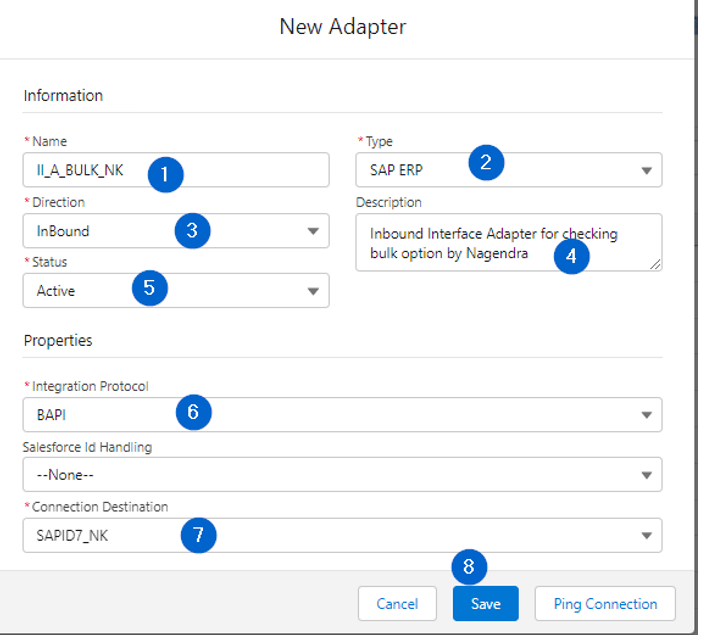
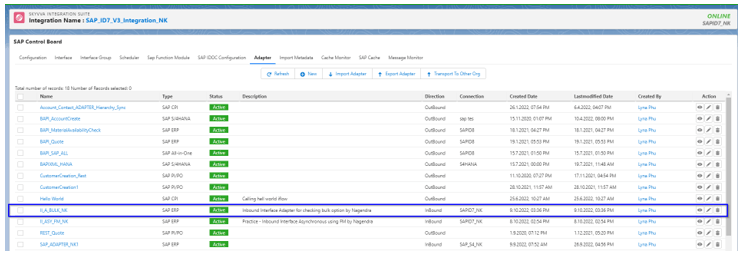
After giving the all the necessary details you can click on the Ping Connection If you get success message pop up you can click on save. Now Adapter gets created and you can see it in the list.
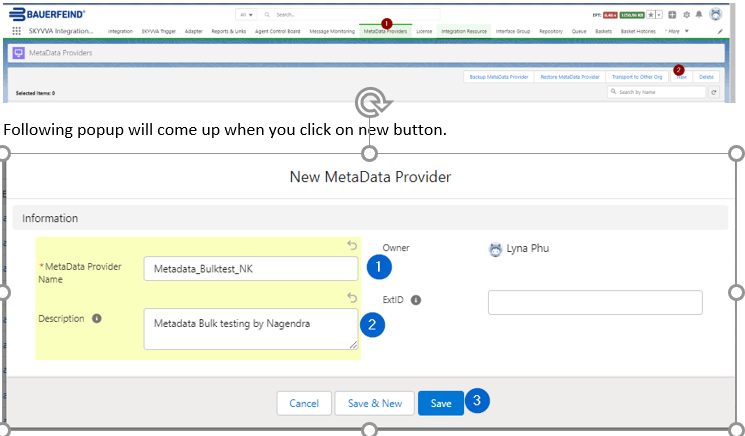
4.Create Metadata Provider and Repository.
To create a metadata provider, click on the metadata provider then click on new button as shown below screen.
Metadata Provider Name: Provider the any name (Mandatory)
Ex: METADATA_Bulktest_NK
Description: You can give any meaning full description for the name.
Then click on save.
You can see newly created Metadata provider in the list or directly it’s opened the below screen.
Click on the Metadata Provider above selected one. You can see below screen. Here you can create a repository. To create a repository, click on new button as shown in the below screen.
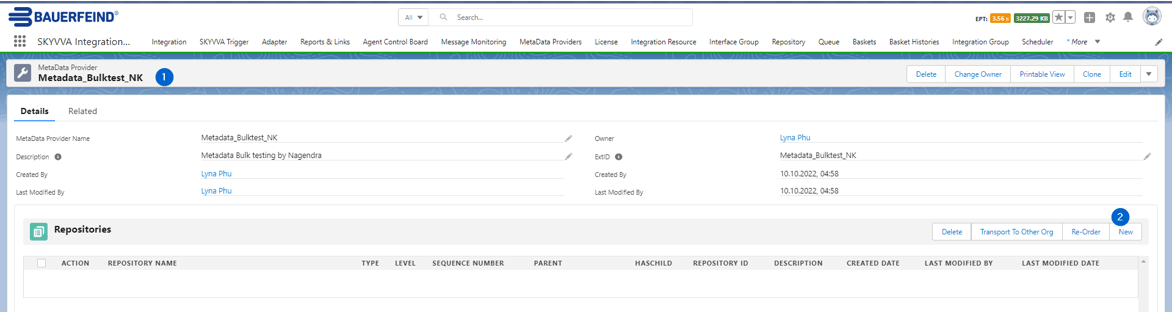
After the click on new button below screen will appear provide the necessary details and click on save.
Repository Name: You can give any name (Mandatory)
Type: You can choose IDOC (Optional)
Metadata Provider: This will come automatically from the previous step (Mandatory)
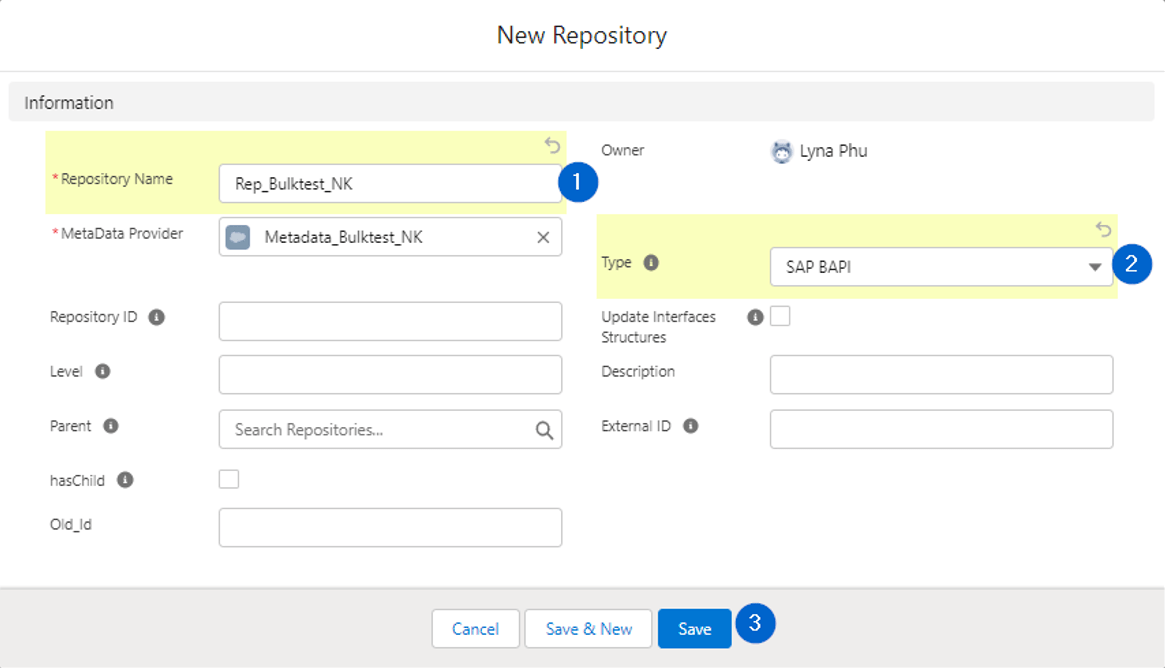
After click on save below screen will appear, then click on the Import SAP Metadata
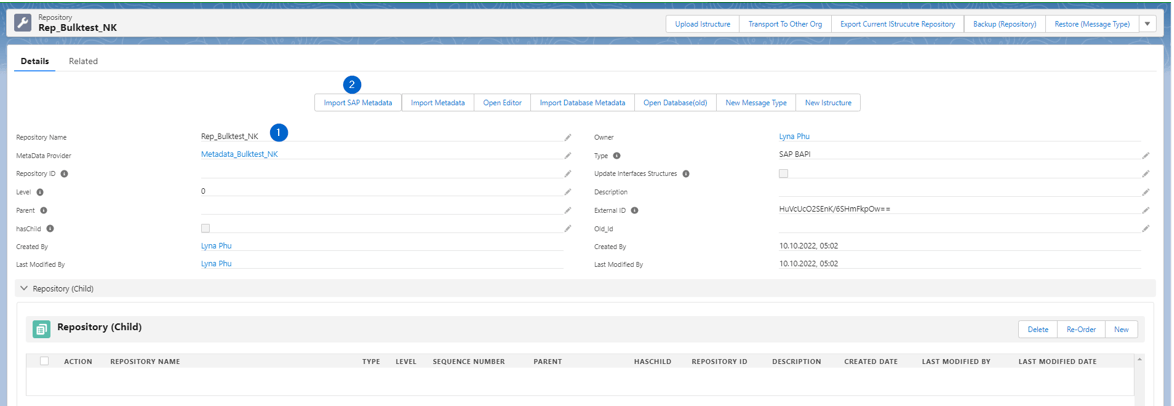
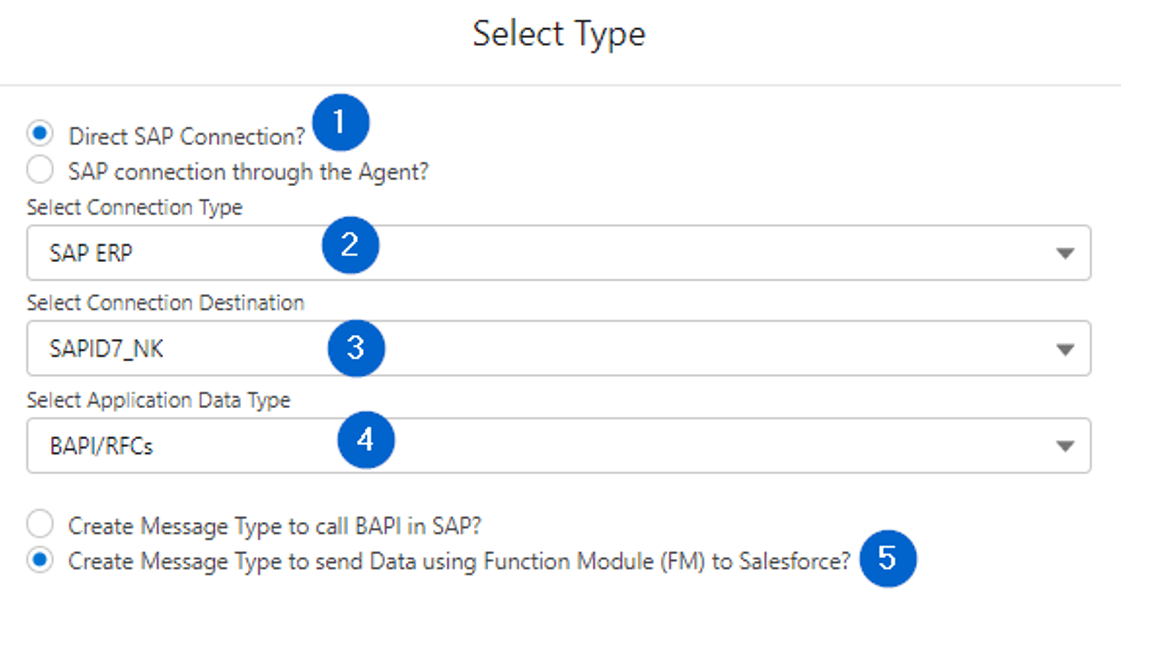
Select the below details from list as per your requirement then click on retrieve button as shown below.
It will display all the object from sap which you have selected above, now you can search you object name here as shown below
5.Create the Message Type using Import SAP Metadata
Select your object name from list and click on create message type.
6. Creating Inbound Interface:
To create new Interface, go to your integration and navigate to Interface tab and click on new Interface as shown in the below screenshot.

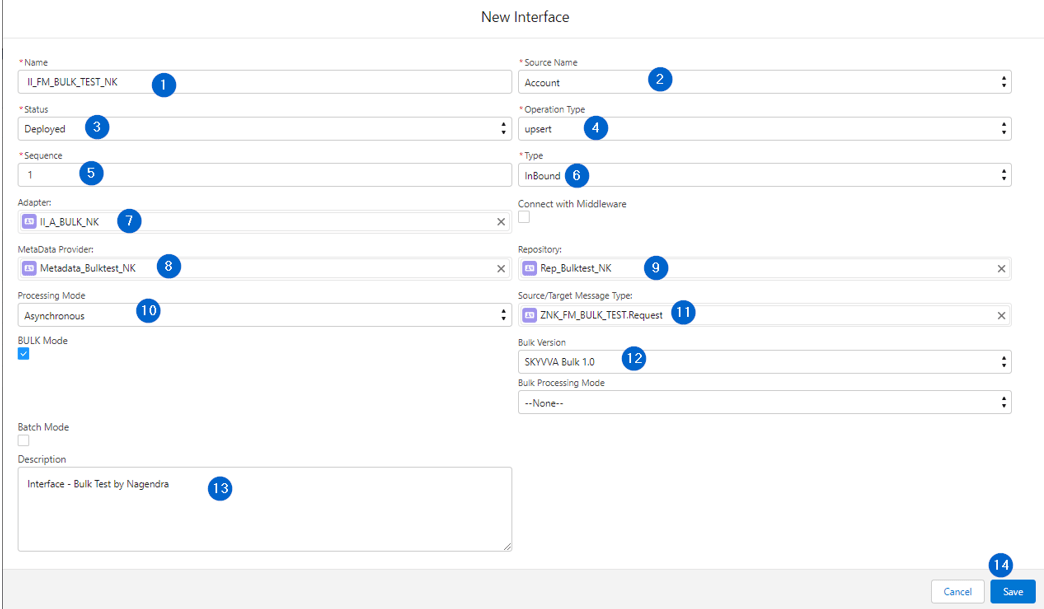
After click on new interface, you can see below screen popup. Give the all-necessary details and click on save.
Name: You can give any name (Mandatory)
Source name: You can choose available options I have choose Account (Where you want to see your SAP data here in salesforce – Mandatory)
Status: Deployed (Mandatory)
Operation Type: upsert (Mandatory)
Sequence: 2 automatically populated
Type: Choose Inbound as we are doing inbound interface (Mandatory)
Adapter: You can give which created earlier steps
Repository: You can choose which created earlier steps
Processing Mode: Choose Asynchronous
Source/Target Message Type: Choose your message type request
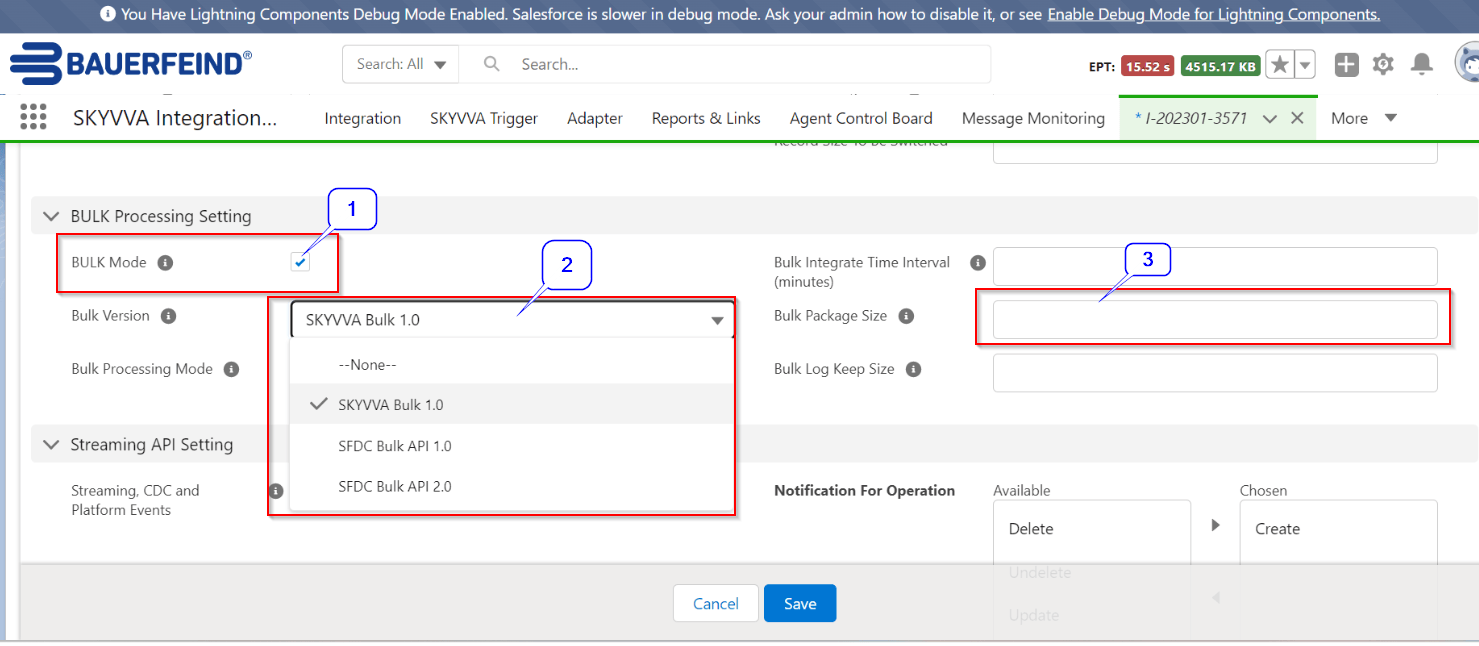
Enable Bulk Mode in interface
Skyvva Bulk Mode OR SFDC Bulk mode is available in interface. User can select Skyvva Bulk 1.0 for Skyvva Bulk Mode OR SFDC Bulk 2.0 for SFDC Bulk as below screen
Save the interface once provide all the necessary details. Now again open the interface and assign inbound adapter if you not did in the previous step.
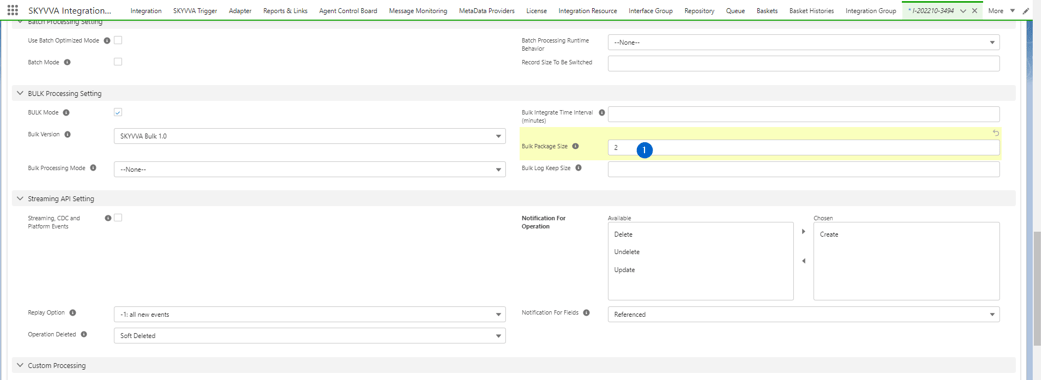
For the Bulk scenario you can test with the size. How many records you are going to send in a Bulk Package size.
In below I am mentioning the pack size is 2.
For inbound interface we have to do mapping, click on open mapping in interface and do mapping as shown below
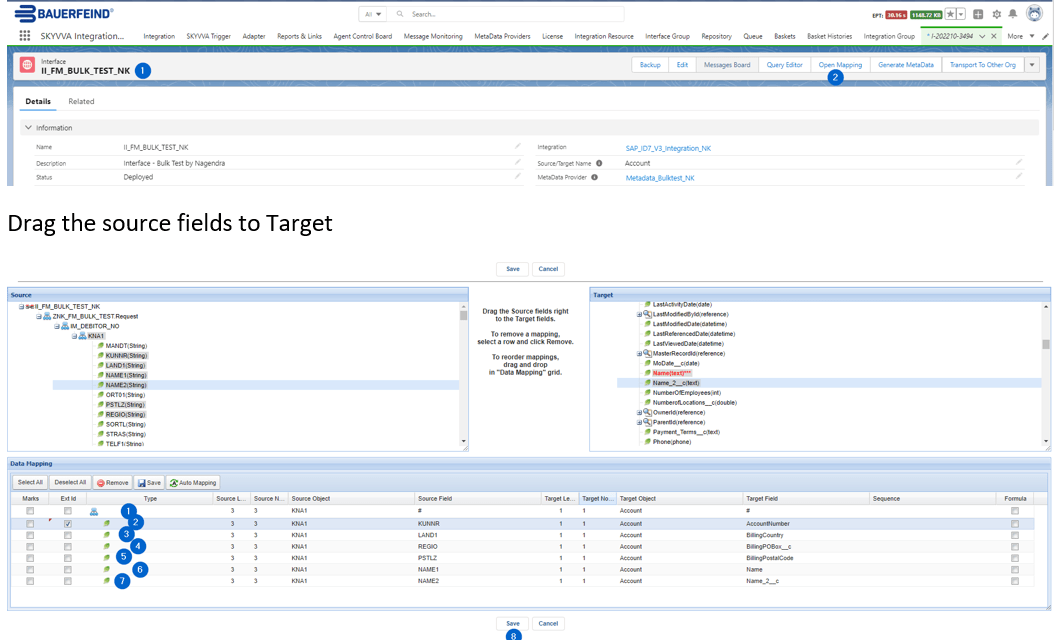
Drag the source fields to Target
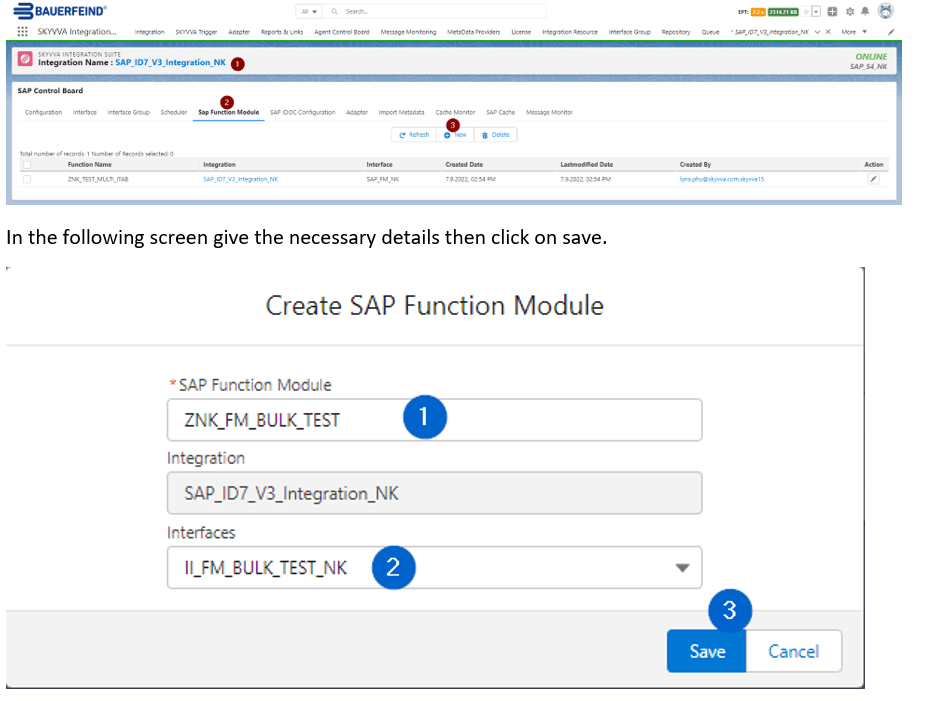
7.SAP Function Module Configure in Salesforce:
Configure SAP newly created FM in the salesforce in the below given path.
Integration -> SAP Function Module -> Click on new
Test:
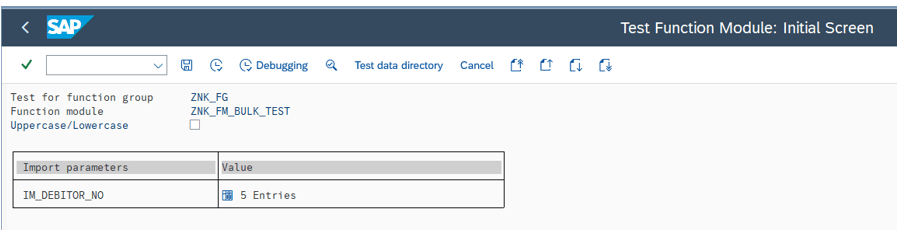
Get the General Customer Master Data from SE11(KNA1 Table)
For this test I am passing few Customers to Salesforce from the above table.
Go to se37 give the FM which we created earlier and click on execute or hit F8.
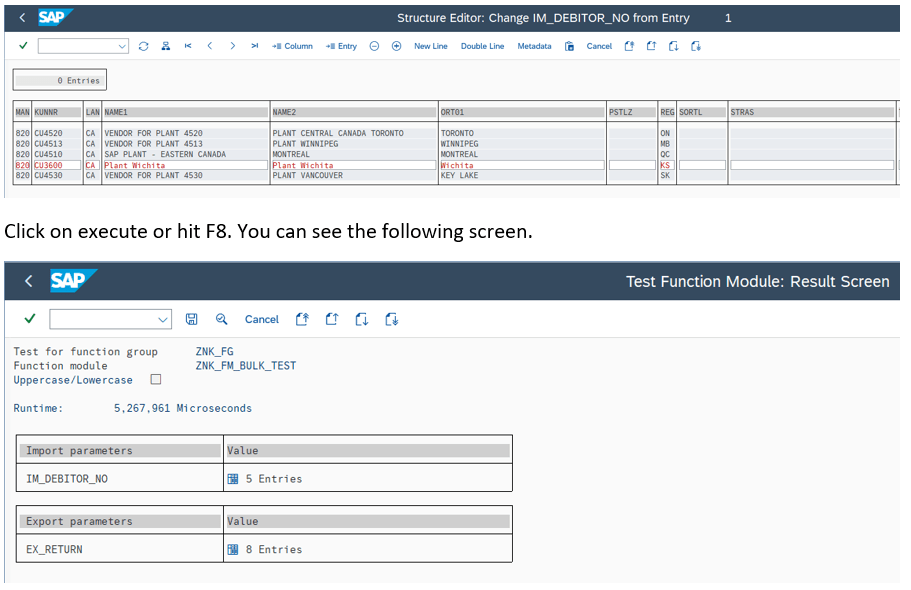
Click on execute or hit F8. You can see the following screen.
Click on EX_RETURN Table to see the response from Salesforce.
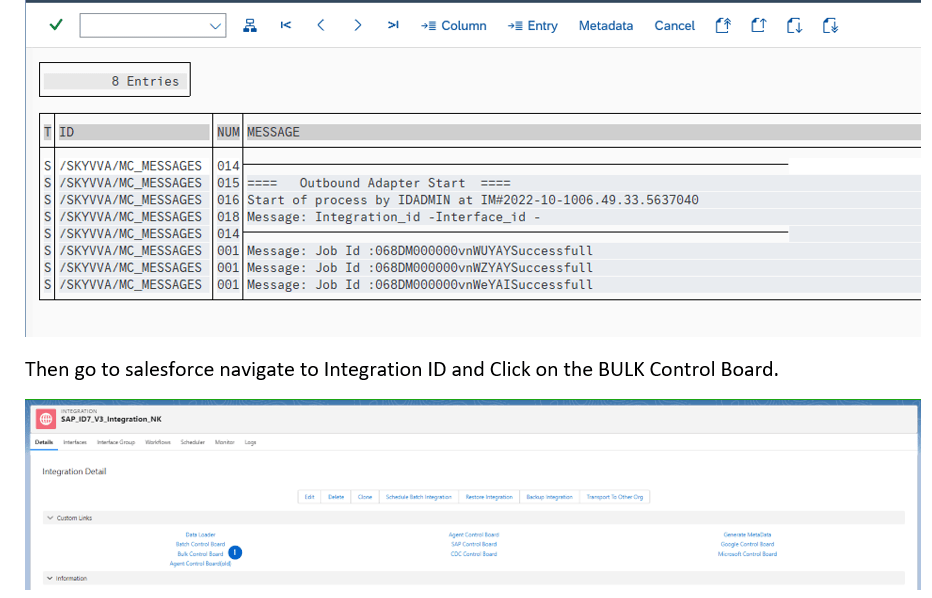
You can choose your interface and then click on search you will get below screen.
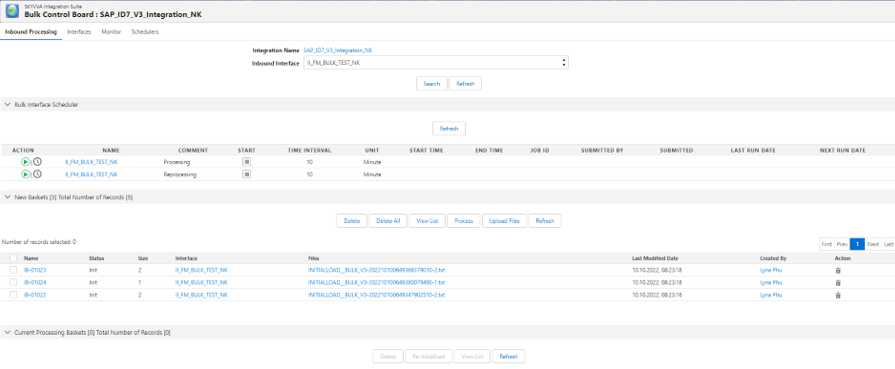
In the above screen we can see 3 Baskets (5 records) as we mentioned pack size as 2.
These baskets we can process in different ways.
One is Manual and another one is using scheduler
Manual:
Select basket and click on process as shown in the below screen.
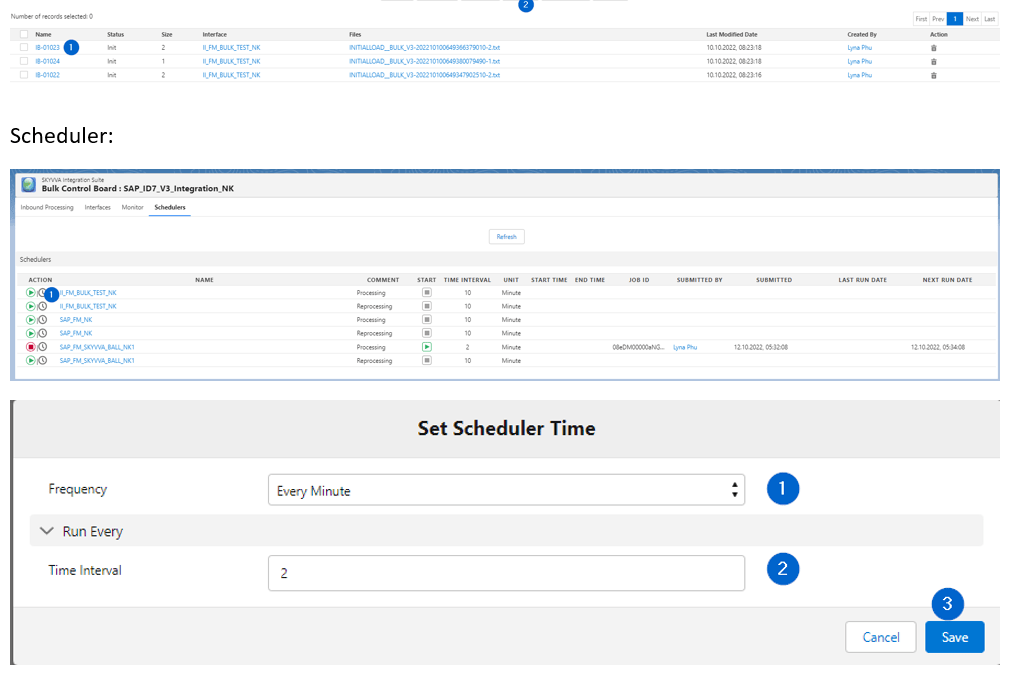
Click on setup as shown in the below screen
In the search bar you can give name as Jobs click on apex jobs and you can see the queue.
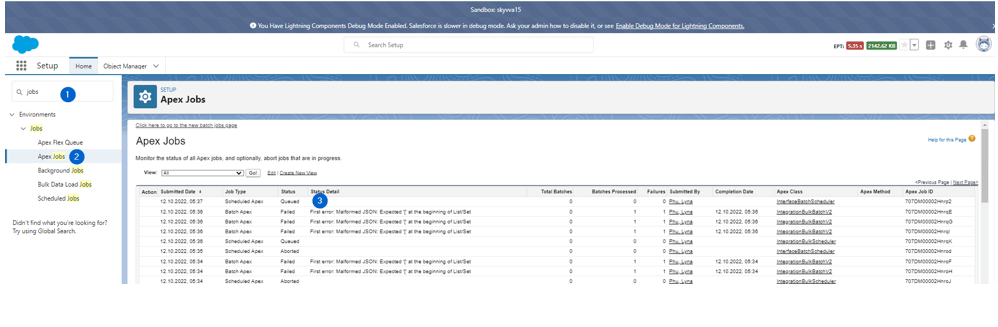
Wait till the job get success.
After that you can go to monitor screen and see the messages.


