
Learning Objectives:-
This unit describes:-
- How to develop an Outbound interface for an Outbound JMS Adapter?
Introduction: #
In this tutorial, we will learn How to develop an Inbound interface for an Outbound JMS Adapter. This functionality is available from v2.47 onwards. In simple words, SKYVVA JMS Adapter, users can easily push data to a topic or queue and perform operations on a schedule or process urgent messages immediately. You can apply priority processing to specific records in queues and topics. Consume data means Outbound JMS Adapter. We need an Outbound JMS Adapter when we want data out to salesforce.
So now we are going to check the use cases for the Outbound JMS Adapter i.e, for Consumer. To configure, firstly we need to learn and follow some steps:
How to configure New Agent Control Board?
To configure a new agent control board follow the given steps:
Step1: Create Integration. => Go custom Link => Clickon agent control board.
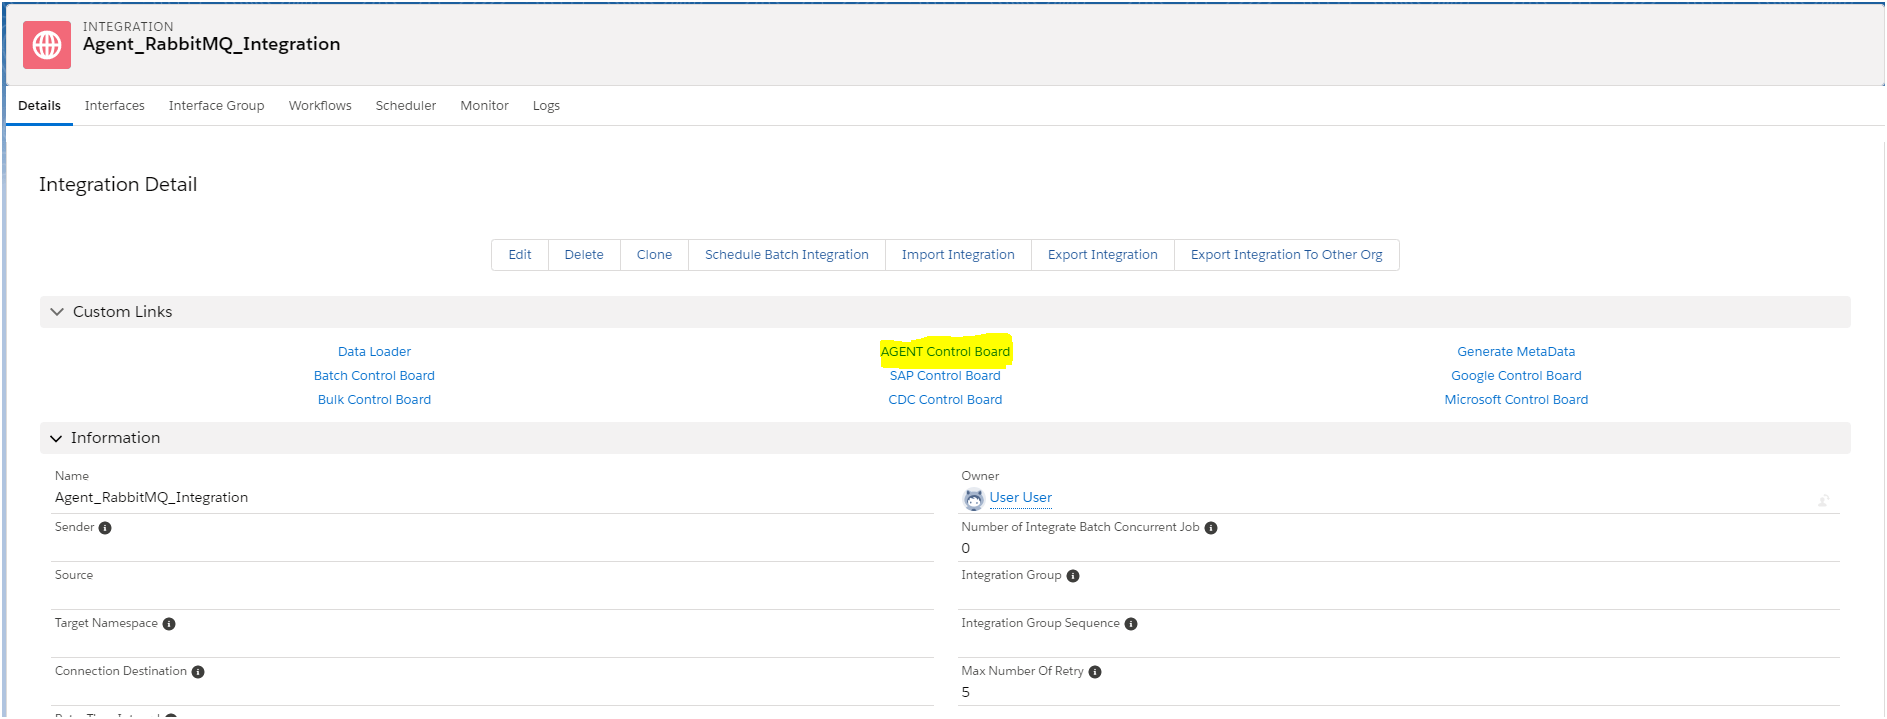
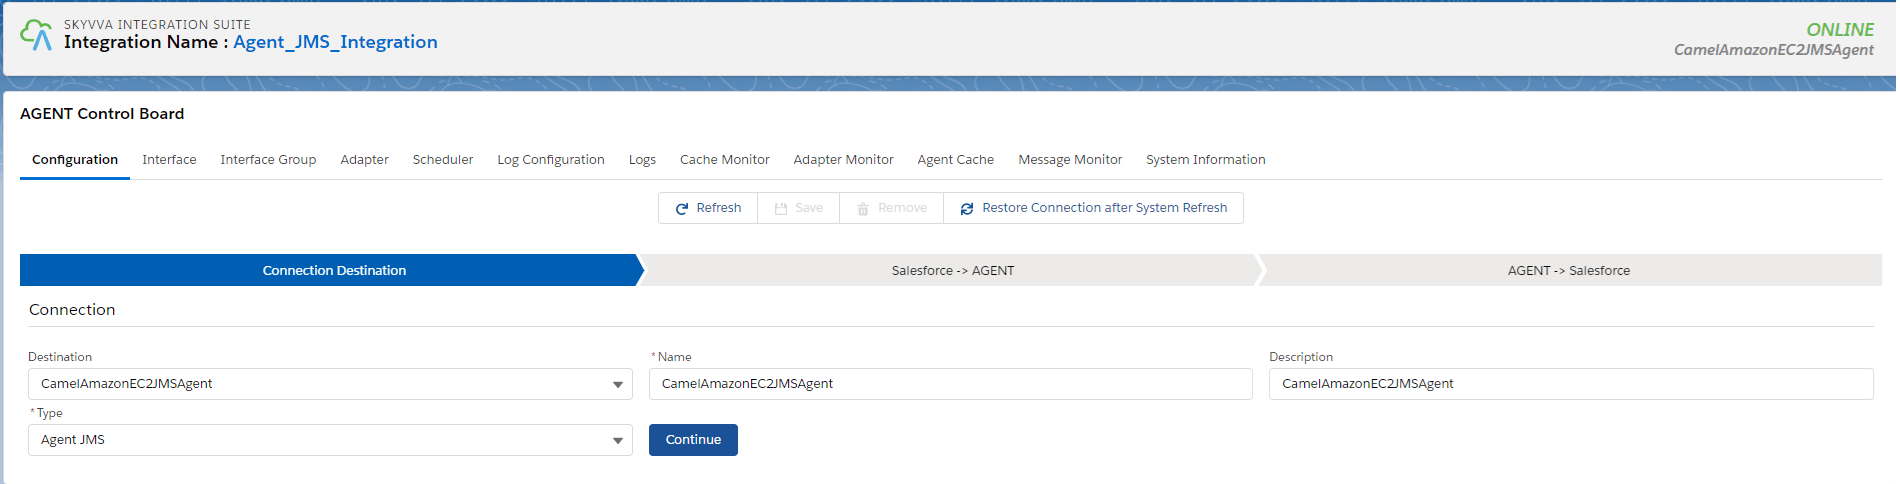
Step2: The custom link (Agent control board) Navigate to the Dashboard of the new agent control board.
- Create your own ” Connection destination file or you can select the existing one”. Then click on the Ping connection button. Make sure the server is running.
- Select type “Agent JMS” Adapter.
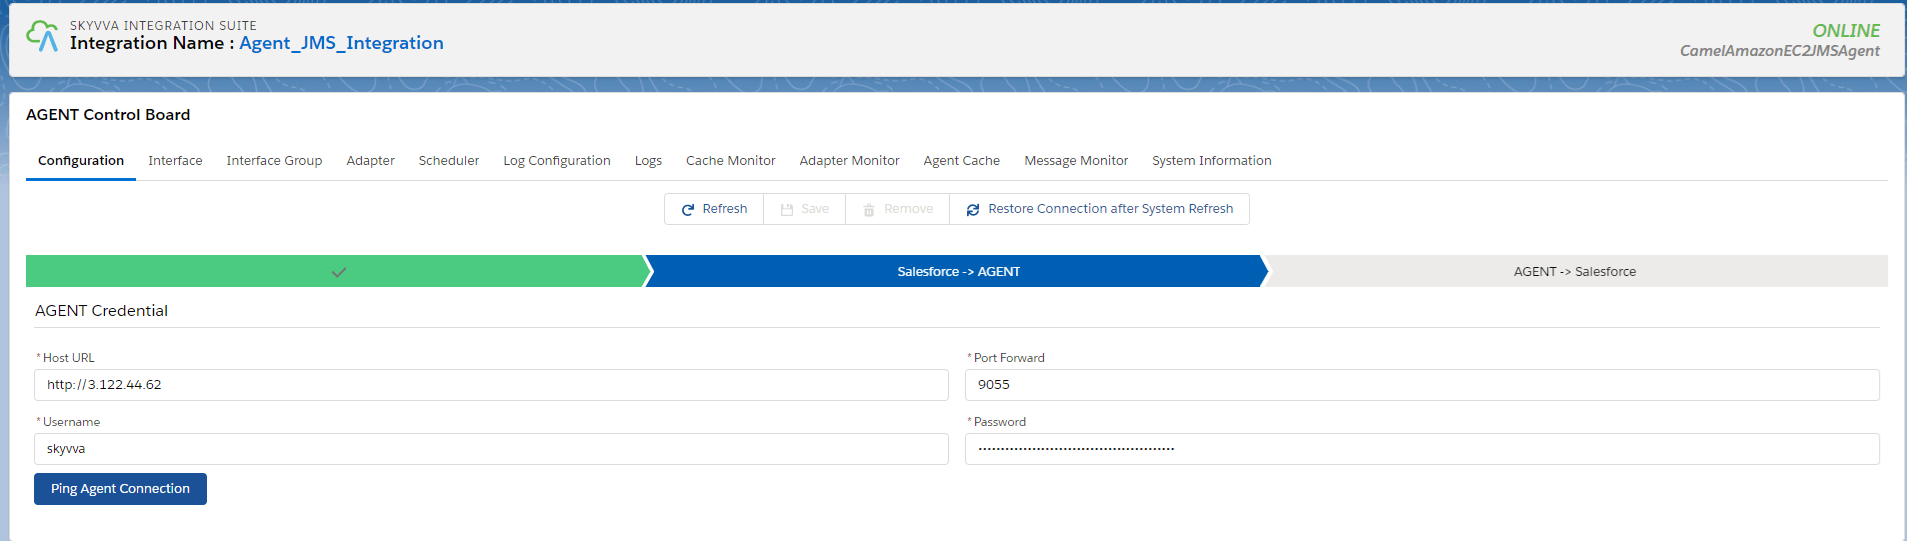
Step3: Fill in all the fields of the agent credential and click on the Ping Agent Connection button.
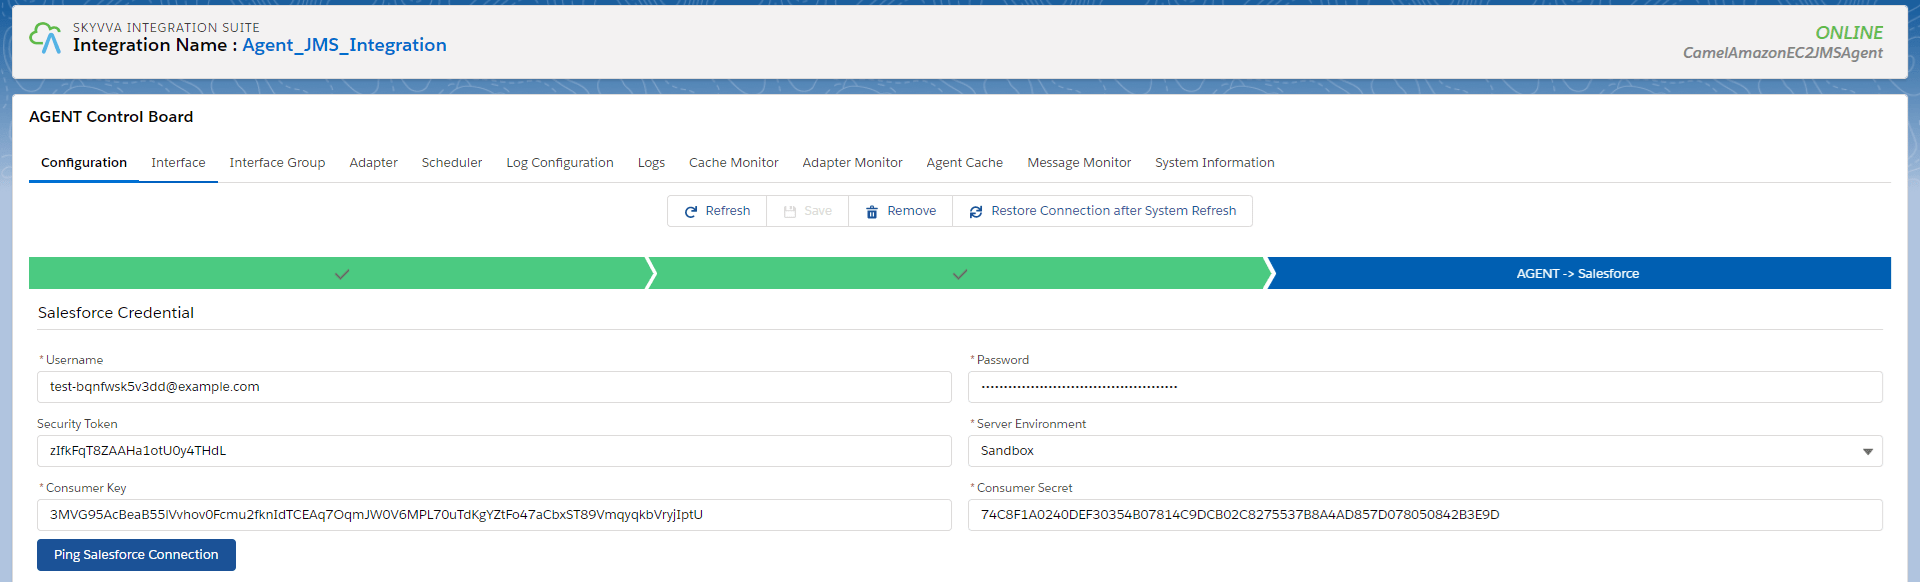
Step4: Fill in all the fields of the Salesforce credential and click on the Ping Salesforce Connection button.
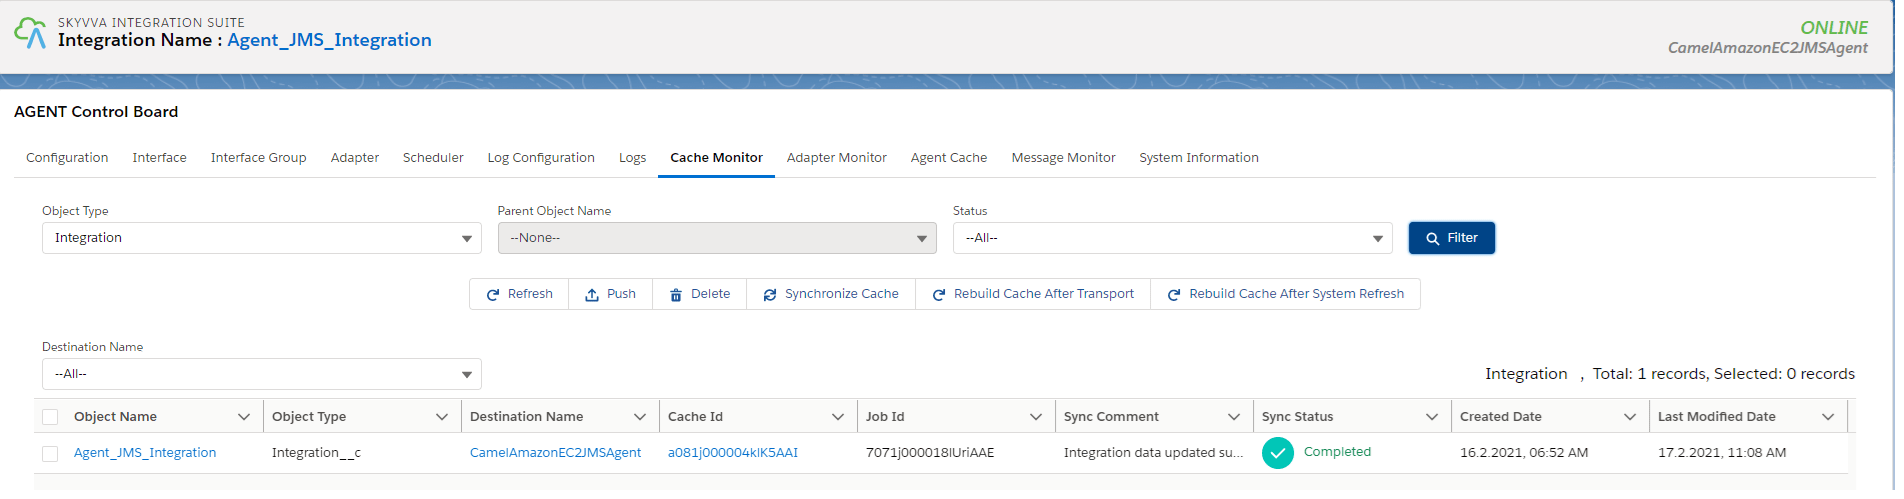
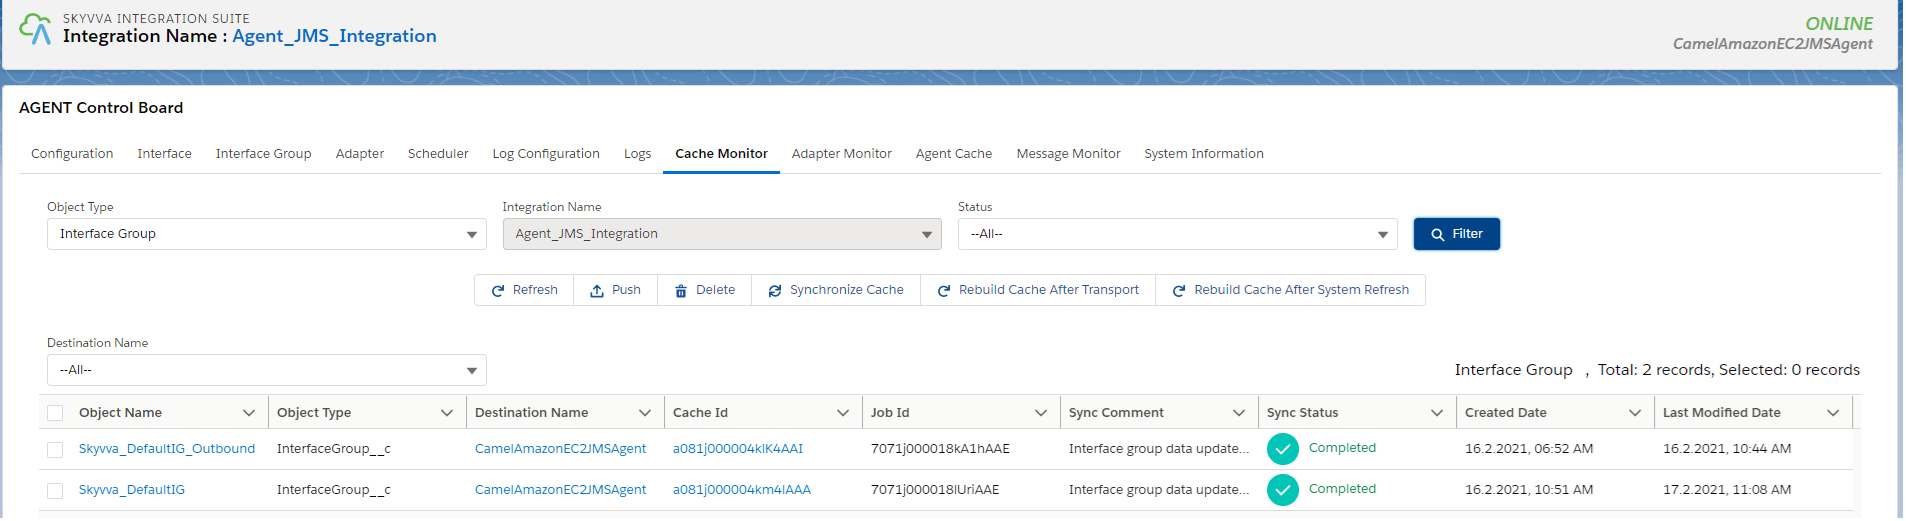
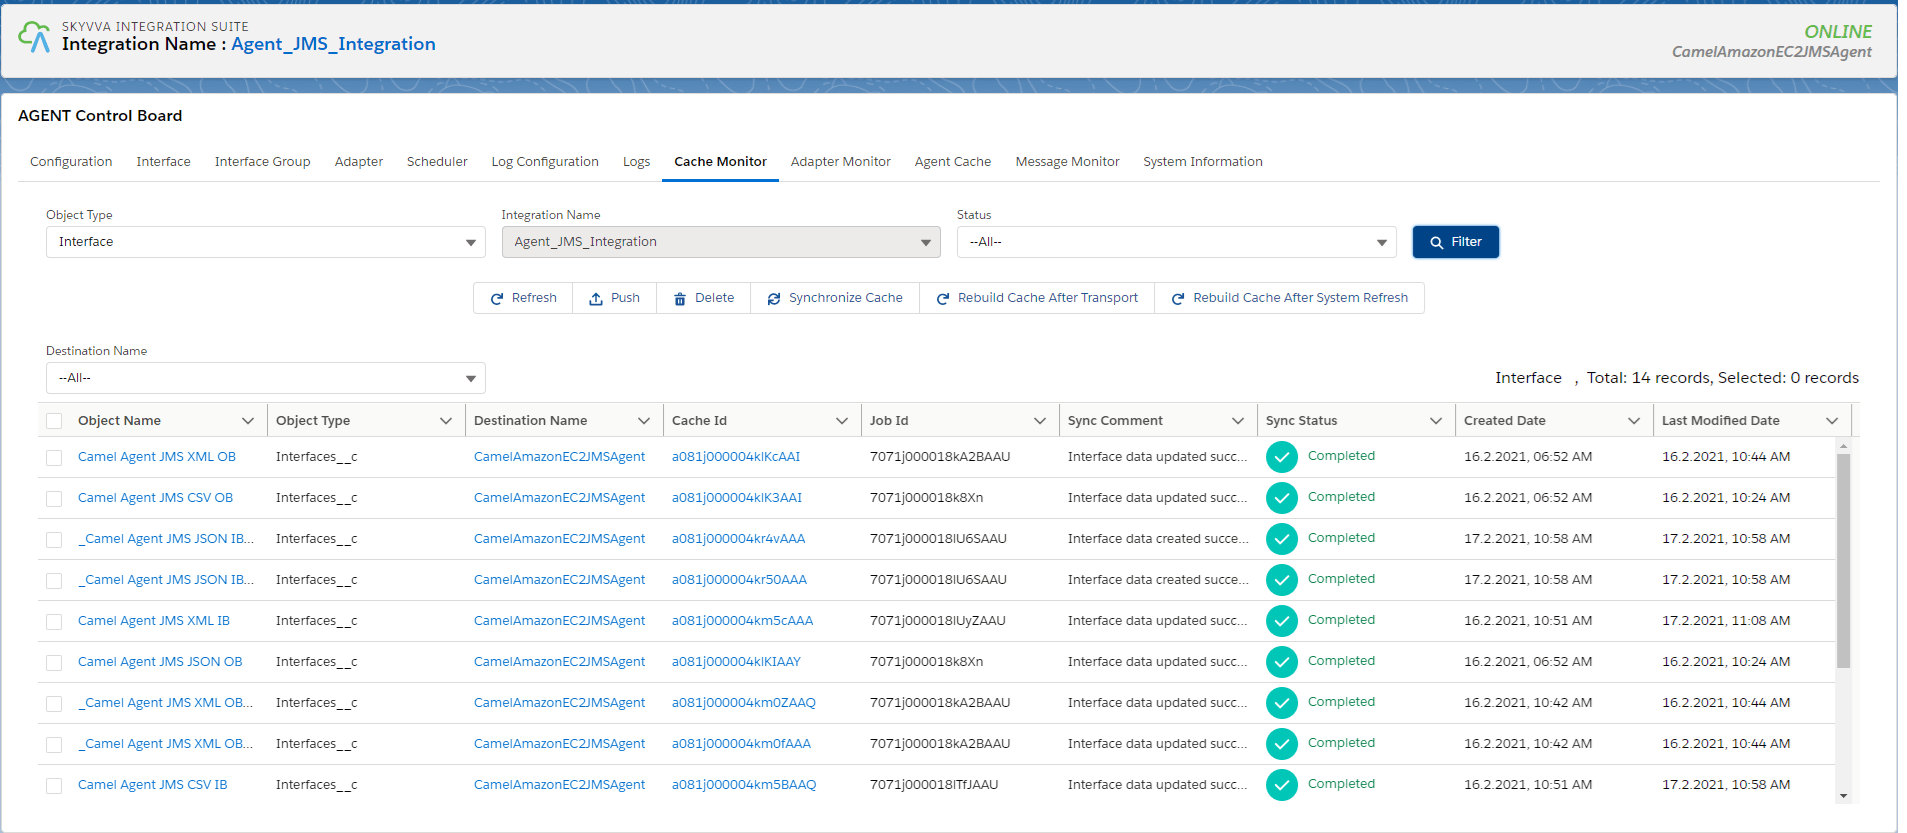
How to check caching New Agent Control Board:
To check caching first you should create all the data.
Integration:
Interface Group:
Interface:
Mapping:

Use Cases: #
- Using file type CSV
- Using file type XML
- Using file type JSON
1. File type CSV: #
Pre-requisite:
- Create Integration.
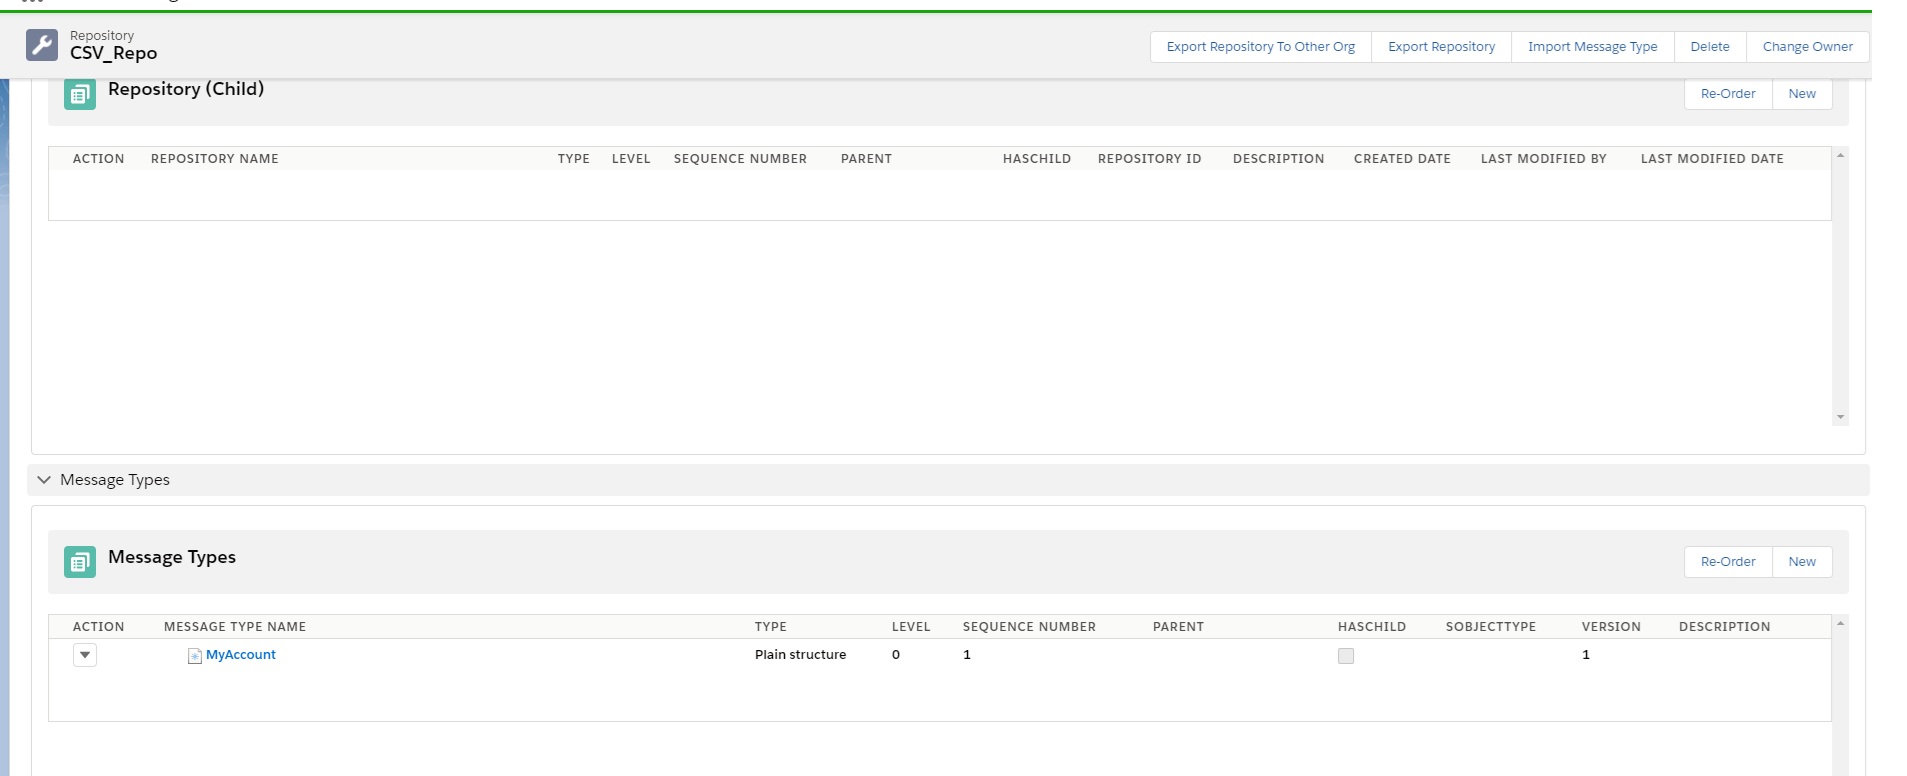
- Create Metadata Provider, IStructure Repository, and Create Flat Message Type.
- Metadata Provider: Agent_ActiveMQ_RabbitMQ_JMS_Metadata
- IStructure Repository: CSV_Repo
- Message Type: MyAccount
Steps: #
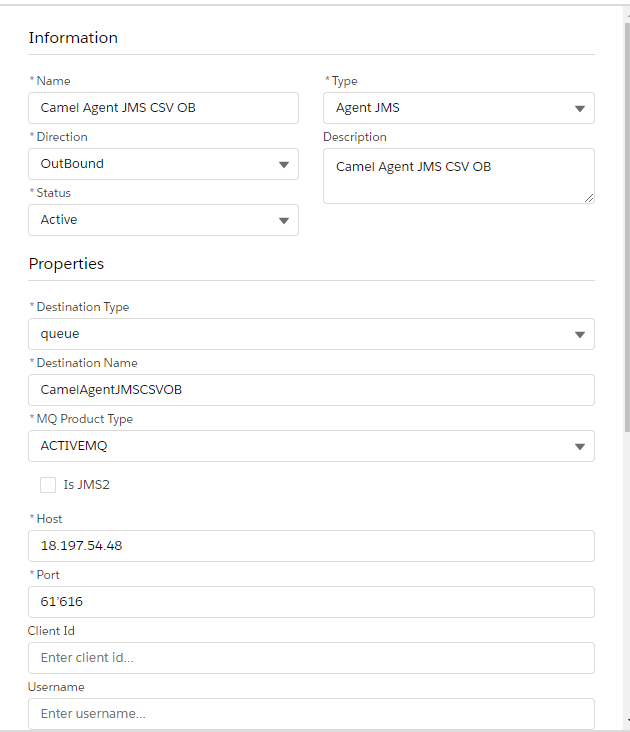
Step1:To Create Agent JMS CSV Outbound Adapter:
- Go to Integration (Example: Agent_JMS_Integration)
- Click on link AGENT Control Board.
- Go to Adapter Tab and Click on New Button.
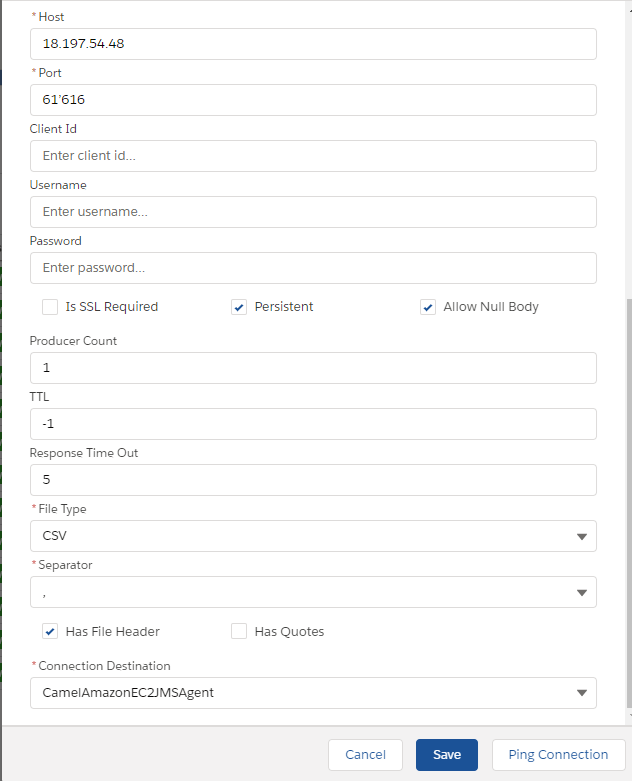
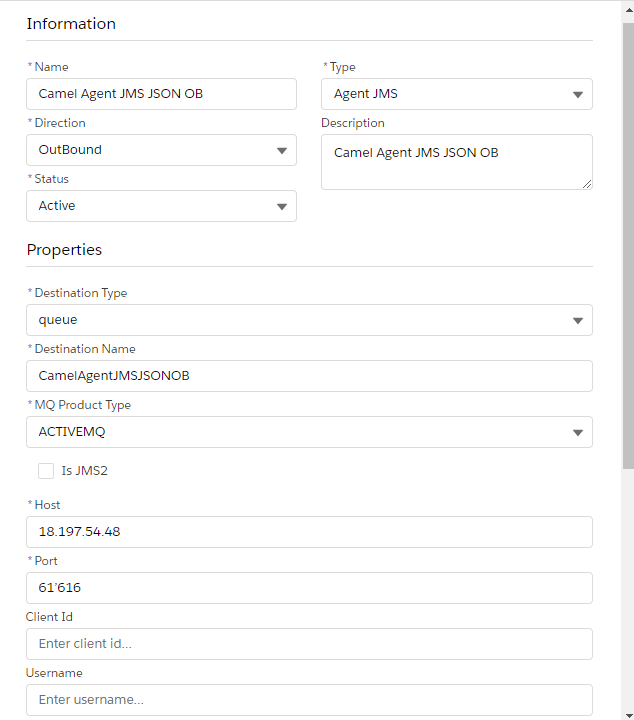
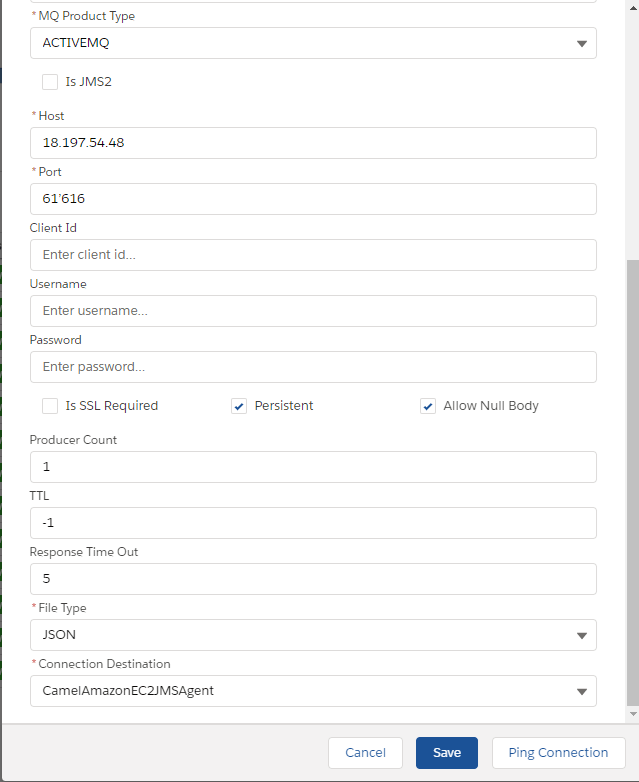
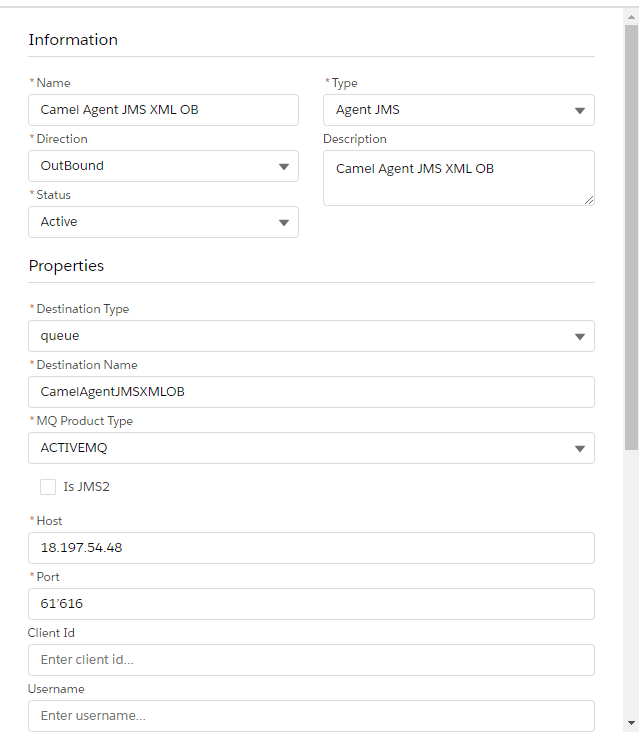
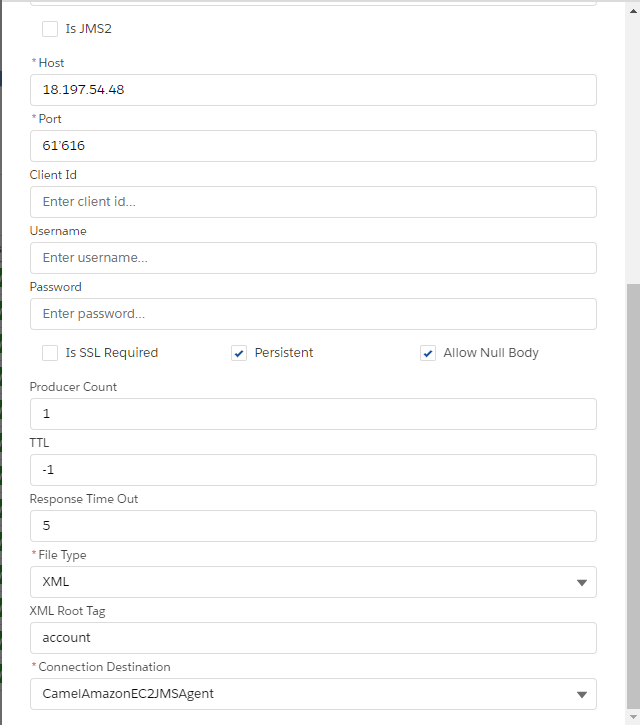
Configure Agent JMS CSV Outbound Adapter: You need to enter adapter properties base on system requirement and Select Connection Destination (Example: CamelAmazonEC2JMSAgent). No need to add a username and password because it is the default admin on the agent side. Here I’m testing Agent JMS adapter with MQ Product Type = ACTIVEMQ also you can test the Agent JMS adapter with another system like you need to configure adapter property base on your system configuration. Example: host, port, etc.
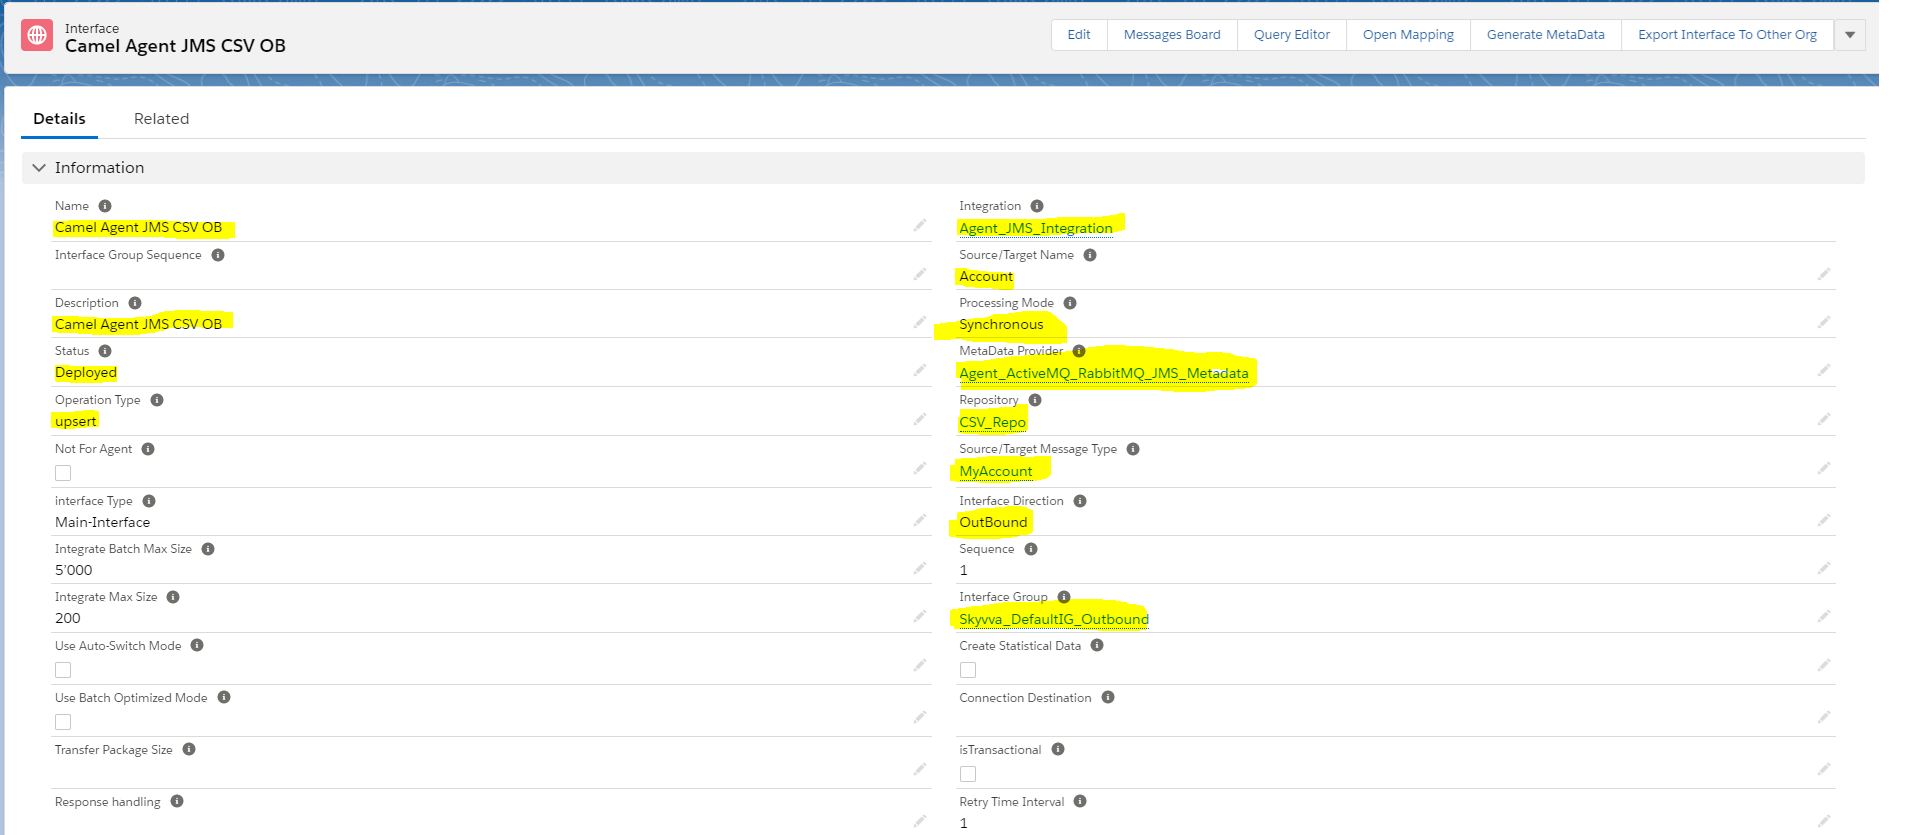
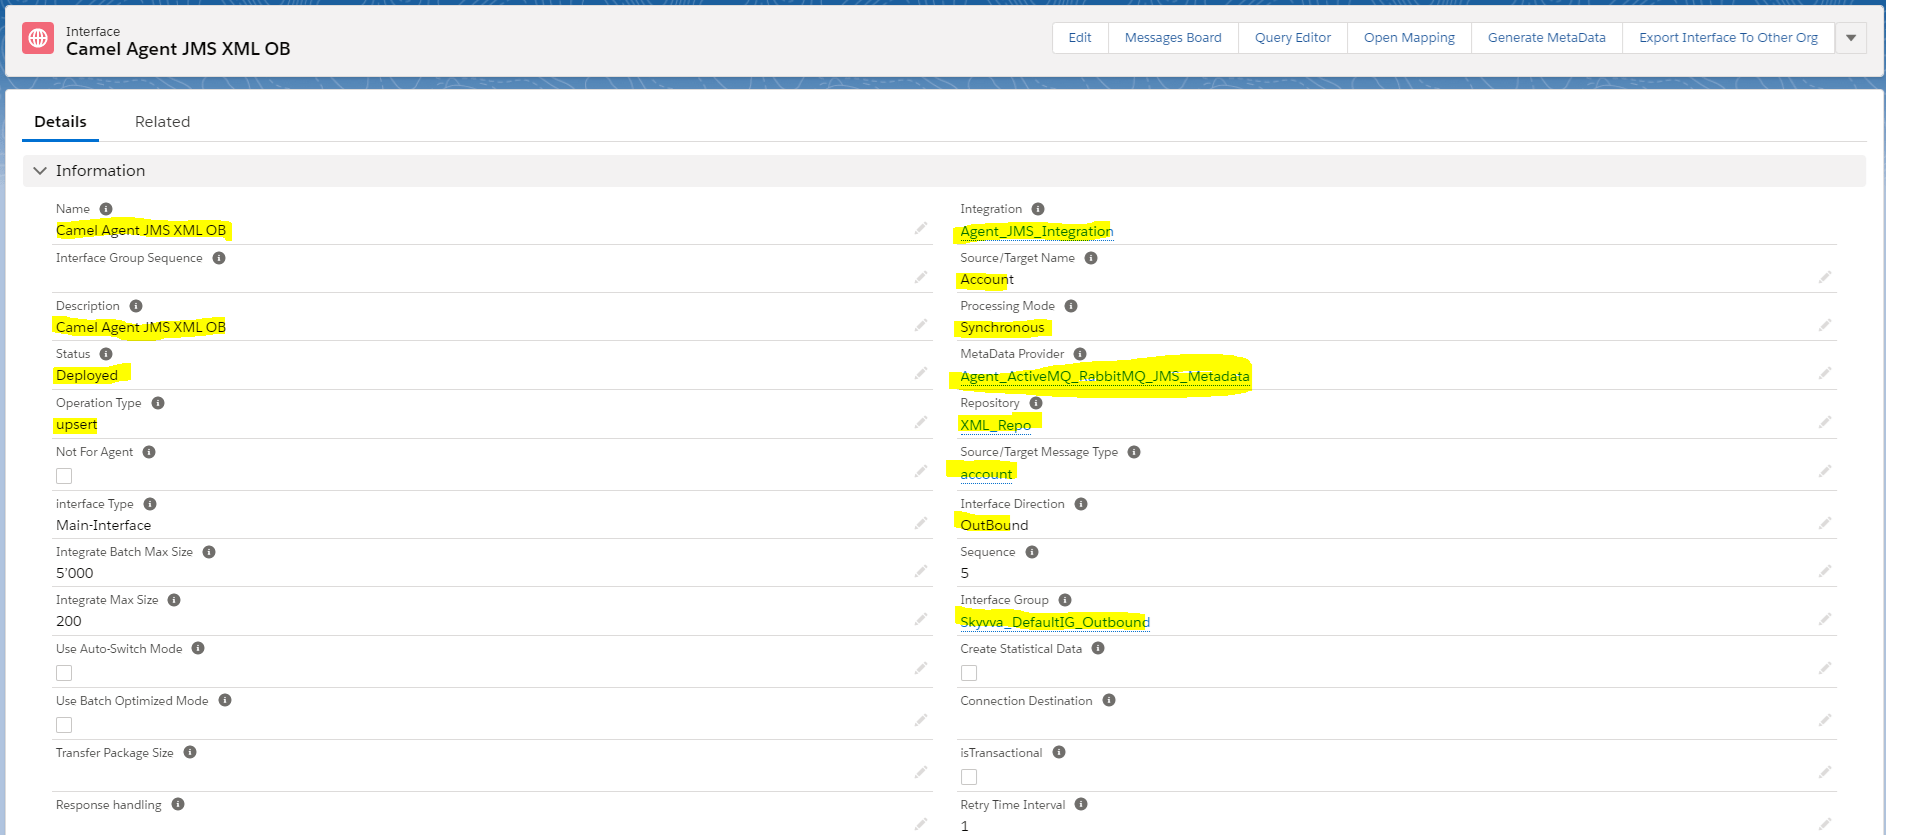
Step2: Create Integration and Outbound Interface:
- Integration: Agent_JMS_Integration
- Inbound Interface: Camel Agent JMS CSV OB
- Metadata: Agent_ActiveMQ_RabbitMQ_JMS_Metadata
- Repository: CSV_Repo
- MessageType: MyAccount
- Adapter: Camel Agent JMS CSV OB

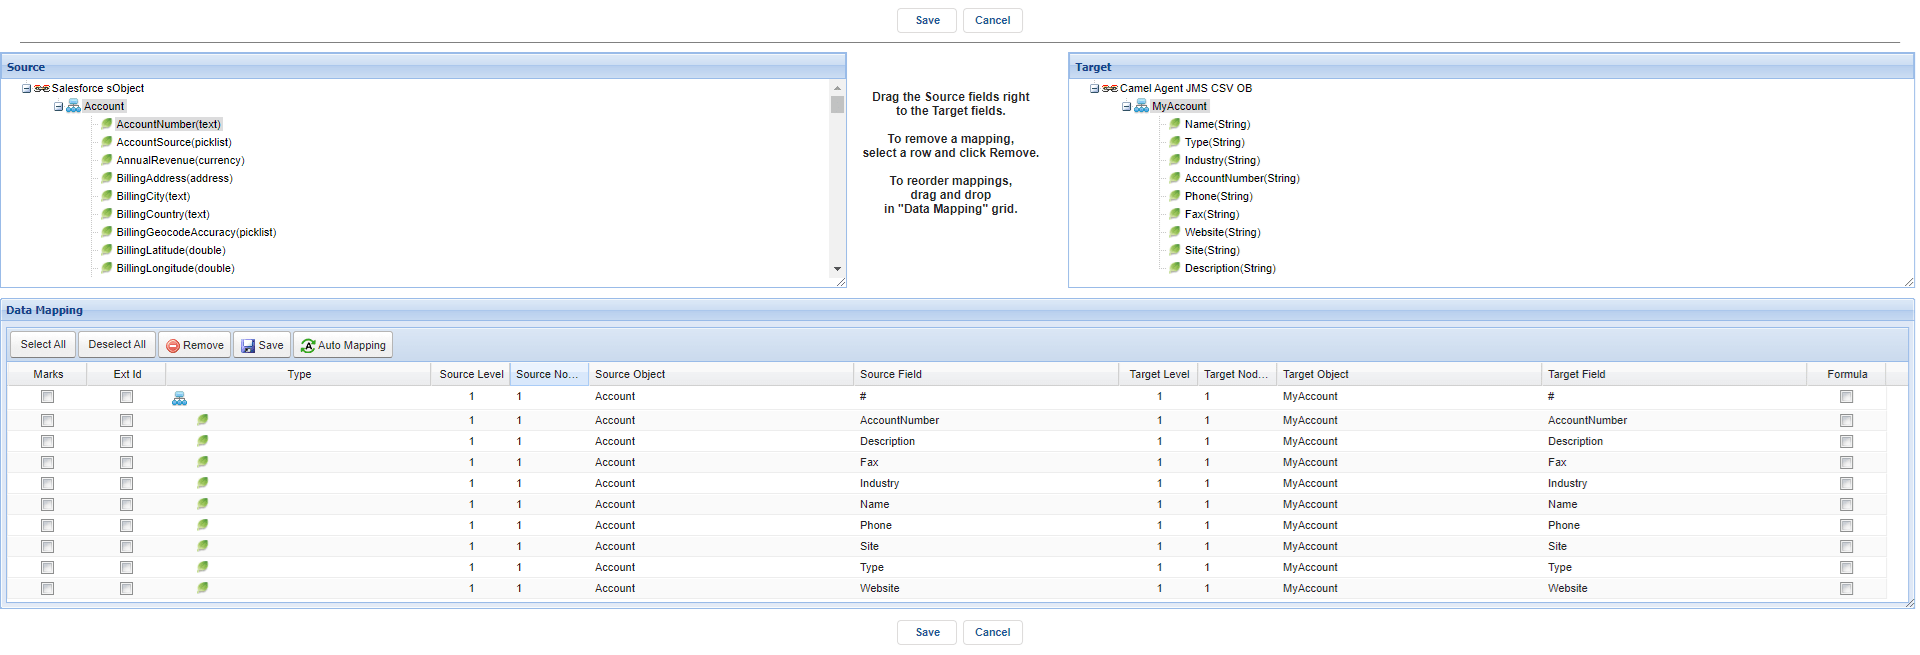
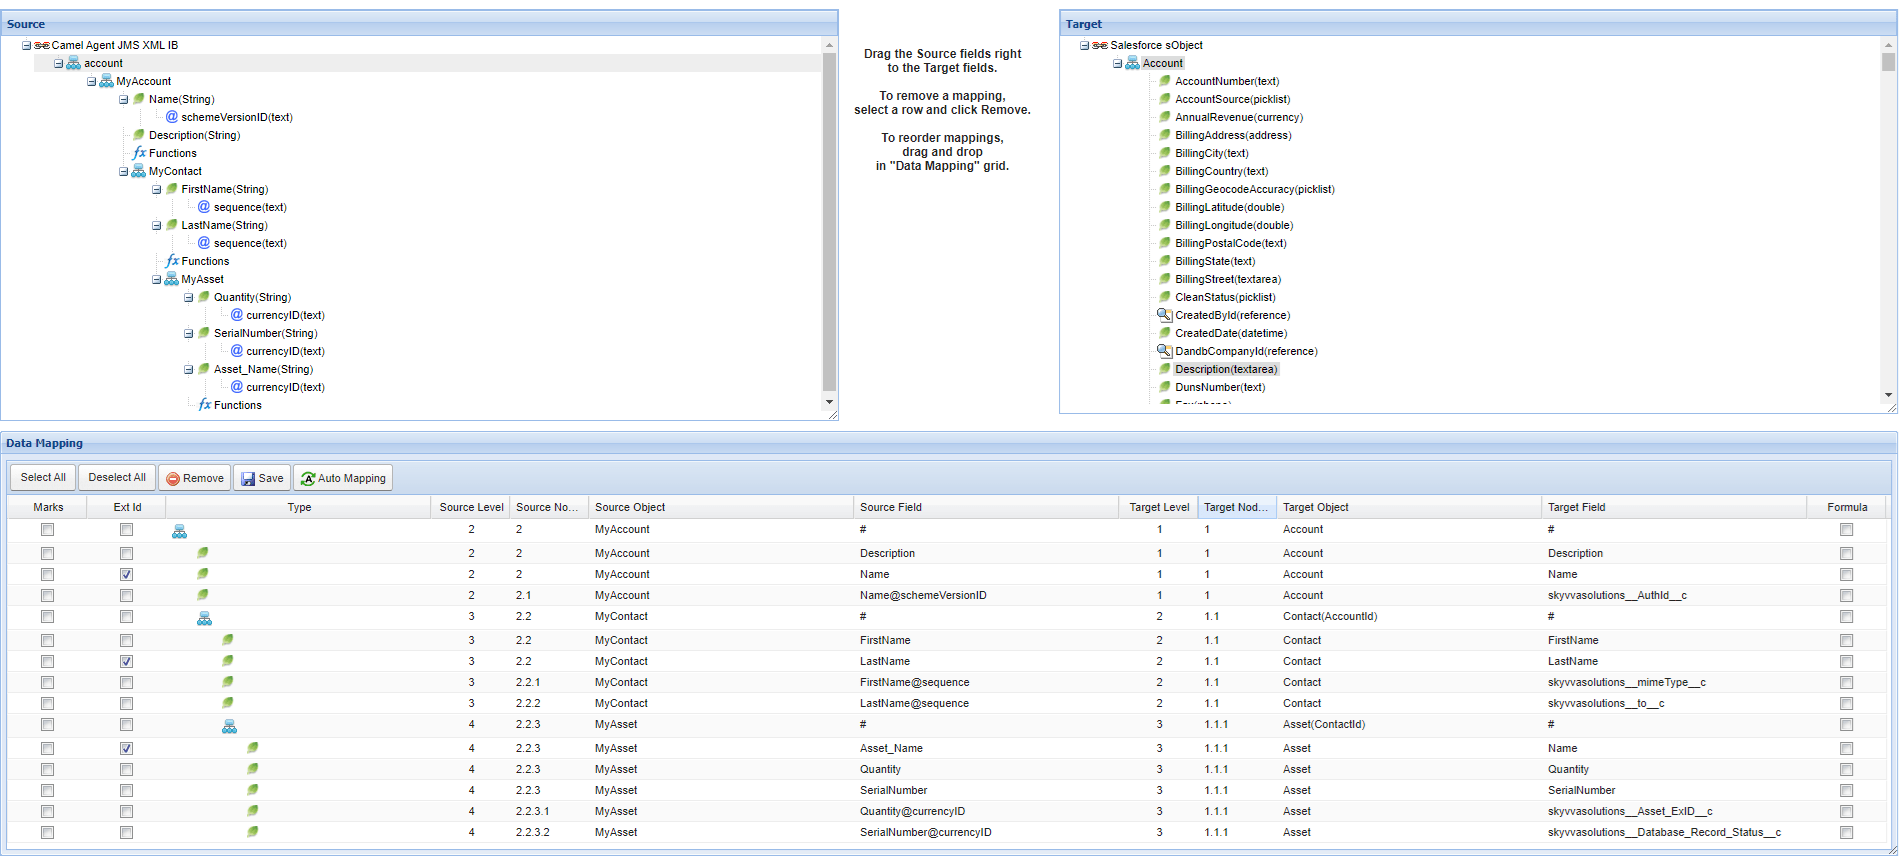
Step3: Mapping
Step4: Callout(When you execute callout then after queue will automatically generate inside ActiveMQ server).
skyvvasolutions.CallOutControl c = new skyvvasolutions.CallOutControl();
c.returnJSONComplete=true;
c.actionDoIntegrate=false;
c.isCreateMessage=true;
String[] ids= new String[]{‘0011j000011qHW8AAM’,’0011j000011qHW9AAM’};
List<skyvvasolutions.CalloutResponse> result = skyvvasolutions.Iservices.invokeCalloutV3(‘Agent_JMS_Integration’,’Camel Agent JMS CSV OB’,ids,’SYNC’,c);
Step5: Message Monitoring

Step6: Check CSV Data on ActiveMQ Server:
Open Link: http://18.197.54.48:8161/admin/browse.jsp
Username: admin
Password: admin
Go to queue
Click on queue example: CamelAgentJMSCSVOB.
Click on message example: ID:ip-172-20-63-98.eu-central-1.compute.internal-35839-1612751473680-17:1:1:1:1.


2. File type JSON: #
Pre-requisite:
- Create Integration.
- Create Metadata Provider, IStructure Repository, and Create Flat Message Type.
- Metadata Provider: Agent_ActiveMQ_RabbitMQ_JMS_Metadata
- IStructure Repository: JSON_Repo
- Message Type: MyAccount
Steps: #
Step1:To Create Agent JMS JSON Inbound Adapter:
- Go to Integration (Example: Agent_JMS_Integration)
- Click on link AGENT Control Board.
- Go to Adapter Tab and Click on New Button.
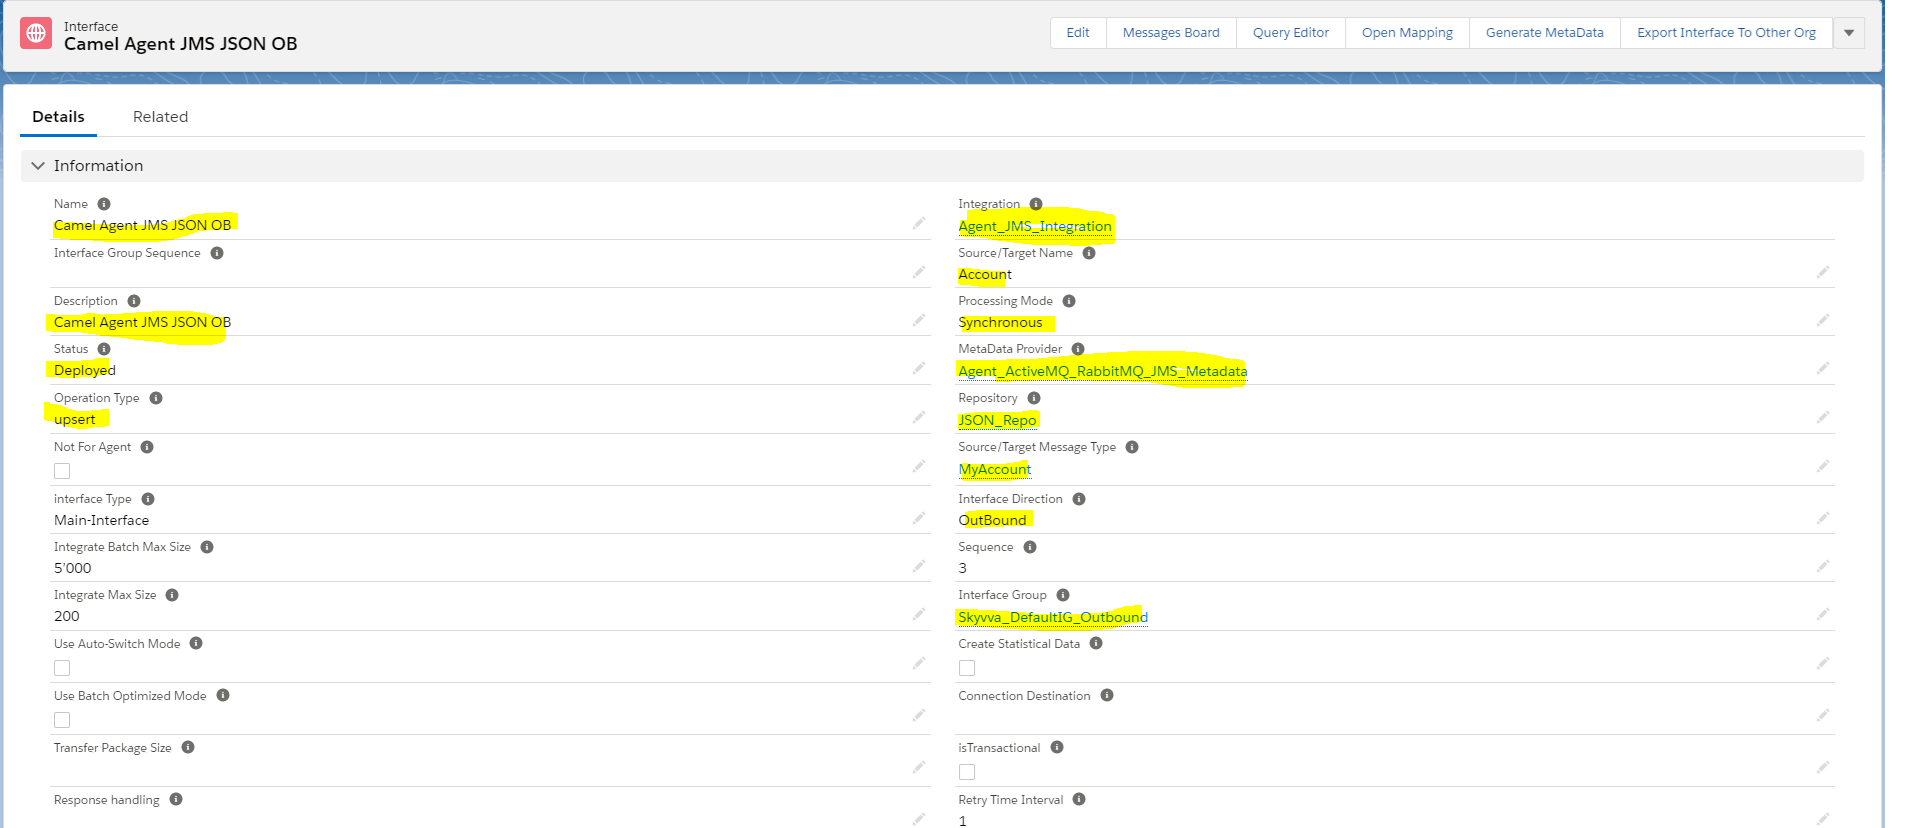
Step2: Create Integration and Inbound Interface:
- Integration: Agent_JMS_Integration
- Inbound Interface: Camel Agent JMS JSON OB
- Metadata: Agent_ActiveMQ_RabbitMQ_JMS_Metadata
- Repository: JSON_Repo
- MessageType: account
- Adapter: Camel Agent JMS JSON OB
Step3: Mapping
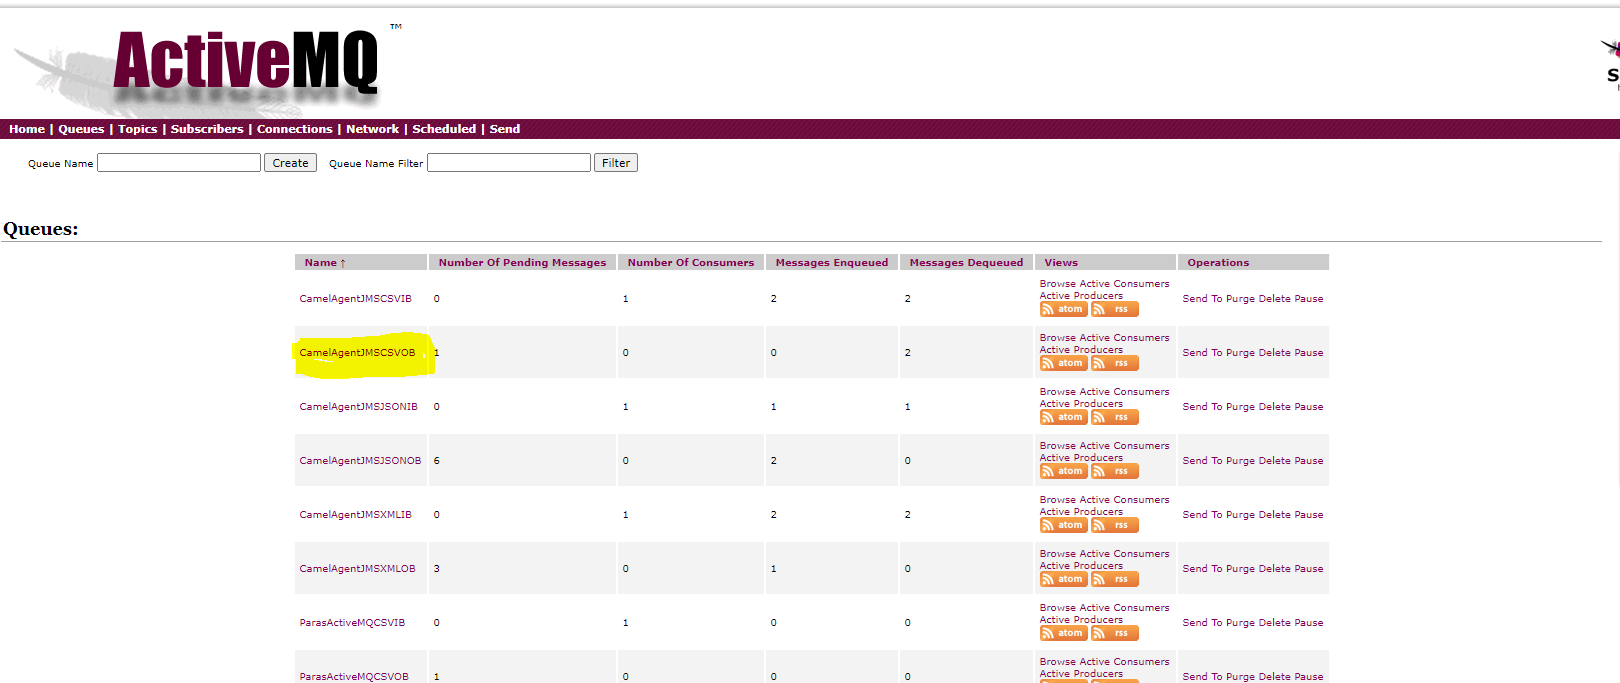
Step4: Check JSON Data on ActiveMQ Server:
Open Link: http://18.197.54.48:8161/admin/browse.jsp
Username: admin
Password: admin
Go to queue
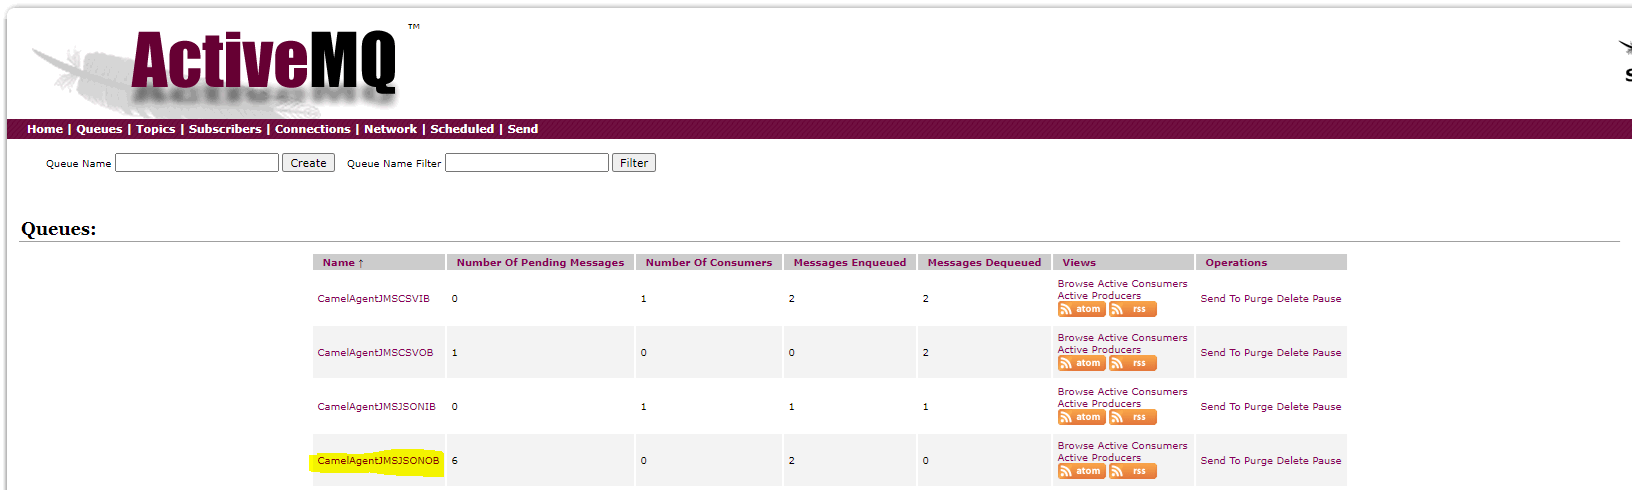
Click on queue example: CamelAgentJMSJSONOB.
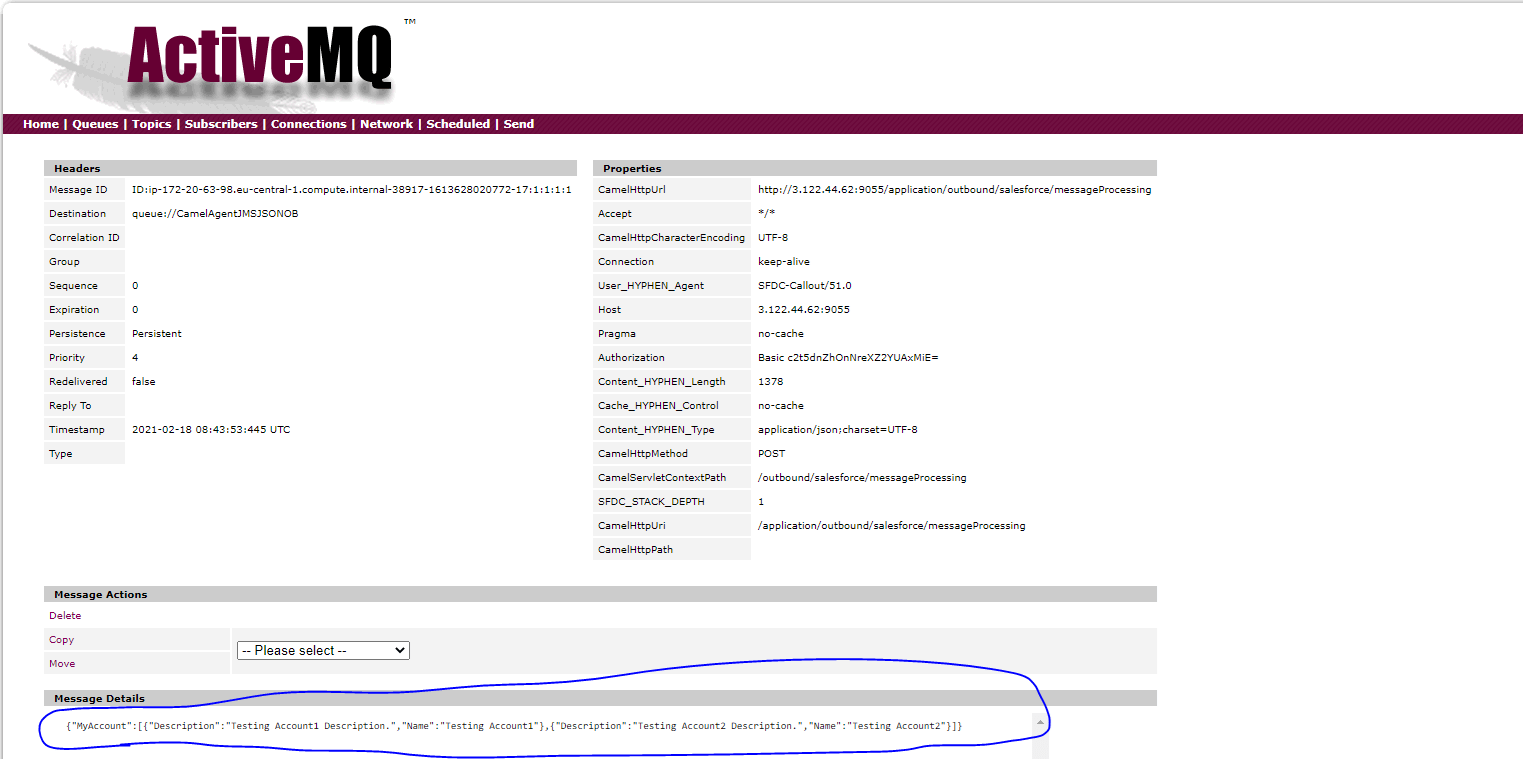
Click on message example: ID:ip-172-20-63-98.eu-central-1.compute.internal-35839-1612751473680-17:1:1:1:1.

Message Monitoring:

3. File type XML: #
Pre-requisite:
- Create Integration.
- Create Metadata Provider, IStructure Repository, and Create Flat Message Type.
- Metadata Provider: Agent_ActiveMQ_RabbitMQ_JMS_Metadata
- IStructure Repository: XML_Inbound_Repo
- Message Type: rootNode
Steps: #
Step1:To Create Agent JMS JSON Inbound Adapter:
- Go to Integration (Example: Agent_JMS_Integration)
- Click on link AGENT Control Board.
- Go to Adapter Tab and Click on New Button.
Step2: Create Integration and Inbound Interface:
- Integration: Agent_JMS_Integration
- Inbound Interface: Camel Agent JMS XML OB
- Metadata: Agent_ActiveMQ_RabbitMQ_JMS_Metadata
- Repository: XML_Repo
- MessageType: account
- Adapter: Camel Agent JMS XML OB
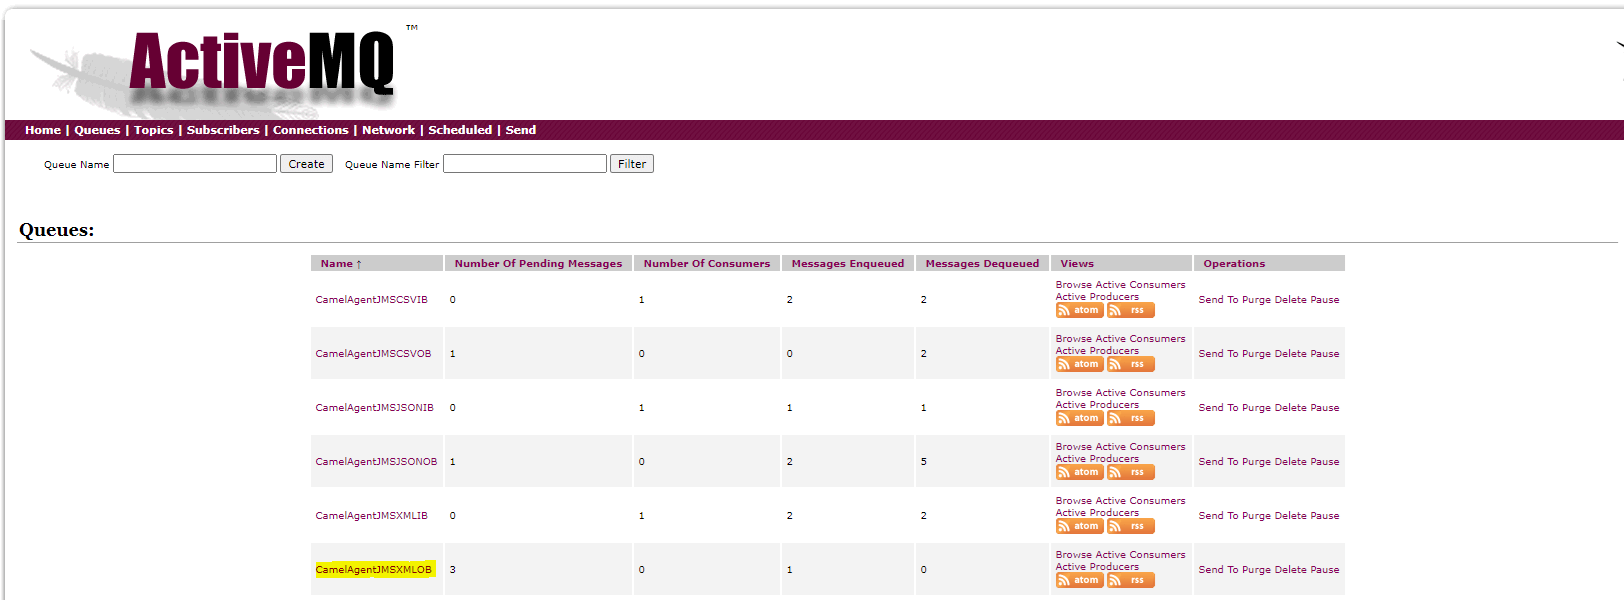
Step3: Check XML Data on ActiveMQ Server:
Open Link: http://18.197.54.48:8161/admin/browse.jsp
Username: admin
Password: admin
Go to queue
Click on queue example: CamelAgentJMSXMLOB.
Click on message example: ID:ip-172-20-63-98.eu-central-1.compute.internal-35839-1612751473680-17:1:1:1:1.


Step4: Message Monitoring


