Learning Objectives #
After completing this unit, you’ll be able to:
- Describe what the Interface is.
- Comfortably use the Interface.
Introduction #
This tutorial should explain the main concept of an interface. After creating the integration user need to come to this step and create an interface. The configuration of an interface is complex we cannot explain all the parameters on the interface screen in detail in this tutorial. Instead, just create an example interface like Account and set only the basic parameter. This interface should be tested using manual load. There are 3 different categories of interface technology we support: Synchronous and real-time (synchronous) batch (asynchronous) bulk (asynchronous) When the interface is run messages will be created. For more detail what message monitoring is and how to use it tell the user to read the other tutorial about “Message Monitoring”.
What is Interface? #
The interface is the second main object in SKYVVA after the integration. The interface describes the structure of data to exchange between Salesforce and other applications. We have two types of Interface:
- Inbound Interface
- Outbound Interface
Next property of interface defines the processing mode. e.g. Synchronous and real-time (synchronous) Batch (asynchronous) and Bulk (asynchronous).
Prerequisites #
- You have your salesforce organization
- You have installed Skyvva in your salesforce organization.
- You have created integration.
How to create inbound Interface? #
- Click on the interface tab
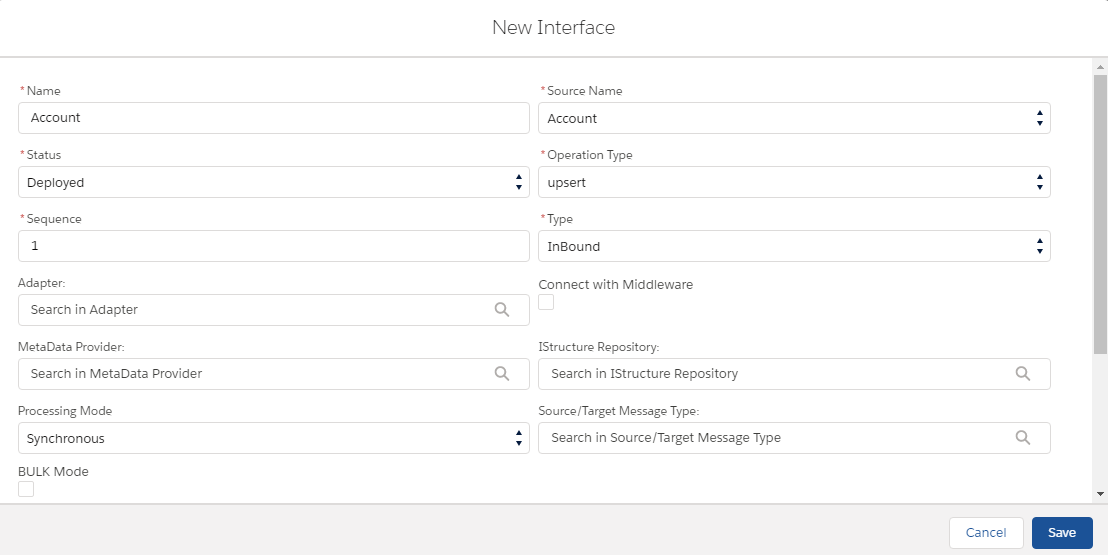
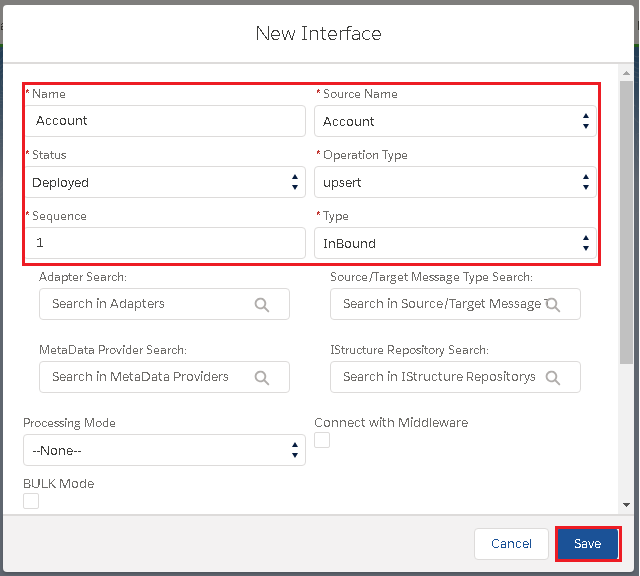
- Fill the following field:
– Name
– Source name
– Status
– operation Type
– Type
- Click on Save button
How to create Outbound Interface? #
- Go to the Interface tab.
- Click on the new interface button.
- Fill the given fields:
Name: It can be Account, Contact or Case.. etc to notify your Interfaces
Status: Deployed (It can be used)
Sequence: Ranking number (1)
Adapter: It is the connector
Source Name: Salesforce Objects (Account, Contact or Case.. etc.)
Operation Type: There are 4 types:
– Upsert: To update on existed data and insert new data that doesn’t exist yet in Message Monitoring.
– Update: Only update on data that is already existed in Message Monitoring.
– Insert: Add all data in the Message Monitoring.
– Delete: Delete all data in Message Monitoring
- Type: It should be outbound
How to create Interface with diff processing mode? #
We will show you how to create an interface to use in a different use case. Following are the different use cases:
– Do real-time interface using synchronous mode
– Do batch processing using batch mode
– Do Bulk processing using bulk mode
– Use our standard CDC feature to create an interface to push data out
Synchronous and real-time (Synchronous) #
- Go to your Integration page.
- Click on Interface tab (near to detail tab)
- Click On New Interface button.

Name: It can be Account, Contact or Case.. etc to notify your Interfaces
Statue: Deployed (It can be used)
Sequence: Ranking number (1)
Adapter: It is the connector
Source Name: Salesforce Objects (Account, Contact or Case.. etc.)
Operation Type: There are 4 types:
- Upsert: To update on existed data and insert new data that doesn’t exist yet in Message Monitoring.
- Update: Only update on data that is already existed in Message Monitoring.
- Insert: Add all data in the Message Monitoring.
- Delete: Delete all data in Message Monitoring
Type: There are two types of interfaces:
- Inbound: Import data into Salesforce
- Outbound: Export data outside SalesforceNote: Upsert is usually used since it can update on the existed data and add new data into Message Monitoring then Save.
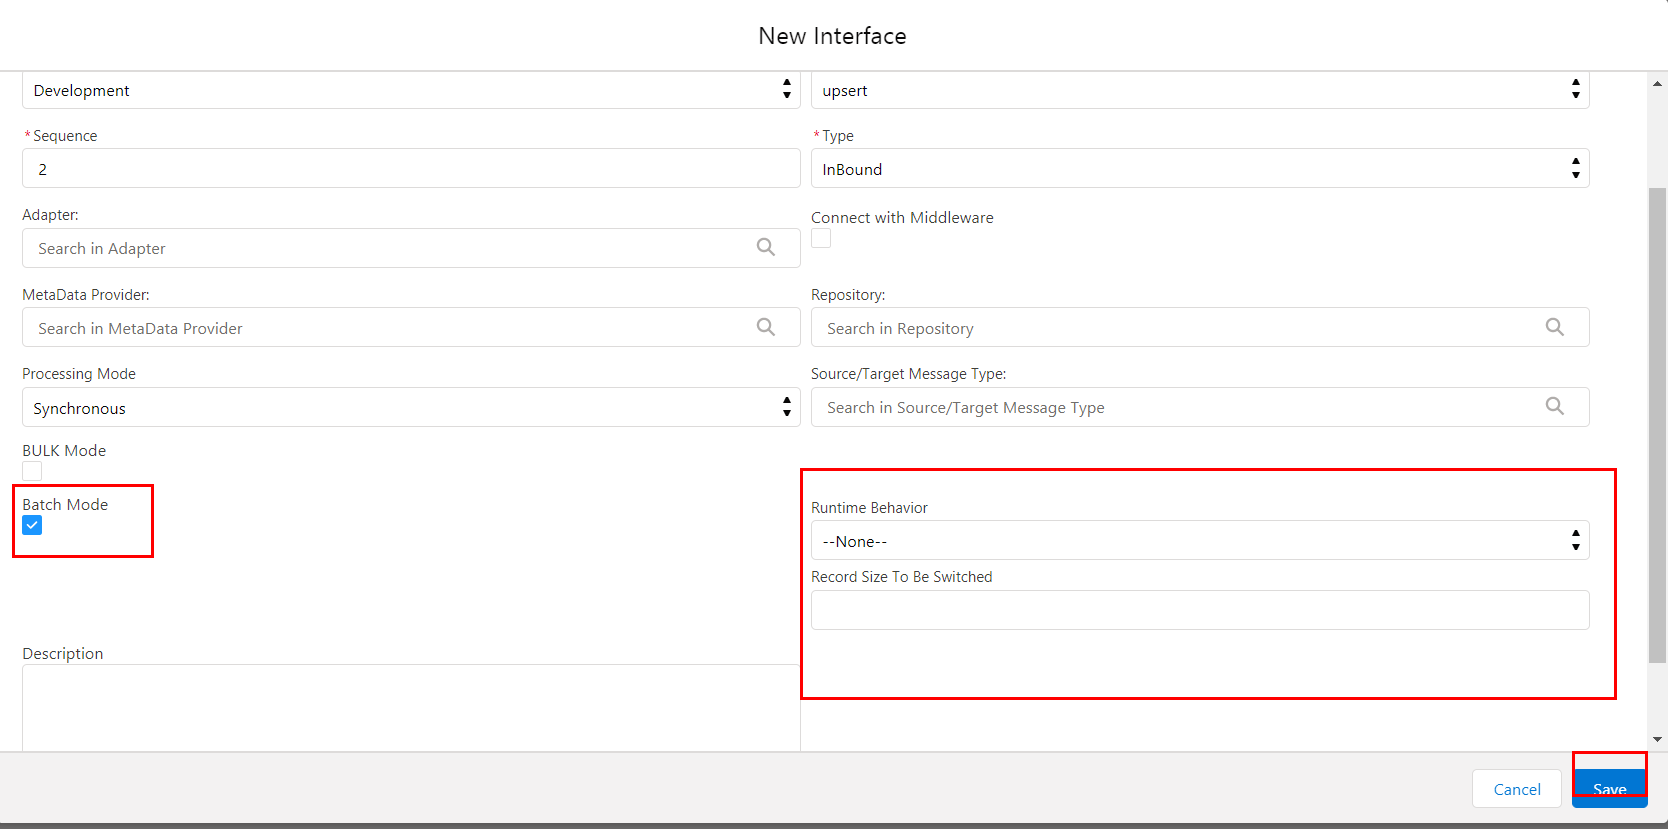
Batch (Asynchronous) #
Batch Mode has been used when there are big amount of data you would like to upload. It is bigger than Synchronous and real-time.
When you prefer to use Batch Mode
- Clicks on Interface
- Click on Edit
- Checks on Batch Mode.

The bulk (Asynchronous) #
Bulk Mode has been used when there are a mass amount of data you would like to upload. It is larger than the Batch mode.
how to configure bulk mode:
– We have to click on our created Interface -> Edit -> checks on Bulk Mode

CDC #
CDC can provide an ability to record all data changes you create on any business object. It will be automatically pushed to your external system at any time you scheduled. When you checkbox this flag it’s mean that you activate CDC. This flag is used to activate both CDC and CDD “Use SKYVVA Outbound Scheduler”.
- Click on checkbox Use Skyvva Outbound Scheduler
- Setup a date from when you define the changed data to be collected in Agent/CDD Scheduler LastRun.