
Introduction #
Providing the capability to create custom adapters within the SKYYVA integration application empowers users with flexibility. This feature enables users to design and build adapters personalized to their specific needs, ensuring connectivity with systems or services not previously integrated into the SKYVVA app. By offering this functionality, users gain the ability to expand integration possibilities, connect with diverse platforms, and adapt to unique business requirements without relying completely on pre-existing adapters. This self-service approach personalized independence, allowing users to create adapters independently within the SKYVVA ecosystem.
Here’s an outline detailing the key aspects and functionalities of the custom adapter feature in the SKYVVA integration application:
- Purpose:
- Facilitates integration with systems needed for pre-built connectors.
- Configure users to create personalized adapters for specific applications or services.
- Creation Process:
- Adapter Builder Interface: Provides a user-friendly environment for adapter creation.
- Configuration Options: Allows defining endpoints, authentication methods, data mapping, and transformation rules.
The custom adapter feature in the SKYVVA integration application empowers users to create, configure, and manage adapters personalized to their specific integration needs, alongside greater connectivity, flexibility, and scalability within the integration ecosystem.
In this scenario, the custom adapter is an intermediary between the custom adapter and the SKYVVA app by utilizing a custom Apex class. This Apex class is likely responsible for handling the communication protocol, such as making requests to the external system and processing its responses.
Users can create properties within this custom adapter that will be utilized as connection parameters for establishing connections with the external system. These properties include authentication details, endpoint URLs, headers, or type of adapter, name, tokens, and username password required to communicate effectively with the SKYVVA app.
In Salesforce, users can access AWS S3 using Named Credentials in both the old way and the new way. The old way typically involves using Named Credentials with a custom endpoint and a remote site setting, while the new way leverages the “Amazon S3” provider for Named Credentials introduced in a Salesforce update. For more understanding, how to create Named credentials hit the link below
– Named credentials to access the AWS s3
Amazon SNS
This example provides a high-level overview of the steps involved in creating a custom adapter to connect to Amazon SNS within the SKYVVA integration application. It involves configuring the adapter, setting up endpoints, and defining data mappings. Specific implementation details and scripting logic would vary based on the intricacies of integrating with Amazon SNS and the requirements of your integration workflow.
Integrating with Amazon SNS involves the following steps:
- Setup AWS Account:
- Ensure that you have an AWS account and the necessary credentials to access Amazon SNS.
- Create Named Credential:
- Create your name credential in set up with the necessary parameters for Amazon AWS, such as AWS Access Key, AWS Secret Key,..
- Custom Apex Class Access:
- We need to create a custom class in Salesforce Apex to support the property adapter within the SKYVVA integration application.
- Create a Custom Adapter:
-
- SKYVVA Integration application creates custom adapters, designs, and implements a custom adapter for Amazon SNS. This adapter handles the authentication, communication, and message formatting required for interacting with SNS.
Example:
The business requirement is to integrate the SKYVVA integration application with Amazon SNS using a custom adapter for seamless communication. This custom solution configures the application to effectively initiate outbound calls to Amazon SNS, ensuring efficient message delivery. The custom adapter serves as the bridge between SKYVVA and Amazon SNS, adhering to specific business needs and ensuring a smooth, secure data exchange process. This integration enhances communication capabilities, allowing the user to leverage the benefits of Amazon SNS within the SKYVVA integration ecosystem for streamlined and effective business operations.
Pre-Required step:
Below are the steps to create the Custom Class, Adapter and Interface:
Create Custom Class: #
- Custom apex is required to extend the build in the SKYVVA apex class:
- skyvvasolutions.V3OutboundOperation and override bellow methods:
Go to Setup -> click search ‘Apex Classes’ and click the New button.
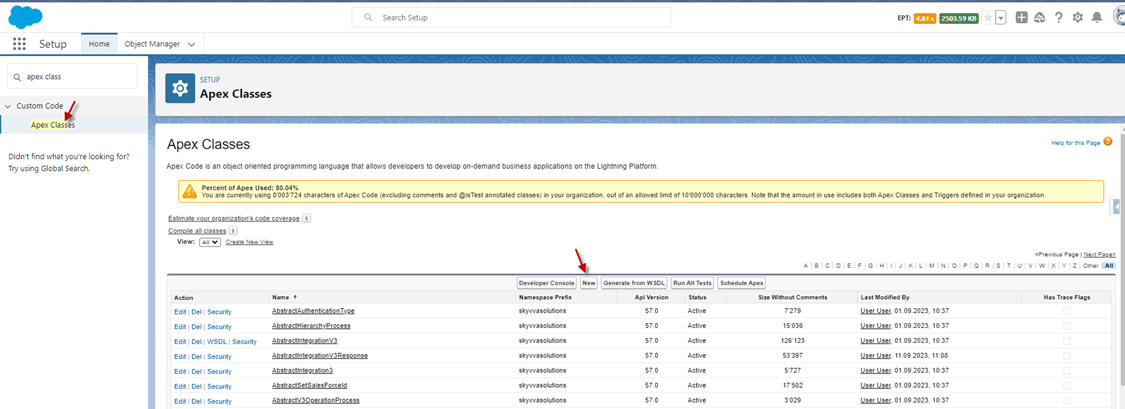
- Input custom code and Custom Adapter Class name: customCalloutSNS2
- click the save button.
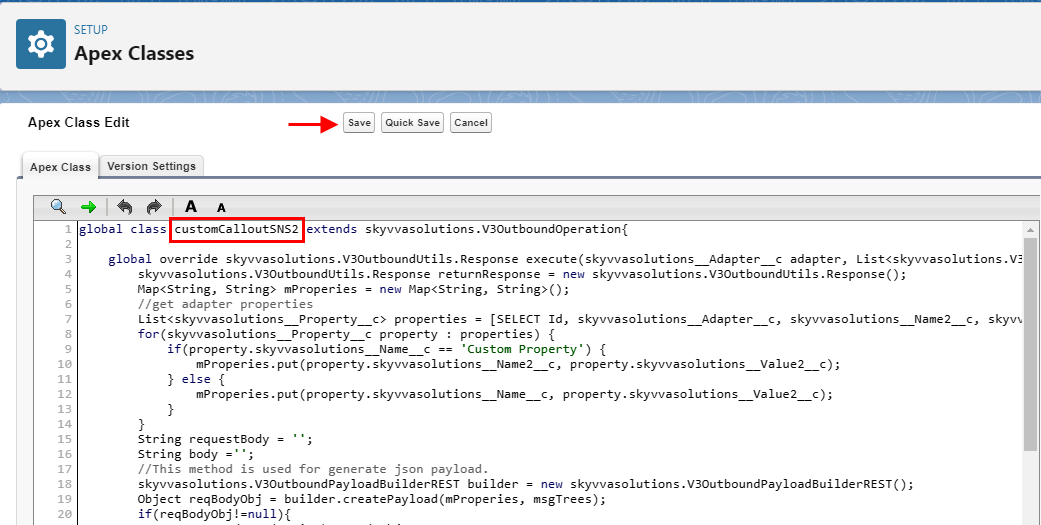
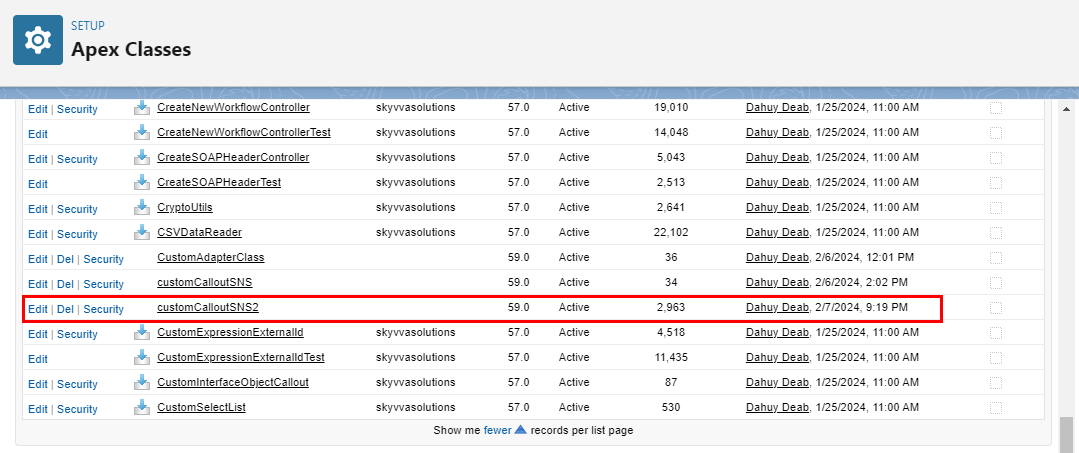
- Here’s the custom class, after the save button.
1.1. Create the Outbound Custom adapter.
- Adapter Type: Custom Adapter
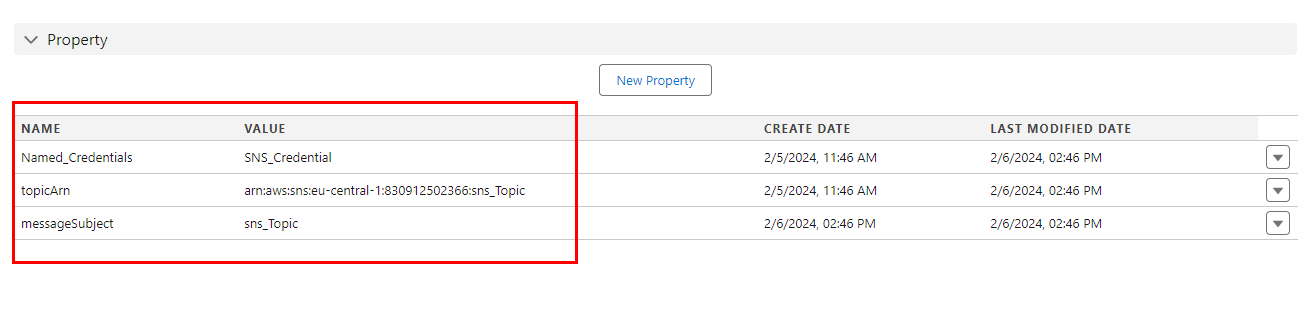
- Properties of adapter: the connection property username, password, token,.. The user clicks the ‘New Property’ button and then inputs the name of the property depending on the Apex class being used at the time of creation
Named_Credentials (is name of credential that create in salesforce set up)
topicArn (get from amazon sns)
messageSubject (is name Topics get from amazon sns)
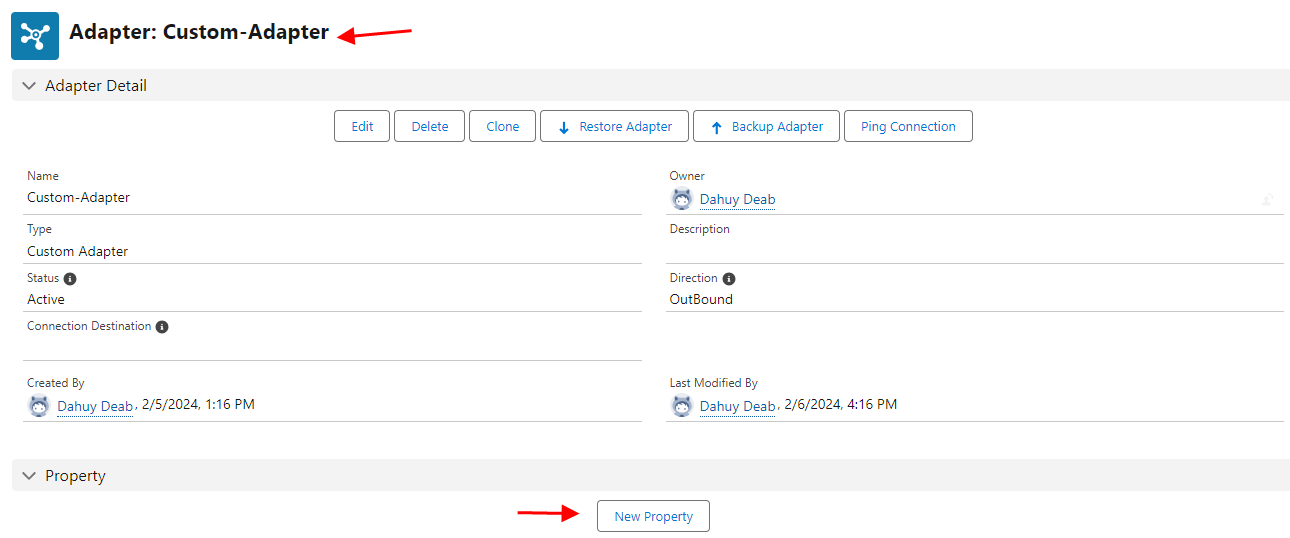
- Click New Property
Create the Integration.
Create the Outbound Interface
- Fill Name
- Select Deployed Status
- Select Account Source Name
- Select Outbound Direction
- Select API V2 or V3
- Link with Outbound Custom Adapter
- Custom Adapter Class field: Input the name of the class: customCalloutSNS2
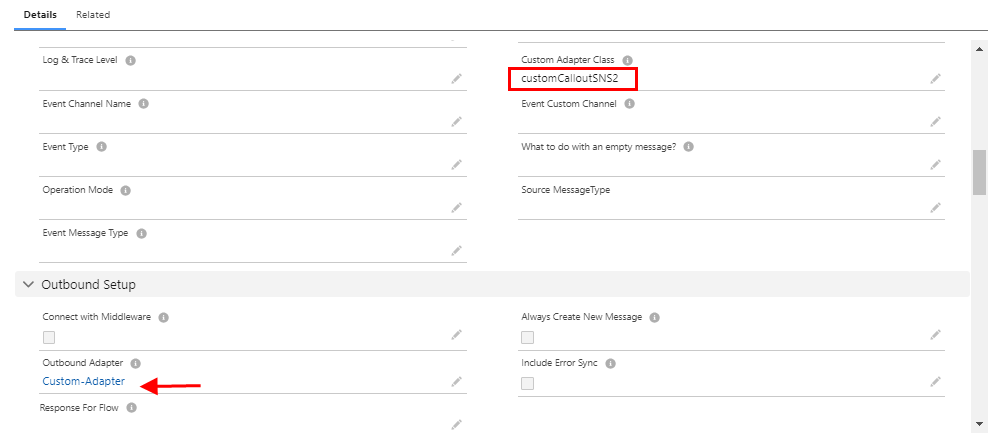
- Do Mapping.

- CallOut in Apex Code.
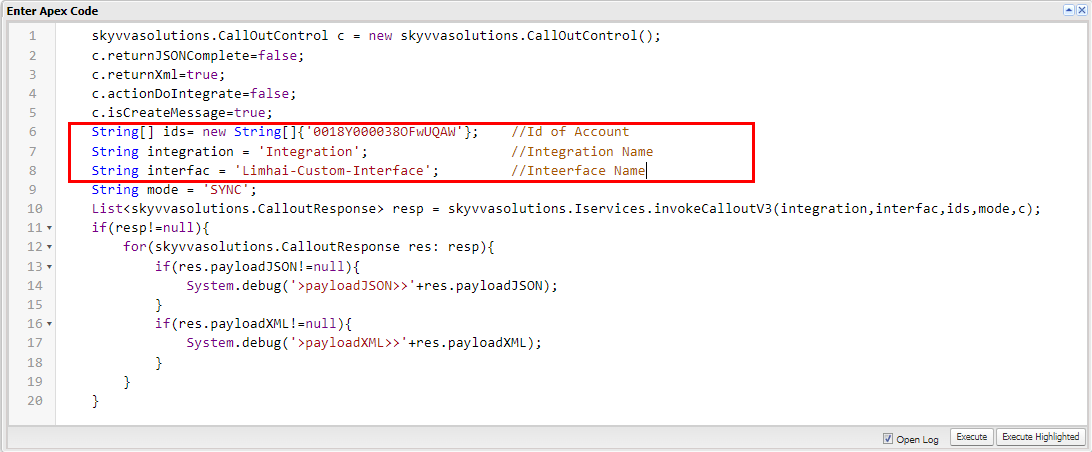
skyvvasolutions.CallOutControl c = new skyvvasolutions.CallOutControl();
c.returnJSONComplete=false;
c.returnXml=true;
c.actionDoIntegrate=false;
c.isCreateMessage=true;
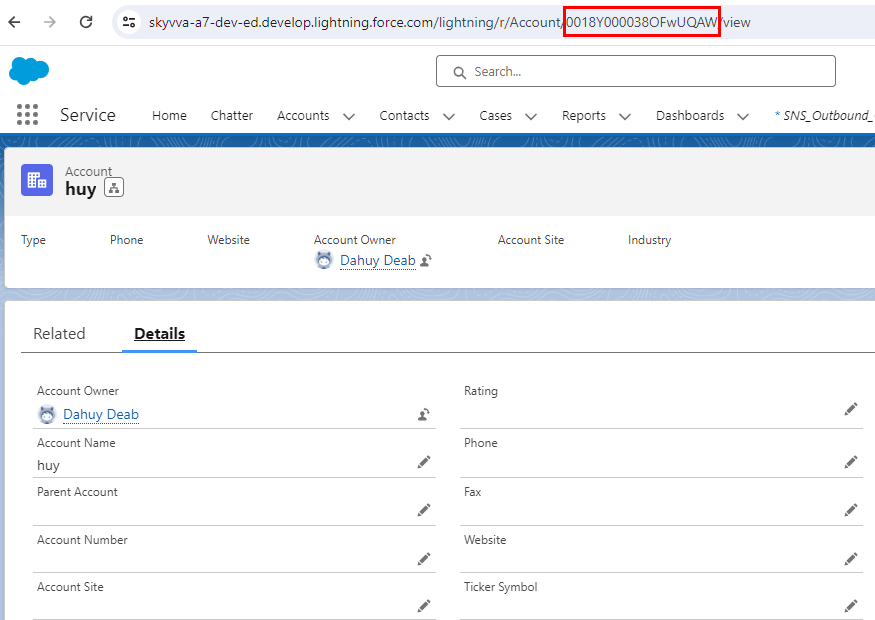
String[] ids= new String[]{'0018Y000038OFwUQAW'}; //Id of Account
String integration = 'Integration'; //Integration Name
String interfac = 'Limhai-Custom-Interface'; //Interface Name
String mode = 'SYNC';
List resp = skyvvasolutions.Iservices.invokeCalloutV3(integration,interfac,ids,mode,c);
if(resp!=null){
for(skyvvasolutions.CalloutResponse res: resp){
if(res.payloadJSON!=null){
System.debug('>payloadJSON>>'+res.payloadJSON);
}
if(res.payloadXML!=null){
System.debug('>payloadXML>>'+res.payloadXML);
}
}
}
- After CallOut success, you can search for messages on the message monitor.
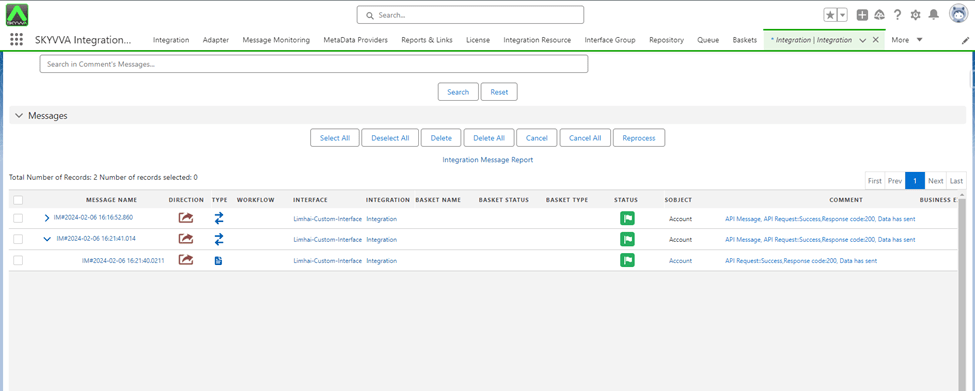
- Alert to email that subscribe to that topic:

- Here is the callout, the record has its account name changed to the record ID.
Summary: #
Now users learn that the process involves configuring the SKYVVA integration application with Amazon SNS by implementing a custom adapter for outbound calls. Enhance communication efficiency, ensuring seamless data exchange Amazon SNS capabilities within the SKYVVA ecosystem for optimal business operations.


