
With this operation, we send a small amount of data from sap-po to Skyvva. We can send the data in a synchronous or asynchronous mode, meaning that when we need a response, we design the interface in sap-po and Skyvva to be synchronous. If a response is not needed, then the interface is designed as an asynchronous one.
3.1 Synchronous versus Asynchronous #
As mentioned above, we create a synchronous or asynchronous interface with SAP-PO. To support this concept, we provide two different operation methods called “Integrate Synchronous” and “Integrate Asynchronous”. If your interface in SAP-PO is a synchronous interface, you must use the operation “Integrate Synchronous” in the rest receiver channel configuration. If it is an asynchronous interface, use the operation “Integrate Asynchronous”.
Here an example screenshots of the asynchronous operation.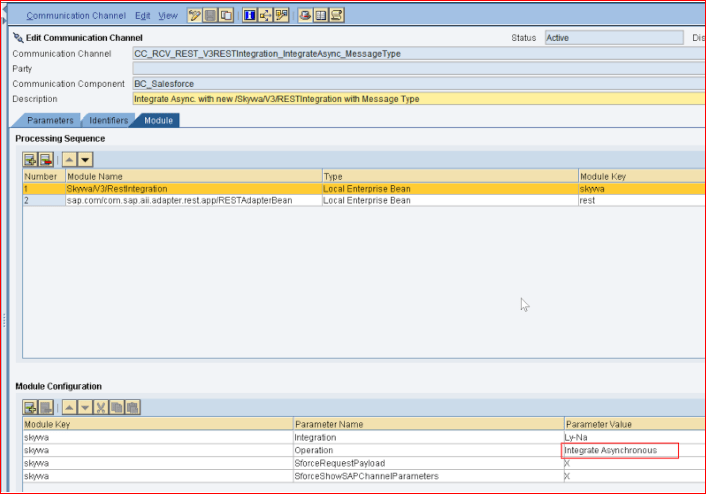
Here is an example of a synchronous operation.
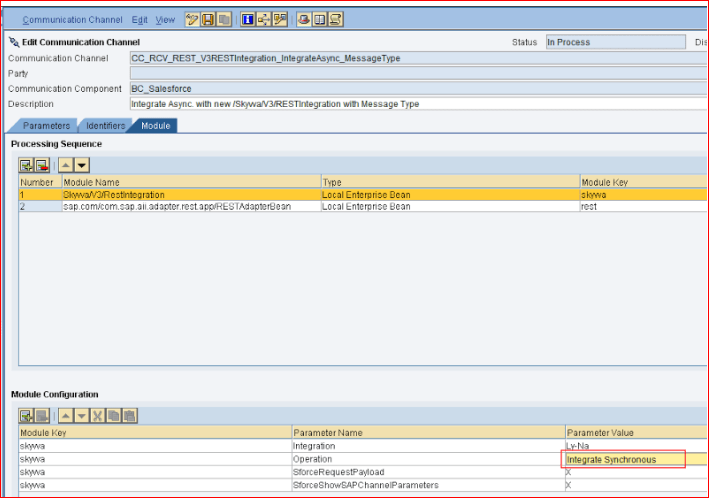
These are the available operation mode you can use with the Skyvva connector module:
- Integrate Synchronous
- Integrate Asynchronous
3.2 Parameters of the Module #
The parameter names used with the old module have been changed to new names. Some parameters we have removed. Some parameters remain the same as in the old version. See the following table for which parameter has been changed, removed, or kept the same. The parameters with the color red are changed named. The ones in blue are removed parameters.
| Old Parameter Name | New Parameter Name | Setting | Comment | |
| 1 | skyvvaVersion | AppVersion | Mandatory | Skyvva App version |
| 2 | IntegrationID | Integration | Optional | Integration name |
| 3 | SforceWebServiceOperation | Operation | Mandatory | Operation name |
| 4 | SessionGlobalFilePath | SessionGlobalFilePath | Optional | No change |
| 5 | SessionPooling.Active | SessionPooling.Active | Optional | No change |
| 6 | SforceAccessPoint | Removed | ||
| 7 | SforceRequestPayload | SforceRequestPayload | Optional | No change |
| 8 | SforceShowSAPChannelParameters | SforceShowSAPChannelParameters | Optional | No change |
Some parameters have been removed because they are not needed anymore.
- SforceAccessPoint. This parameter is no longer needed because we use the OAuth REST API from Salesforce directly.
- SforceSecurityToken. This parameter is not needed anymore. The security becomes part of the password and has to be entered as one string to the password field “pwdSforceLoginPassword”.
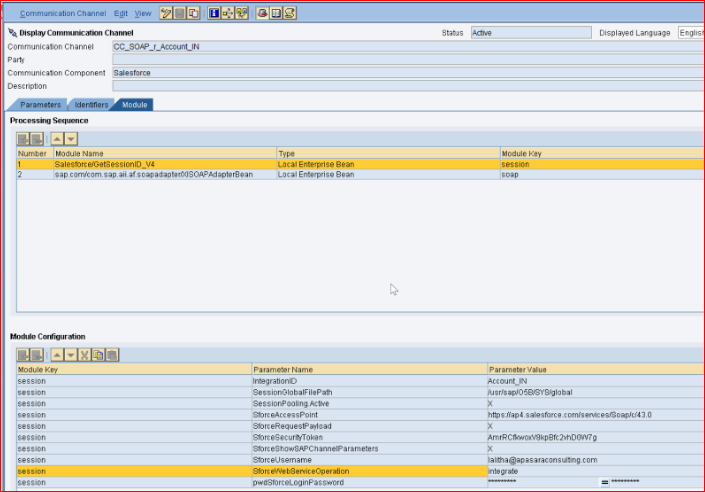
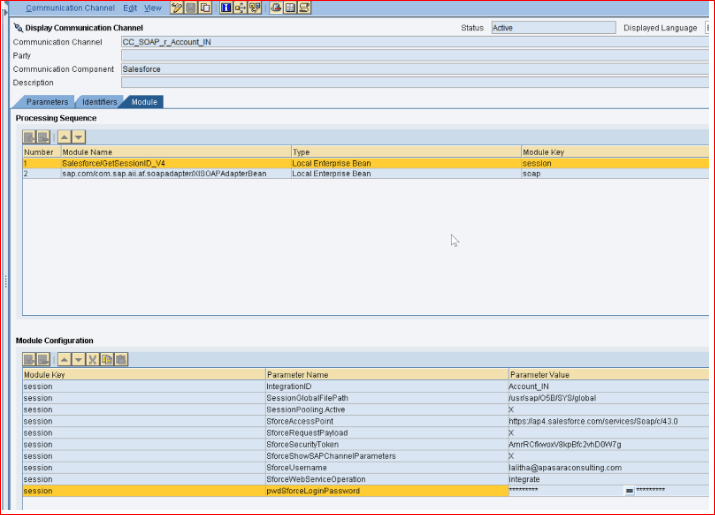
This is an example of the old module with some parameters. You can see that in the old module, you need to configure the authentication to the one you have done for the soap receiver channel. With the new module, we don’t need to use the authentication inside the module anymore. We are using the authentication from the REST adapter. Therefore there is no need to configure the authentication for the new Skyvva REST module again
 #
#
3.3 Creating the REST receiver channel #
For using the new connector module V2/ or V3/RestIntegration, you must create a rest receiver channel in SAP-PO. The SAP-PO generic parameter is the same for the V2/ and V3/RestIntegration modules. The only difference is the module’s name, e.g., “Skyvva/V2/RestIntegration” for the V2, and for V3, the module “Skyvva/V3/RestIntegration”. In the following example, you will see an example with the V2/RestIntegration module.
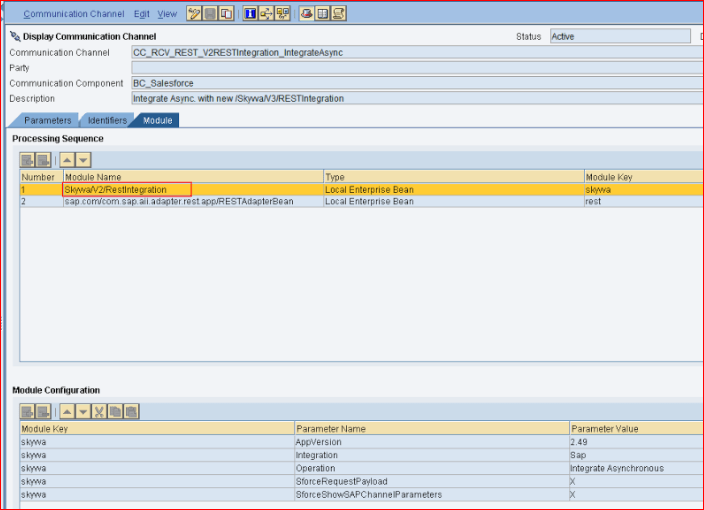
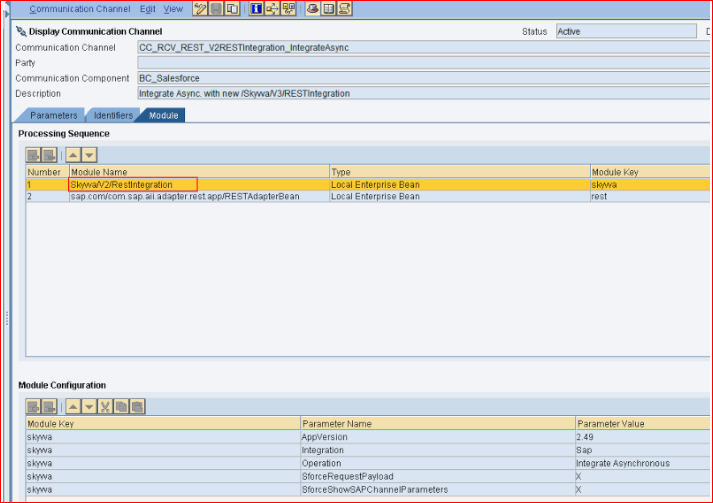
Here is an example screenshot of the V2/RestIntegration module.
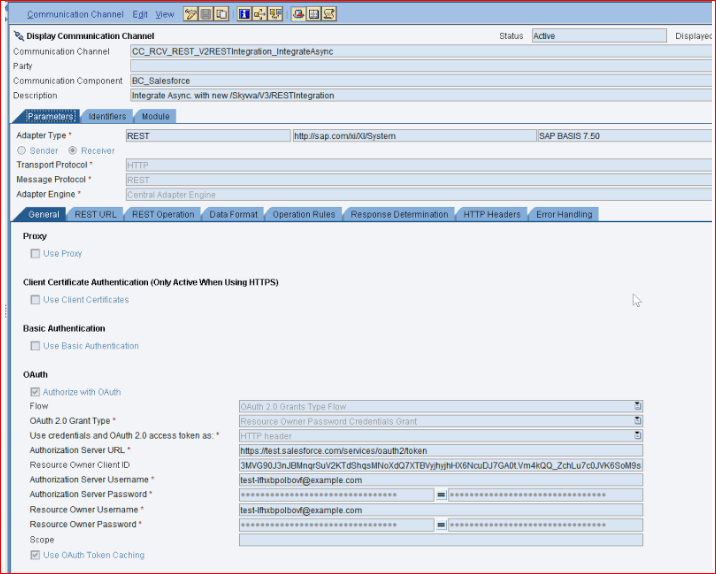
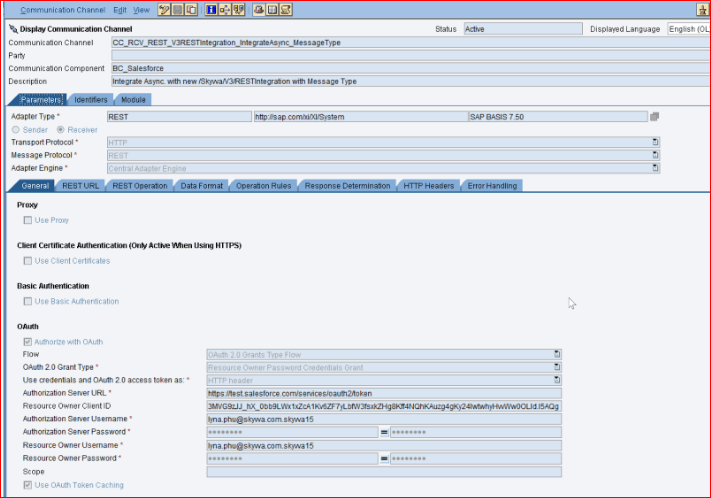
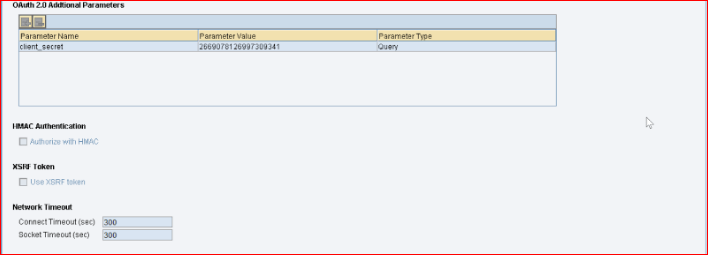
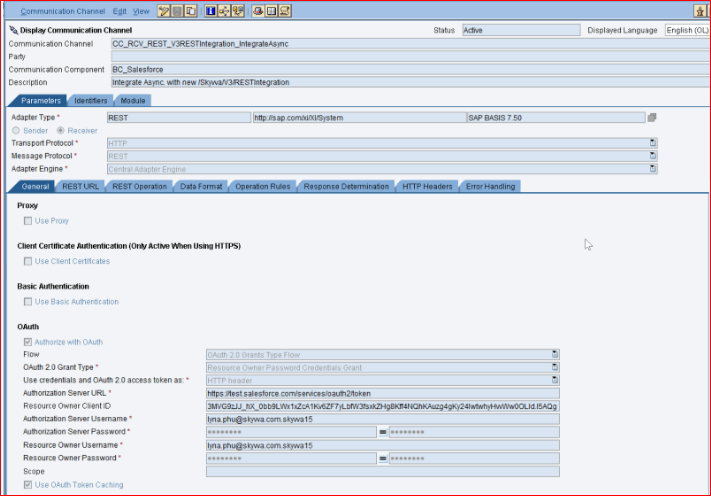
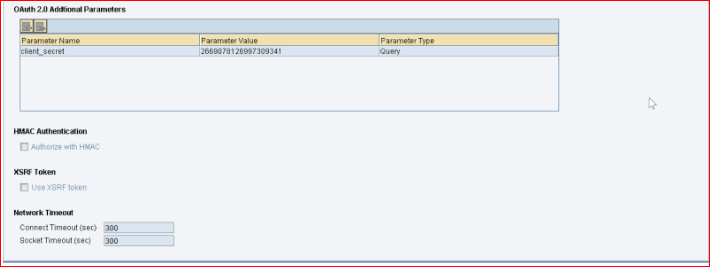
You have to create a new rest receiver channel module, as shown below screenshot. You need to configure the OAuth authentication using the client-id and client-secret. This can be found as the consumer-secret and consumer-id in the Salesforce Connected App. Enter the Salesforce instance URL of your organization into the field “Authorization Server URL”.
Select the check box “Authorize with OAuth” as shown in the screenshot below. Chose for the “OAuth 2.0 Grant Type” the value “Resource Owner Password Credentials Grant”. Set at the transfer method for the field “Use credentials and OAuth 2.0 access token as:” the value “HTTP Header”.
Enter the Salesforce username into the fields “Authorization Server Username” and “Resource Owner Username”. Enter the username’s password into the fields “Authorization Server Password” and “Resource Owner Password”. Enter to both fields the same username and password!
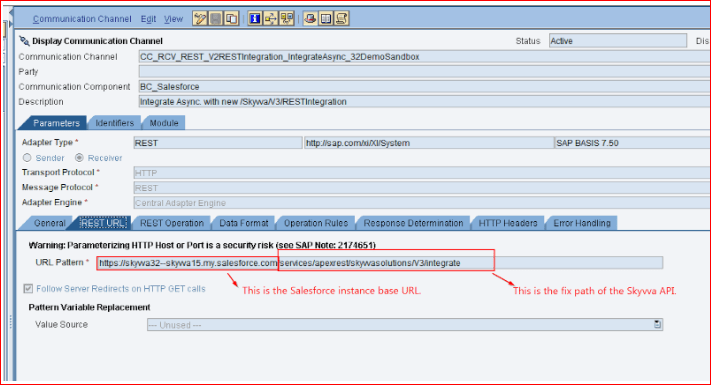
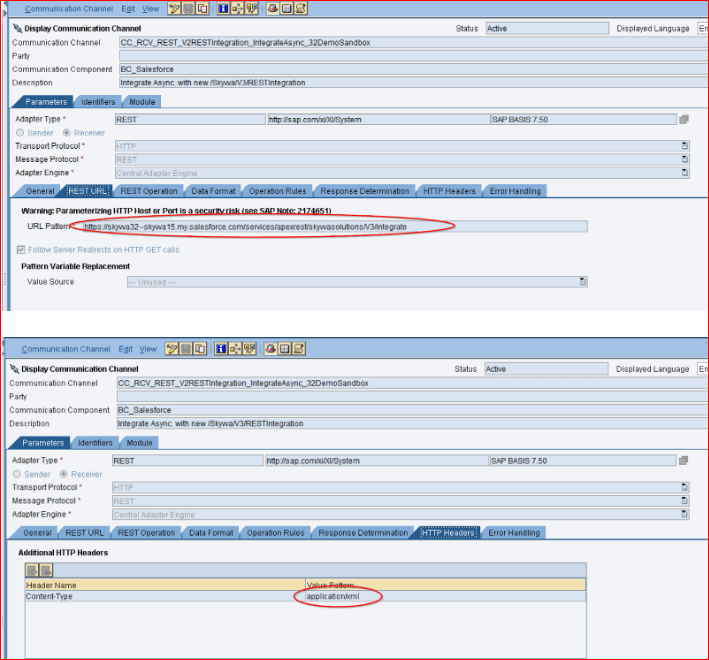
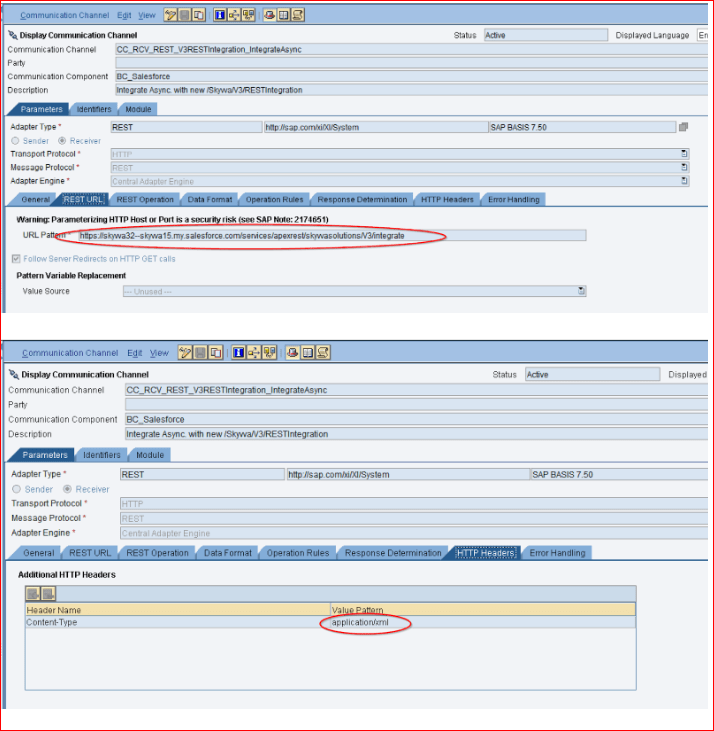
In the tab “REST URL” enter the Skyvva API that consists of the instance URL and the fix string “/services/apexrest/skyvvasolutions/V3/integrate”. It is your responsibility to get the correct Salesforce instance base URL of your organization!
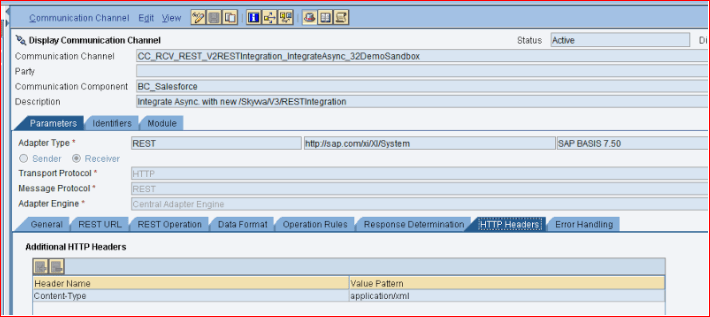
In the tab “HTTP Header” enter the Content-Type parameter as shown on the screen below.
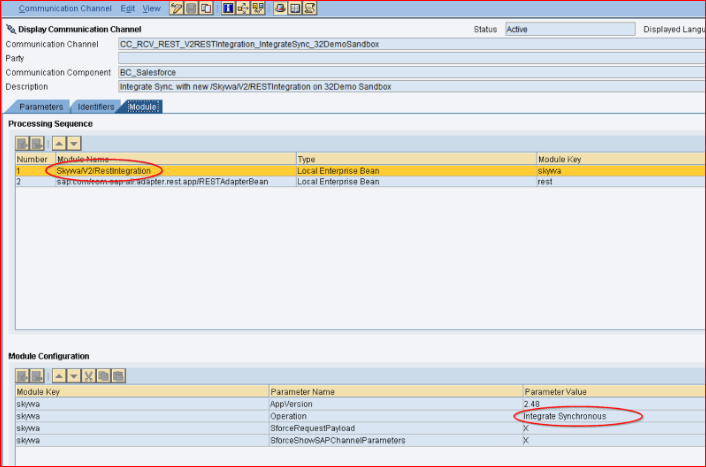
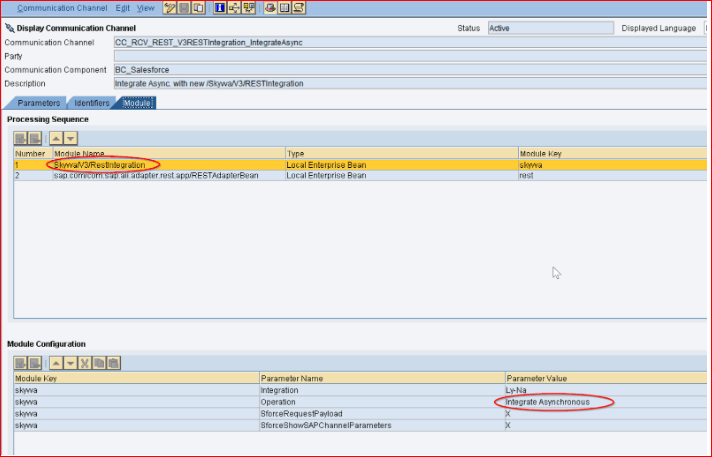
On the tab “Module” enter the Skyvva connector module. Note that in the example on the screenshot we use the V2 rest connector module and therefore we have entered the module “Skyvva/V2/RestIntegration”.
As a required parameter you must enter the parameter “Operation” and set it to “Integrate Asynchronous” or “Integrate Synchronous”. If this parameter is not set then the interface will not work. The next parameter is the integration name which you have to enter into the parameter “Integration”. This is only needed if you have not set the integration name in the mapping. If you have set the integration name in the mapping, you can omit this parameter because in this case, we use the integration name from the mapping.
You must enter the Skyvva App version using the parameter “AppVersion”. Ensure you enter the correct Skyvva App version installed on your Salesforce instance, for example, 2.47, 2.48, 2.49, etc. Other parameters on the below screenshot are optional.
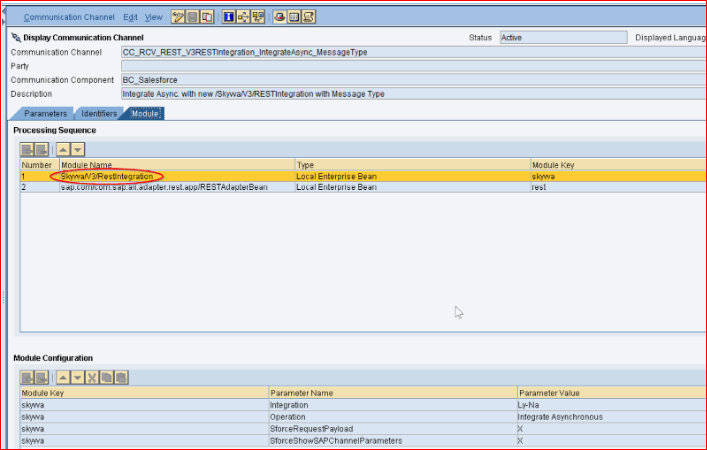
As explained above the parameters for the V2/- and V3/RestIntegration are the same. Here is a second example of the configuration with V3/RestIntegration module.
Here we can see that the V3/RestIntegration module is used instead of the V2/RestIntegration. The module parameters are the same as we have shown in the V2/RestIntegration module configuration.
The REST receiver channel is required in the migration work. We are using the REST receiver channel with the Skyvva connector module instead of the soap module. After you have created one working rest receiver channel you can use it as the template for a new channel you needed later. Ensure that you adapt the parameter accordingly when creating a new channel based on the existing one. The Salesforce instance URL, username, password, client-id, and client-secret parameters might be changed according to the Salesforce instance you are using.
3.4 How to migrate a V2 Interface? #
We need to distinguish between the V2 and V3 interface versions because different module is used. Here is an example of the REST adapter receiver channel configuration where you see some parameters.
The parameter “AppVersion” is needed to set the Skyvva App version you are running on the Salesforce instance. The parameter “Integration” is the integration name. This parameter is optional. If you set the integration name in the mapping, this parameter is not needed in the module configuration. If you set the parameter in both places, e.g., in the mapping and the module configuration, then the priority is given to the module parameter. This means that the module setting overwrites the mapping setting and therefore has a higher priority.
The parameter “Operation” is used to set the Skyvva operation. We have two different values for this mode, e.g.,
- Integrate Asynchronous. This operation is used when the interface is asynchronous and no response is needed in sap-po.
- Integrate Synchronous. This operation is used when you need a response from the Skyvva API.
The parameter “SforceRequestPayload” and “SforceShowSAPChannelParameters” are optional and used to create Skyvva-related traces in the adapter log. If you don’t need any log, then remove these parameters. It is recommended to use these parameters for testing in the UAT or Sandbox but removes them on the production because they create many log entries into the SAP-PO rest adapter trace.
For your old V2 module configuration with the soap adapter, you have to create a rest receiver channel and use the new module with the name “Skyvva/V2/RestIntegration”. Then set the parameters as described above. Change your configuration to use the new rest receiver channel instead of the soap receiver channel.
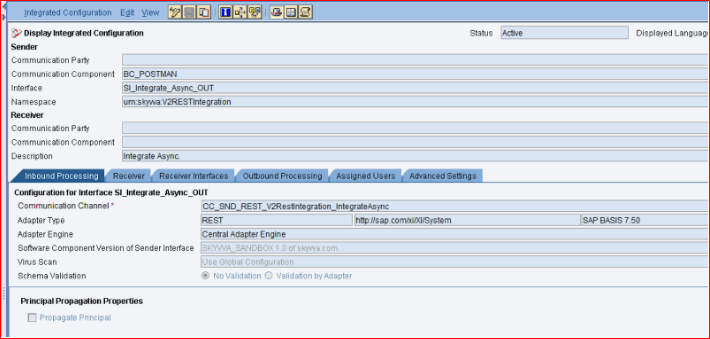
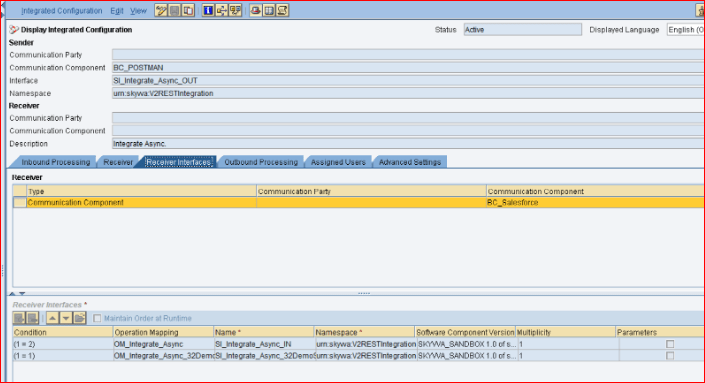
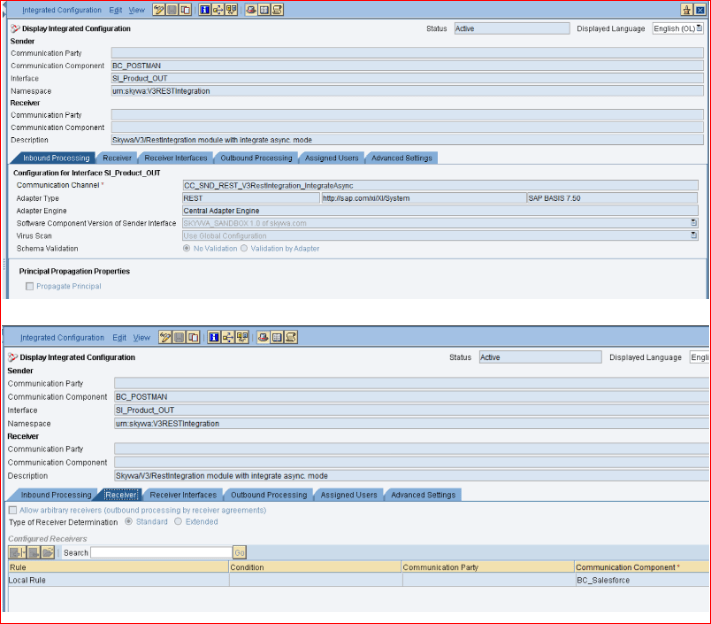
Here is an example of a configuration scenario for the operation “Integrate Asynchronous”. Note that your interfaces in the ESR remain as it is and can be reused. You only need to adapt the configuration by replacing the soap with the rest receiver channel.


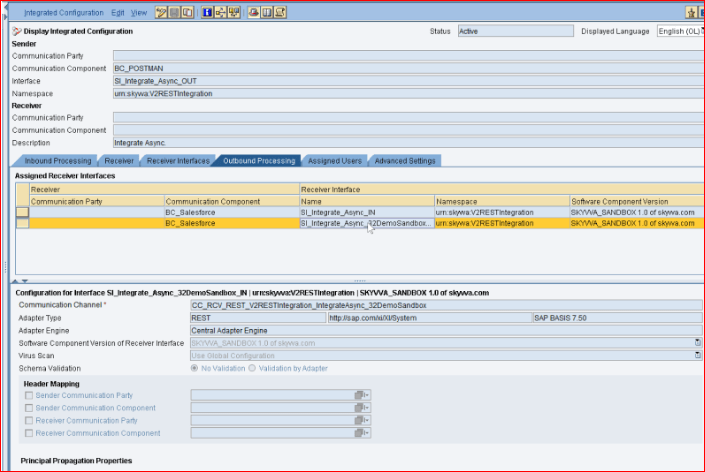
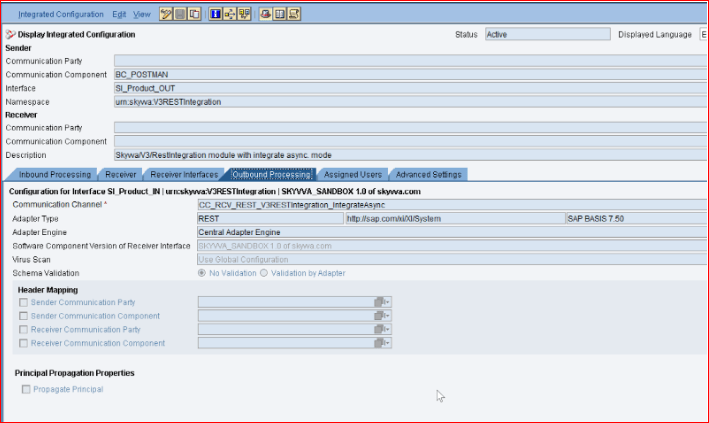
This is the rest receiver channel that you have to create.

3.5 How to migrate a V3 Interface? #
In this case, use the module “Skyvva/V3/RestIntegration”. The migration is the same as the V2 interface migration. The parameters are the same. You have just to replace the soap module with the V3 interface with the new rest module with the V3 version.

This is the adapter.
In the example above we have shown how to use the asynchronous interface e.g. the operation “Integrate Asynchronous”. If you have a synchronous scenario, you just need to change the operation name to “Integrate Synchronous”. Of course, your ESR definition has to use the synchronous service interface, and your sender adapter must use the QoS = BE. These are SAP-PO-specific interface design concept that is not described in this guide.


