Introduction #
Skyvva Added this feature to import data to support XML file with element syntax, support JSON file, support CSV file which contains hierarchical data. It is used with an inbound interface which is a normal or ichained interface. In the case of ichained interface, we have hierarchical data.
What Is this feature? #
This feature is built to import data(chained interface), to support XML file with element syntax(The XML file contains flat or hierarchical data), support JSON file (The JSON file contains flat or hierarchical data), support CSV file which contains hierarchical data (The format is described in the task ).
With integrate3 we provide the possibility to use a custom class to code the entire business logic using the message payload. Integrate3 will pass all messages to the custom class and the customer class will post the message for example insert or update. The custom class can also do other specific logic based on the requirement. With custom class, we can build complex processing and even provide the transactional handling e.g. rollback to a save point. Note that when we use custom class it will do all the logic of the whole processing block e.g. workflow, mapping, and operation like upsert. With custom class, we do the whole logic for all steps.
Here we need to create an apex class. #
Apex class: An apex class is similar to java class. It is a template or blueprint from which objects are created. In Apex, you can define top-level classes (also called outer classes) as well as inner classes, that is, a class defined within another class.
Why we use apex class here? #
For some custom requirements, the client needs to change some data from the inbound interface or the client needs to add some condition before inserting the data apex formula is used. For example, if we have to calculate some field before sending data to the outbound interface, but just a more complex formula can be done through the apex class.
It is used when any of the functions do not support the logic which needs to be in the formula. e.g. one customer has a requirement where I used this. they had one field called timestamp provider. They need to check that if timestamp which is coming from outside salesforce to salesforce is older than the current timestamp or not. In this case, we cannot access existing data in salesforce through the formula. here we need some custom formula that can be build apex formula.
How to create an apex class? #
To built apex class please follow the given steps:
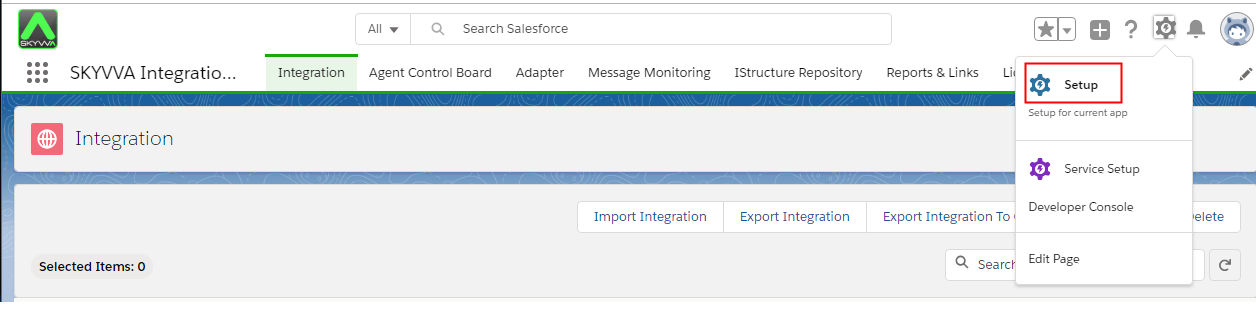
Step1: We have to go to set up in our salesforce organization. Click on the setup option.
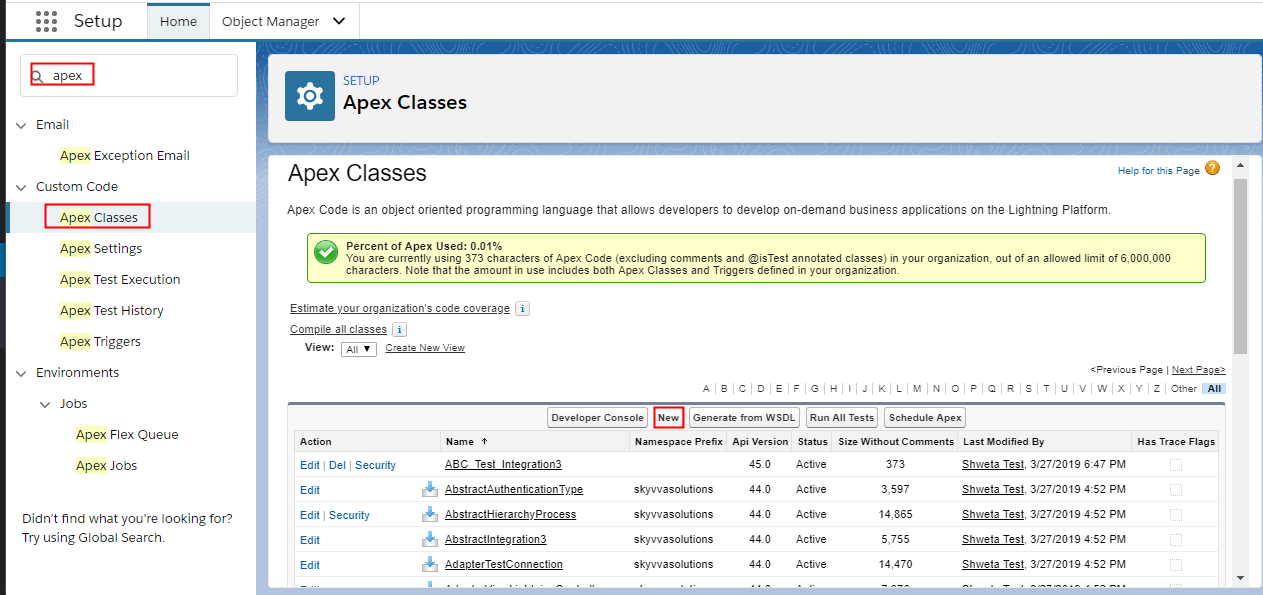
Step 2: Search apex class in the quick search box and click on the new button to create a new apex class.
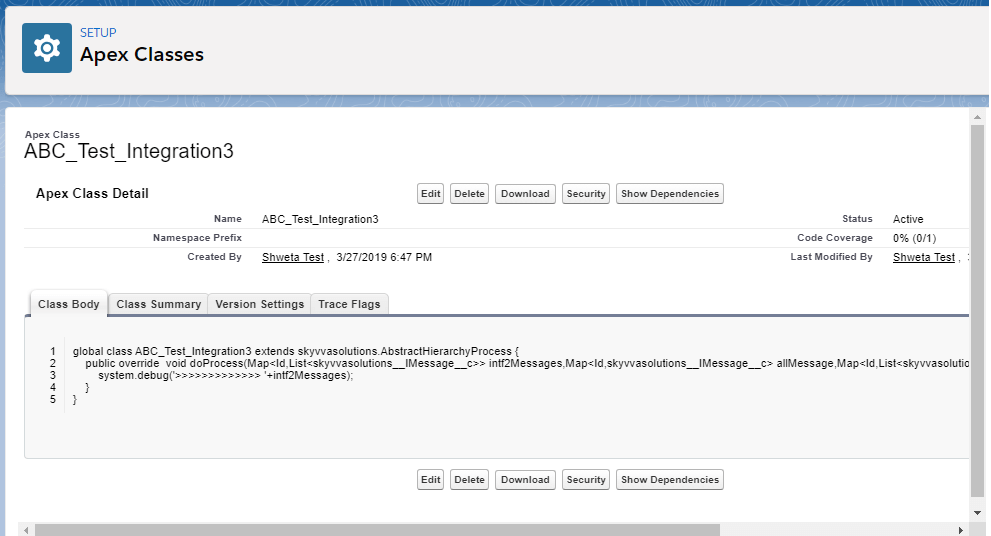
Step 3: New button should navigate to new page. Enter the following code there:
[aux_code language=”javascript” theme=”tomorrow” title=”” extra_classes=””]
global class ABC_Test_Integration3 extends skyvvasolutions.AbstractHierarchyProcess {
public override void doProcess(Map<Id,List<skyvvasolutions__IMessage__c>> intf2Messages,Map<Id,skyvvasolutions__IMessage__c> allMessage,Map<Id,List<skyvvasolutions__IChained_Interfaces__c>> treeInterface,Id pInterface){
system.debug(‘>>>>>>>>>>>>> ‘+intf2Messages);
}
}
[/aux_code]
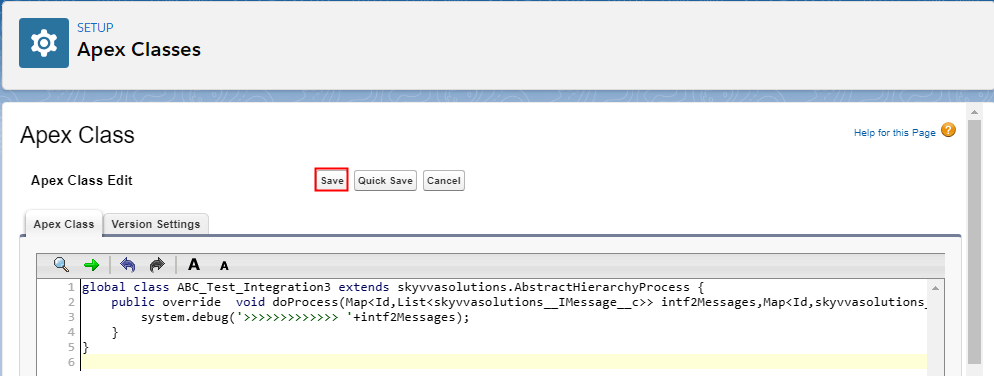
And click on the save button to save the apex class.
Pre-requisite :
- We have to create an apex class.
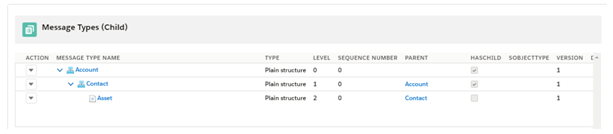
- We have to create hierarchical Message type:
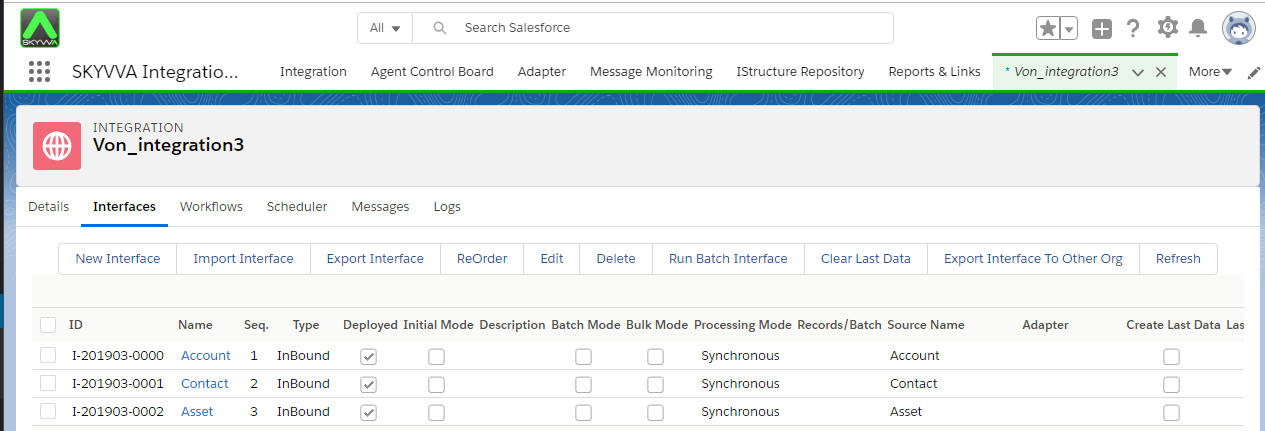
3. We have to create Integration.
4. We have to create three interfaces.
- Account (parent) Interface using hierarchical message type.
- Contact Interface: child of account interface.
- Asset Interface: child of the contact interface.
In integration3 here, no need to do mapping manually.
How to process message type based Interface? #
To process the message type-based interface we have to follow the given steps:
Step1: We have to configure Ichain interface
Configuration of Ichained Interface in account and contact object.
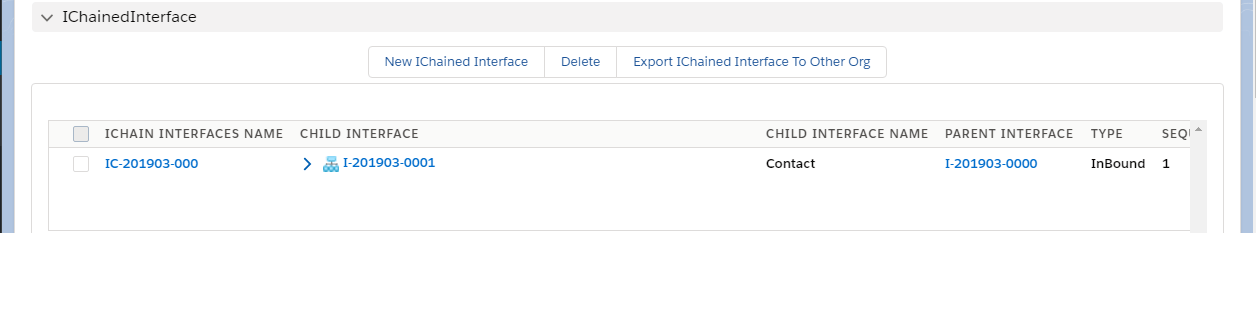
Configuration of Ichained Interface in contact and Asset objects.

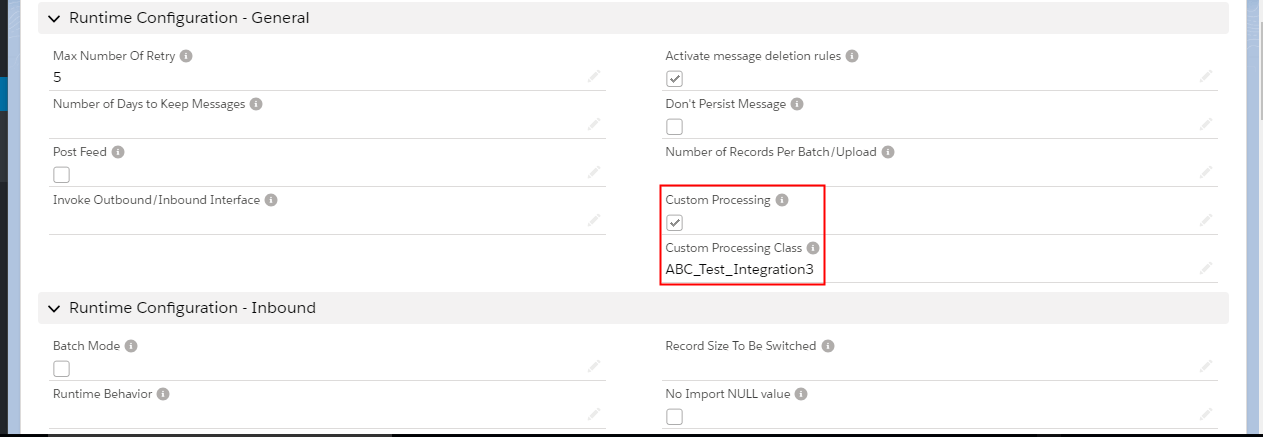
Step2: Configure in 2 fields in the parent interface is Account
-Custom Processing = True
-Custom Processing Class = enter the name of a custom class e.g: (ABC_Test_Integration3)
Step3: Navigate to Integration => Manual Load => select parent interface (Account) => select Data Type = XML HIERARCHY => Choose hierarchical data xml and upload.
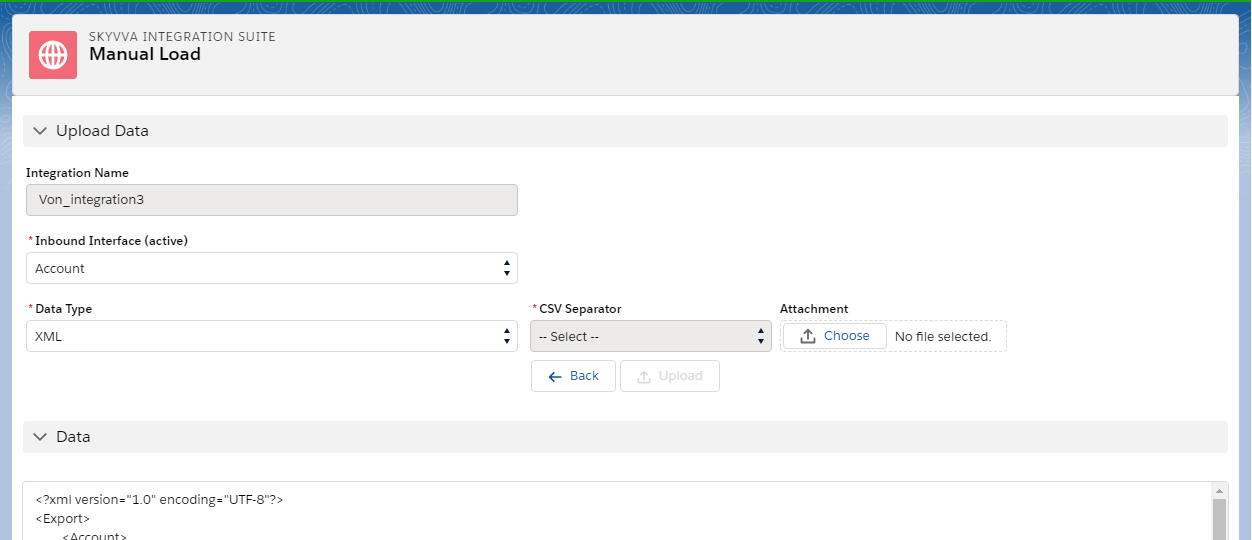
Here is an example hierarchical data payload.
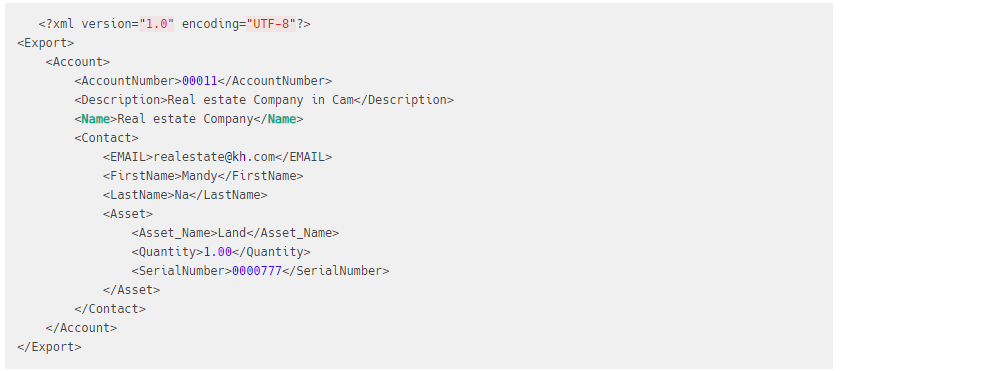
We can not select data to push. We have to push all the uploaded data.
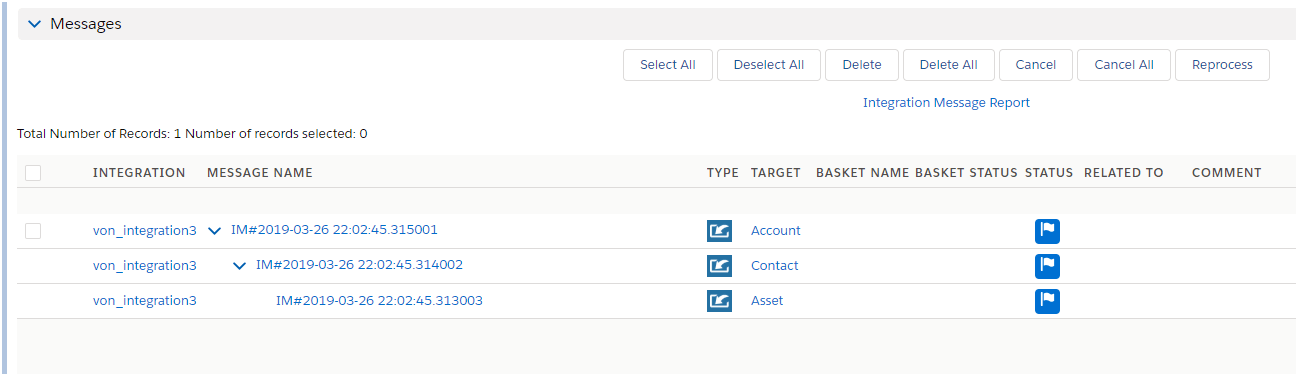
Click on the Message Board button to view all messages after processed.