Introduction #
SKYVVA application’s functionality for importing JSON Swagger, OpenAPI 3. x, and EDMX files using an Open Editor button. The enhancement, here we described involves a pop-up screen for importing metadata and opening the editor. The main difference is in the second step of importing metadata, where users can manually enter values in the ‘Open Editor‘ and click the ‘Upload‘ button to choose the API of the message type.
Here’s a breakdown of the process described:
- Importing Metadata: Users click on the “Open Editor” button to initiate the process.
- Pop-up Screen: A pop-up screen appears, where users can select the file they want to import. This file can be in JSON Swagger, OpenAPI 3. x, or EDMX format.
- Manual Entry: In this step, users have the option to manually enter values in the “Open Editor” field. it is text input where users can provide input.
- Click Upload: After entering the desired values in the “Open Editor” field, users click the “Upload” button. This action likely triggers the import process for the selected API or message type based on the entered values.
It’s important to ensure that the user interface is clear and intuitive so that users can easily understand and navigate through these steps.
How to use the ‘Open Editor’ button to create a message type. #
Case 1: Swagger 2.0/OpenAPI 2.0 file types.
The process for generating an API from a Swagger 2.0/OpenAPI 2.0 file. Here’s a breakdown of the steps are mentioned:
- Select Swagger 2.0/OpenAPI 2.0 File Type: The user starts by selecting the file type you want to use, which is Swagger 2.0 or OpenAPI 2.0. These are commonly used specifications for describing RESTful APIs.
- Upload Open Editor Button: After selecting the file type, the user likely has an open editor box where the user inputs the content or path to your Swagger 2.0/OpenAPI 2.0 file. This file typically contains the API definition, including endpoints, request/response schemas, and other relevant information.
- Generate the API: Once you’ve provided the necessary input, a process is initiated to generate the API based on the contents of the Swagger 2.0/OpenAPI 2.0 file. This process may involve parsing the file and creating code or configuration files necessary to expose the API.
- API Appears on the Screen: After the generation process is complete, the resulting API is displayed on the screen. This could include a visual representation of the API endpoints, documentation, or other relevant information.
- Choose and Save Message Type: At this point, you have the option to choose and store the message type for a specific API. Message types might refer to how requests and responses are formatted or serialized, such as JSON, XML, or other custom formats. This step allows you to configure how the API will send and receive data.
Overall, this process appears to be a streamlined way to import a Swagger 2.0/OpenAPI 2.0 definition, generate an API, and configure message types for communication with the API. It’s a common workflow in API development and integration.
Required step:
- Create metadata provider and repository.
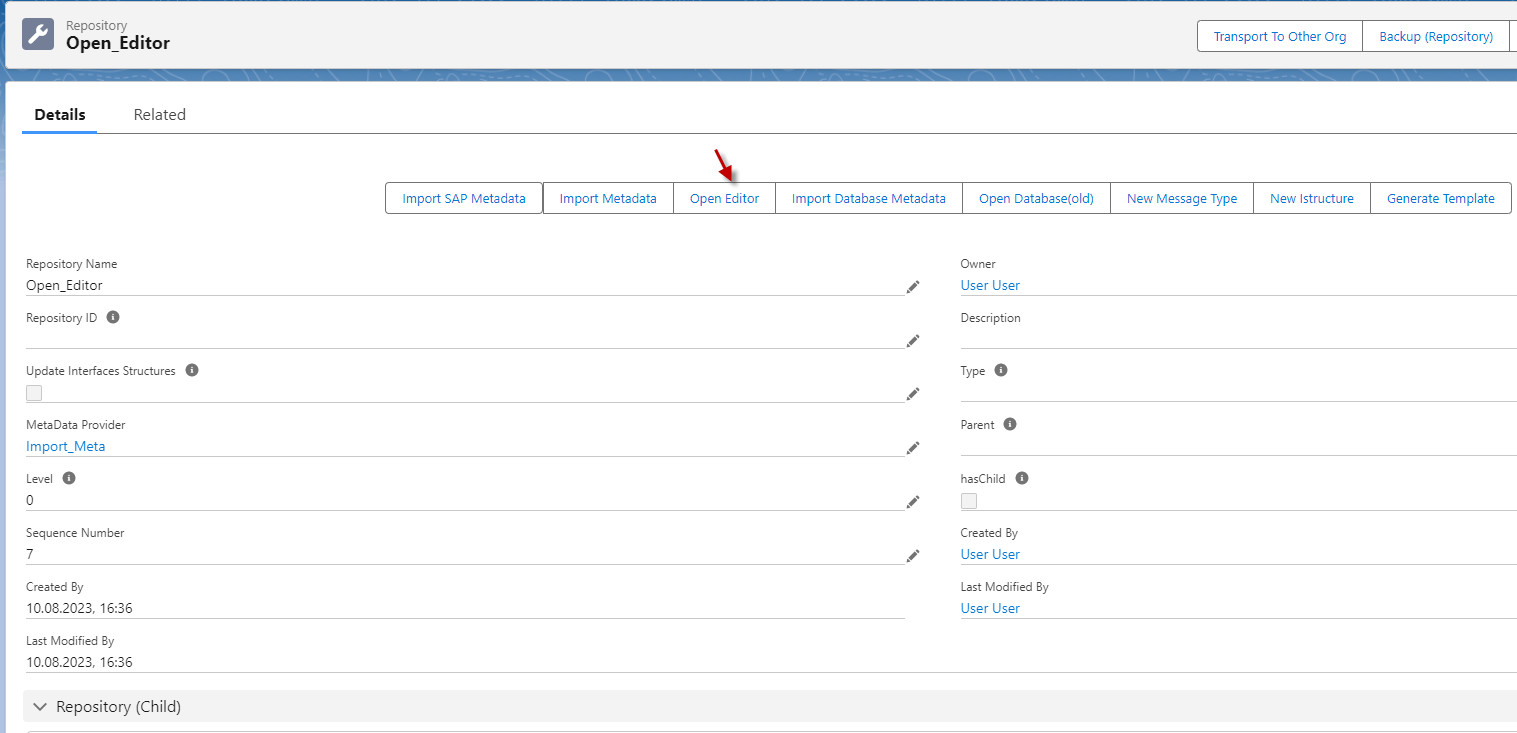
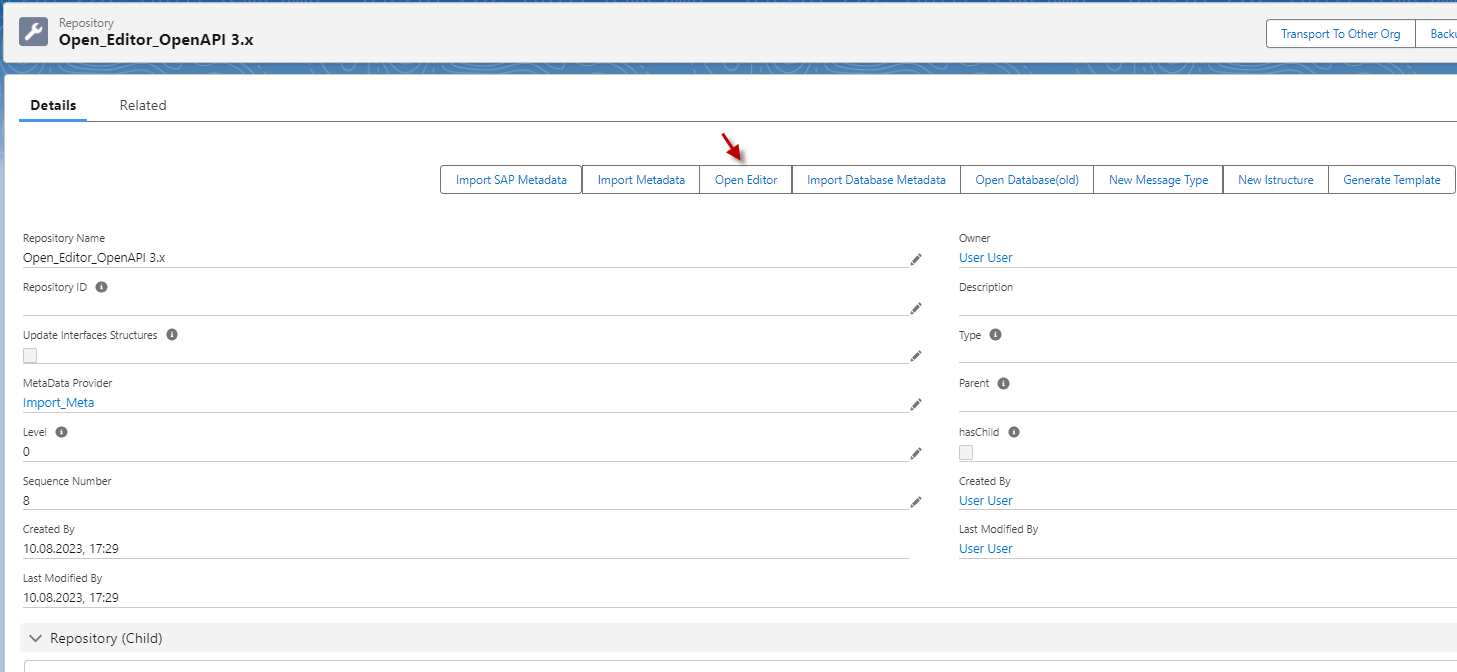
- Go to the repository then click the Open Editor button.
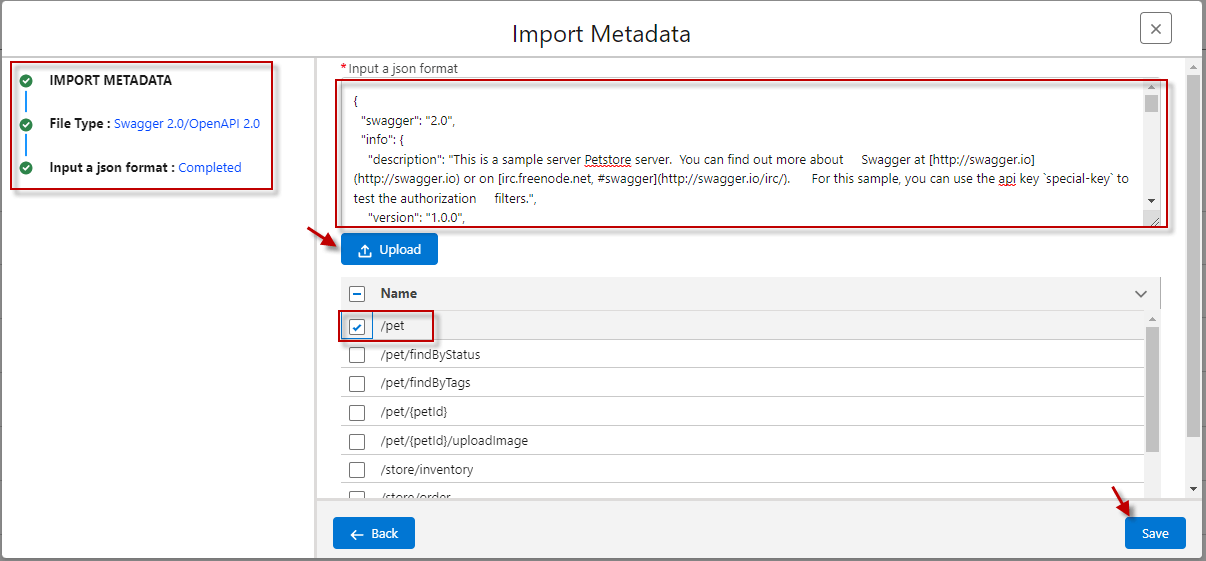
- Choose the file type as Swagger 2.0/OpenAPI 2.0 and click the next button, then manually enter the values in the box.
- Click the ‘Upload’ button and click choose the API Name.
- The save button will generate a message type.
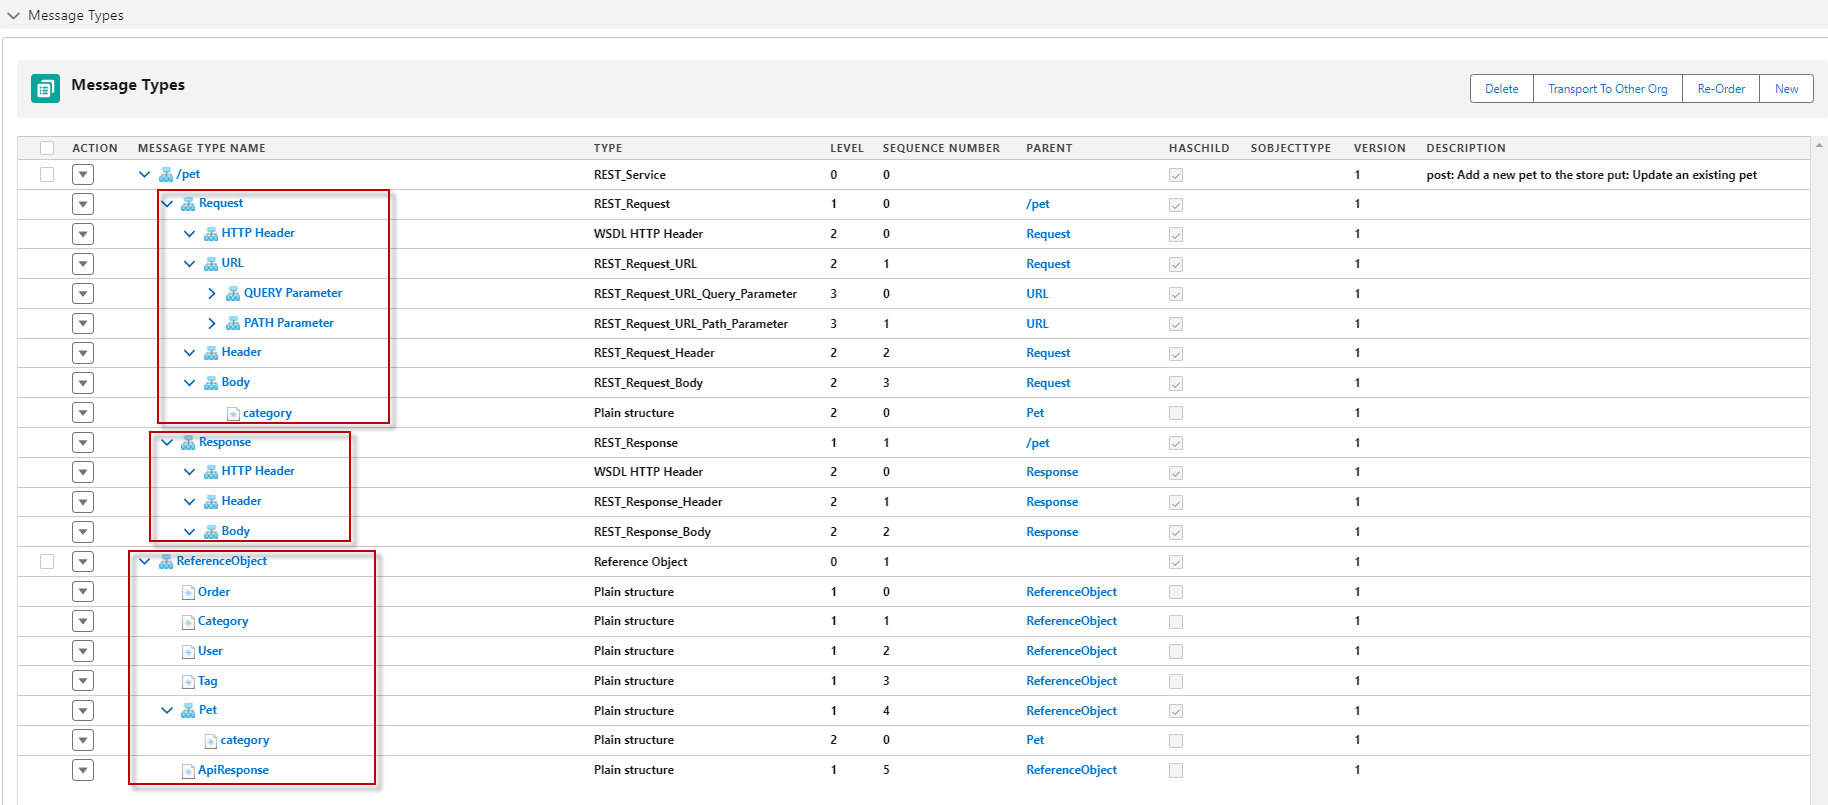
This is a process where a pop-up screen displays API information, including the API name and ReferenceObject, and then generates a REST template, including the Request and Response. Here’s a general outline of how users configure this:
- User Interaction: Create a user interface that allows users to input the API name and ReferenceObject. This interface of the SKYVVA application.
- Pop-Up Display: When the user inputs the API name and ReferenceObject, trigger a pop-up or modal dialog that displays this information.
- Generate REST Template:
- Request: Based on the API name and ReferenceObject, dynamically generate the REST request template. This template should include the HTTP method (GET, POST, PUT, DELETE, etc.), the API endpoint, request headers, and request body.
- Response: Similarly, generate the REST response template. This should include the expected HTTP status codes, response headers, and response body structure.
- Display Templates: Display the generated request and response templates to the user within the format screen. Users can format these templates in a user-friendly way, such as JSON or XML, depending on the API and user preferences
Case 2: OpenAPI 3. x file types.
This process is related to working with OpenAPI 3.x files and generating an API. OpenAPI is a specification for building APIs, and it provides a standardized way to describe the endpoints, data models, and operations of an API. Here’s a breakdown of the steps you mentioned:
- Select ‘OpenAPI 3.x’ File Type: This step involves choosing the OpenAPI version the user wants to work with. OpenAPI 3.x is one of the versions, and it might be offered as an option when users are setting up or configuring an API with the SKYVVA application.
- Enter a Value in the Open Editor Box: After selecting the ‘OpenAPI 3.x’ file type, the user would typically need to provide or upload an OpenAPI specification file. This file is usually written in XML or JSON and contains the details of your API, such as endpoints, request and response schemas, authentication methods, etc. The “Open Editor Box” is likely where you paste the contents of your OpenAPI specification file.
- Generate the API on the Screen: Once the user enters the OpenAPI specification, the system or tool the user using will process it and generate an API based on the provided specification. This API generation process may involve parsing the OpenAPI file configurations for user API.
- Choose and upload Message Type for a Specific API: After the API is generated, a user may have the option to choose and upload a message type for a specific API. Message types could refer to data formats or structures used for communication within the API, such as JSON, or XML. Depending on user requirements, a user might need to select a message type that aligns with your API’s design.
Required step:
- Create metadata provider and repository.
- Go to the repository then click the Open Editor button.
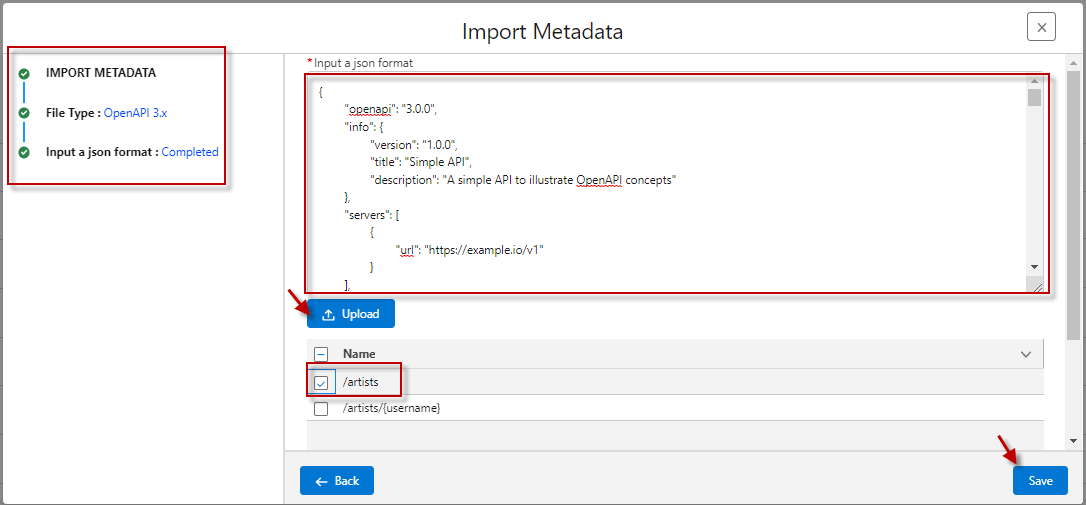
- Choose the file type as OpenAPI 3. x and click the next button, then manually enter the values in the box.
- Click the ‘Upload’ button and click choose the API Name.
- The save button will generate a message type.
This is a process where a pop-up screen displays API information, including the API name and ReferenceObject, and then generates a REST template, including the Request and Response. Here’s a general outline of how users configure this:
- User Interaction: Create a user interface that allows users to input the API name and ReferenceObject. This interface of the SKYVVA application.
- Pop-Up Display: When the user inputs the API name and ReferenceObject, trigger a pop-up or modal dialog that displays this information.
- Generate REST Template:
- Request: Based on the API name and ReferenceObject, dynamically generate the REST request template. This template should include the HTTP method (GET, POST, PUT, DELETE, etc.), the API endpoint, request headers, and request body.
- Response: Similarly, generate the REST response template. This should include the expected HTTP status codes, response headers, and response body structure.
- Display Templates: Display the generated request and response templates to the user within the format screen. Users can format these templates in a user-friendly way, such as JSON or XML, depending on the API and user preferences
Case 3: EDMX file types.
This process is related to working with EDMX files and generating APIs using either a REST template or a SOAP template. Let us break down the steps based on your description:
- Select the EDMX File Type: You start by selecting the “EDMX” file type. EDMX (Entity Data Model XML) files are often used in the context of Entity Framework.
- Enter a Value in the Open Editor Box: After selecting the EDMX file type, you might be prompted to enter a specific value in an open editor box. This value could be related to the configuration or setup of the API user generating.
- Choose Between Two Templates: Next, you have the option to choose between two templates:
- REST Template: If the user selects the REST template, it means the user wants to create a RESTful API based on the EDMX file. RESTful APIs are commonly used for web services.
- SOAP Template: If the user selects the SOAP template, you’re opting for a SOAP-based API. SOAP (Simple Object Access Protocol) is a protocol used for exchanging structured information in the implementation of web services
4. Generate the API: After selecting one of the templates (either REST or SOAP), the system will generate the API on the screen. This generated API is likely a basic structure that users can customize to meet their specific requirements.
5. Choose and upload the Message Type: Once the API is generated, the user has the opportunity to choose and save the message type for a specific API. This step allows the user to configure the API to work with the specific data formats you need.
- Rest Template
- EntitySet
Select Function ‘EntitySet’: After selecting the template, the user will need to specify the function the user wants to use. Choose the “EntitySet” function, which relates to a collection of entities in the SKYVVA data model.
- Choose File Type as EDMX: Begin by selecting the file type as “EDMX” (Entity Data Model XML) in the SKYVVA application. This involves opening a dialog or interface for selecting file types.
- Click the Next Button: After selecting the EDMX file type, click the “Next” button. This action should take us to the next step of the process.
- Manually Enter Values in the Box: In the subsequent screen or dialog, you will need to manually enter values into one or more inputs. These values could be related to the SKYVVA data model, configuration settings, and parameters. The specific details of what users need to enter will depend on the SKYVVA Application and the context of user business requirements.
- Click the ‘Upload’ Button: After entering the required values, locate and click the “Upload” button. This action will likely initiate the processing or validation of the information the user provided.
- Select Template ‘Rest Template’: In the next step, the user will be prompted to select a template. Choose the “Rest Template” from the available options. This template defines the structure and behavior of the API users are generating.
- Click the API Name and ‘Save’ Button: The user will now need to provide a name for the user API. After entering the API name, click the “Save” button. This action will trigger the generation of the message type or the creation of the API based on user selections and configurations.
Required step:
- Create metadata provider and repository.
- Go to the repository then click the Open Editor button.
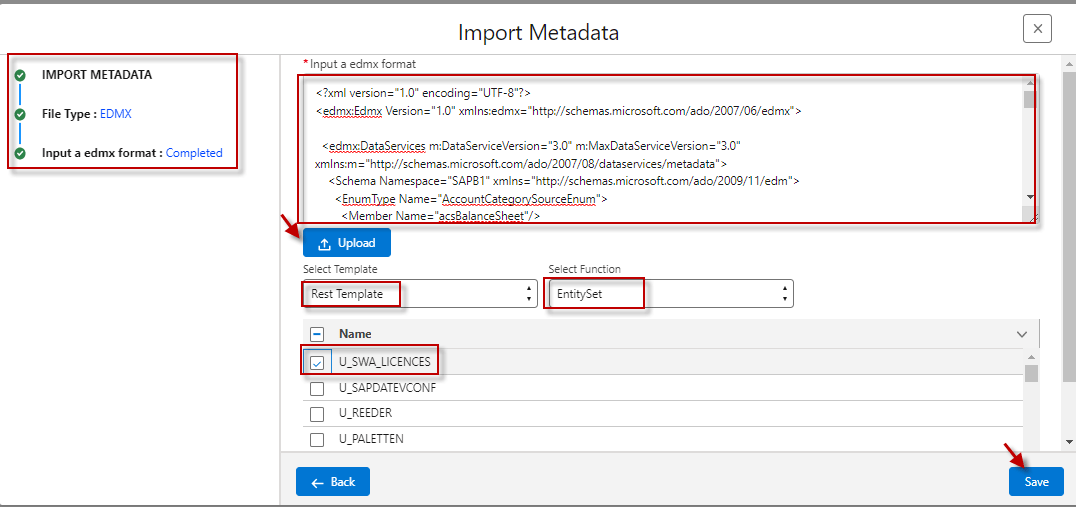
- Choose file type as edmx and click the next button, then manually enter the values in the box.
- Click the ‘Upload’ button.
- Select template ‘Rest Template’, Select function ‘EntitySet’
- click the API Name and ‘save’ button it will generate a message type.
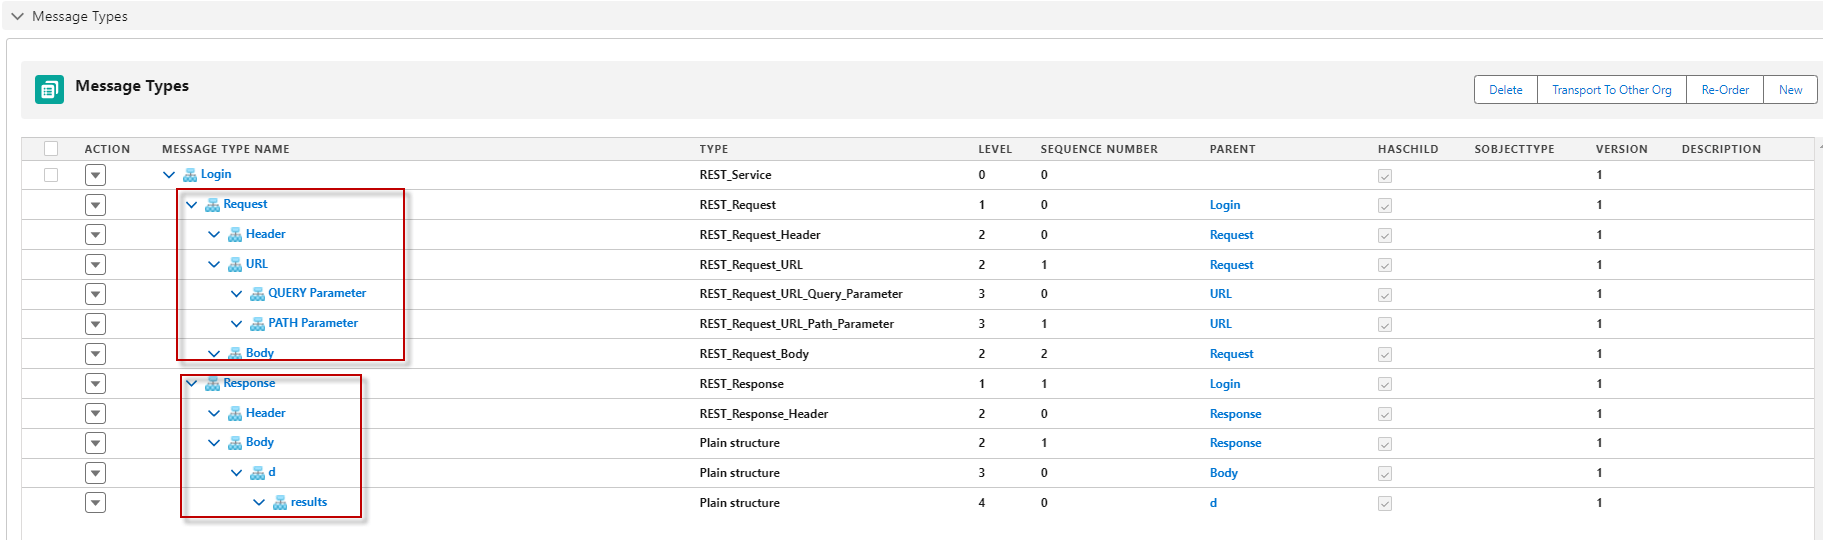
This is a process where a pop-up screen displays API information, including the API name, and then generates a REST template, including the Request and Response. Here’s a general outline of how users configure this:
- Pop-up Screen: After performing a certain action, a pop-up screen appears. This pop-up screen likely contains information related to an API.
- API Name: The pop-up screen displays the name of the API. This could be the title or identifier of the API being used.
- REST Template Generation: The process also involves generating a REST template. A REST template is typically used to structure and document RESTful API requests and responses. This template will help users understand how to interact with the API effectively.
- Request and Response: Within the generated REST template, there will be sections or fields for the Request and Response. These sections will provide details on how to structure requests to the API (e.g., HTTP methods, headers, parameters, and body) and what to expect in the API’s response (e.g.headers, and response data).
Overall, this process is a user interface element (the pop-up screen) that helps users access information about an API, and it streamlines the process of generating a REST template to work with that API, including guidance on how to structure requests and handle responses.
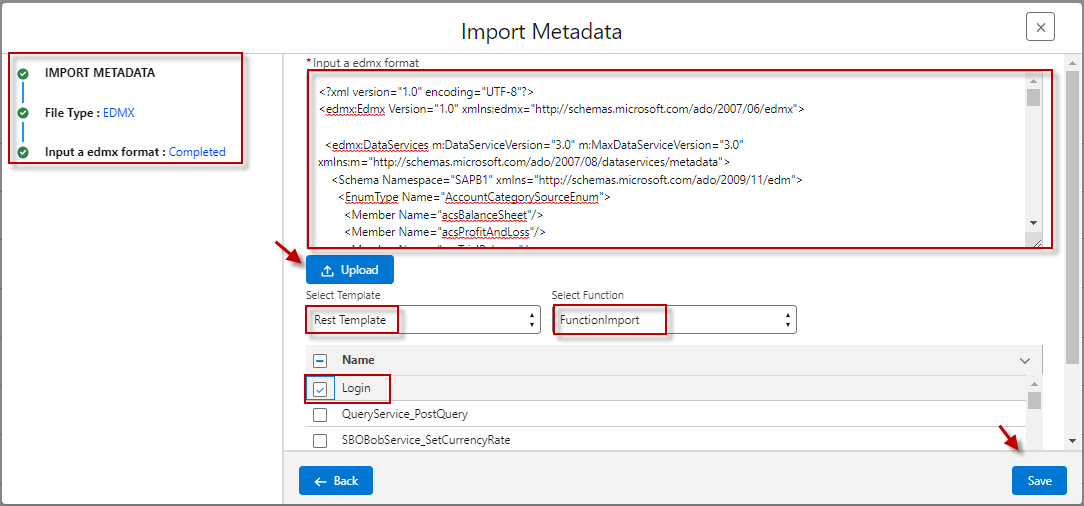
- Rest Template
- FunctionImport
Select template ‘Rest Template’, Select function ‘FunctionImport’: It appears the user choosing a specific template (in this case, “Rest Template”) and a function (likely for defining a RESTful API endpoint or operation) as part of the configuration process. Based on the instructions the user provided, it appears to be related to configuring and setting up API or service using an EDMX file, likely in an environment. Here’s a general breakdown of the steps you’ve mentioned:
- Choose file type as edmx and click the next button: This suggests that you are selecting a specific file type (EDMX, which is commonly used for Entity Data Model XML files) in some kind of software or tool. After selecting the file type, you’re clicking a “Next” button, which likely takes you to the next step in the configuration process.
- Manually enter the values in the box: The user is expected to input certain values into some input fields. These values are related to configuring the EDMX file or setting up the API or service.
- Click the ‘Upload’ button: Once the user entered the required values, you click an “Upload” button to submit the data or configuration.
- Click the API Name and ‘save’ button: The user seems to be naming the API or specifying some kind of identifier for it. After providing the API name, the user clicks a “Save” button to finalize the configuration.
- It will generate the message type: After completing the above steps, the SKYVVA application will automatically generate a message type, presumably related to the API or service user configuring.
Required step:
- Choose file type as edmx and click the next button, then manually enter the values in the box.
- Click the ‘Upload’ button.
- Select template ‘Rest Template’, Select function ‘FunctionImport’
- Click the API Name and ‘save’ button it will generate the message type.
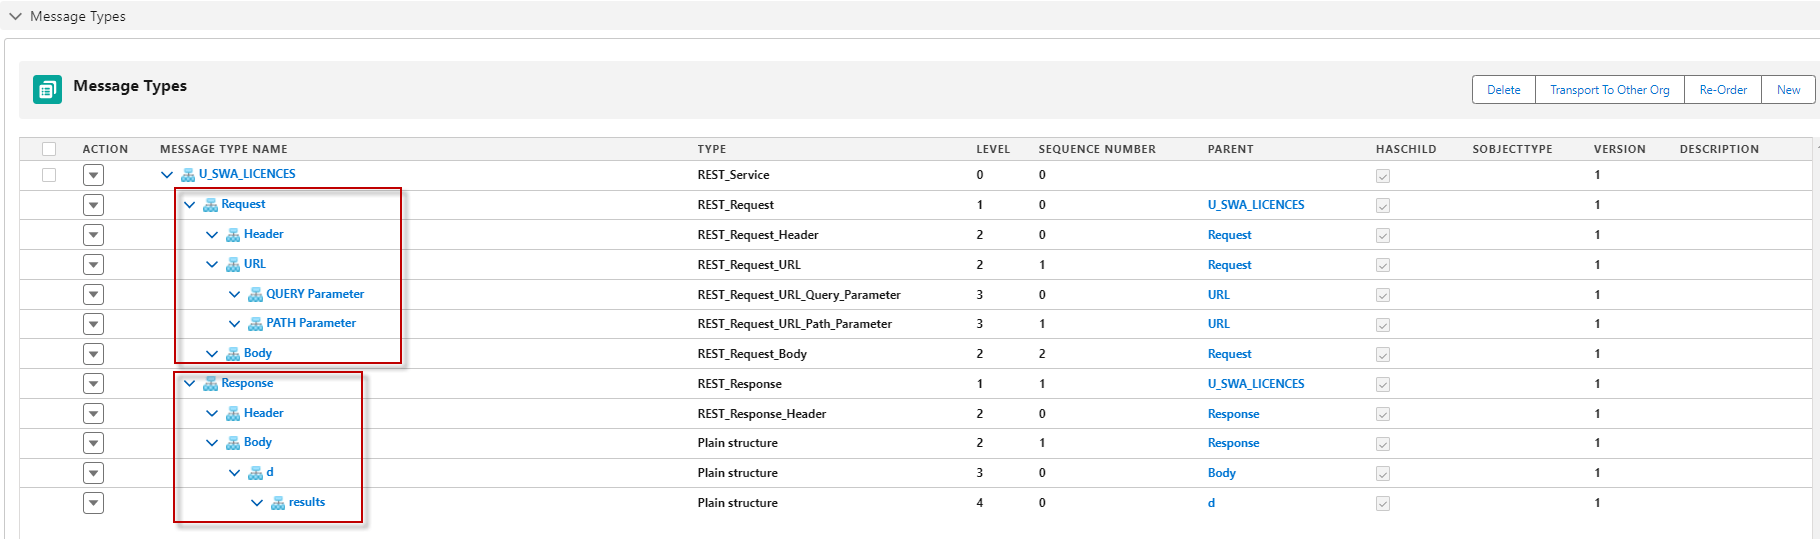
It describes a result or outcome related to displaying a pop-up screen with API information and generating a REST template with Request and Response components. Here’s a more detailed description of the result:
Result Description: When the user performs the specified action, the following result:
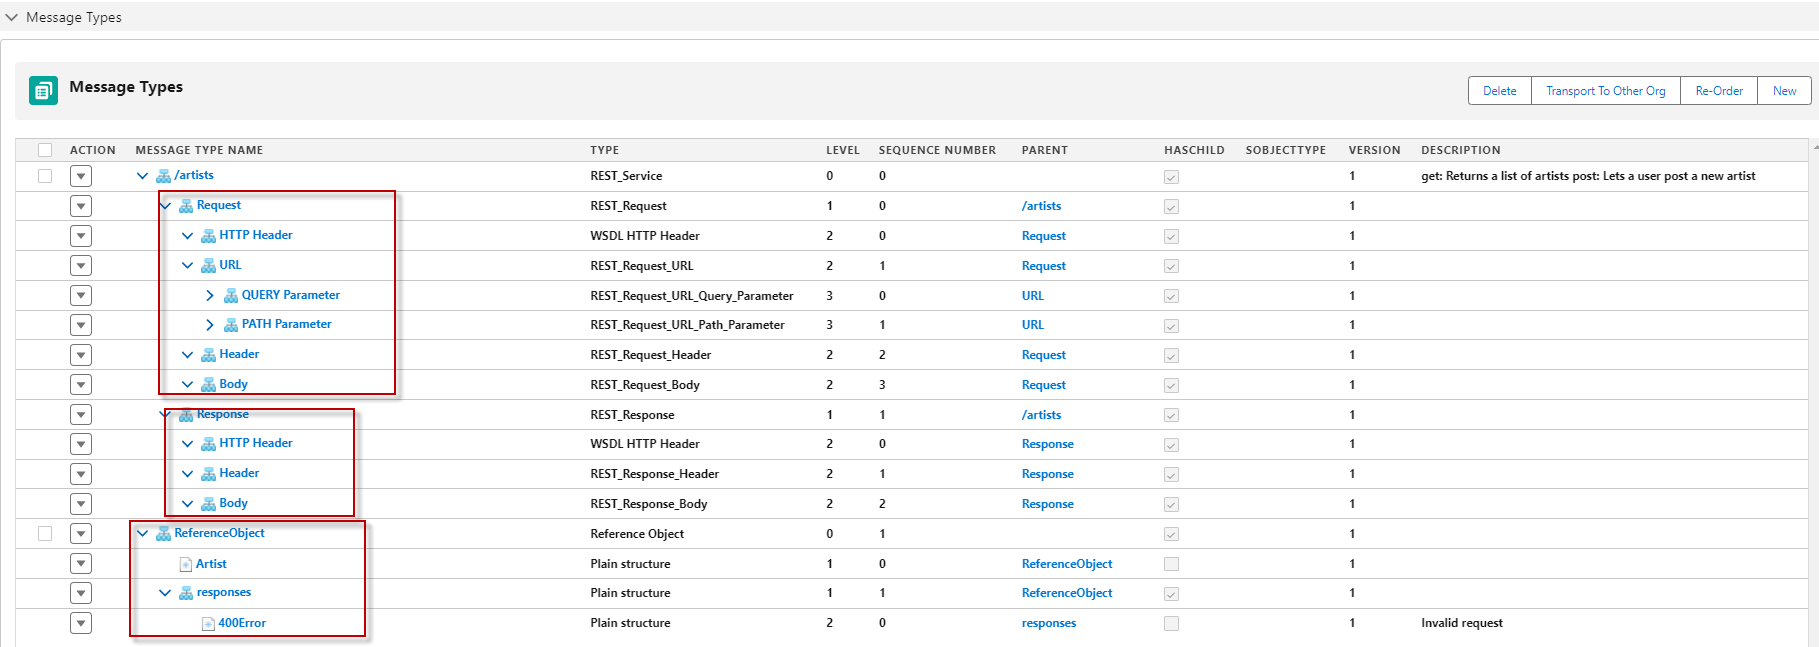
- Pop-up Screen Display:
- A pop-up screen will be shown on the message types. This pop-up screen will contain the relevant API name, providing a clear and informative display for users.
- REST Template Generation:
- REST template will be automatically generated as part of this process. The REST template will include both Request and Response components, simplifying the process of interacting with the API. Here’s what the user can expect in the generated REST template:
Request Component:
- The Request component of the REST template will include:
- HTTP method (e.g., GET, POST, PUT, DELETE) required to interact with the API.
- Endpoint URL or URI, specifies the location of the API.
- Headers and authentication information, if applicable.
- Request body, including parameters, payload, or data required for the API call.
Response Component:
- The Response component of the REST template will include:
- Expected HTTP status codes (e.g., 200 OK, 404 Not Found) and their meanings.
- Sample response data or schema, indicating the structure of the data returned by the API.
- Error handling information specifies how errors or exceptions will be handled in the response.
This result ensures that users have access to essential information about the API and a preconfigured REST template to facilitate API interactions, streamlining the integration process.
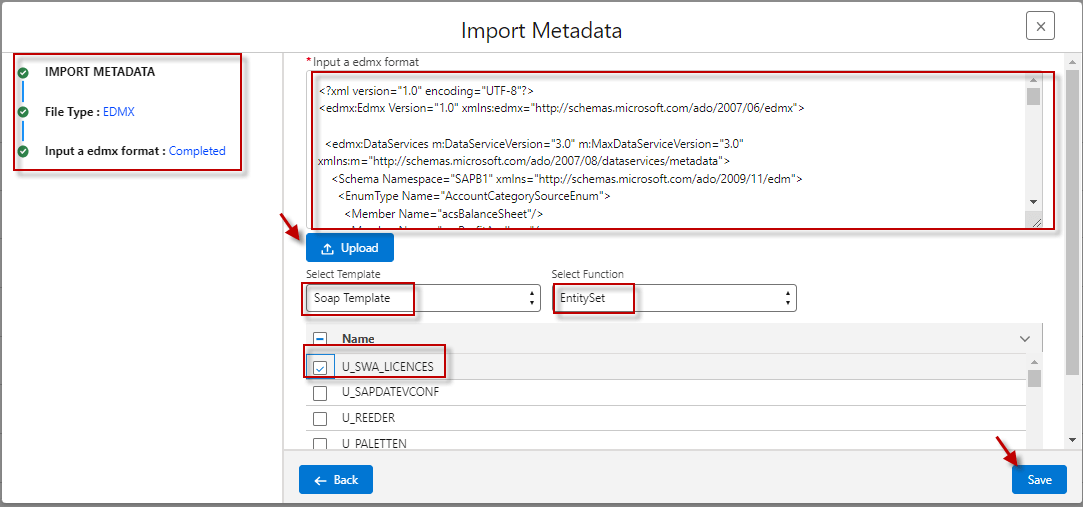
- Soap Template
- Function: EntitySet
It describes a series of steps to perform a specific task related to working with an EntitySet Data Model (EDMX), SOAP templates, and function imports in a SKYVVA application. These steps are typically part of the configuration process in an SKYVVA application. Here’s a breakdown of the steps you mentioned:
- Select function ‘FunctionImport‘: Users select a function import, which is a way to expose a function or method from your data model as a callable operation SKYVVA application.
- Choose file type as edmx: This step involves selecting the file type as EDMX (Entity Data Model XML) when users are working with data models in an SKYVVA application.
- Click the next button: This suggests that the user should proceed to the next step or screen in our SKYVVA application.
- Manually enter the values in the box: This refers to filling in specific information or configuration settings in a dialog box or form within the SKYVVA application. The exact values to enter would depend on user-specific business requirements.
- Select template ‘Soap Template’: This step involves choosing a SOAP (Simple Object Access Protocol) template as the basis for your development work. SOAP is often used for web services.
- Click the API Name and ‘save’ button: It appears that the user is providing a name for your API and saving the configuration. This could be the name of the function import or some other API-related component.
- It will generate the message type: After completing these steps, the SKYVVA application should generate a message type function import user configured. This message type can be used to send and receive data when working with SOAP web services.
Required step:
- Choose file type as edmx and click the next button, then manually enter the values in the box.
- Click the ‘Upload’ button.
- Select template ‘Soap Template’, Select function ‘EntitySet’
- Click the API Name and ‘save’ button it will generate the message type.
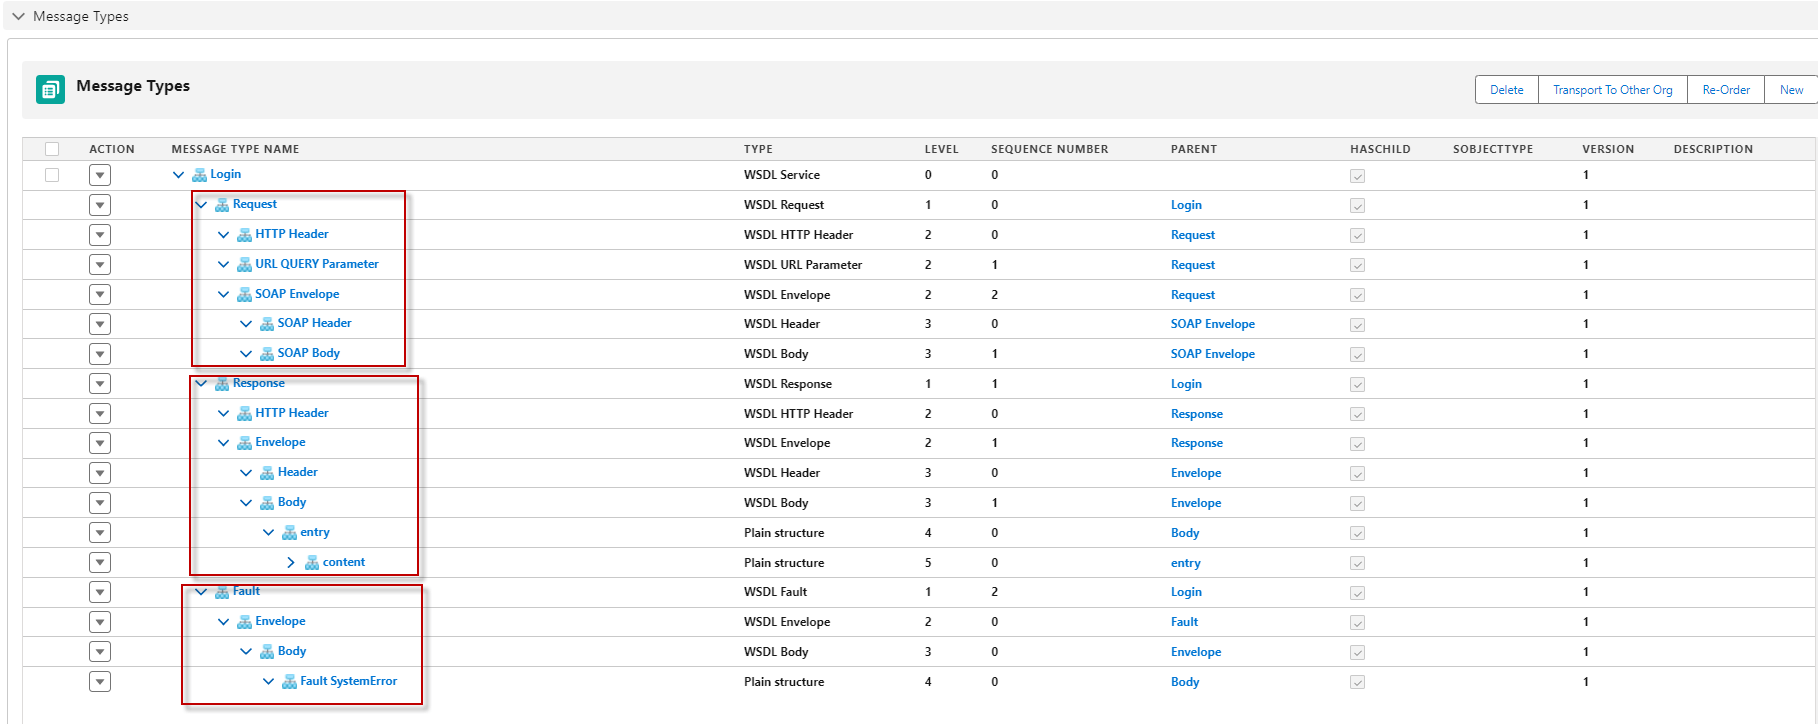
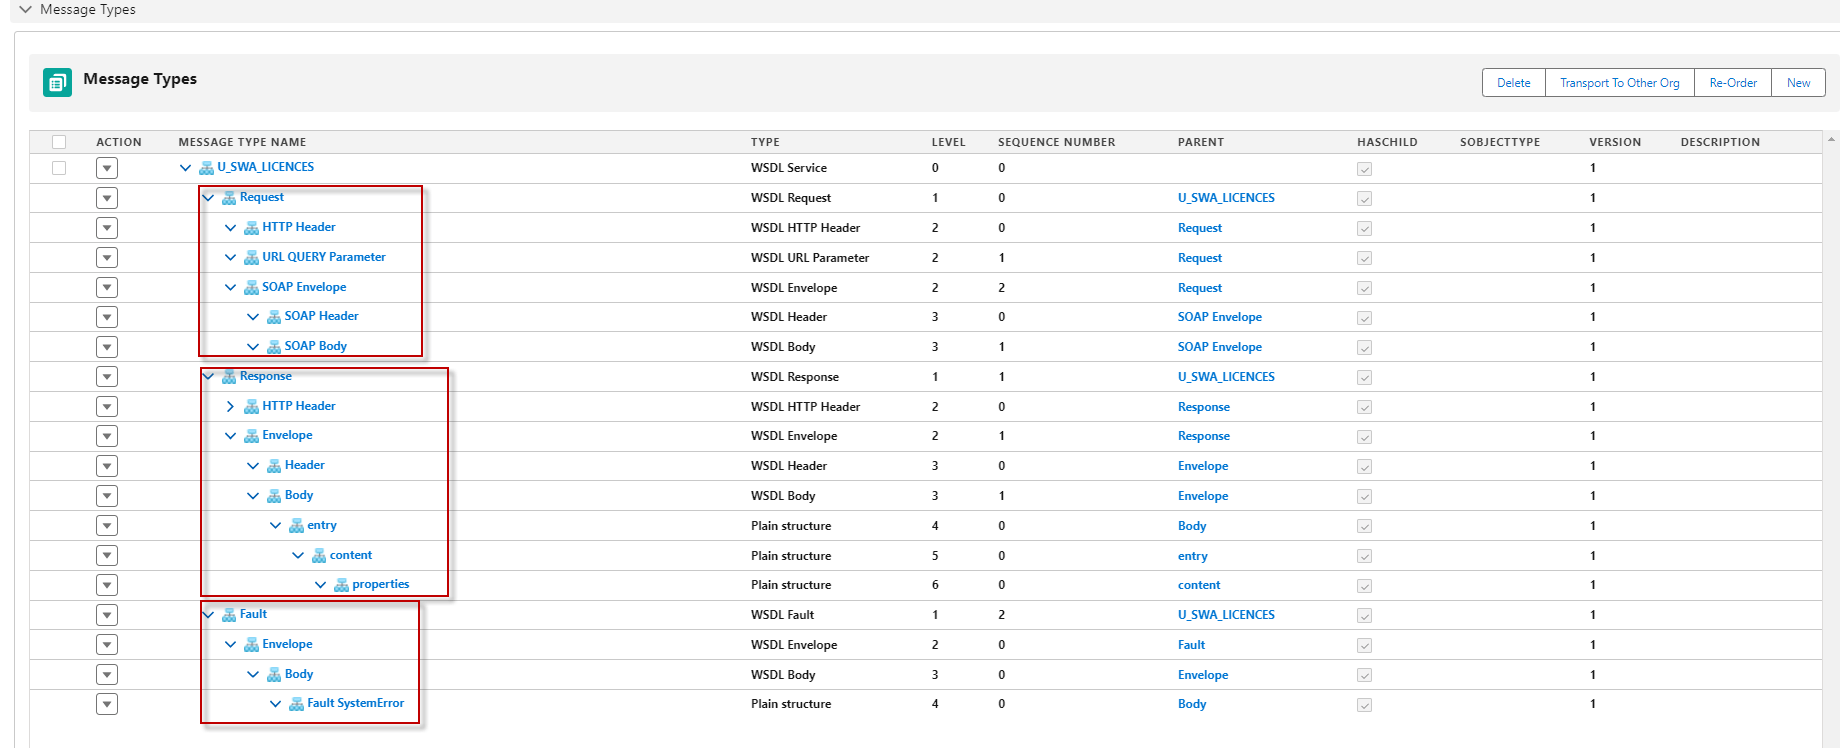
It describes a SKYYVA application feature or functionality related to working with APIs and SOAP (Simple Object Access Protocol). To provide more specific guidance or assistance, Here’s a general breakdown of the components you mentioned:
- Pop-up Screen: This is likely a user interface element that displays information to the user. It could be a modal dialog or a pop-up window.
- API Name: This is the name of the API you’re working with. It’s essential for identifying which API users want to use and generating a SOAP template.
- SOAP Template: A SOAP template typically consists of the following parts:
- Request: This represents the structure and content of the data you send to the API as a request. It includes information like the method to call, input parameters, and data format.
- Response: This outlines the expected structure and content of the data used received as a response from the API.
- Fault: Describes the potential errors or exceptions that might occur during the API call and how they should be handled.
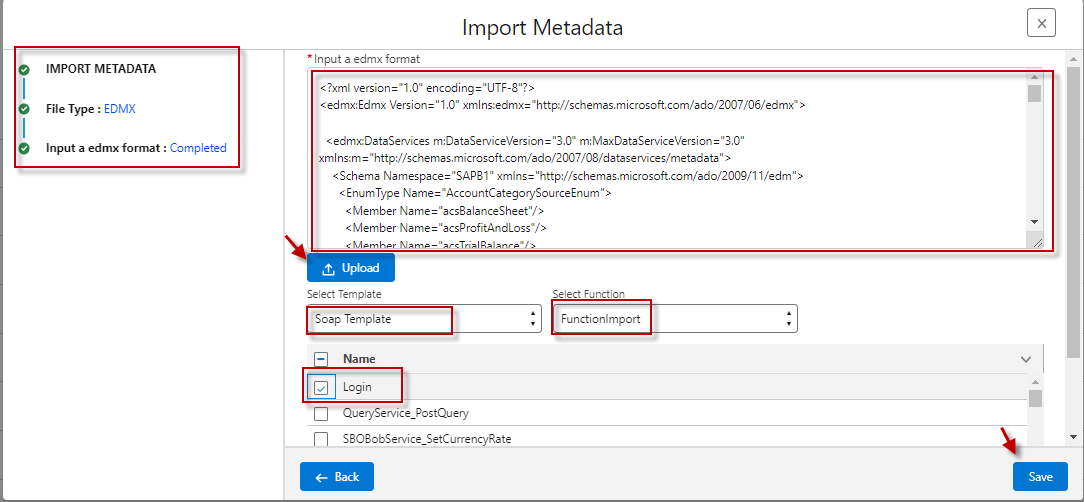
- Soap Template
- Function: FunctionImport
Select Function ‘FunctionImport’: Choose an operation called ‘FunctionImport. This function is within the EDMX file or a function exposed by the SOAP service user working with it.
- Choose File Type as EDMX: Select the EDMX file format within the SKYVVA application. Users may need to create a new EDMX file.
- Click the Next Button: This suggests that there is a wizard or a series of steps you need to follow within the SKYVVA application. Clicking “Next” typically advances you to the next step in the process.
- Manually Enter Values in the Box: The user will need to provide specific information, which includes data configuration settings.
- Select Template ‘Soap Template’: The user should have the option to choose a template for the user project service. Select the “Soap Template” which is relevant to your business requirement.
- Click the API Name: Locate the field where the user can define the API name.
- Click the ‘Save’ Button: Save your configuration. This might generate a message type and perform the actions in ipmort MetaData.
- Generate the Message Type: After saving, the SKYVVA application automatically generates a message type.
Required step:
- Choose file type as edmx and click the next button, then manually enter the values in the box.
- Select template ‘Soap Template’, Select function ‘FunctionImport’
- Click the API Name and ‘save’ button it will generate the message type.
It describes the expected result of a process involving an API, particularly in the context of SOAP (Simple Object Access Protocol). To clarify, here’s a breakdown of the described result:
- Pop-up Screen: A pop-up screen will appear. This screen serves as a user interface element to provide information options related to the API operation.
- API Name: The pop-up screen will display the name of the API. This is important for users to identify which API they are working with, as there may be multiple APIs in a system.
- SOAP Template: The result will include the generation of a SOAP template. SOAP is a protocol for exchanging structured information in the implementation of web services. The SOAP template will contain the following components:
- Request: This part of the template specifies how to structure the data and format the request that the client sends to the server. It defines the input parameters and data expected by the API.
- Response: The response part of the SOAP template outlines the expected structure of the data that the server will send back to the client after processing the request. It includes details about the response format and content.
- Fault: The fault describes how error or exception handling is structured in the SOAP message. It specifies how errors will be reported back to the client if something goes wrong during the API call.
In summary, the described result involves a user-friendly pop-up screen displaying the API name and providing a SOAP template that includes sections for request, response, and fault handling. This setup is typical in systems that use SOAP-based APIs for communication between different SKYVVA application components.