
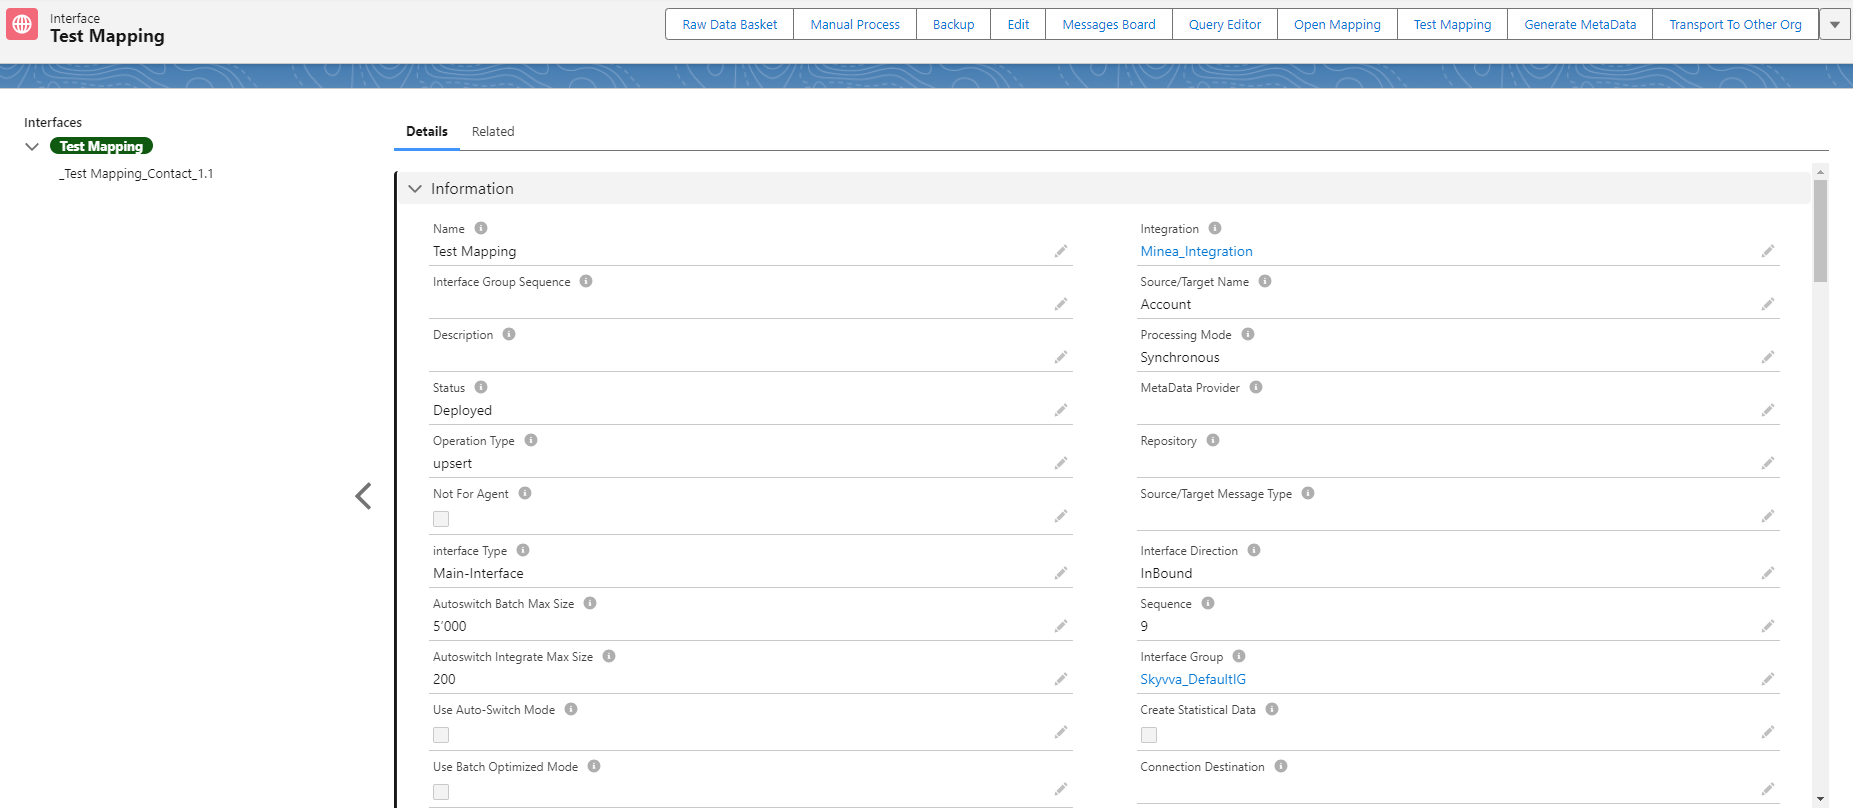
Introduction #
- Inbound Mapping: The source panel will show the text area where the user can modify the template we provide as SoapUI does. We support CSV, XML, and Json formats. The user can enter the data into the template and execute the mapping test. The mapping result is shown in a table tree view on the left panel. We don’t need to show the mapping result in a text area as CSV, XML, or Json. The mapping result shows the result in a table view, and there is no need to make any changes. The mapping result contains the final data with the sObject field names ready to be posted. But we are not doing the real posting. We show only the mapping result for debugging purposes and analysis.
- Outbound Mapping: The source side shows the sObject and the mapping result in a table tree view is displayed on the target side. We provide the query editor to let the user choose a sObject record where we read the data and provide for the mapping test. Then the user doesn’t need to enter the complete data. He can modify the data we have read from the record if needed.
Inbound Mapping #
It is the feature of the inbound mapping functionality of a SKYVVA application, an integration tool. Here’s a breakdown of what we have mentioned:
- Source Panel: This is where users can input or modify a template. The template appears to be provided in a format compatible with CSV, XML, or JSON.
- Supported Formats: Users can work with data templates in three formats: CSV, XML, and JSON. This flexibility allows users to manipulate data in the format they prefer or that suits their business requirement integration needs.
- Data Entry: Users can enter data into the provided template. This suggests that the SKYVVA application allows users to customize the template according to their business requirements.
- Mapping: After entering data into the template, users can execute a mapping process. This mapping transformations to the data as per the mapping configuration.
- Mapping Result Display: The mapping results are displayed in a table tree view on the left panel. This view provides a structured and organized representation of the mapped data.
- Result Format: The mapping results are not displayed as CSV, XML, or JSON, which means that the output is presented in a structured, tabular format. This format is more user-friendly and suitable for analysis.
- Subject Field Names: The mapping result includes sObject field names. These field names likely correspond to the data elements in the template or have been generated as part of the mapping process.
- Debugging and Analysis: The mapping results are primarily intended for debugging purposes and analysis. This suggests that users can review and assess the mapped data to identify any issues or discrepancies in the mapping process.
- No Real Posting: The SKYVVA application performs data transmission. It focuses solely on the mapping aspect, preparing data in the desired format for further integration.
Case1: Test Mapping with Inbound Interface
A “Mapping Button” for an inbound interface is a feature used in integration tools to facilitate testing and debugging of data mappings. It allows users to execute or test the payload by applying a specific mapping to convert data from one format to another. This is particularly useful when dealing with different data formats like CSV, XML, and JSON.
Here’s how it typically works:
- Select Source Data: The user starts by selecting the source data that needs to be transformed. This could be a file or a message type.
- Choose Mapping: The user then selects to specify the mapping rules that define how the source data should be converted into the desired format (e.g., CSV to XML, XML to JSON, etc.). This mapping can be predefined or customized based on user integration business requirements.
- Execute/Test: After configuring the source data and mapping rules, the user uses the “Mapping Button” to test the mapping process. The SKYVVA application tool applies the mapping rules to the source data, transforming it into the target data.
- View Mapping Results: Once the mapping is complete, the user can view the results to ensure that the data transformation was successful. This would involve viewing the transformed data in the desired format (e.g., CSV, XML, JSON) or checking for errors and discrepancies by pop-up dialogue screen.
This capability is crucial in integration business scenarios where data from different sources and in different formats need to be harmonized or translated to be compatible with the target data of our SKYVVA application. It allows users to quickly verify that the mappings are working correctly and to troubleshoot any issues that may arise during the data Mapping.
Required step:
- Create an Integration
- Create an Inbound Interface -> Set Interface API Version: V3
- Do Mapping
- Go to Interface -> click on Button Test Mapping

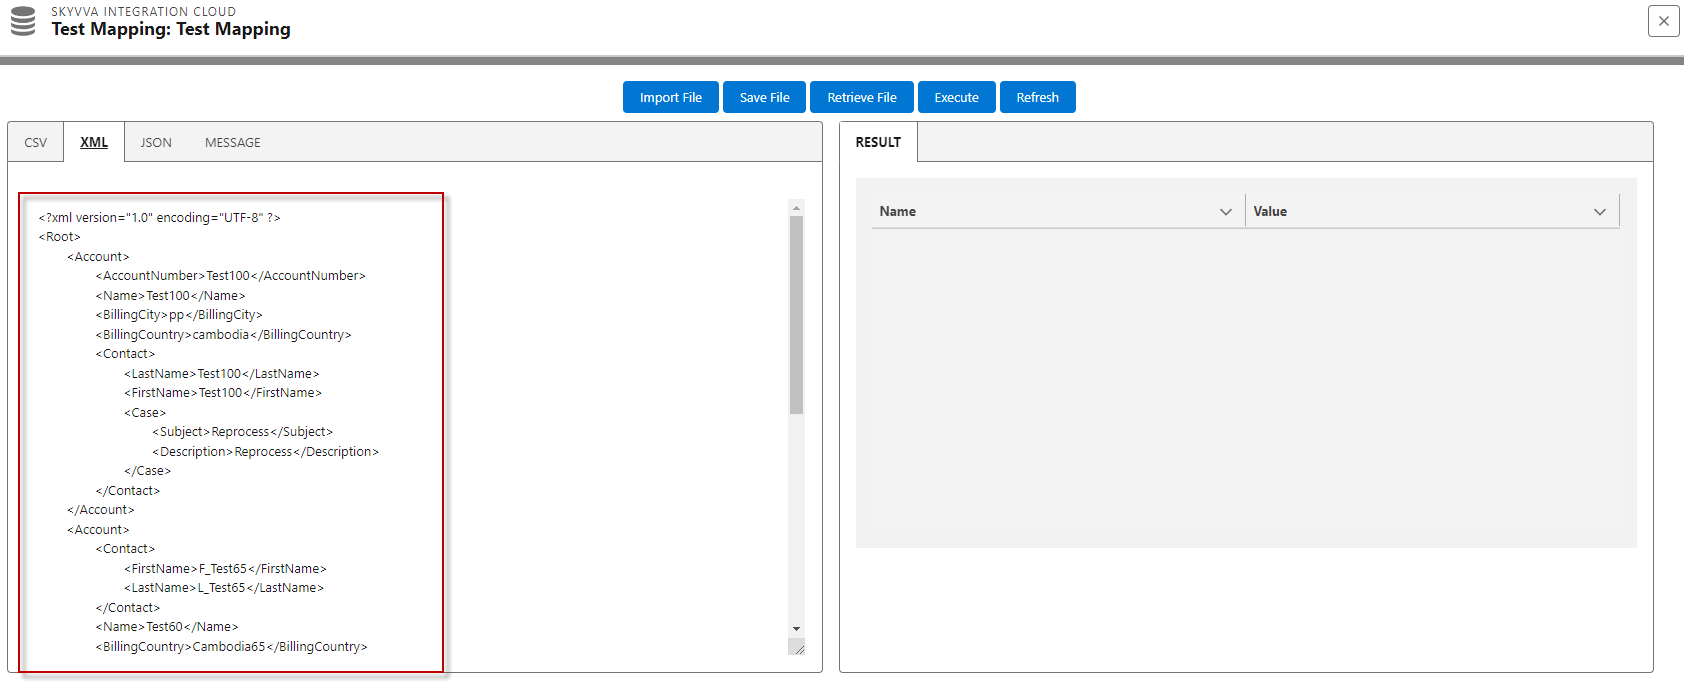
- After click on the Test Mapping -> we can see the pop-up screen Test Mapping as below:
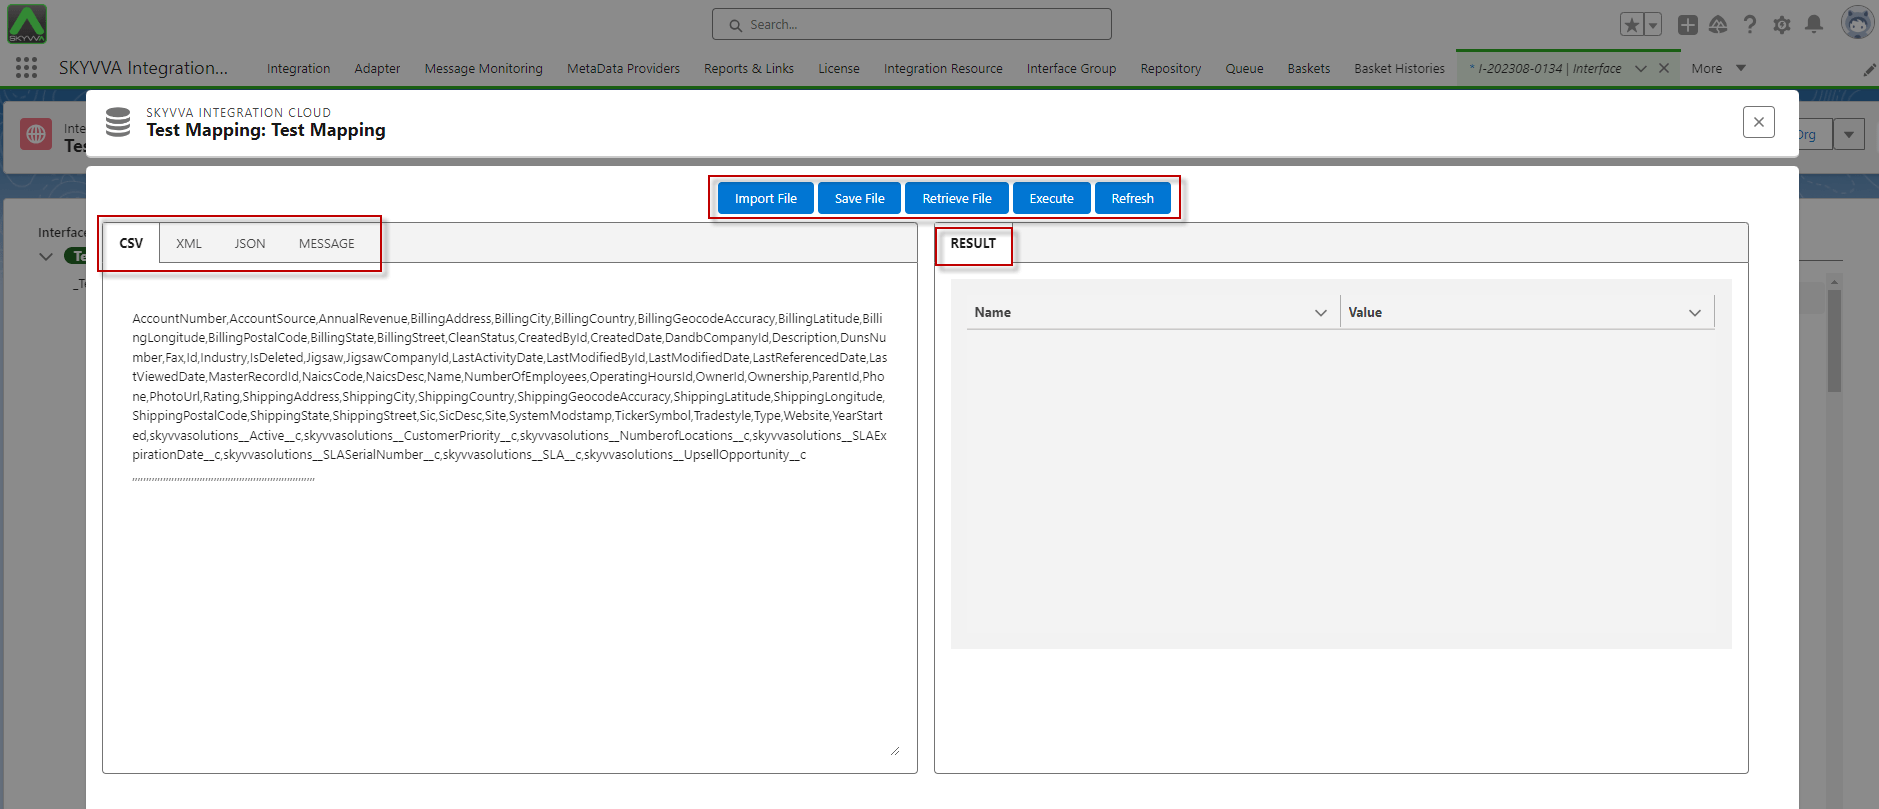
- The left box is used to input the payload in different formats such as CSV, XML, and JSON. It also allows you to select an existing message to execute/test the mapping and view the mapping results.
- The right box is used to check the mapping results after the payload has been executed from the left box.
- If you use Interface V3, the left column shows 4 tabs (CSV, XML, JSON, Message)
- If you use Interface V2, the left column shows 2 tabs (CSV, Message)
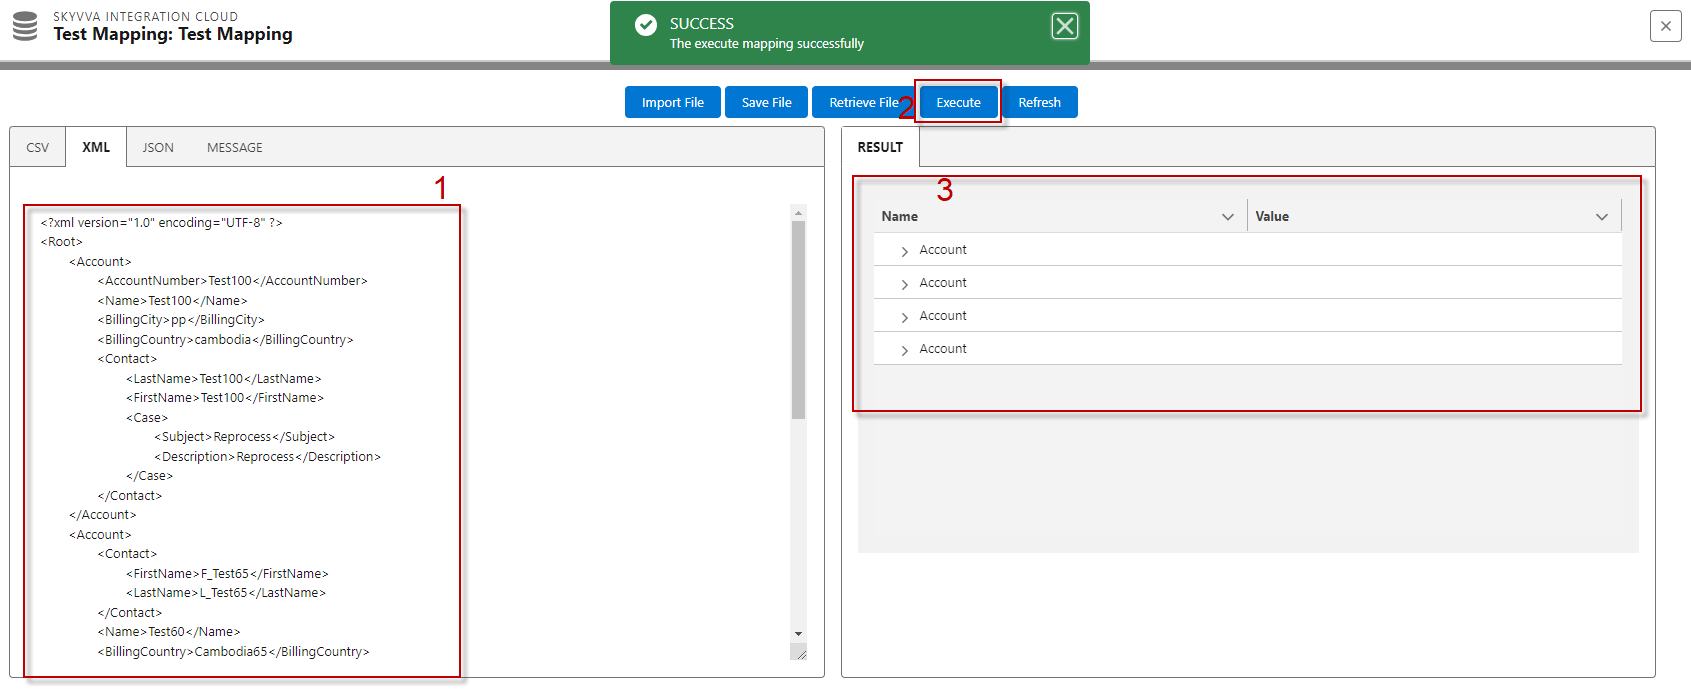
“Inbound Interface” with five buttons, and one of those buttons is the “Execute Button.” The purpose of the “Execute Button” is to trigger the execution of a payload in order to test the mapping of the result.
Here’s a breakdown of its functionality:
- Execute Button: This button initiates the execution of a payload. It sends the payload to a specific destination or service and then waits for the results to be returned. This is useful for testing the configuration and ensuring that data is being processed correctly.
- This is used to execute the payload to test the mapping of the results
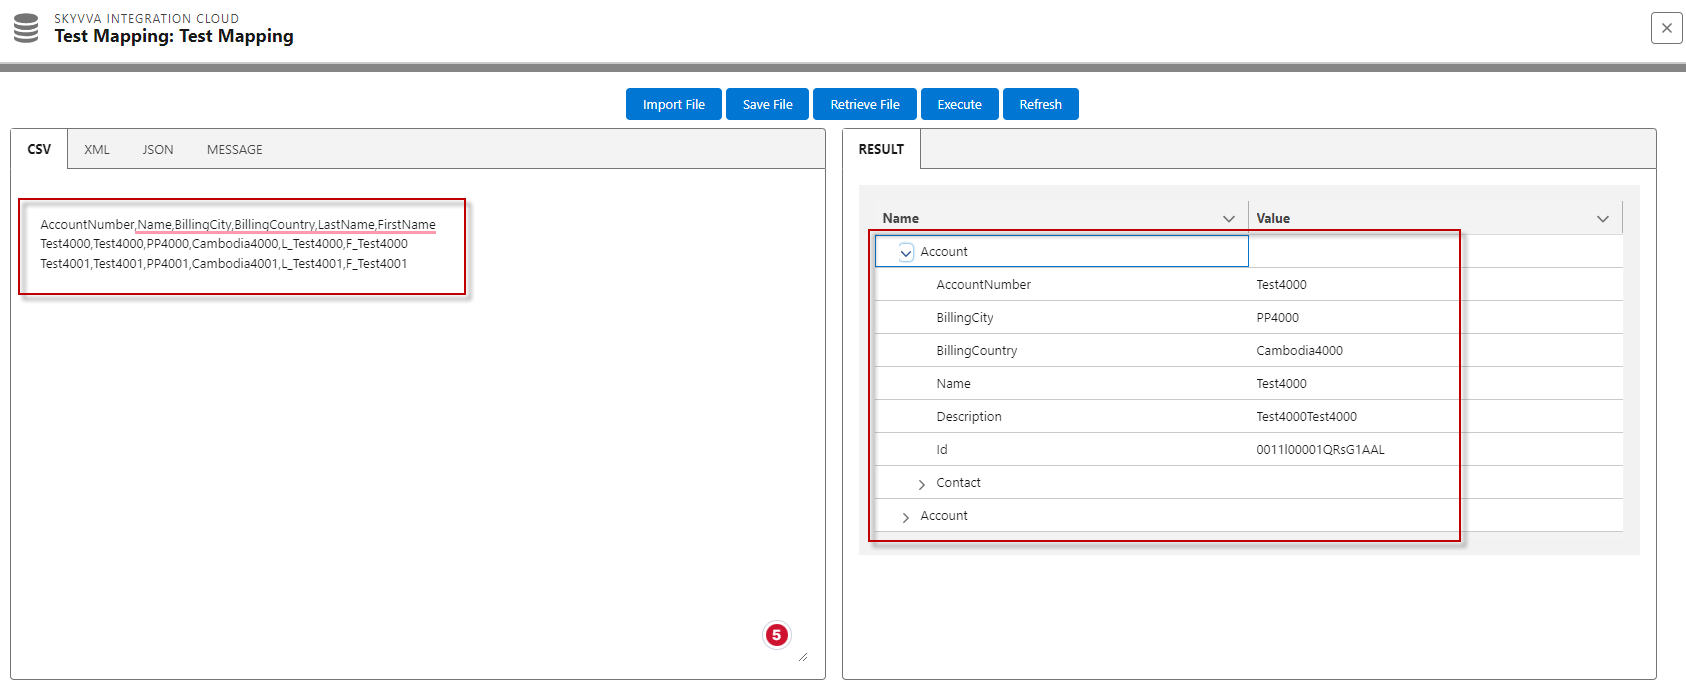
- Before clicking the Execute Button:
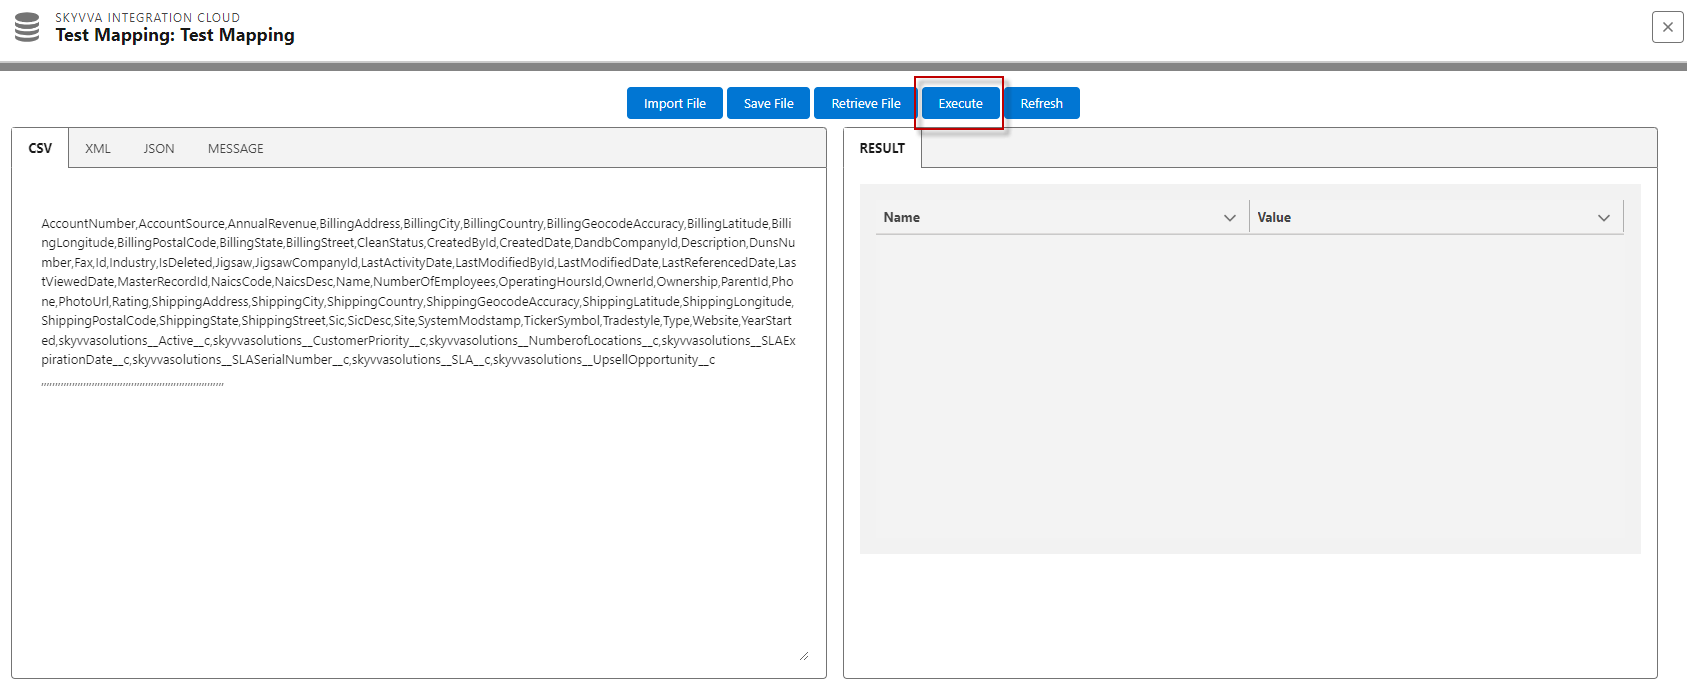
- After Executed, we got the result as below
The “Refresh” button is a common user interface element in the SKYVVA application that serves to update or reload content, which can include payloads and results, to ensure that users have access to the most current information or data available. The specific behavior and functionality of the “Refresh“.
Refreshing a Payload: In APIs (SKYVVA Application Interfaces) or web services, a “Refresh” button is used to resend a request with the same or updated parameters to retrieve a new payload or response from the server.
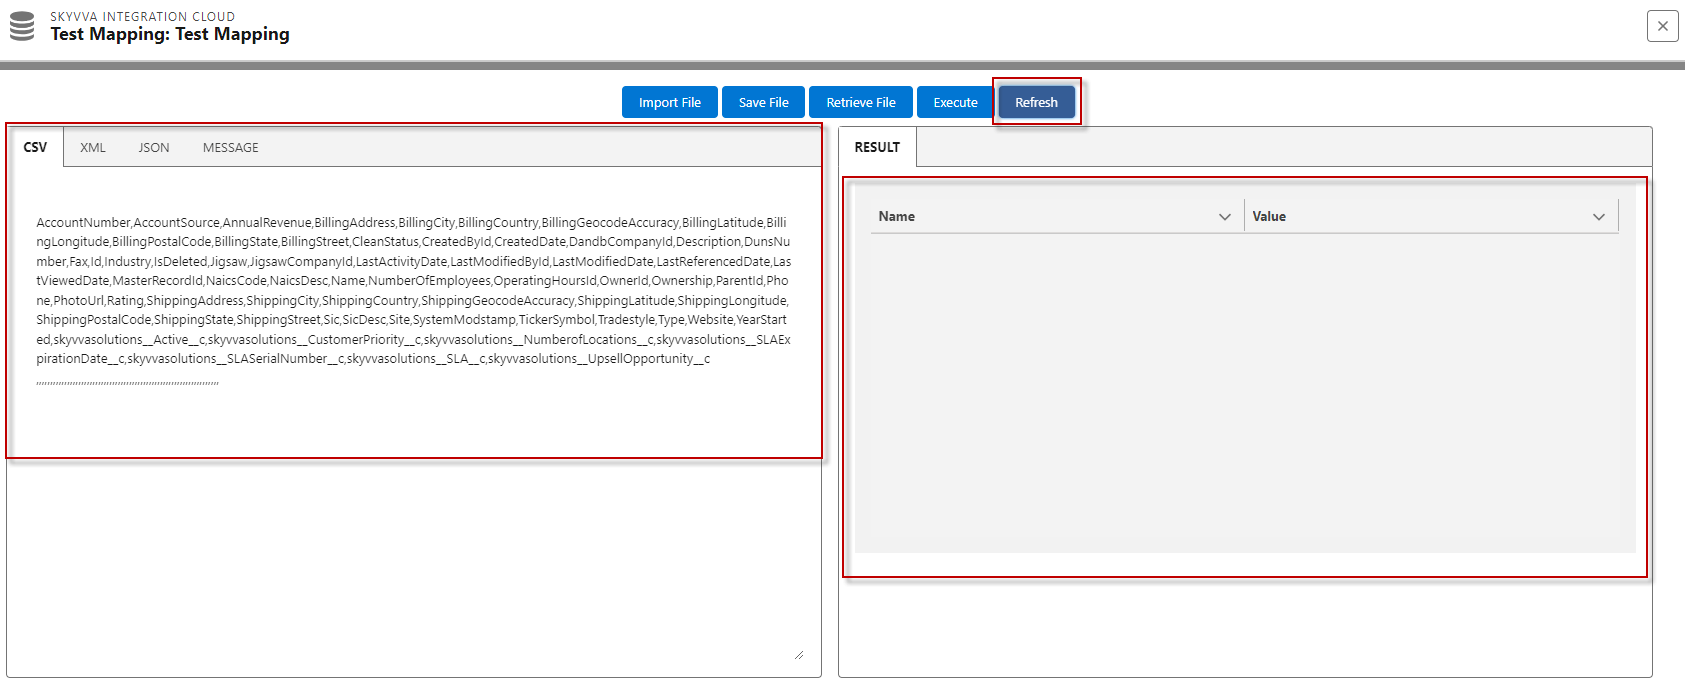
- Refresh Button: is used to refresh the Payload and the Results
- Before clicking the button Refresh
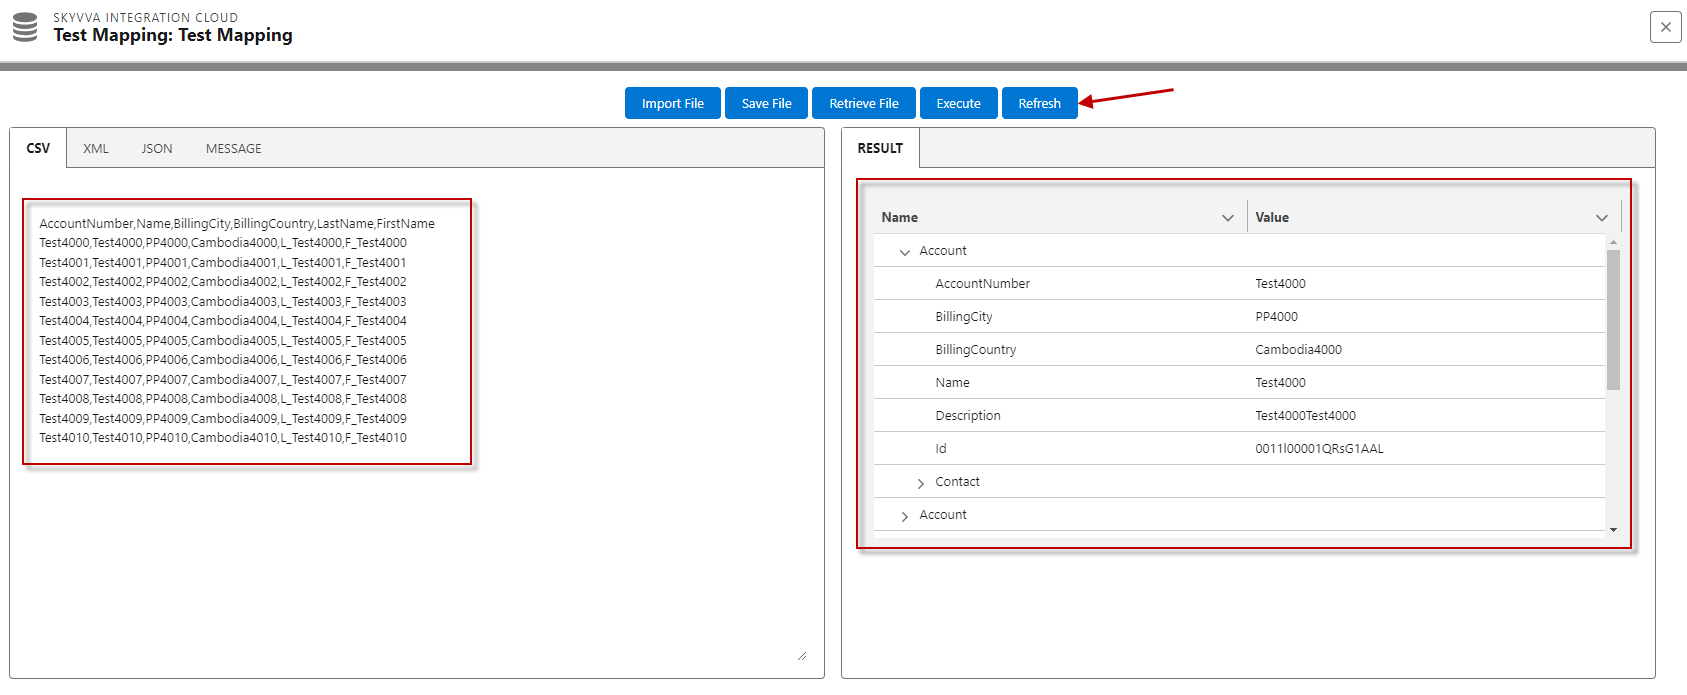
- After clicking the Refresh button
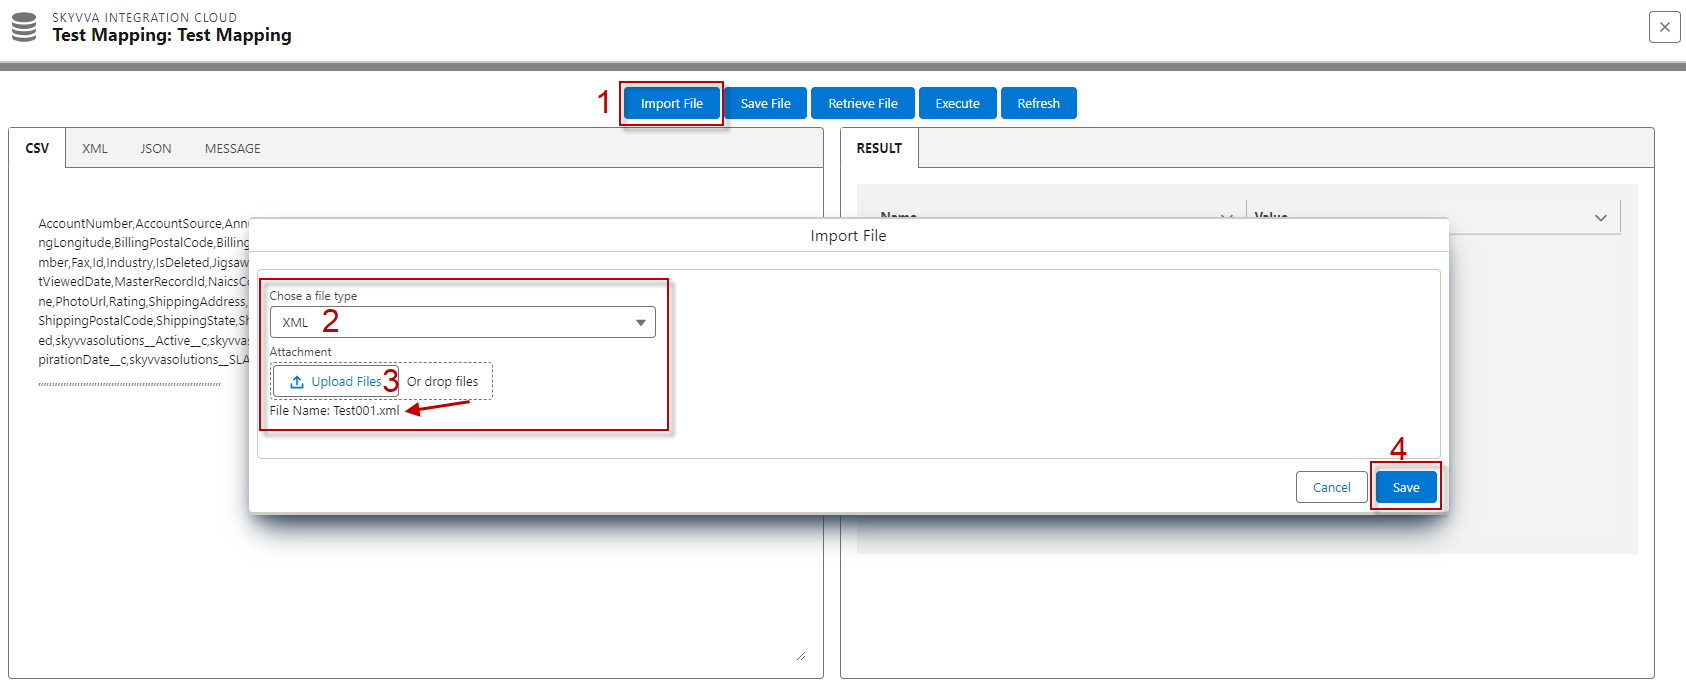
The “Import File Button” is a feature or component in a SKYVVA application that allows users to bring external files into the system. It has the following functionalities:
- File Type Selection: The user can choose the type of file they want to import. It supports file types such as CSV, XML, and JSON. This means that users can specify the format of the file they are importing.
- Mapping: The import process involves mapping the data in the external file to the data structure or schema within the SKYVVA application. “Defined mapping,” which recommends that the SKYVVA application might have predefined mappings for certain file types. For example: if the mapping is flat (i.e., a one-to-one mapping of fields), it would work for CSV files. More complex mappings might be needed for other file types like XML or JSON.
- File Import: After selecting the file type and mapping (if necessary), the users can initiate the import process. The SKYVVA application reads the selected external file and extracts the relevant data according to the mapping rules.
- Click on the Import File button, and its alert pop-up screen Import File has chosen a file Type and Upload Files button
- After clicking on Save, it reads the payload from a file and writes it onto the screen then when clicks on the Execute
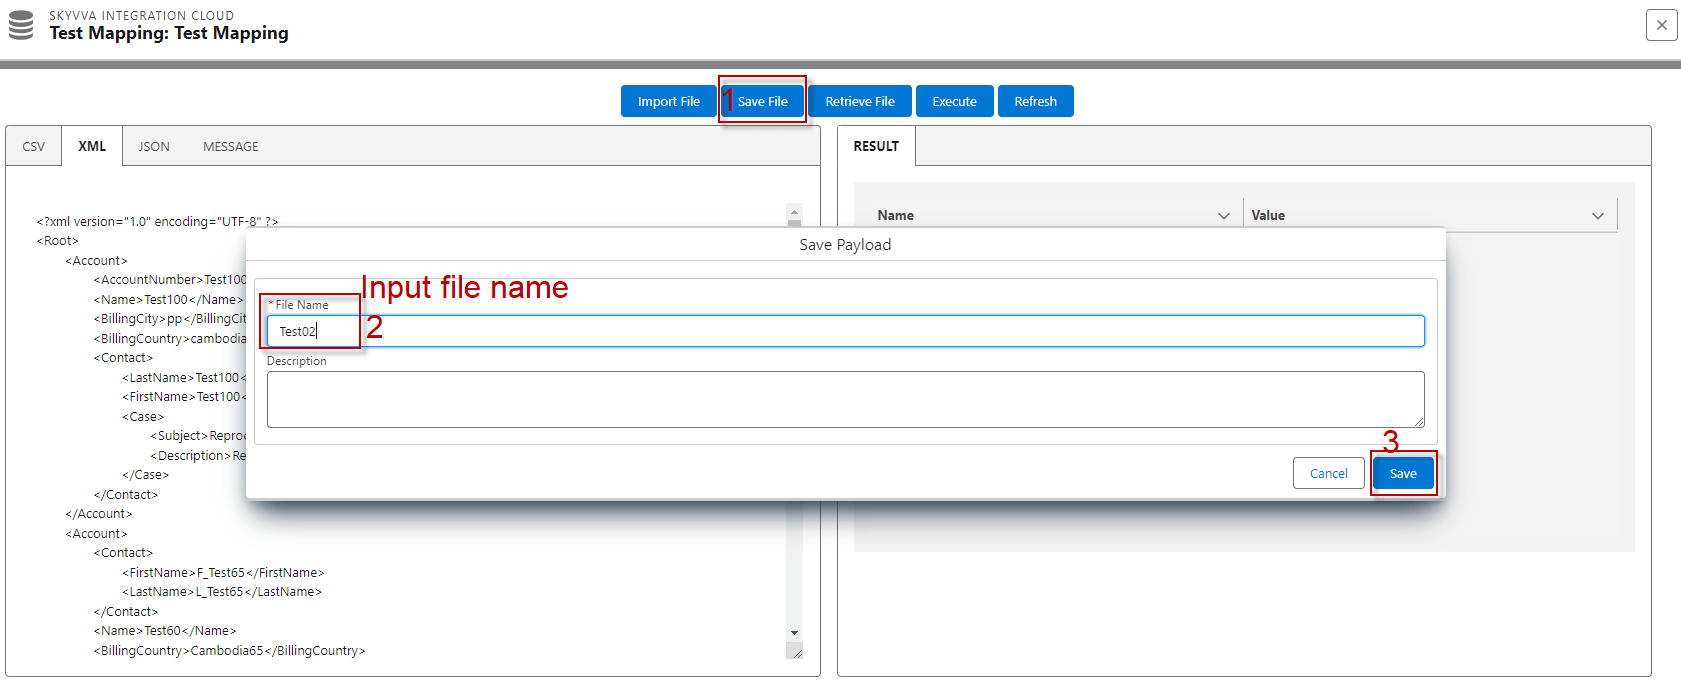
“Save File” is an option in the SKYVVA application, that allows users to save the content displayed on the screen into a file. This action involves taking the information or payload currently visible on the screen and writing it to a file on the storage system.
Here’s how it generally works:
- User Action: The user, initiates the “Save File” action by selecting it from the SKYVVA application menu.
- Dialog Box: After selecting “Save File,” the SKYVVA application usually opens a pop-up screen that allows the user to specify various options for saving the file. This may include choosing the file name, file format (e.g., CSV, JSON, XML), location on your computer, and another system.
- Saving the Payload: Once the user has configured the settings in the dialog box, the user confirms. The SKYVVA application then takes the content currently displayed on the screen (the payload) and writes it to the specified file on the computer.
- File Saved: After the file is successfully saved, the user can access it at the specified location on the computer for future reference.
After clicking on the Save File button, the alert ‘Save Payload’ pop-up screen, you have to input File Name -> Save
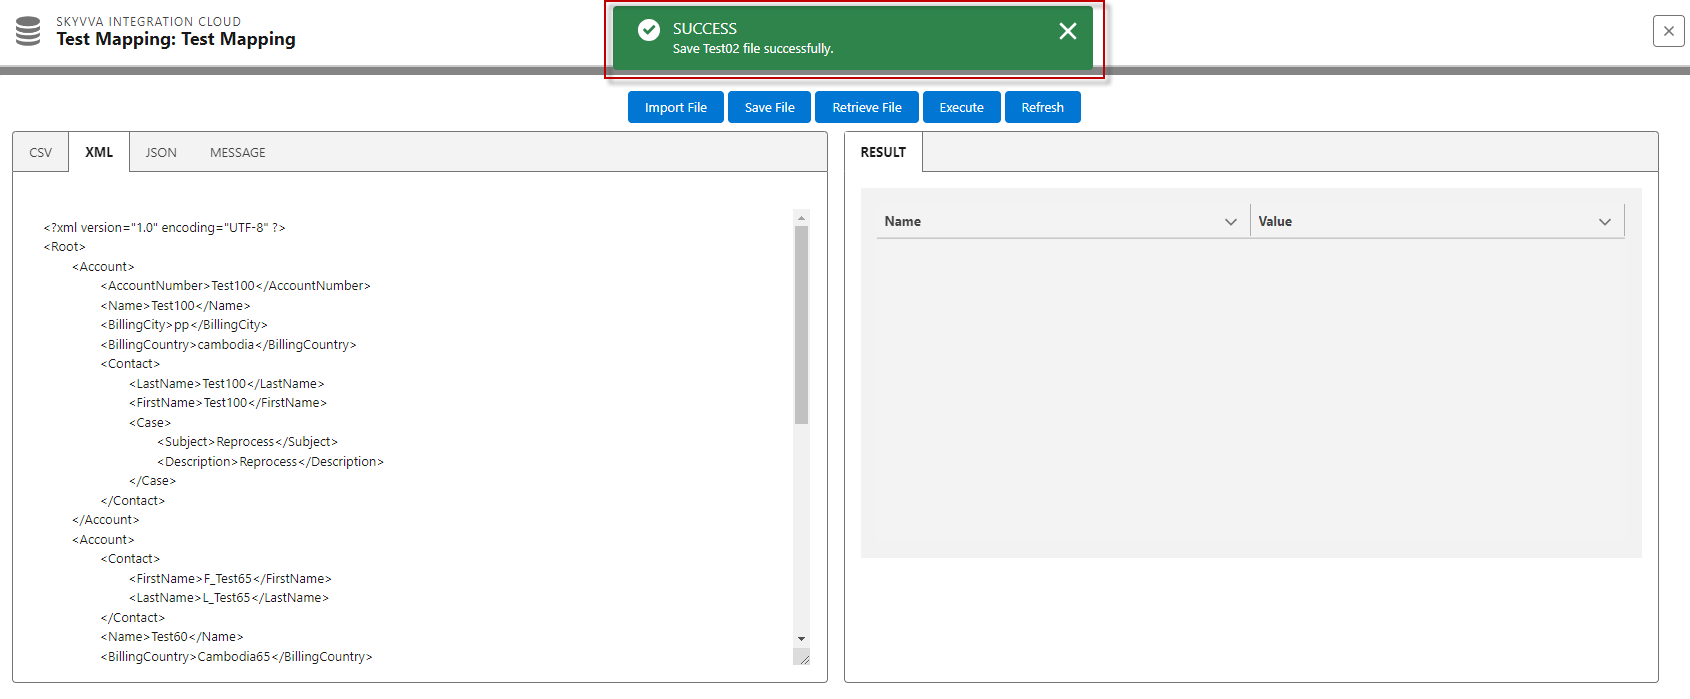
- After Saved, it will alert message [SUCCESS: Save Test02 file successfully
Retrieve File is a feature related to handling payload files, in a SKYVVA application. Here’s a breakdown :
- Payload File: The file that contains data that needs to be processed within an SKYVVA application.
- Save and Read: This is a process where the user first saves the payload data to a file and then later reads it from that file. This is an approach for working with data in the SKYVVA application.
- Write it onto the Screen: After reading the payload from the file, the user intends to display it on a screen.
- Retrieve File: This is a feature in your SKYVVA application that deals with handling the payload file. It has two actions:
- Download: This action allows users to download the payload file, which is useful if they want to keep a copy of it for reference.
- Delete: This action allows users to delete the payload file, which is useful for managing storage space or for privacy/security reasons.
After clicking on the Retrieve File button, we can see that the pop-up screen Retrieve File has stored the file type (CSV/XML/JSON) we have saved before
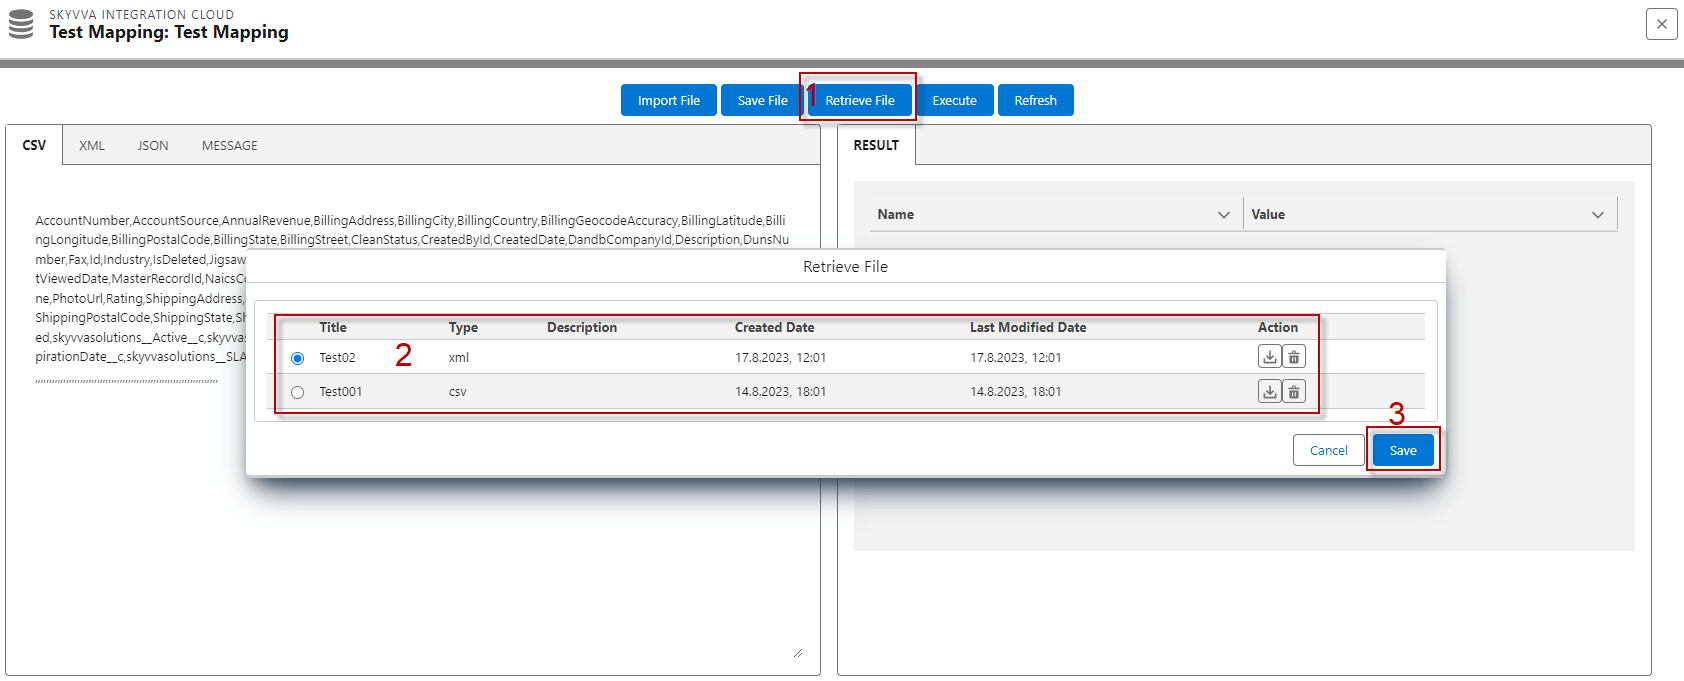
- After selecting the File -> Save, it will take that value file to show on the screen.
- Interface API Version V2: On the Test Mapping Button, the structure of the payload will be described based on the source sObject definition. For V2, only CSV is available because it is a flat format.
- Interface V2: If you upload a structure from a file, it will retrieve the structure payload from the imported file in the source interface.
- Interface API Version V3: The Interface without specifying a message type, On the Test Mapping Button, the structure of the payload will be described based on the source sObject definition. For V3, CSV, XML and JSON are available as they can handle hierarchical payloads.
- Interface V3: If the interface is linked with a Message Type, On the Test Mapping Button fields will be retrieved via the Message Type link with the interface.
Outbound Mapping #
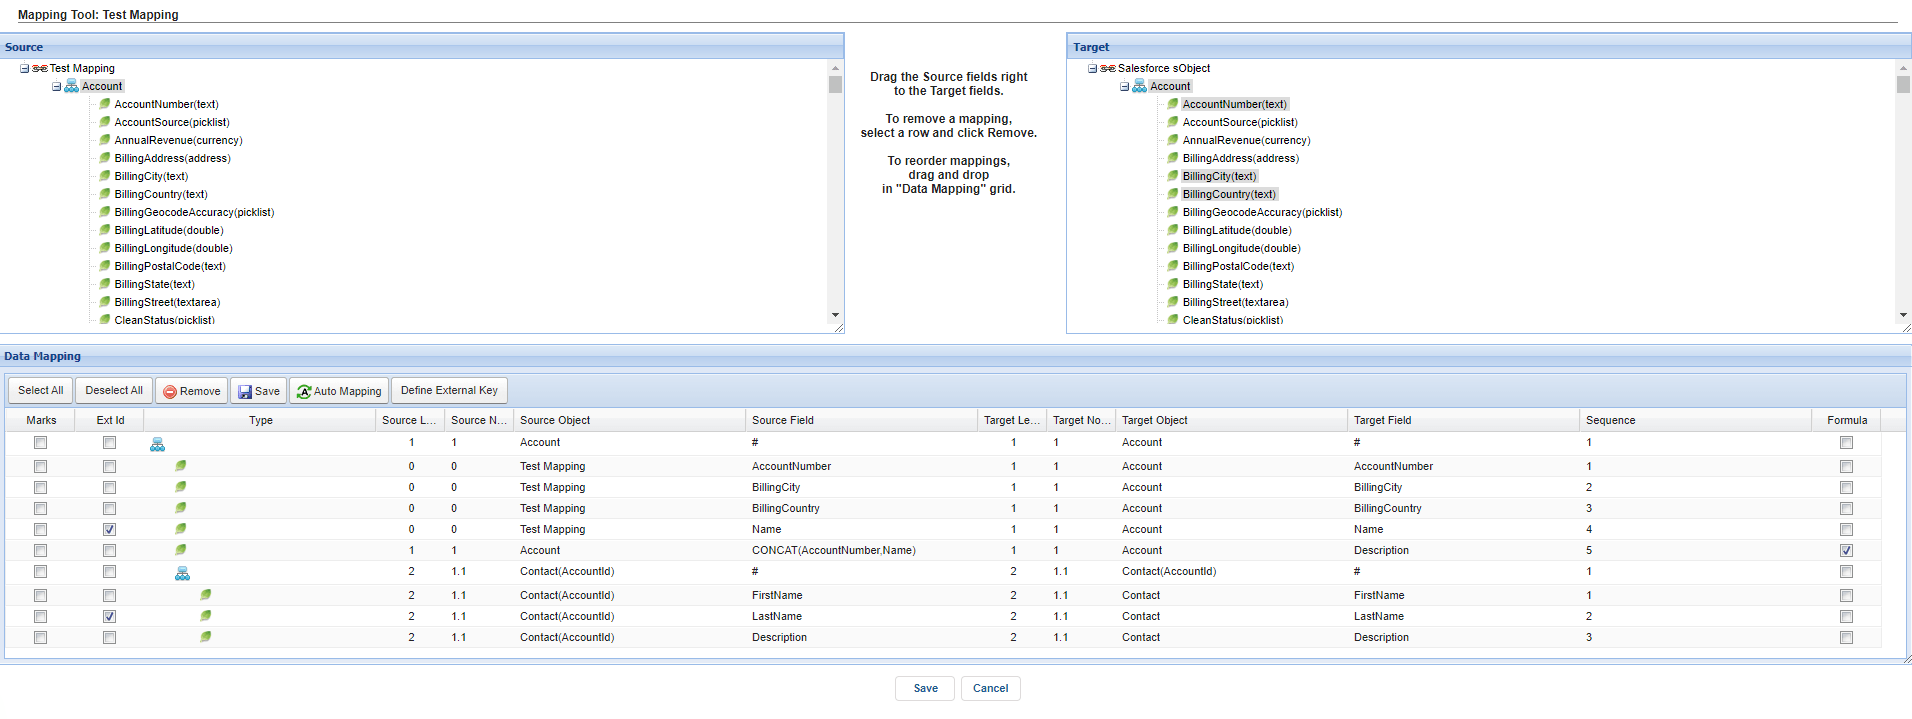
It is a feature or functionality related to data mapping in the context of working with sObjects, which typically refers to Salesforce objects in the Salesforce platform. SKYVVA application provides a user-friendly way for users to map data from a source sObject to a target data structure, and the user considers the use of a query editor to facilitate this process. Here’s a breakdown of your description:
- Outbound Mapping: This feature works with data integration or data transformation, where users are taking data from a source (in this case, an sObject) and mapping it to a target data structure.
- Source sObject: In Salesforce, a sObject is a generic term used to represent any standard or custom object. It seems the user using a sObject as the source of data for the mapping.
- Mapping Result in Table Tree View: The user experience displays the mapping result in a table tree view on the target side. This table tree view would show how the data from the source sObject maps to the target structure, making it easier for users to understand the data flow.
- Query Editor: The user provides a query editor to allow users to select a sObject record. This query editor would enable users to choose a specific record from the source sObject.
- Modify Data: Users can modify the data retrieved from the source sObject if needed. This suggests that the mapping process is not entirely automated and allows for manual adjustments to the mapped data.
Case2: Test Mapping with Outbound Interface
It is a feature within an SKYVVA application with outbound interfaces and testing mappings. This feature appears to be related to data transformation or integration testing. Here’s a breakdown of what you’ve described:
- Outbound Interface: This is a component of an SKYVVA application system that is responsible for sending data or messages from the system to external systems or services. Outbound interfaces are used in integration business scenarios to exchange information with other systems.
- Test Mapping: This feature is used for testing purposes, specifically for mapping data from one format or structure to another. Mapping is often used in integration business scenarios to transform data from one schema to another so that it can be properly processed by the receiving system.
- Two Boxes: Here are two boxes, a left box for querying data/messages and a right box for viewing test mapping results. This suggests that the Test Mapping feature has a user interface with two input areas:
- Left Box (Query): This is where the user specifies the data or messages want to use for testing. You may enter queries or select data/messages from a source, such as a database, file, or previous system interactions.
- Right Box (Results): This is where the user can see the outcomes or results of the test mapping process. It displays how the data/messages will be transformed based on the mapping rules the user has defined.
In essence, this feature allows you to set up test scenarios for your outbound interface by selecting or specifying data/messages in the left box and then observing how they will be transformed using the mapping rules in the right box. This can be helpful for ensuring that your integration processes are working correctly and that data is being properly transformed before it is sent to external systems.
Required step:
- Create an Integration
- Create an Adapter e.g., Adapter SOAP
- Create an Outbound Interface -> link with Message Type Template and Adapter
- Do Mapping
- Go to Interface -> click on Button Test Mapping
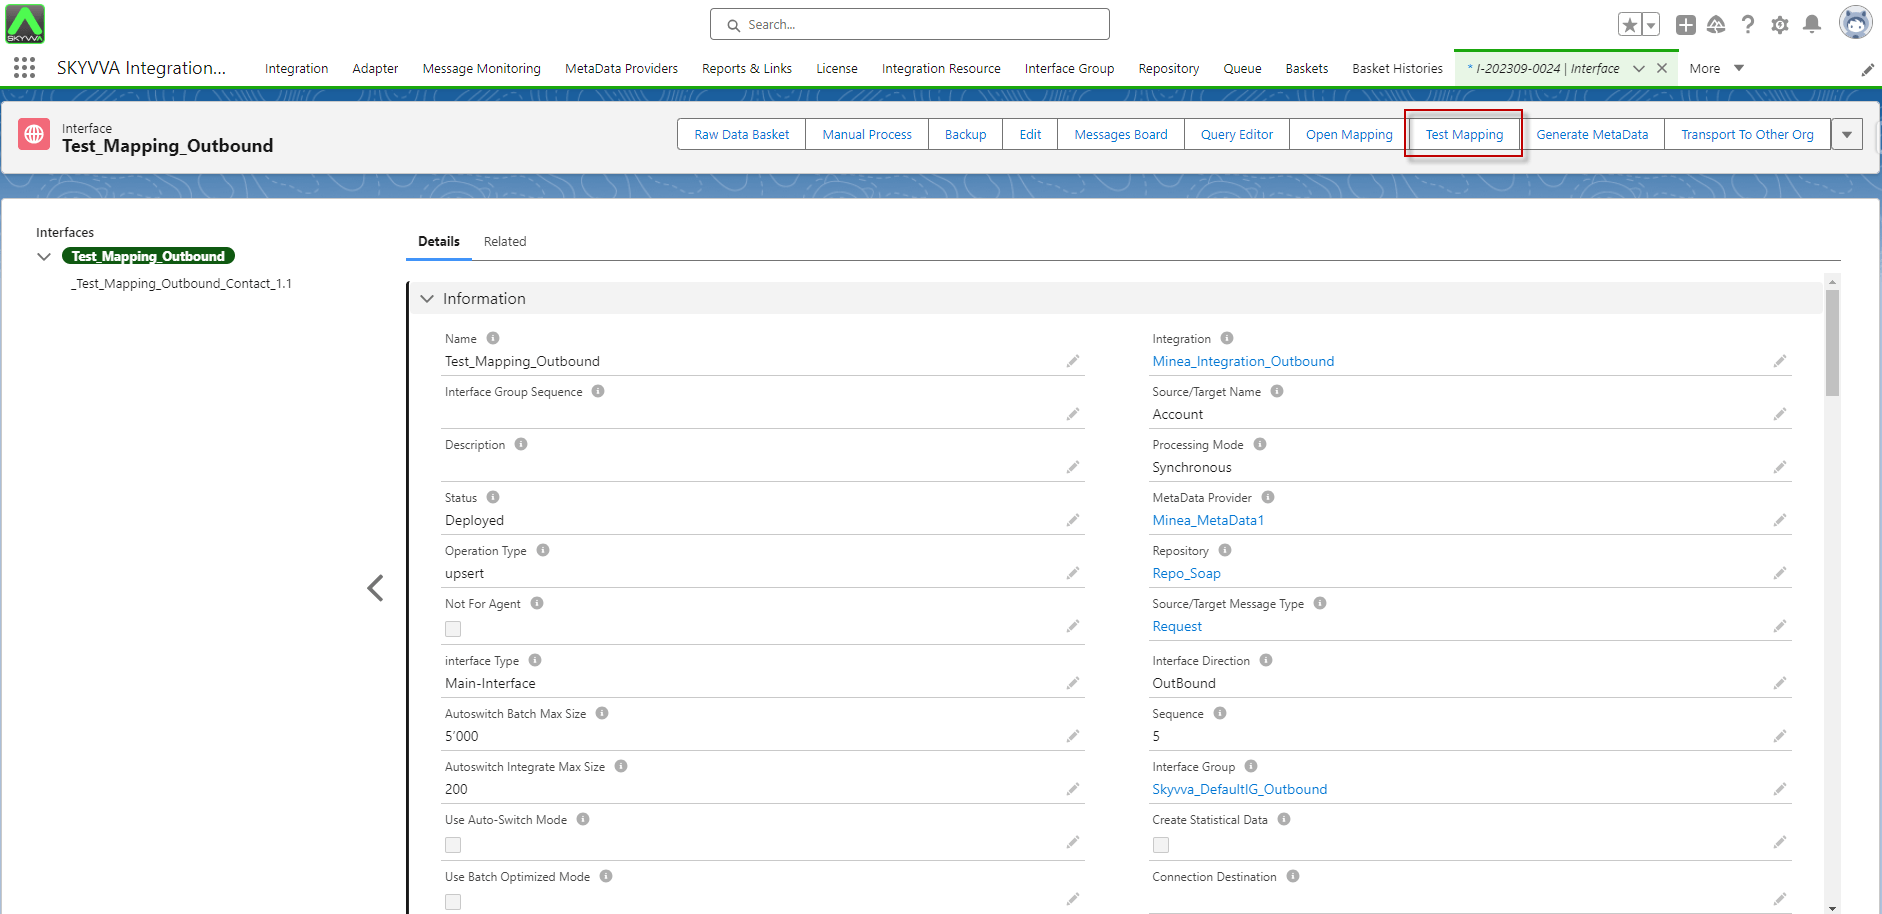
- After click on the Test Mapping -> we can see the pop-up screen Test Mapping as below:
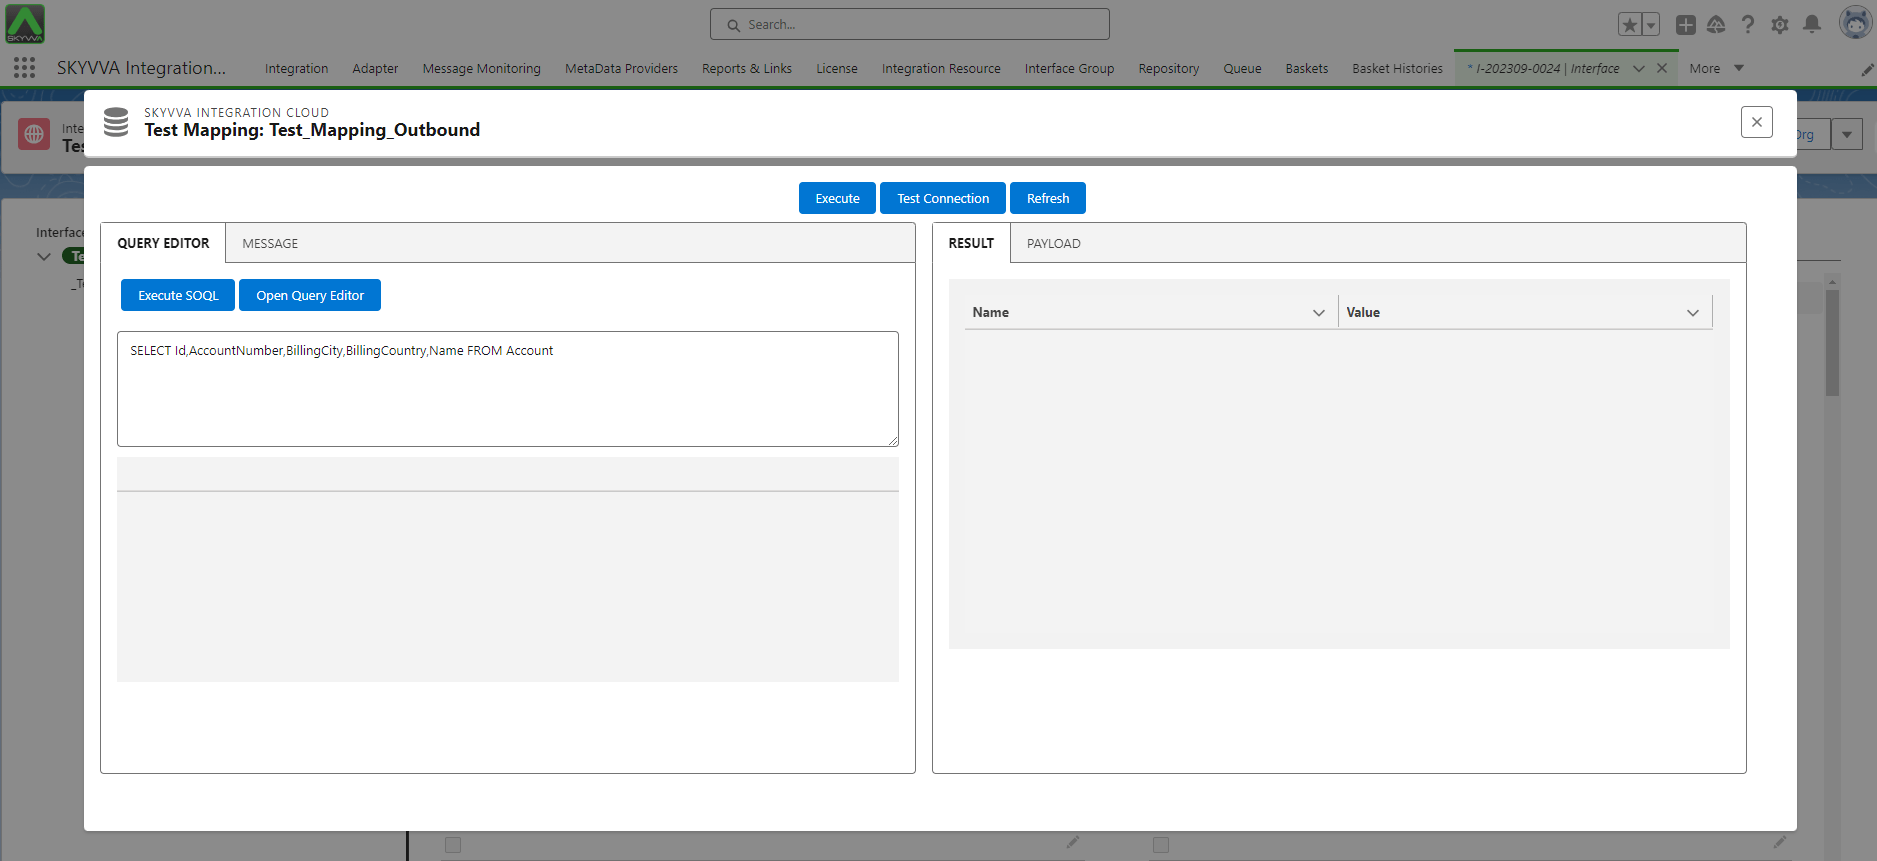
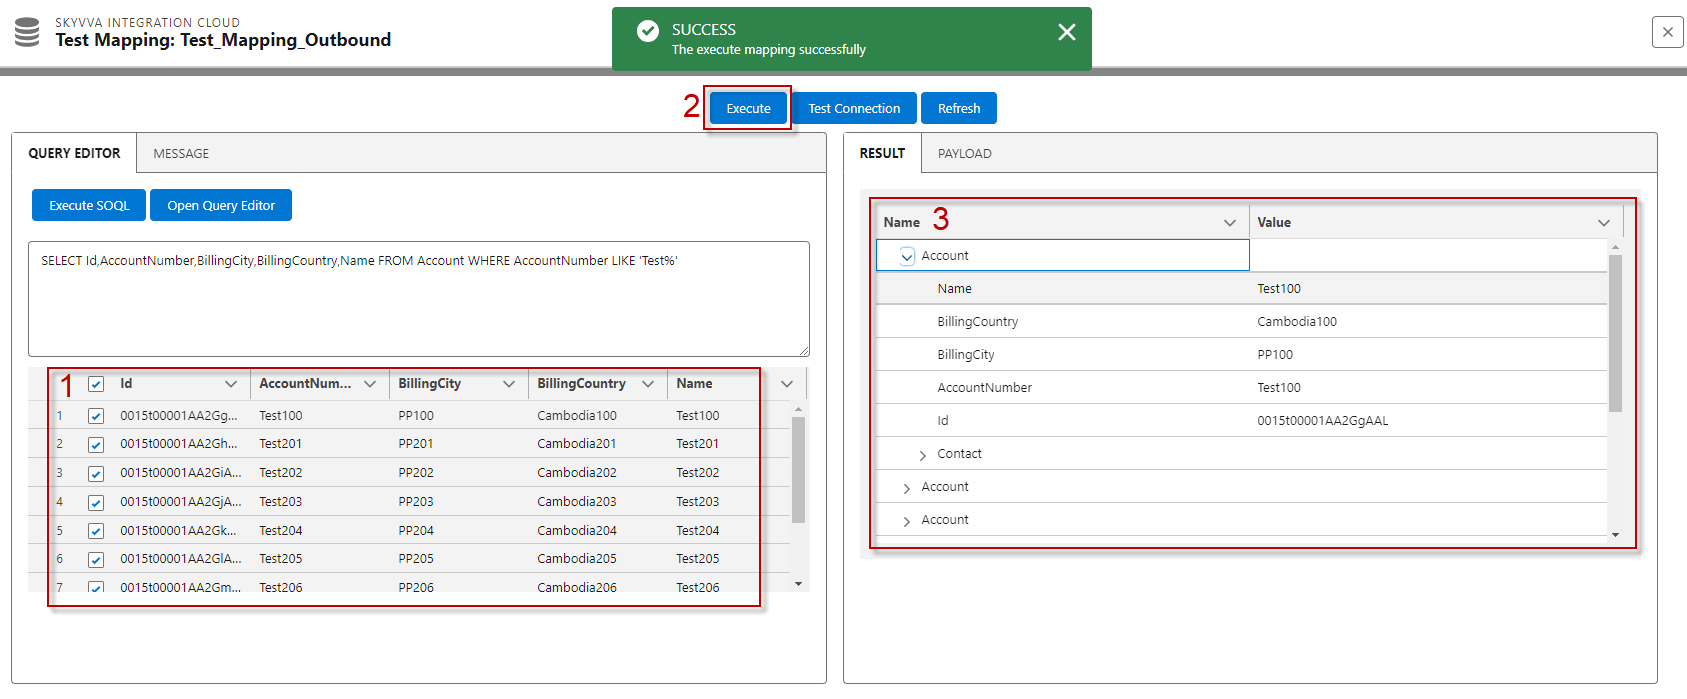
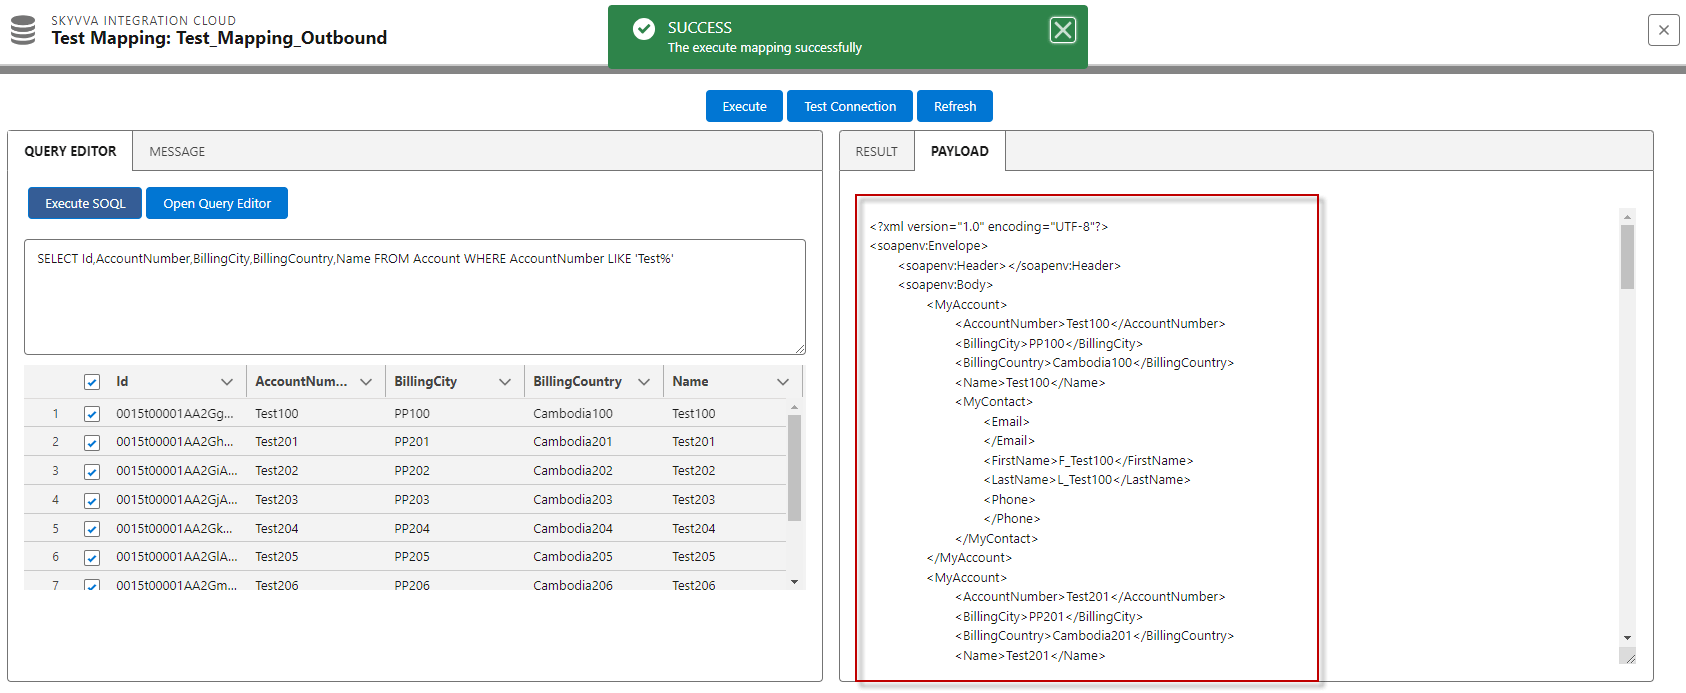
- The left box is used to execute SOQL queries and query messages for the current interface. After executing, you will receive records and then you can select them to test your mapping result/payload.
- The right box is used to check the mapping results/payload after the records have been executed from the left box.
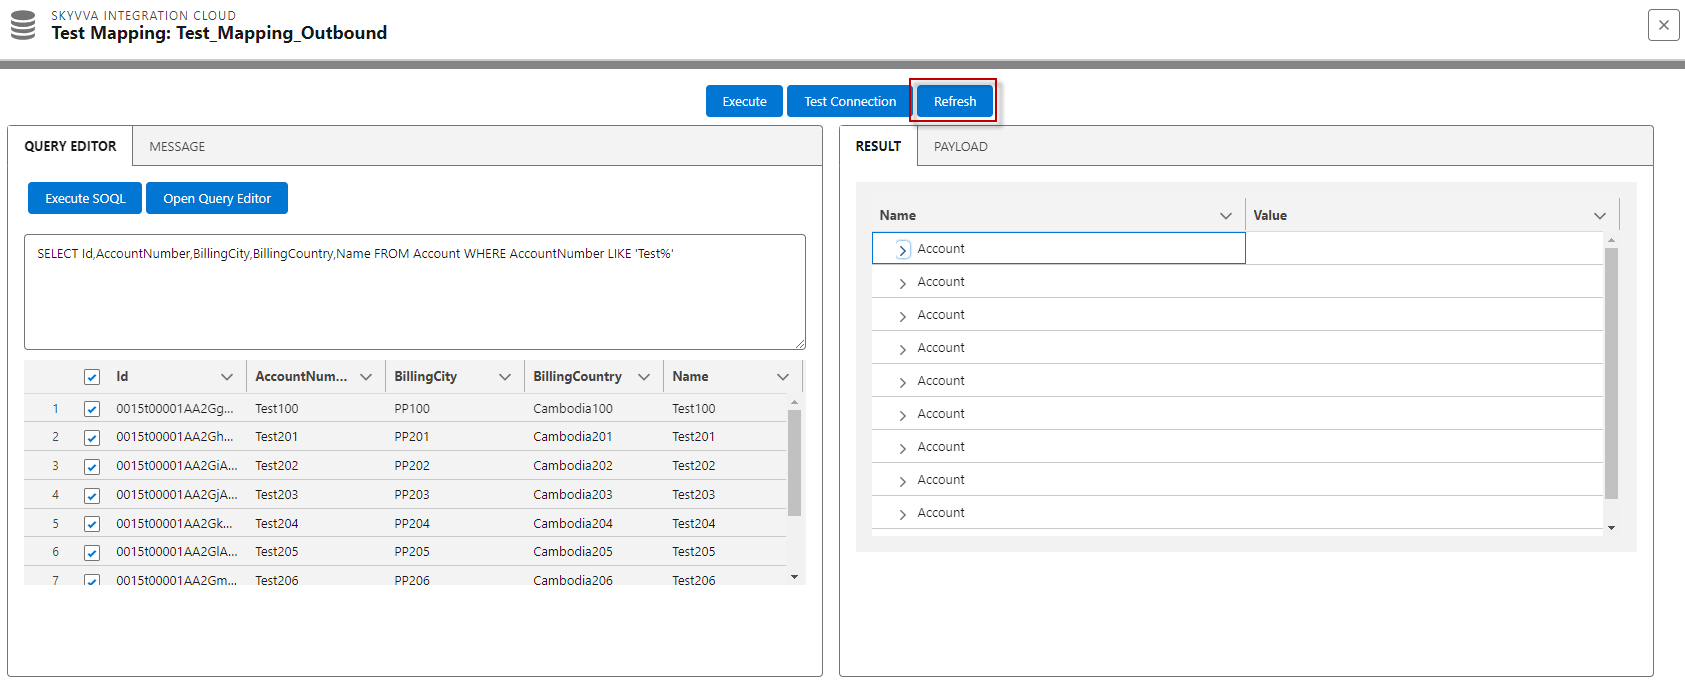
The user interface with three buttons related to executing SOQL queries and querying data from a database. Let us explain the functions of each button based on the information provided:
- Execute Button: This button is used to execute SOQL (Salesforce Object Query Language) queries and query messages. Its primary purpose is to test the results or payload mapping the queries. When the user clicks this button, it sends the SOQL query to the database and retrieves the corresponding data, which can then be used for testing or analysis.
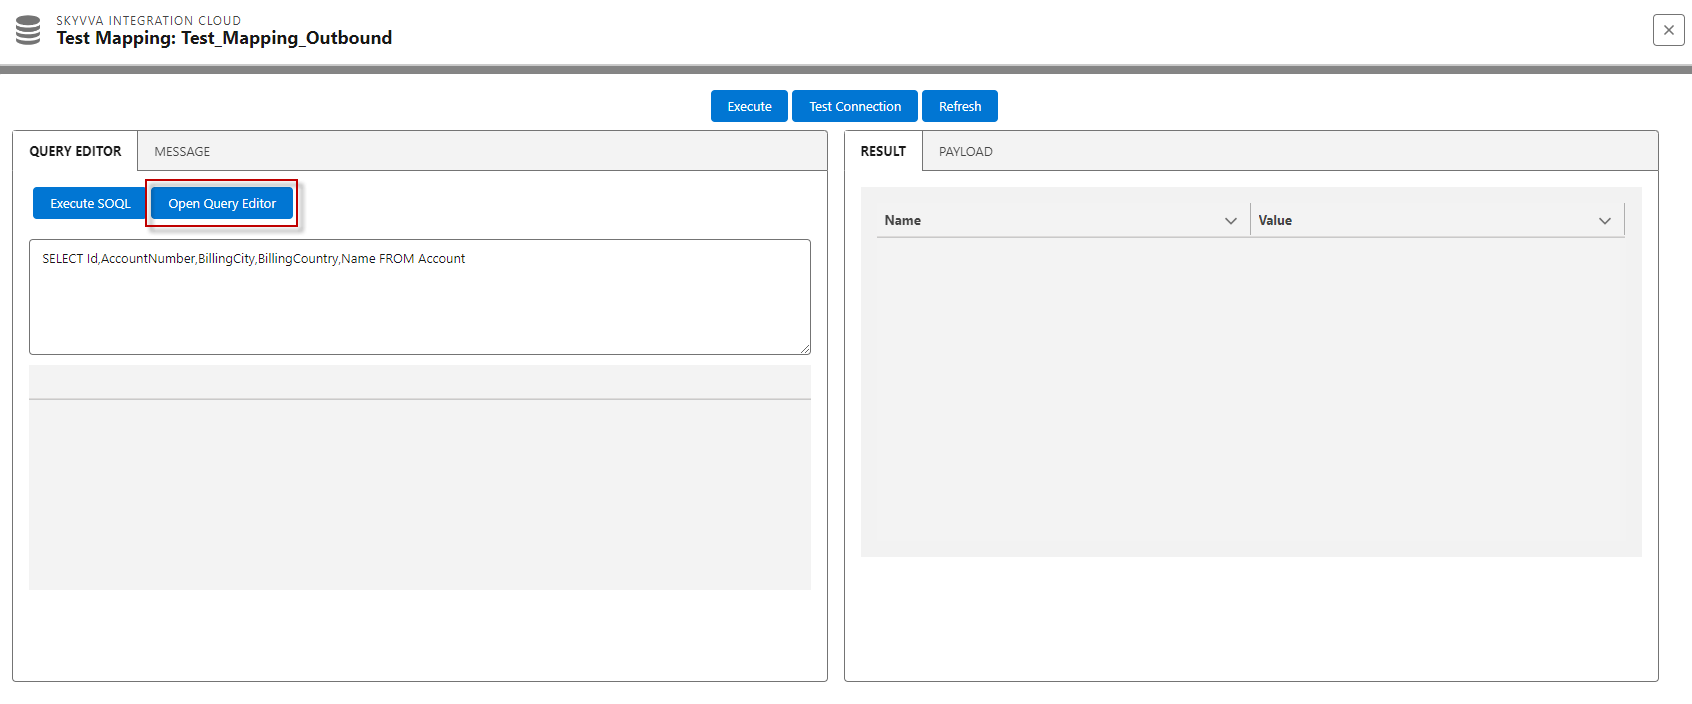
- Open Query Editor: This button is used to open a query editor interface. In this editor, the user can specify the specific objects and fields user wants to query from the database. It helps to build and customize the query statements before executing them using the Execute Button. The query statements created in the Query Editor can be sent for execution when the user is ready.
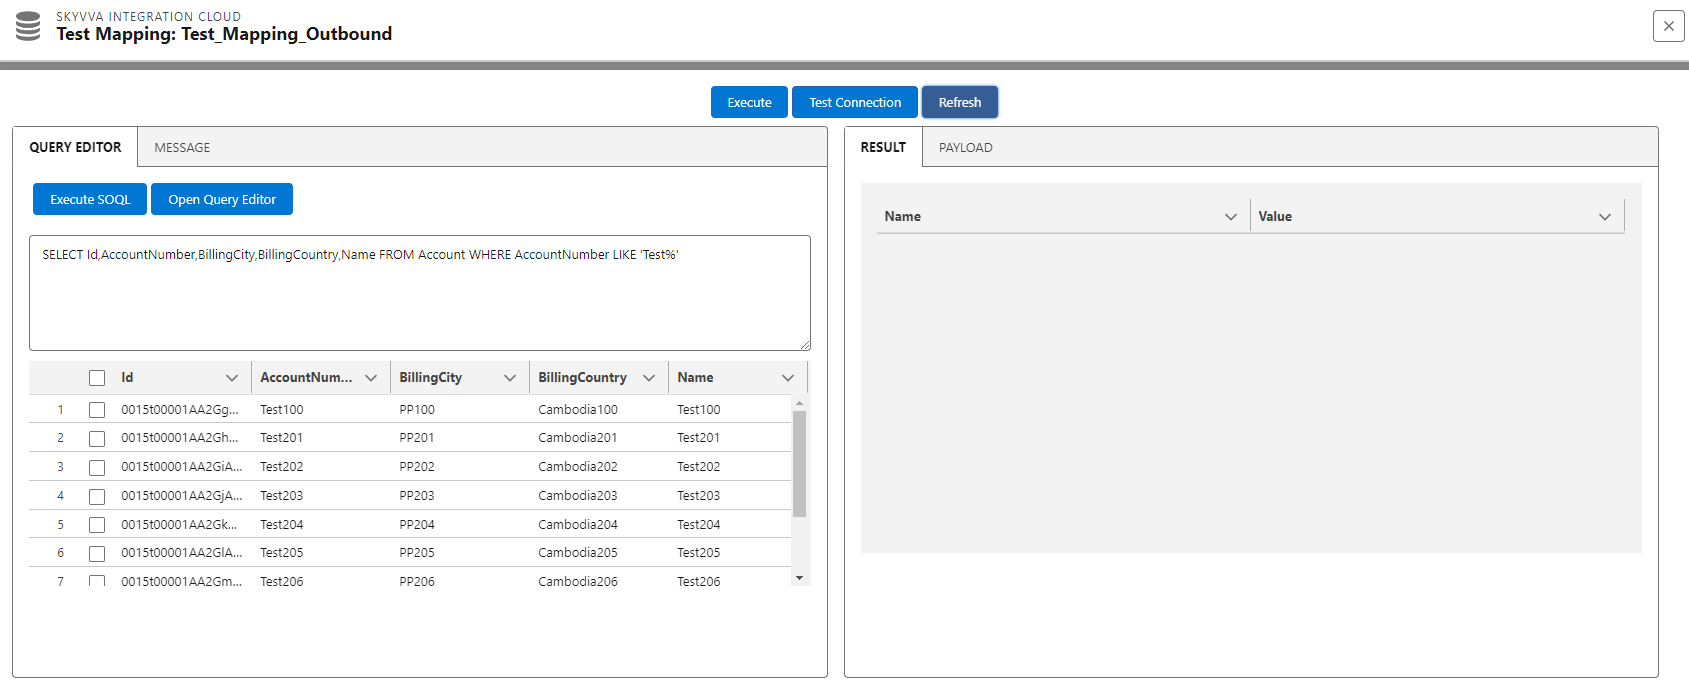
- Refresh Button: The Refresh Button is used to refresh the Query Editor and possibly other components of the interface. It ensures that any changes or updates made to the query editor or the data are reflected in the interface. This can be helpful when the user working with dynamic data or making adjustments to your query.
Before clicking the Refresh Button, the user may want to make sure that the user completed necessary changes or updates in the Query Editor or other parts of the interface, and the user has to ensure that the displayed data is up-to-date. Clicking the Refresh Button will refresh the interface to reflect the current state of the data and any changes the user has made.
In summary, these three buttons are part of designed for querying and testing data using SOQL in a database, with the Execute Button for running queries, the Open Query Editor for customizing queries, and the Refresh Button for updating the interface’s displayed data and status.
- The section with Outbound Interface has 3 buttons:
- Execute Button: is used to execute SOQL queries and query messages to test the results/payload mapping
- Open Query Editor is used to query specific objects and fields from the Database to get query statements into the Query Editor on Test Mapping
- When click on Open Query Editor, it alerts pop-up screen for filer query statements then click Save SOQL
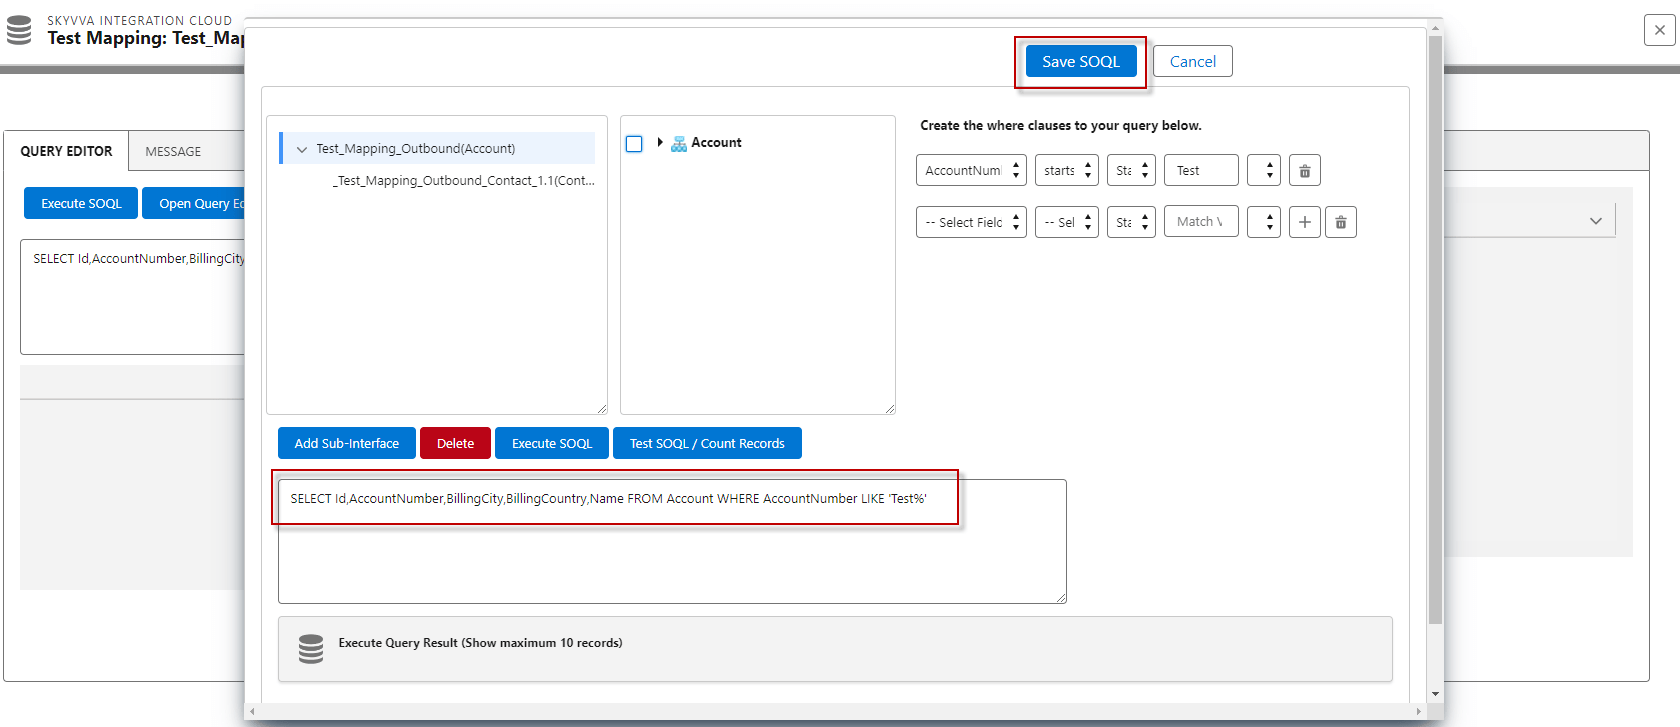
- After clicking Save SOQL, it gets query statements into the Query Editor on Test Mapping
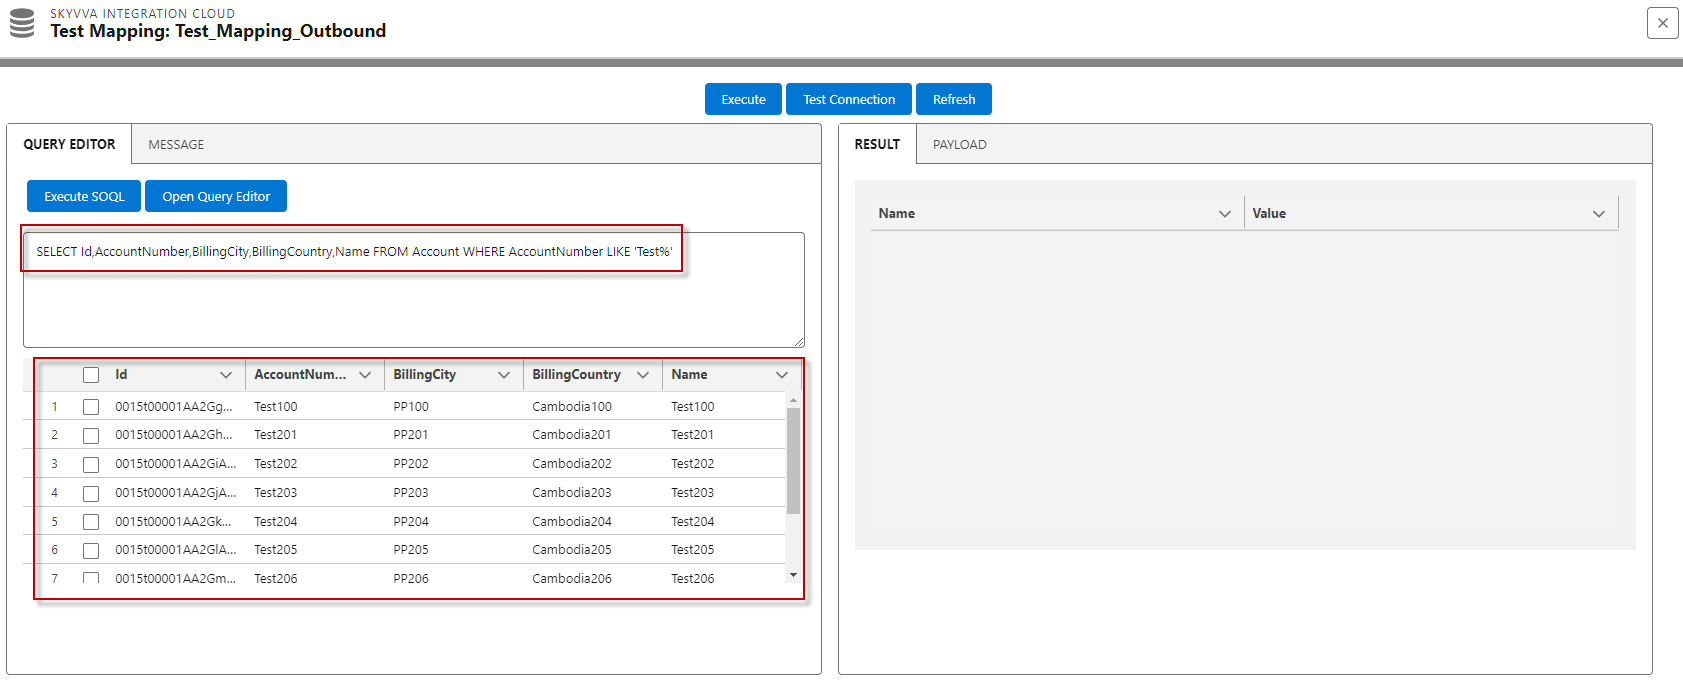
- Before Execute test mapping result you need to Execute SOQL for the query records you want to test Execute
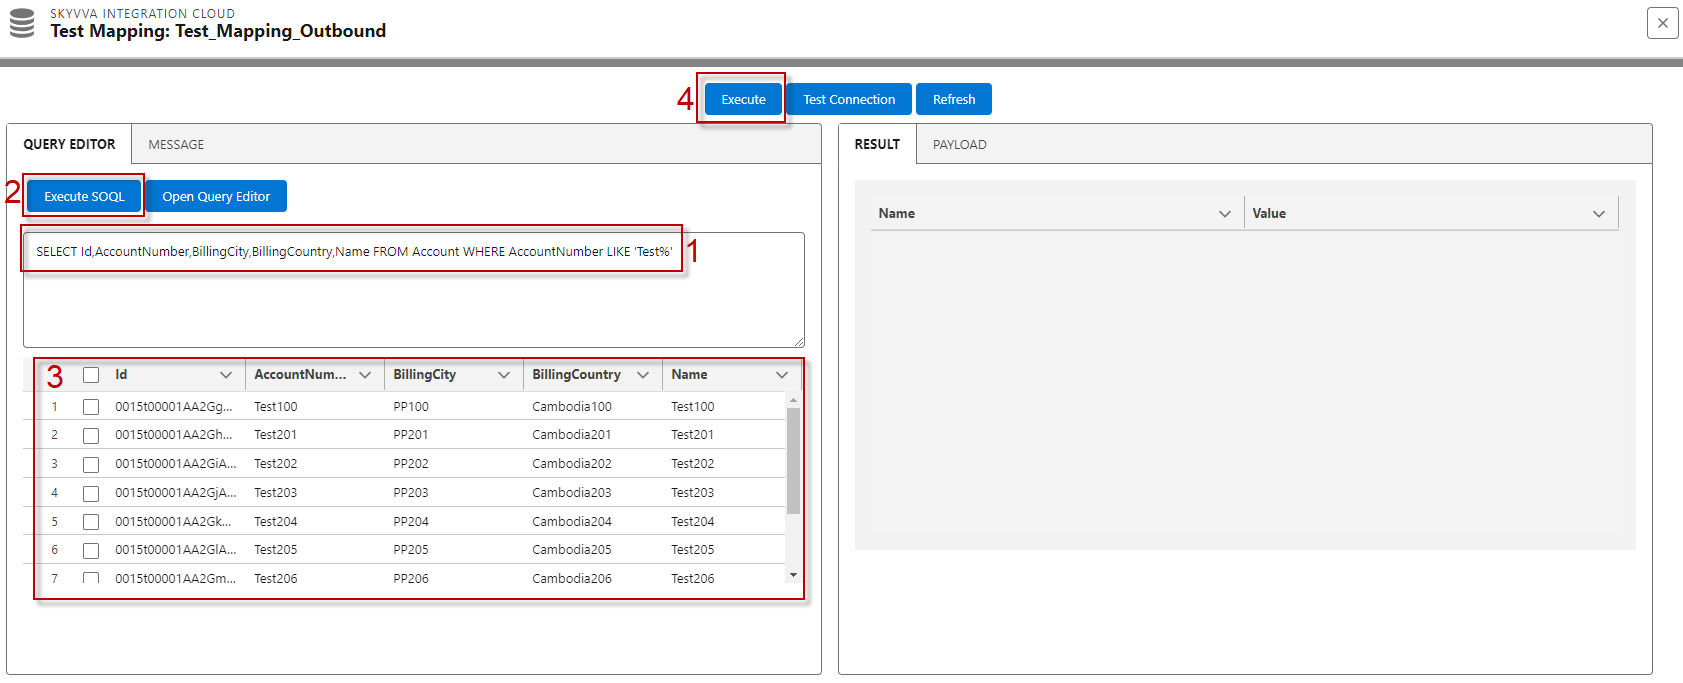
- After clicking Execute SOQL -> Select the Records -> then click Execute Button to test Mapping Result/Payload
- Refresh Button: is used to refresh the Query Editor and the
- Before clicking the Refresh Button
- After clicking the Refresh Button
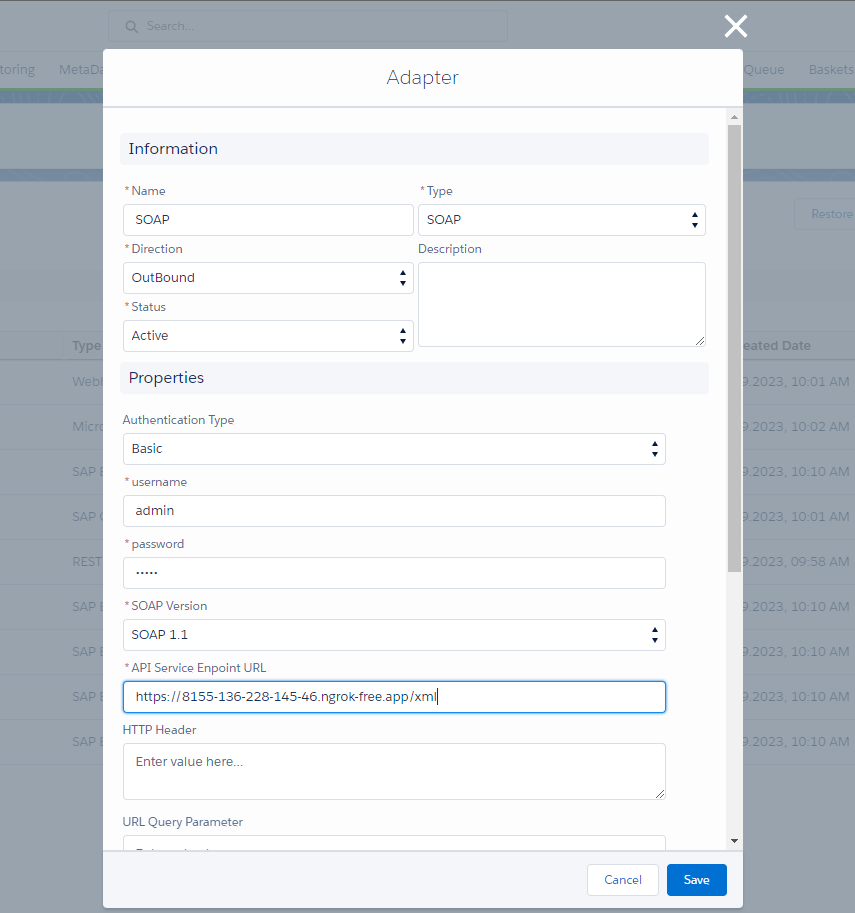
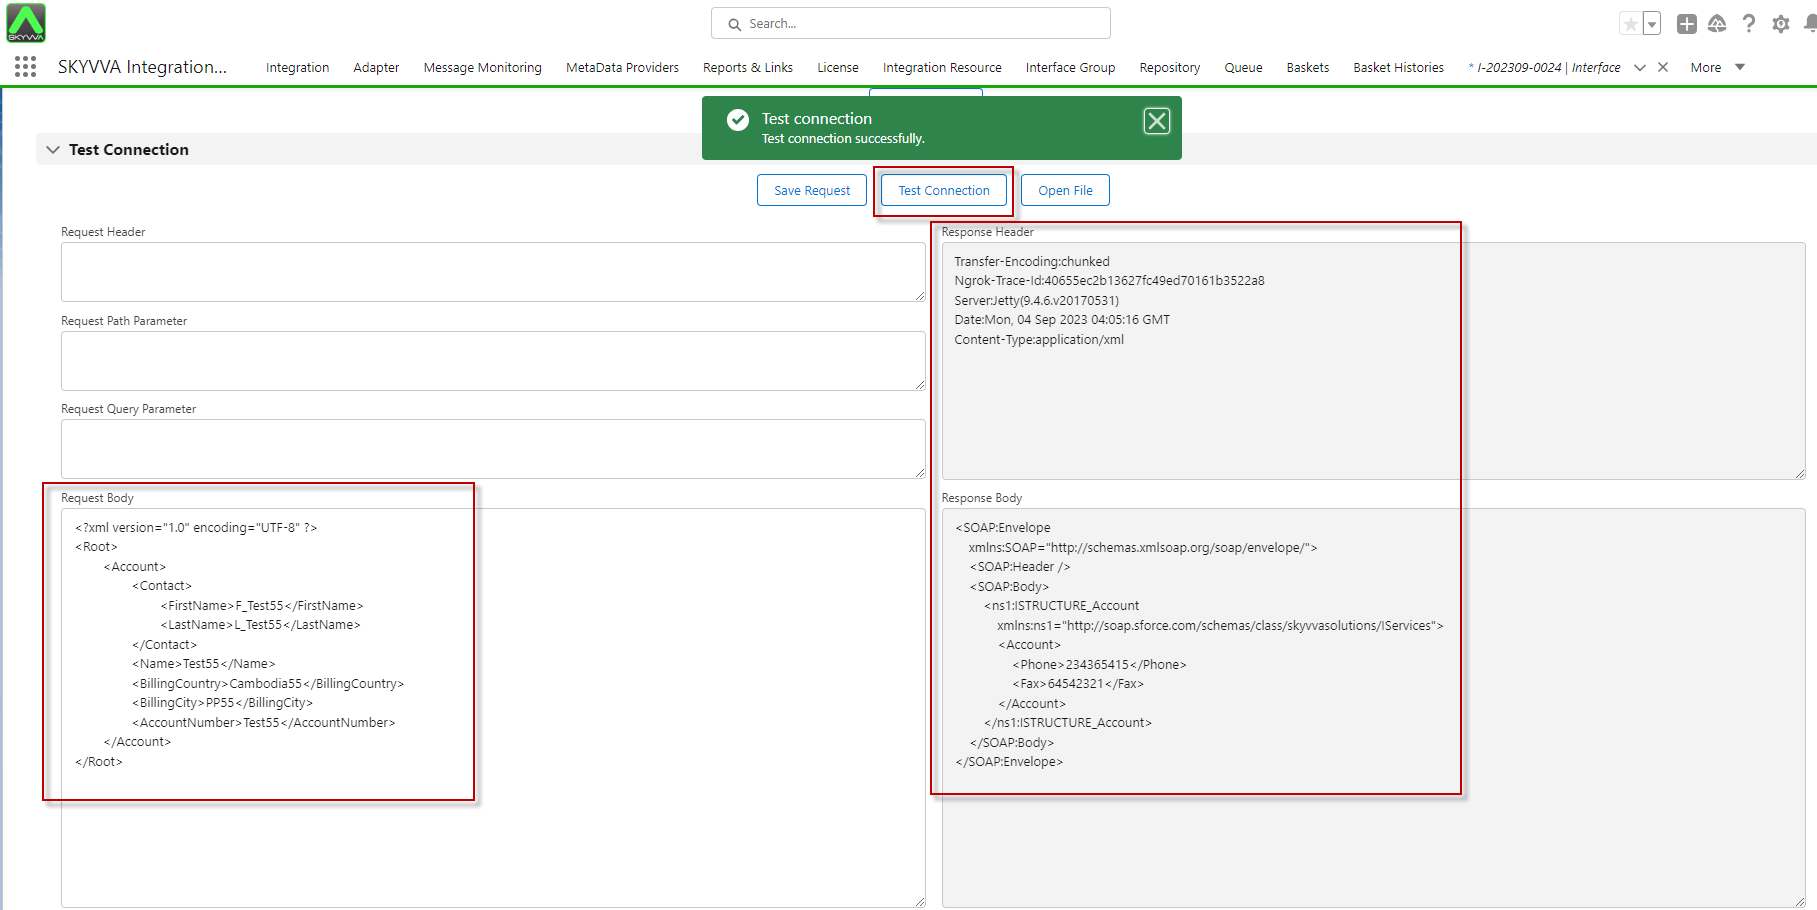
It is a feature or functionality in a SKYVVA application that involves testing the connection and configuration of an adapter. Here’s a breakdown of the information you provided:
- Test Connection Button: This button is used to initiate a connection test and check the configuration of an adapter. It is specifically designed to work with Interface V3.
- Functionality: When the “Test Connection” button is clicked, it triggers a page reload that takes the user to the “Adapter Test Connection” page.
- Adapter Test Connection Page: This page is divided into four sections:a. Adapter Detail: This section likely provides information about the adapter being tested, such as its name, type, and version.b. Property: This section allows users to view and possibly edit the properties of the adapter configuration.c. Existing Test Case: This section may display information about any previously saved test cases related to this adapter. It shows test case results.d. Test Connection: This is where the actual testing of the adapter’s connection and configuration takes place. Users can initiate the test from here and check whether the adapter is functioning as expected.
- Saving Test Cases: The users have the option to save the test cases they’ve performed on this page. Saving test cases can be helpful for reusing test business scenarios in the future for reference.
This functionality is part of a SKYVVA application that allows users to test and manage the configuration of adapters, specifically those using Interface V3. The “Adapter Test Connection” page provides a comprehensive interface for performing these tasks and managing test case records.
- Test Connection: is used to Test Connection and check Configuration Adapter. This button just supports only the Interface V3.
- When clicking on the Test Connection, it will reload the page to the Adapter Test Connection
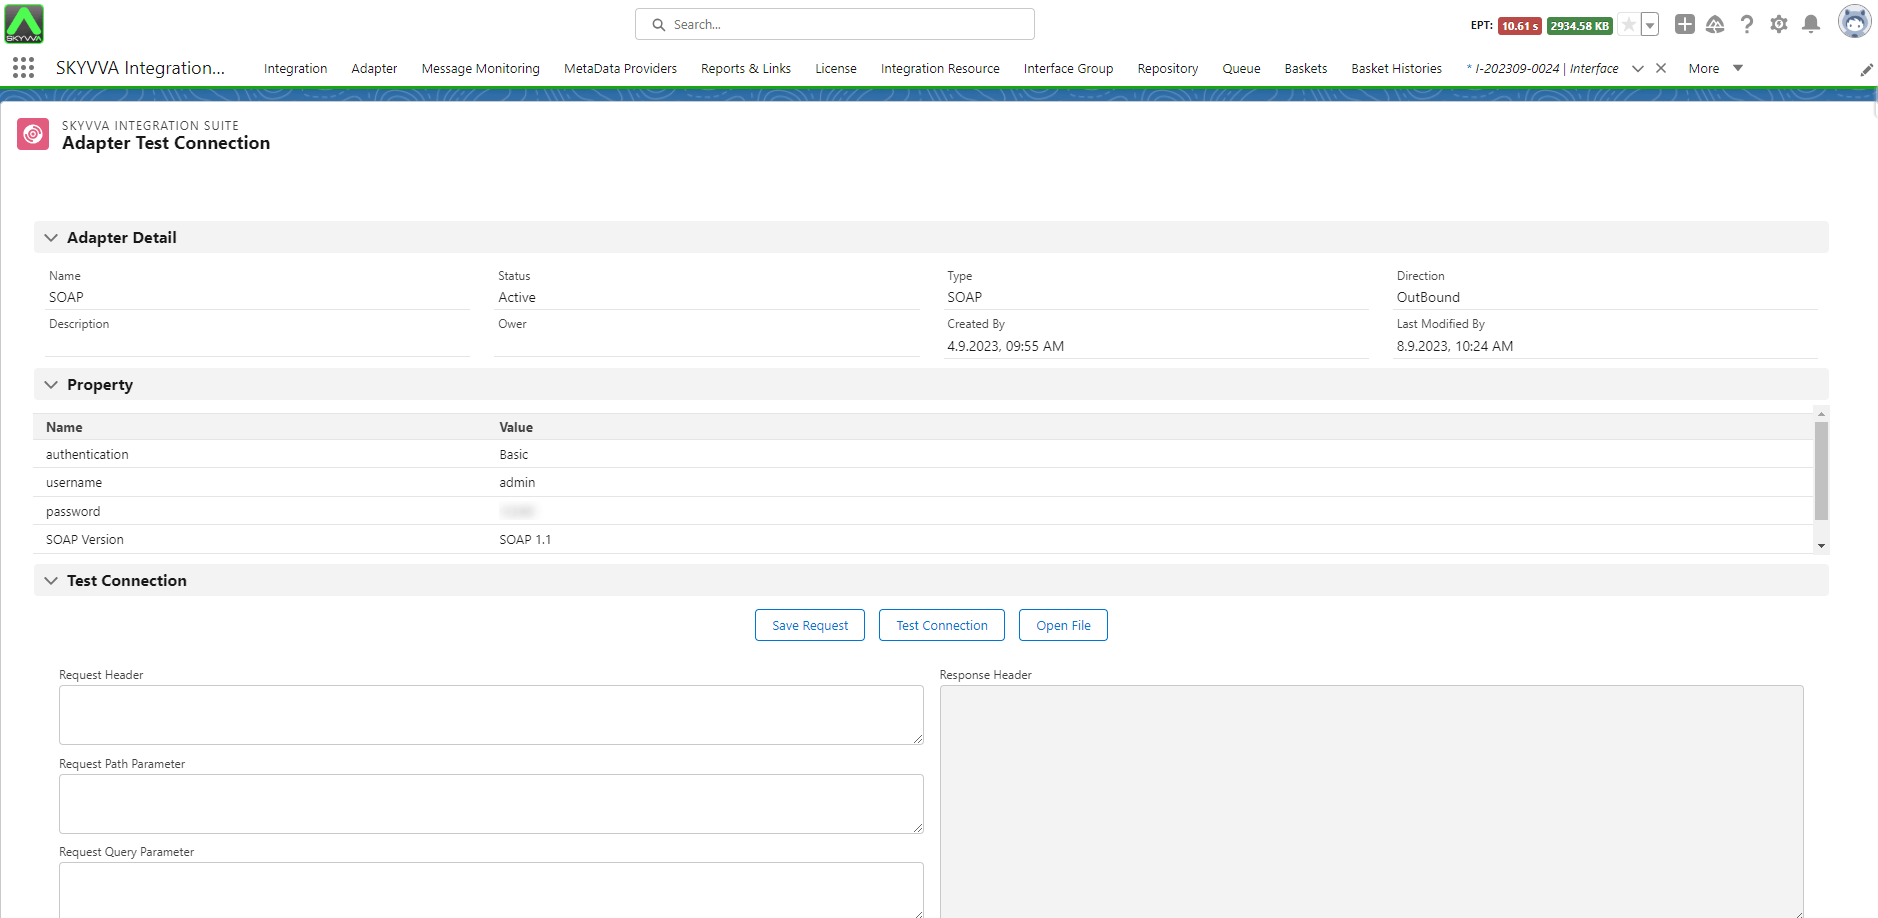
2. On the ‘Adapter Test Connection’ page, you can see four sections: Adapter Detail, Property, Existing Test Case, and Test Connection. It allows you to test and check the Adapter configuration and also provides the option to save the Test Case that you have checked previously.
- Interface API Version V2/V3 (without a message type): The Test Mapping feature does not support generating the Payload; it only displays the Results Mapping.
- Interface V2 for Outbound: The ‘Test Connection’ button is not supported. Instead, we display two buttons: ‘Execute’ and ‘Refresh’.
- Interface V3 with a message type: If you link an Adapter to the Interface, the Payload will be generated based on the Adapter


