
Skip to content
  • Blog
  • Docs
  • Documentation
  • Imprint
SKYVVA Integration App – Documentation
SKYVVA Integration App - Documentation
  • Documentation
  • Zurück zur Webseite
  • Back to website
SKYVVA Integration App – Documentation
SKYVVA Integration App - Documentation
Popular Search how tohow to useagenthowdatarestformulacustomstorebatch

SAP PI/PO Adapter

Tutorials (Lightning)

Agent Old Administration Guide

SAP Release Notes

Agent Release Notes

Agent - New Administration Guide

SAP CPI Adapter

SKYVVA Administration Guide (Lightning)

SKYVVA Release Notes

SAP/ERP | S4/HANA (Latest Version) Adapter

  • 1. Pre-Requisite
    • 1.1 Pre-Requisite
    • 1.2. Import/Deploy ABAP Transport In SAP
    • 1.3. Certificate for Secured Communications
    • 1.4. Setup Connection SAP SALESFORCE
    • 1.5 Activation of Skyvva service in SAP
    • 1.6 Create Connection Destination & SAP Adapter in Salesforce
    • 1.7 Activation of the “rfc” service service in SAP
  • 2. Create Metadata provider
    • 2.1. How to Create Metadata provider in Salesforce (Direct SAP->SF)
    • 2.2. How to Create Metadata provider in Salesforce Using AGENT
  • 3. IDOC Configuration
    • 3.1. IDOC Configuration in SAP
    • 3.2. IDOC Configuration in SALESFORCE (Direct SAP Connection)
    • 3.3. IDOC Configuration in SALESFORCE (Using AGENT)
  • 4. SAP to Salesforce (Using SAP Control Board)
    • 4.1 How to send data using IDoc?
    • 4.2 How to send data using BAPI, FM?
    • 4.3. How to use Batch mode?
    • 4.4 How to use Bulk mode?
    • 4.5 How to use Auto-Switch mode?
    • 4.6 How to use Salesforce Bulk mode?
  • 5. SAP to Salesforce (Using AGENT Control Board)
    • 5.1 How to send data using IDoc?
    • 5.2 How to send data using BAPI, FM?
    • 5.3. How to use Batch mode?
    • 5.4 How to use SFDC Bulk mode?
    • 5.5 How to use AUTO-SWITCH mode?
    • 5.6 How to use Salesforce Bulk mode?
  • 6. Salesforce to SAP(Using SAP Control Board)
    • 6.1 How to Call IDoc From Salesforce
    • 6.2 How to call S/4 HANA IDOC from Salesforce
    • 6.3 How to Call SAP ERP BAPI/FM From Salesforce
    • 6.4 How to call S/4 HANA BAPI from Salesforce
    • 6.5 How to call SAP REST API using Skyvva REST Adapter?
    • 6.6 How to call SAP SOAP API using Skyvva SOAP Adapter?
  • 7. Salesforce to SAP(Using Agent Control Board)
    • 7.1 How to Call SAP ERP IDoc From Salesforce
    • 7.2 HOW TO CALL SAP S/4 HANA IDOC FROM SALESFORCE
    • 7.3 How to Call SAP ERP BAPI/FM From Salesforce
    • 7.4 HOW TO CALL SAP S/4 HANA BAPI FROM SALESFORCE
    • 7.5 HOW TO CALL SAP REST API USING SKYVVA REST ADAPTER?
    • 7.6 How to call SAP SOAP API using Skyvva SOAP Adapter?
  • How to develop inbound interface using FM/RFC/Report with the multi-itab adapter synchronously?
    • 13. How to develop inbound interface using FM/RFC/Report with the multi-itab adapter synchronously?
    • a. Direct SAP to SALESFORCE
    • b. Using AGENT
  • DEBMAS IDOC Sending from SAP -> SF
    • 14. DEBMAS IDOC Sending from SAP -> SF
    • a. Direct SAP to SALESFORCE
    • b. Using Agent
  • ORDRSP IDOC Sending from SAP -> SF
    • 15. ORDRSP IDOC Sending from SAP -> SF
    • a. Direct SAP to SALESFORCE
    • b. Using Agent
  • DESADV IDOC Sending from SAP -> SF
    • 16. DESADV IDOC Sending from SAP -> SF
    • a. Direct SAP to SALESFORCE
    • b. Using Agent
  • INVOIC IDOC Sending from SAP -> SF
    • 17. INVOIC IDOC Sending from SAP -> SF
    • a. Direct SAP to SALESFORCE
    • b. Using Agent
  • Generic Use of Multit-Tab
    • 8. Generic Use of Multit-Tab
  • Inbound Interface using Bulk Mode
    • 2. HOW TO DEVELOP INBOUND INTERFACE USING Bulk Mode (SAP Control Board)
    • 1. HOW TO DEVELOP INBOUND INTERFACE USING BULK MODE (AGENT CONTROL BOARD)
  • Inbound Interface using Batch Mode
    • 1. HOW TO DEVELOP INBOUND INTERFACE USING Batch MODE (AGENT CONTROL BOARD)
    • 2. HOW TO DEVELOP INBOUND INTERFACE USING BATCH MODE (SAP CONTROL BOARD)

SAP-ERP (Old Version) Adapter

Mule Adapter

Migration from SAP-PO SOAP Skyvva connector to REST connector module

View Categories
  • Home
  • Documentation
  • SAP/ERP | S4/HANA (Latest Version) Adapter
  • 6. Salesforce to SAP(Using SAP Control Board)

6.5 How to call SAP REST API using Skyvva REST Adapter?

Posting BAPI  to SAP ERP from salesforce using Skyvva REST Adapter
In SAP ERP we have to do the following settings
How to Activate the Skyvva service in SAP using Tcode SICF.

Introduction:- #

In this chapter, you will learn about the “Activation of  Skyvva service in sap”. The service is used to send & receive data from SAP <> salesforce .

Activation of Skyvva service in Tcode SICF #

Once you have installed the Skyvva package(TR) all Internet Communication Framework (ICF) services are available in an inactive state for security reasons. After the installation you have to decide which services must be activated for the applications you want to use.
Since multiple services can be executed when you call a URL, all service nodes must be activated in the SICF tree. The URL path is mapped in ICF subnodes (services). For example, if you want to activate the services for URL  /default_host/sap/bc/skyvva/, you have to activate the service tree default_host in transaction SICF. Then you have to activate services sap, bc and skyvva separately.
You activate an ICF service as follows:

  1. Select the required ICF service in the ICF tree in transaction SICF.
  2. Activate the ICF service in one of the following ways:
  3. Using menu option Service/Host  ->  Activate
  4. Using the context menu and choosing Activate Service.

Services for Skyvav #

For skyvva ABAP  the following services must be activated in the system.

Using skyvva Applications #

/default_host/sap/public/ping
This node itself must be activated, for ping service.
/default_host/sap/bc/skyvva/
Here only the node itself must be activated, and not the subnodes.
/default_host/sap/bc/skyvva/v3/

This node is activated automatically when the subnodes described below are activated. Likewise, here only the node itself must be activated, as well as the following subnodes: #

/default_host/sap/bc/skyvva/v3/cache
/default_host/sap/bc/skyvva/v3/ GetBapiDetail
/default_host/sap/bc/skyvva/v3/ GetIdocSegField
/default_host/sap/bc/skyvva/v3/ GetIdocSegList
/default_host/sap/bc/skyvva/v3/ GetObjCount
/default_host/sap/bc/skyvva/v3/ GetObjectList
/default_host/sap/bc/skyvva/v3/ GetPartnProfile
/default_host/sap/bc/skyvva/v3/ GetQualifier
/default_host/sap/bc/skyvva/v3/ GetTabFieldList
/default_host/sap/bc/skyvva/v3/ restoreendpoint

  • Activate All the service as shown below.
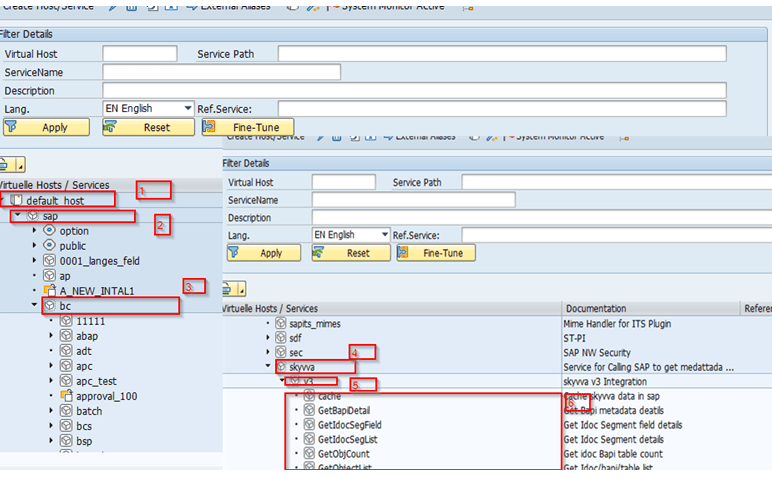
We will get the endpoint and request and response JSON payloads from SAP. By using that we have to create message type in Skyvva.

Creating the REST Adapter in Skyvva
We need to provide the following details to create the REST adapter
Name – Name of the adapter
Type – REST
Description – BAPI REST Adapter
Direction – Outbound
Status – Active
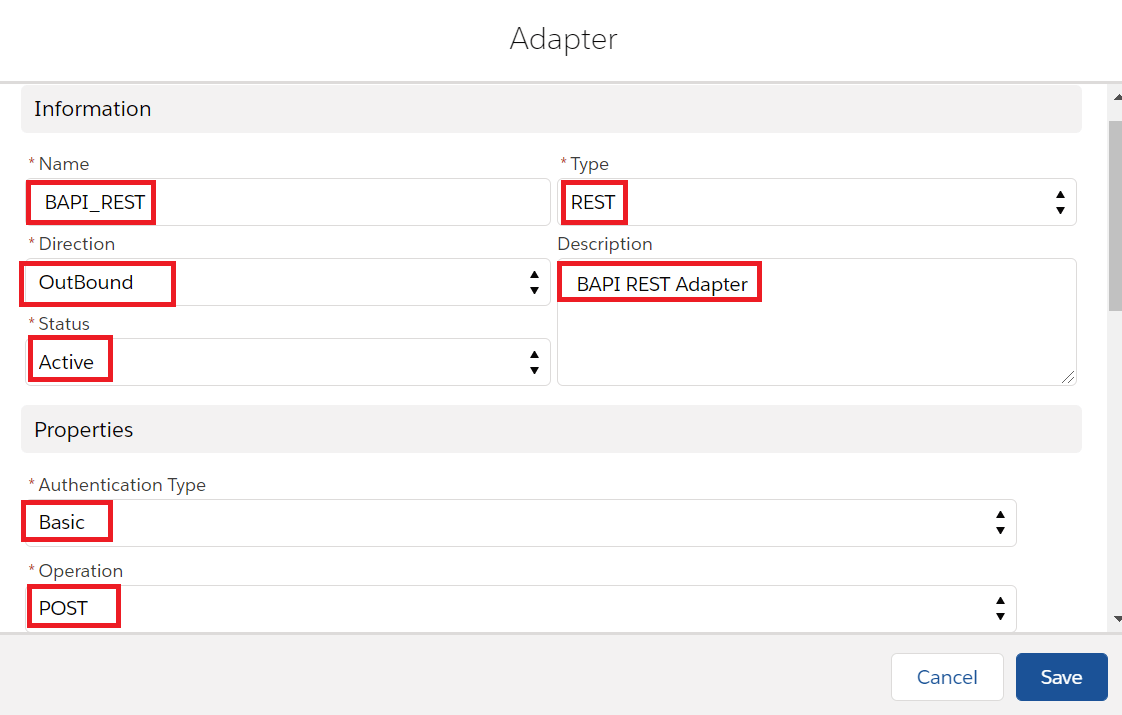
Authentication – Basic
endpoint – http://195.201.104.232:16080/sapid7/sap/bc/skyvva_sf/createso?sap-client=820
Operation – POST
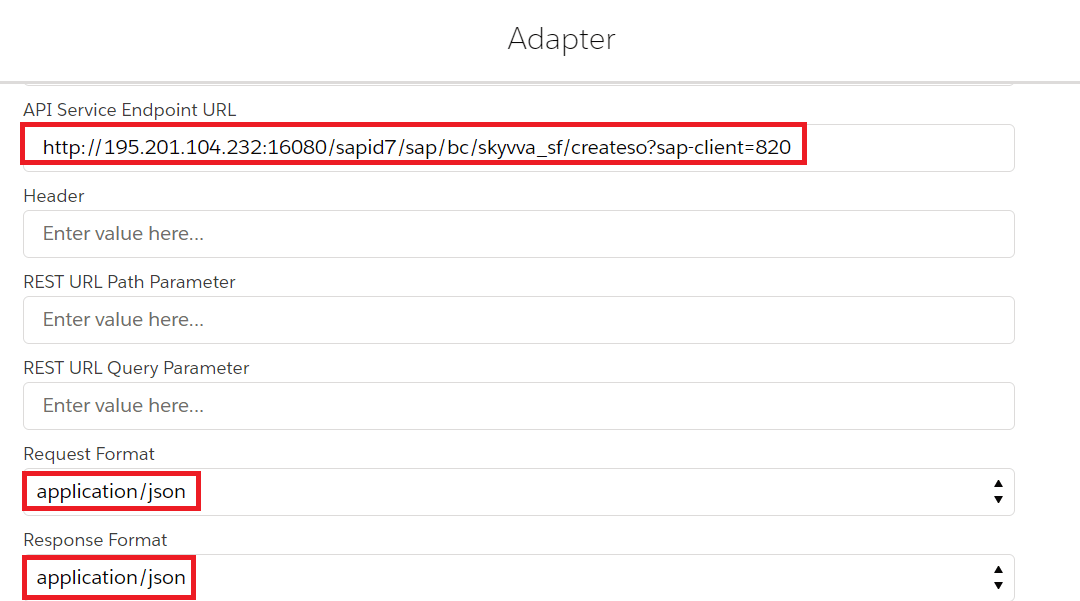
Request and Response Format – application/json
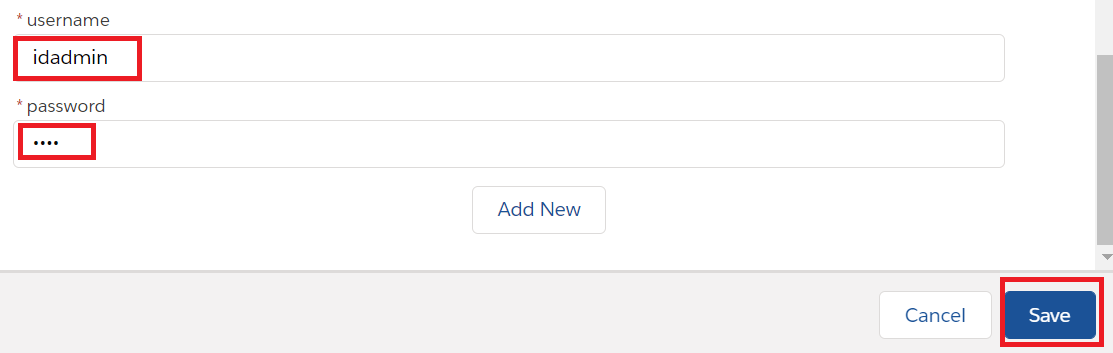
Username – idadmin
Password – ******
Now click on save button to create the adapter.
Create Metadata Provider –
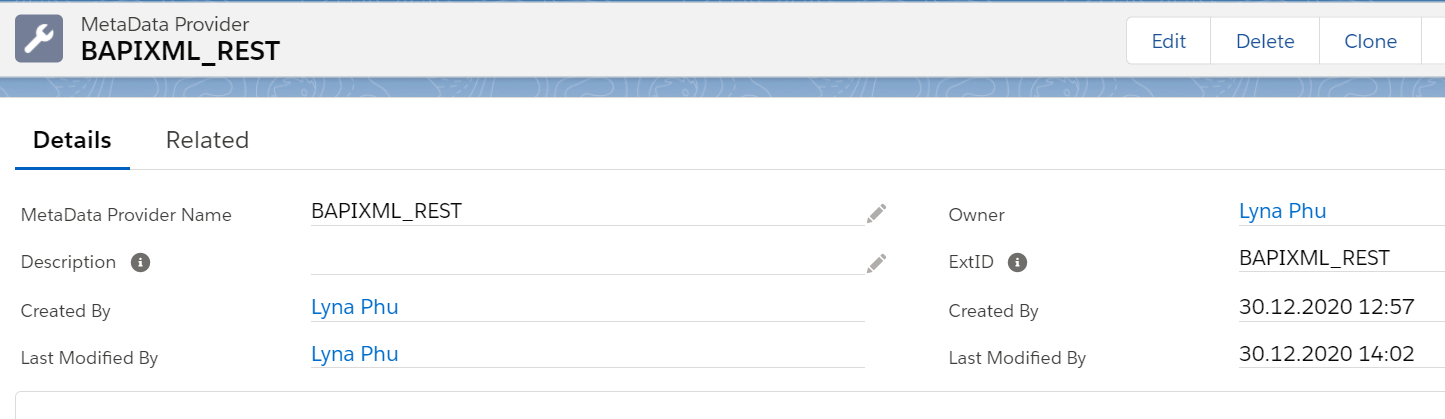
Create Repository –
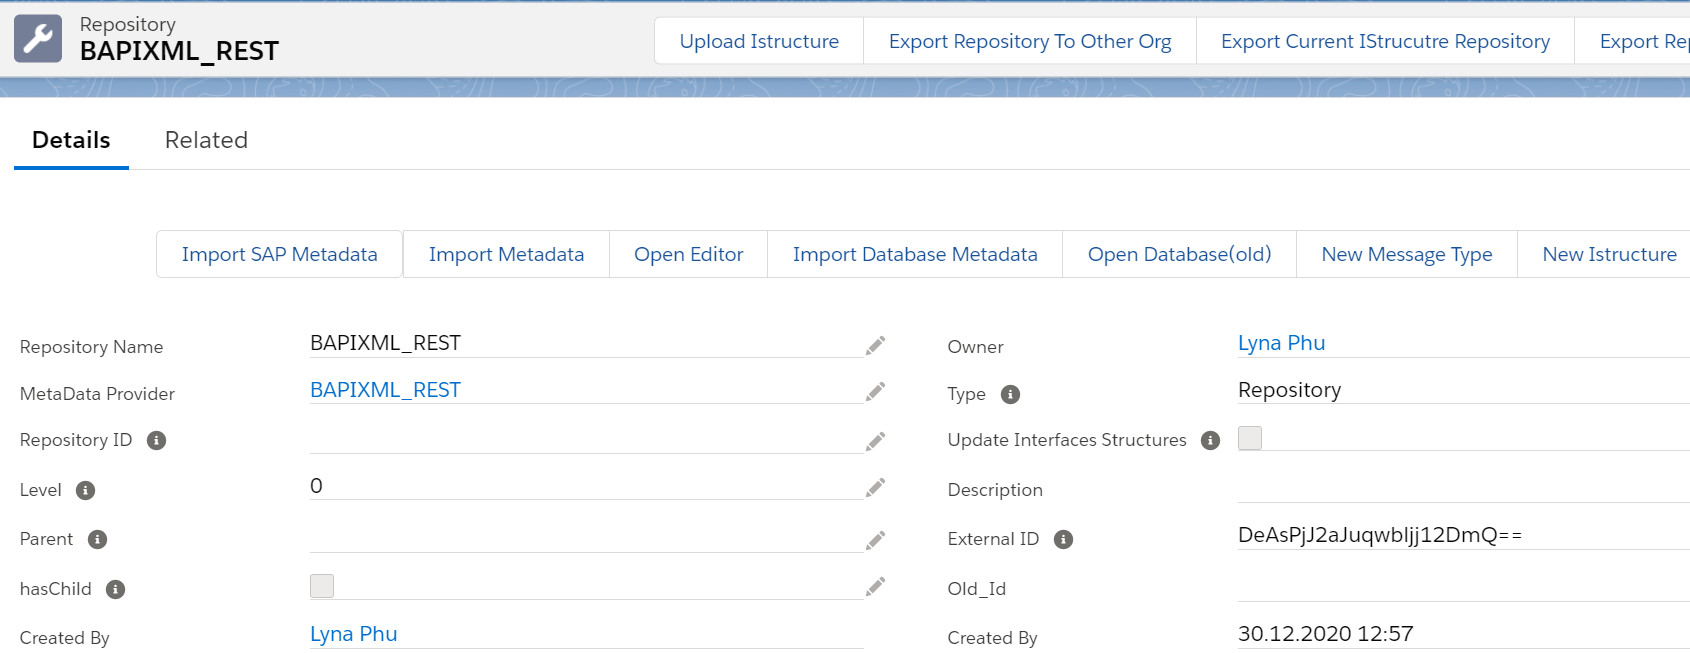
Create Message type –
Creating the message type using the following JSON payload.
Request Structure:
{

  “DocType” : “TA”,
  “SalesOrg” : “1000”,
  “DistrChan” : “12”,
  “Division” : “00”,
  “NvHeaderToOrdItem” : [
    {
      “ItmNumber” : “000010”,
      “Plant” : “1000”,
      “Material” : “1400-300”,
      “TargetQty” : “100.000”,
      “NvOrdItemToSchLine” : [
        {
          “ItmNumber” : “000010”,
          “ReqQty” : “100.000”,
          “ReqDate” : “2020-08-23T12:34:56”
        }
      ]
    }
  ],
  “NvHeaderToPartners” : [
    {
      “PartnRole” : “AG”,
      “PartnNumb” : “0000002300”
    }
  ],
  “ReturnSet” : [{
  “Type” : “”,
  “Message” : “”,
  “MessageV1” : “”
  }]
}
Response Structure:
{
“ARRAY”: [
{
“TYPE”: “S”,
“ID”: “V4”,
“NUMBER”: “233”,
“MESSAGE”: “SALES_HEADER_IN has been processed\r\nsuccessfully”,
“LOG_NO”: “”,
“LOG_MSG_NO”: “000000”,
“MESSAGE_V1”: “VBAKKOM”,
“MESSAGE_V2”: “”,
“MESSAGE_V3”: “”,
“MESSAGE_V4”: “”,
“PARAMETER”: “SALES_HEADER_IN”,
“ROW”: 0,
“FIELD”: “”,
“SYSTEM”: “CNT_DEV820”
},
{
“TYPE”: “S”,
“ID”: “V4”,
“NUMBER”: “233”,
“MESSAGE”: “SALES_ITEM_IN\r\nhas been processed\r\nsuccessfully”,
“LOG_NO”: “”,
“LOG_MSG_NO”: “000000”,
“MESSAGE_V1”: “VBAPKOM”,
“MESSAGE_V2”: “000010”,
“MESSAGE_V3”: “”,
“MESSAGE_V4”: “”,
“PARAMETER”: “SALES_ITEM_IN”,
“ROW”: 1,
“FIELD”: “”,
“SYSTEM”: “CNT_DEV820”
},
{
“TYPE”: “S”,
“ID”: “V1”,
“NUMBER”: “311”,
“MESSAGE”: “Standard\r\nOrder 20469 has been saved”,
“LOG_NO”: “”,
“LOG_MSG_NO”: “000000”,
“MESSAGE_V1”: “Standard\r\nOrder”,
“MESSAGE_V2”: “20469”,
“MESSAGE_V3”: “”,
“MESSAGE_V4”: “”,
“PARAMETER”: “SALES_HEADER_IN”,
“ROW”: 0,
“FIELD”: “”,
“SYSTEM”: “CNT_DEV820”
}
]
}
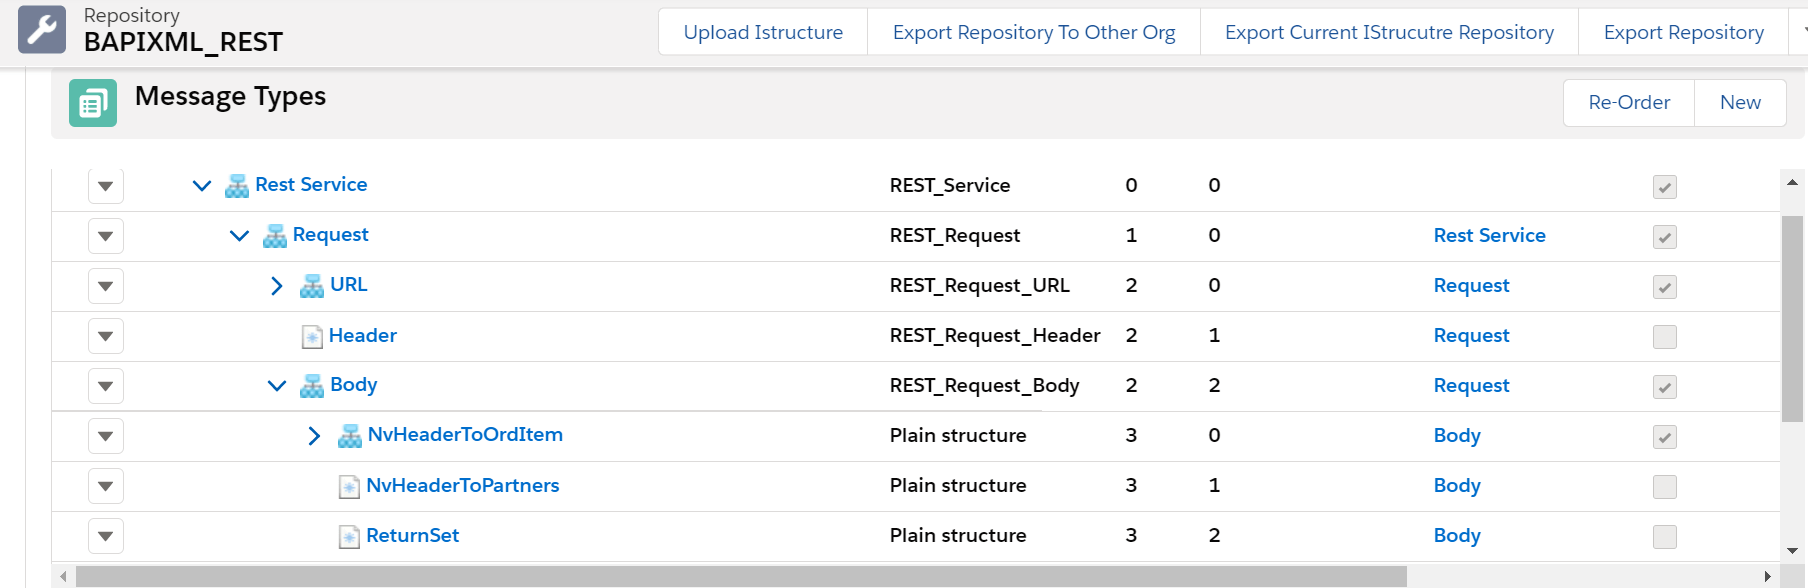
Now create the message type using the above payloads along with the rest template.

Use the above messagetype while creating the outbound and inbound interface.

Creating an Outbound interface:
Provide the Name, sObject type, Description, Processing mode, Status, Metadata provider, Repository, Message type, outbound adapter and the SQL statement as shown in the screenshots below
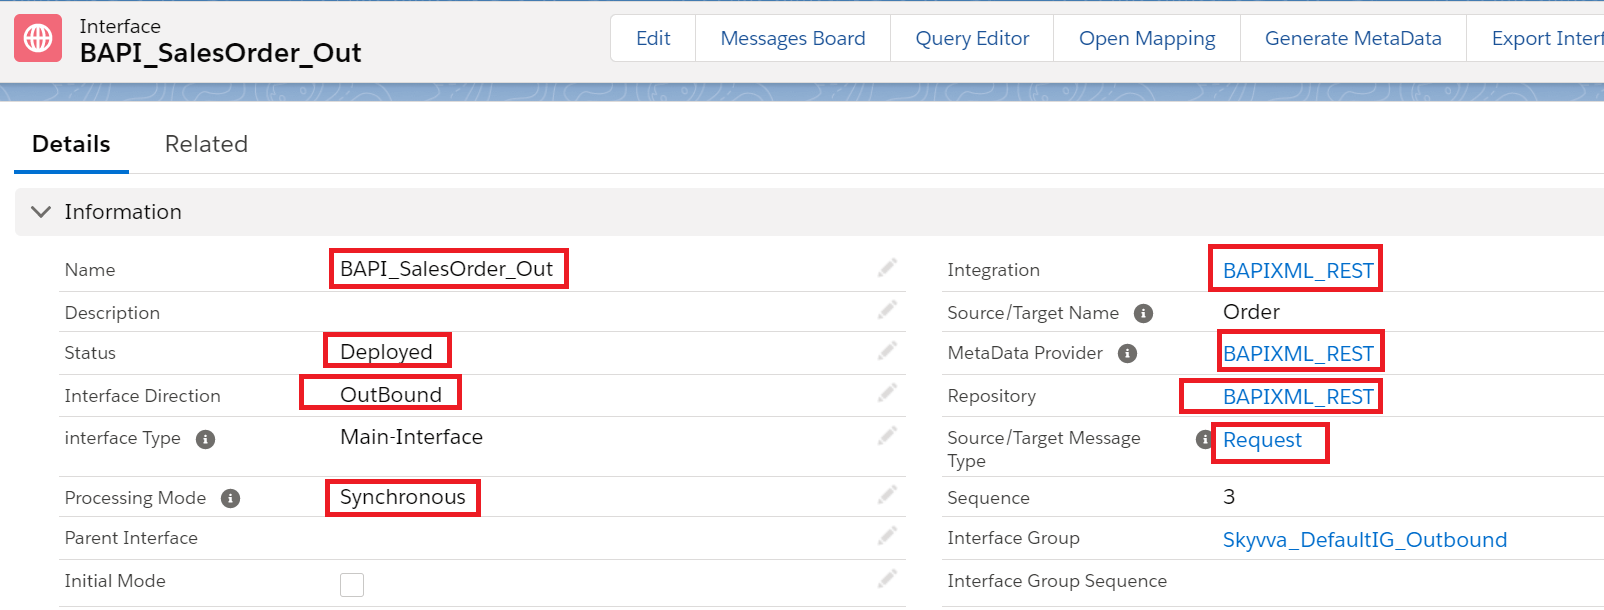
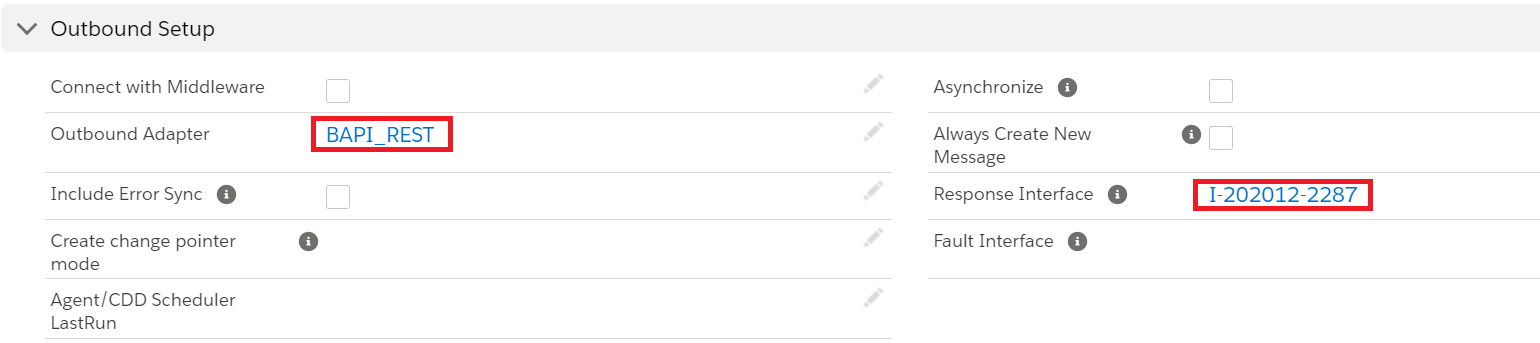
For outbound interface we have to do mapping in Skyvva as shown.
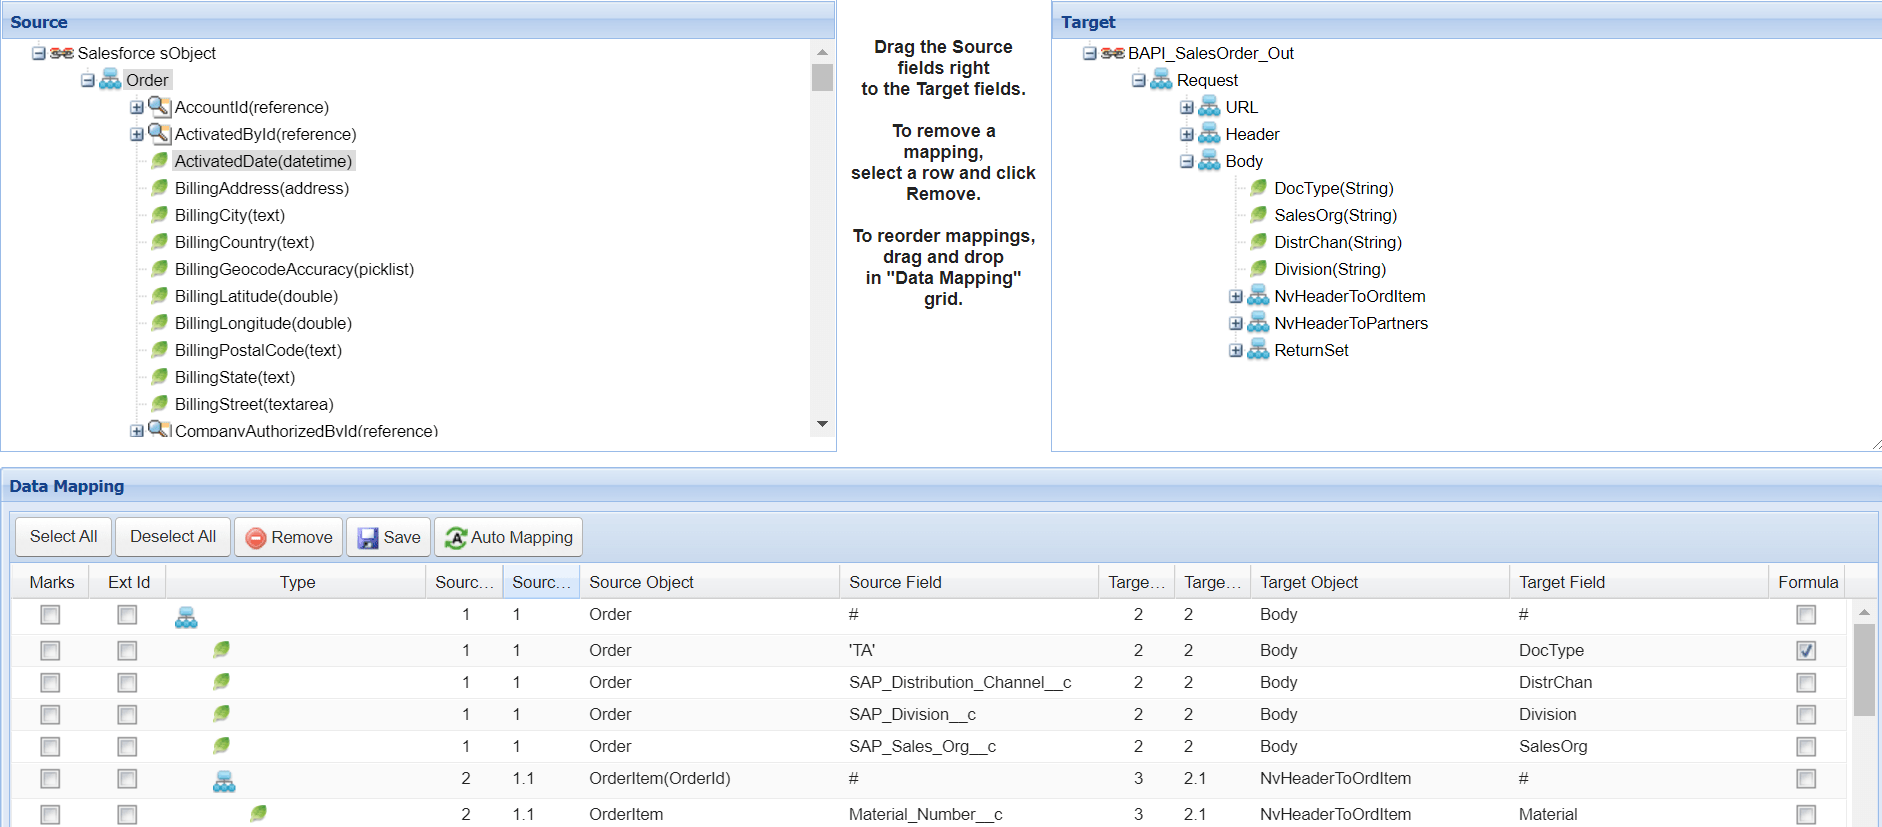



Save the interface once provide all the necessary details.

Create Inbound response interface:
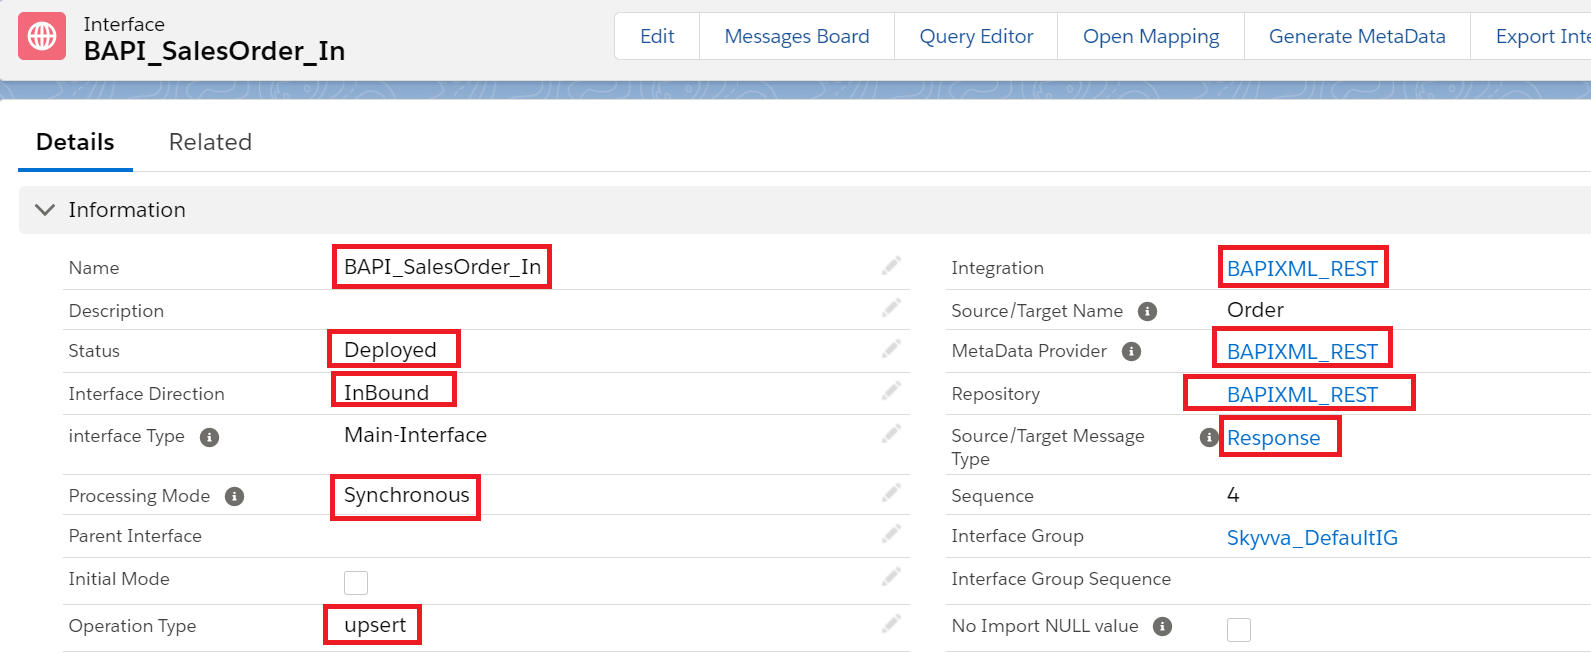
Do the mapping as shown
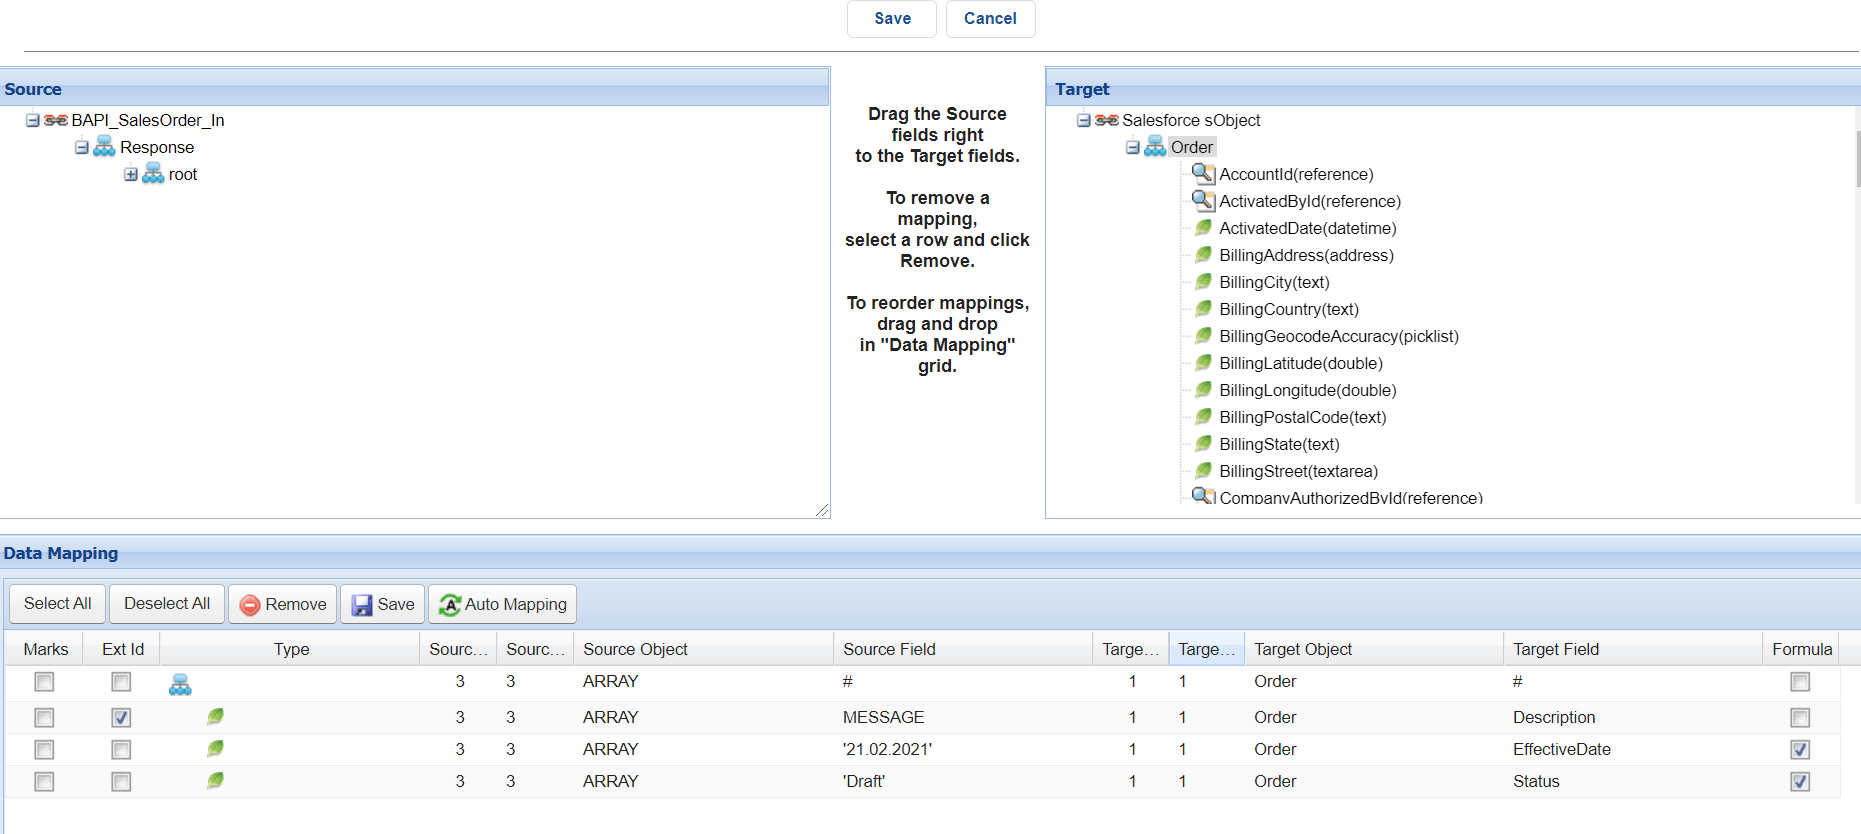
Now do the callout using below apex code:
skyvvasolutions.CallOutControl c=new skyvvasolutions.CallOutControl();
c.returnXml=true;
c.returnListRecord=true;
c.isCreateMessage=true;
c.actionDoIntegrate=true;
String[] ids=new String[]{‘0Q0f0000000ASn6CAG’};
skyvvasolutions.Iservices.invokeCalloutV3(‘BAPIXML_REST’,’BAPI_SalesOrder_Out’,ids,’SYNC’, c);

Now we can see the message in the message monitor:

Share This Article :

  • Facebook
  • X
  • LinkedIn
6.4 How to call S/4 HANA BAPI from Salesforce6.6 How to call SAP SOAP API using Skyvva SOAP Adapter?
Table of Contents
  • Introduction:-
  • Activation of Skyvva service in Tcode SICF
  • Services for Skyvav
    • Using skyvva Applications
    • This node is activated automatically when the subnodes described below are activated. Likewise, here only the node itself must be activated, as well as the following subnodes:

Copyright © 2026 | Apsara Consulting GmbH | All rights reserved

  • Imprint
  • Zurück zur Apsara Webseite
  • Back to Apsara website
