
Introduction #
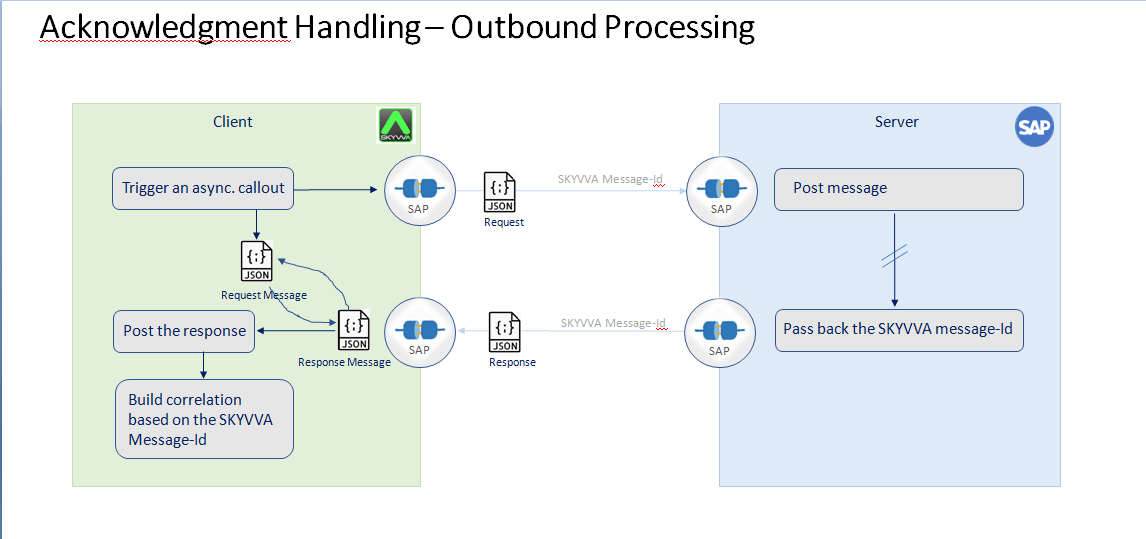
Acknowledgment can be of system and application acknowledgment. System acknowledgment is a technical message send back to the caller to indicate that the data has been technically transferred. Application acknowledgment is to tell the caller that the data has been successfully processed without any business error. The acknowledgment can be sent to the caller back as a reaction of what he has sent to us. This is for inbound message. For the outbound message, we can only request from the receiving system to send us an acknowledgment or notification. We can request from the receiver to send us back the technical or application acknowledgment.
A notification or acknowledgement message can be immediately e.g. send back from the receiver immediately for the outbound message or at a later time. In both cases, the acknowledgement message is an asynchronous message. If we make a synchronous call then we have immediately the response where we are waiting for that and get blocked until the response arrives. In this real synchronous case, we don’t need acknowledgement or notification because the response is already the acknowledgement/notification message. Acknowledgement and notification make sense only for asynchronous messages.
What should we provide for the outbound message?
For the outbound interface, we can only request from the receiving system to send us the acknowledgment or notification. For acknowledgment, it is enough when we get only the application acknowledgment. We don’t need a system acknowledgment.
Usecase to built the acknowledgement scenario for the inbound and outbound processing: #
- Create Adapter:
- Type: SOAP
+ Create Property
Name Value
- Endpoint : e http://110.74.222.147:9292/xml
- Authentication : Basic
- Operation : Post
- Username: e … admin
- Password : e … 12345
We can handle if the business has URL Query Parameter and HTTP Header
- URL Query Parameter : ?pCity={!City}&pCountry={!Country}
- HTTP Header : Content-Type:Application/xml|{!LastName}:{!FirstName}
2. Create Integration : i.e Testing-SOAPV3
Create Interfaces: Interface (inbound , outbound)
- Name: Request-Interface, type outbound
Note: Chain Interface must be apply base on business.
- Name: Response-Interface: type Inbound
4. Create Metadata Provider : Meta-SOAPV3
5. Create Repository : Repo-SOAPV3
6. Create MessageType : MessageType must define as SOAP Template
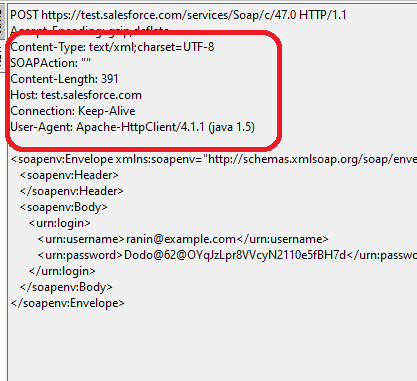
-Here is SOAP tamplate created by Message Type for build xml payload:
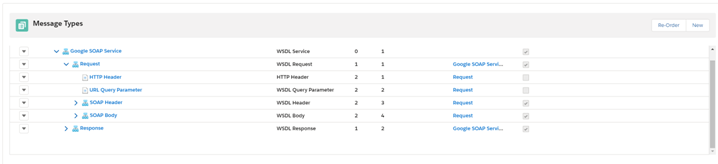
MessageType :Google SOAP Service Type : WSDL Service
MessageType: Request Type: WSDL Request
MessageType : HTPP Header Type : HTTP Header
MessageType : URL Query Parameter Type : WSDL URL Query Parameter
MessageType : SOAP Header Type : WSDL Header
MessageType : SOAP Body Type : WSDL Body
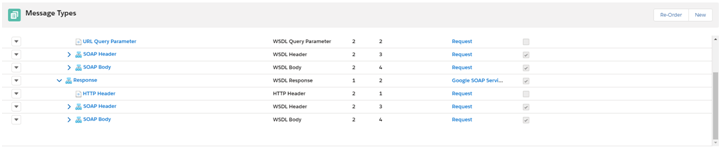
MessageType: Response Type: WSDL Response
MessageType : HTPP Header Type : HTTP Header
MessageType : SOAP Header Type : WSDL Header
MessageType : SOAP Body Type : WSDL Body
MessageType we have created:
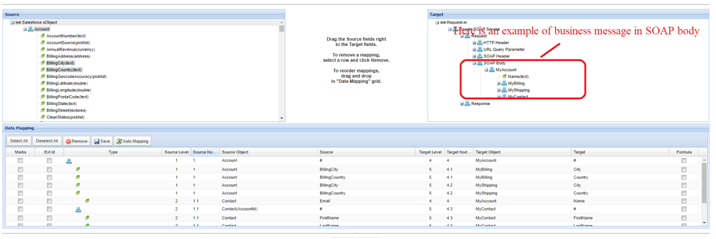
Mapping of request:
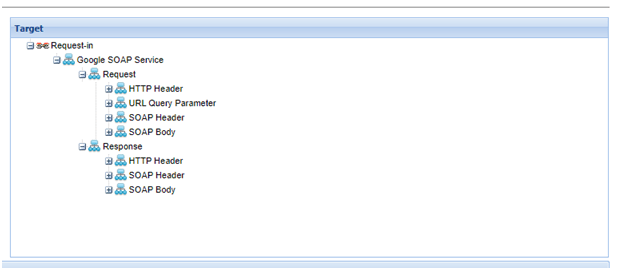
With the message Type “Google SOAP Service” You can define with other Name but type is still WSDL Service
Business MessageType:
The business message Type could be in SOAP Header and SOAP Body
Example : MyAccount, MyContact , MyCase
7. Create IStructure
8. Create MessageField Entry
9. Do Configuration with Request Interface(OutBound)
Source/Target Message Type = Google SOAP Service
10. Do Mapping
After finished configuration then you can Execute Callout
CallOutControl c= new CallOutControl();
List<CallOutResponse> r = IServices.invokeCalloutV3(‘Integration Name’,Interface Name’,new String[]{‘RecordId’},’SYNC’,c);
System.debug(r);
11. Look back to the Point 1 you see the Property name URL Query Parameter and HTTP Header
- If we execute callout with input param like queryparam and headerparam the value we replace on property name URL Query Parameter and HTTP Headeris base on CallOutControl input param, but if we don’t use this case the value will replace by mapping.
Example of input with CallOutControl
CallOutControl c= new CallOutControl();
Map<String,String> queryparam= new Map<String,String>();
queryparam.put(‘City’,’Mumbai’);
queryparam.put(‘Country’,’India’);
Map<String,String> headerparam= new Map<String,String>();
headerparam.put(‘LastName’,’Patil’);
headerparam.put(‘FirstName’,’Shweta’);
c.queryParam(queryparam);
c.headerParam(headerparam);
List<CallOutResponse> r = IServices.invokeCalloutV3(‘Integration Name’,Interface Name’,new String[]{‘RecordId’},’SYNC’,c);
Example of value base on Mapping:
We create IStructure for URL Query Parameter and HTTP Header
- IStructure of URL Query Parameter
for example, 1- City
2- Country
- IStructure of HTTP Header
for example 1- LastName
2- FirstName
And do mapping from Source field to Target field of these MessageType.
– Following the URL Query Paramter: After we have replaced the value, then the value of property URL Query Paramter will be link with the Property Endpoint.
Example : http://110.74.222.147:9292/xml?pCity=PhnomPenh&pCountry=Cambodia
– Following the HTTP Header: After we have replaced the value
Example: Content-Type:Application/xml|Yan:Ranin
Response Result (Inbound):
If the Response is success our functionality will create root API message for both Messages (Request and Response) and API of Request and Response message will link to each other.
Otherwise if the Callout request failed and response with fault, Currently messages request will update to failed and fault error will put into the Messages comment.
Here is some of to do mapping in response interface :
We using the existing Response Message type that we have created in the Message Type Google SOAP Service for link to Interface response.
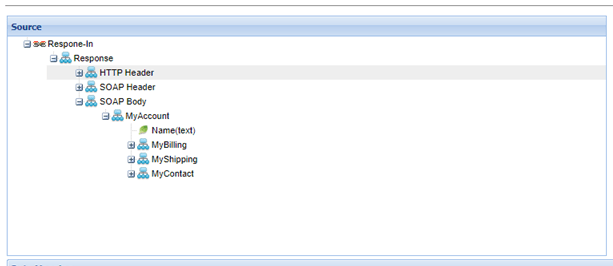
Currently our inbound processing is working only response with body, so the business response is must in the MessageType SOAP Body.
We can do mapping from the messagetype “MyAccount” map to Node Target sObject “Account”. And then do map source field to target field.
For the example you can testing with Mock Service and with the Fake response.
The Result of API Messages of Request and Response:


