This tutorial explains what file, ftp/sftp adapter are, and why do we need them. It describes how to create and use them.
1 What is File adapter? #
File adapter is used to integrate data from file to SFDC and from Salesforce to file. The file
type that our Agent support is CSV, XML and Excel that can be integrated with their
content. You can integrate file attachment into attachment object.
2 What is FTP/SFTP adapter? #
FTP Adapter use as a connector to transfer data from FTP server to Salesforce and from
Salesforce to FTP server.
3 Prerequisite #
Before creating adapter, you have to have Integration and interface and these two things
must create in Salesforce. To create, edit, and delete you need to do in Salesforce not
Agent. Please perform both integration and interface development in Salesforce first. Then
run AgentUI and create adapter there.
4 The creating of Adapter #
This document will be explain about two adapter:
– File Adapter (CSV, Excel, XML)
– FTP/SFTP Adapter
4.1 File adapter
This document is focus only on the creation of adapter, so some steps before it would be
skip eg. Creating Integration and Interface.
To create File Adapter, there are some steps must be follow:
Run Agent UI > Integration Wizard > Choose Integration > Choose existing interface.
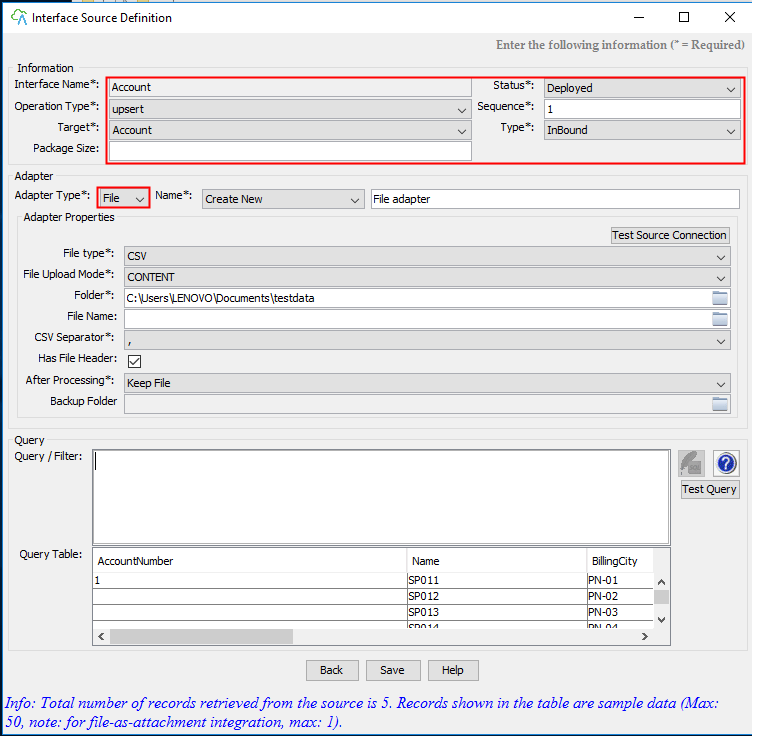
1. Adapter Section: Choose Adapter Type (File) > Name Adapter
2. Adapter Properties:
– File type: Choose CSV
– File Upload Mode: Choose CONTENT or FILE
– Folder: Choose the folder (path to get the file/ files)
– File Name: Choose file name (a file name for agent to query data from. If this
field is empty, it mean you to select all files in the selected folder.
– After Processing: Choose what you want to do with your file
• Keep File: The file will keep in the folder.
• Lock File: The file will lock.
• Delete File: The file will delete.
• Backup File: The file will back up in the other folder.
– Backup Folder: The folder to keep the processed file. If you choose to back up
your file, you have to input your folder name here.
3. Click “Test Source Connection” to test the connection to the specified folder and
file.
4. Click Save.
Note: For Excel and XML File, you can just do the same as CSV File. However, just you need
to change the file types, adapter and its properties accordingly.
5 FTP/SFTP Adapter
This document is focus only on the creation of adapter, so some steps before it would be
skip eg. Creating Integration and Interface.
To create FTP Adapter, there are some steps must be followed:
Run Agent UI > Integration Wizard > Choose Integration > Choose existing interface.
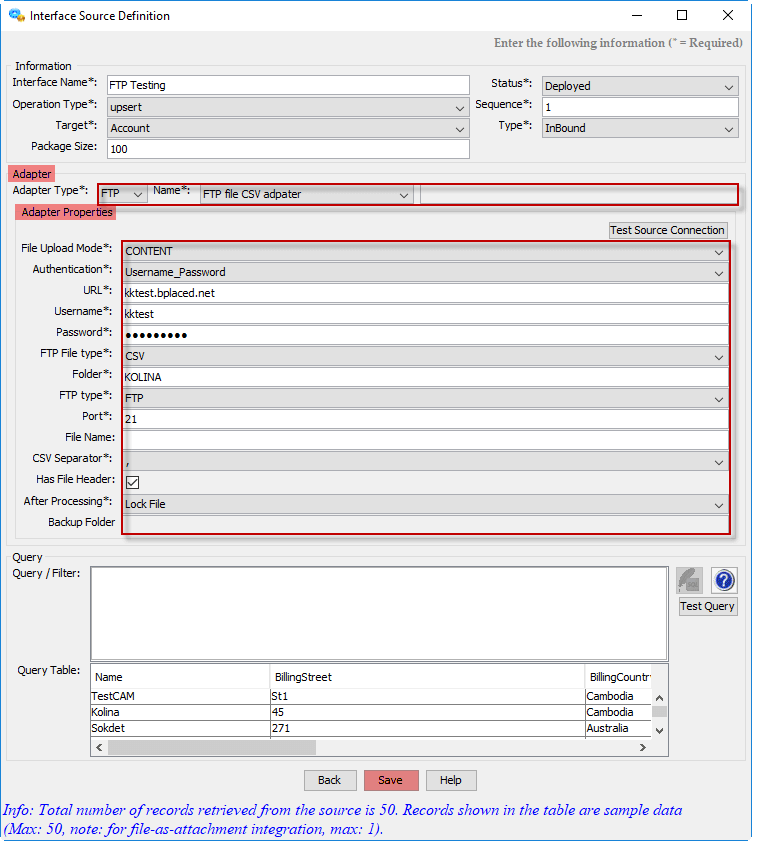
- Adapter Section: Choose Adapter Type (FTP) > Name Adapter
- Adapter Properties:
- Authentication: Username_Password
- URL: the URL to your FTP server – here we use http://www.bplaced.net/ but it
can be any link from your side - Username: kktest (Username to log in to FTP server)
- Password: ******* (The default password to use when making the connection to
the FTP Server) - FTP File Type: Choose CSV or other
- Folder: /KOLINA (path to get the file/ files)
- FTP Type: Choose FTP
- Port: 21(Default)
- File Name: (Optional) a filel name for agent to query data from
- After Processing: Choose what you want to do with your file
-Keep File: The file will keep in the folder.- Lock File: The file will lock- Delete File: The file will delete.- Backup File: The file will backup in the other folder. - Backup Folder: The folder to keep the processed file. If you choose to backup
your file, you have to input your folder name here
3. Click “Test Source Connection” to test the connection to the specified folder and
file.
4. Click Save.
Note: For SFTP configuration, please kindly look for document (SFTP Configuration).
6 To test Integration
There are three ways to test yours integrate.
6.1 Button Test Integration
When you click test integrate the 50 records among many data will process. The maximun
is 50. By clicking this button you will know if your configure is correct or not. This button is
located in Integration Setup Wizard-Integration Detail.

6.2 Button Process
The Process button is also located in Integration Setup Wizard-Integration Datail. When you
click this button all your data will be processed. This is manually processing.

6.3 Schedule
Click Integration Scheduling>Property File Selection>Integration Name>Interface
Name>Integration Mode>On>Run at/Run every>Save
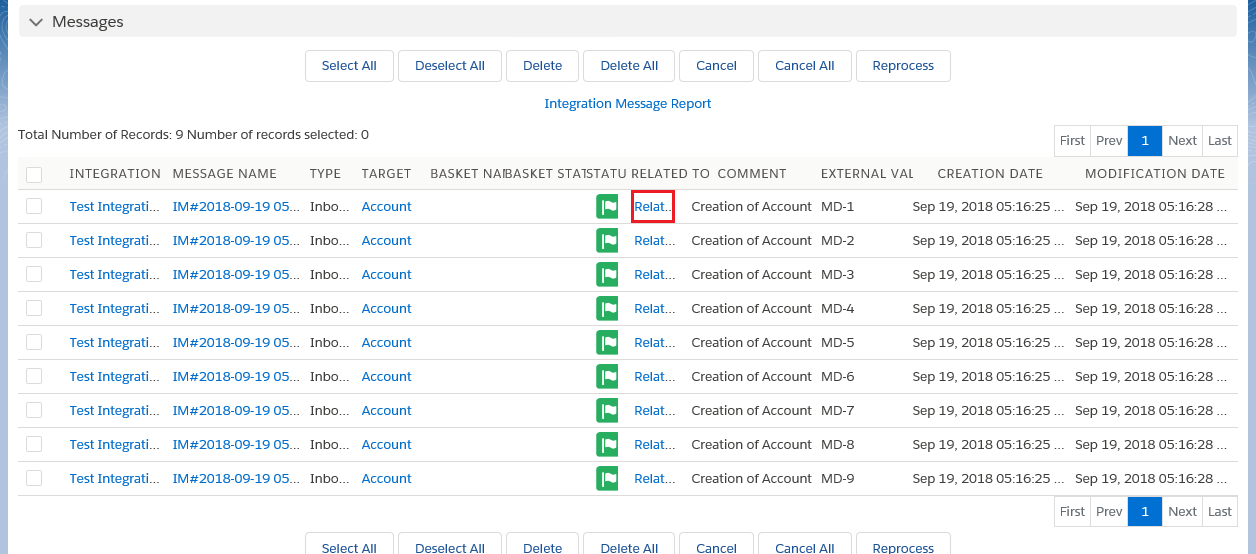
7 To check result
Go to SF > Message Monitoring Board