Learning Objectives:-
This unit describes:-
- How to use an Agent Pulsar adapter for consumers?
Introduction: #
In this tutorial, we will learn how Agent Pulsar adapter works for Consumers. In simple words, an Agent pulsar adapter for Consumer means Inbound Pulsar Adapter. We use Inbound Pulsar Adapter when somebody pushes the topic into a topic customer on the Kafka side, then we are consuming. We have an event-driven listener which is camel consumer. We don’t need a scheduler. We can consume immediately. This is the Inbound process because we are receiving data here. It plays the role of the consumer.
So now we are going to check the use cases for inbound Pulsar Adapter i.e, for consumers. To configure, firstly we need to learn and follow some steps:
1.How to configure a new agent control board.
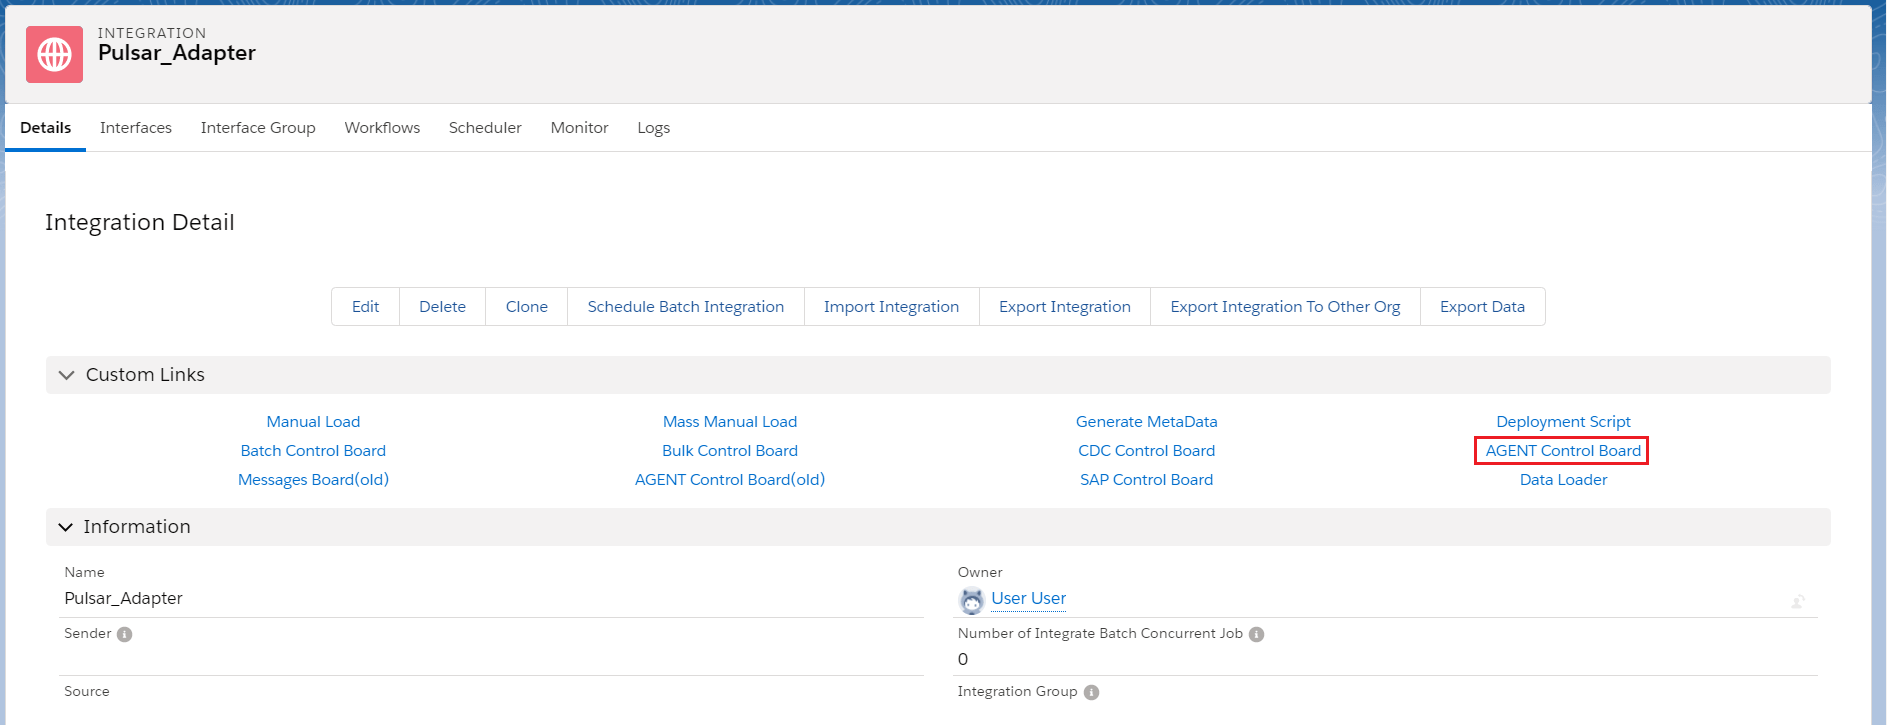
- Go to the Integration Detail page.
- Click on the new agent control board.
- Now we need to create a connection destination. For that, we can give any name to the destination. As shown below.
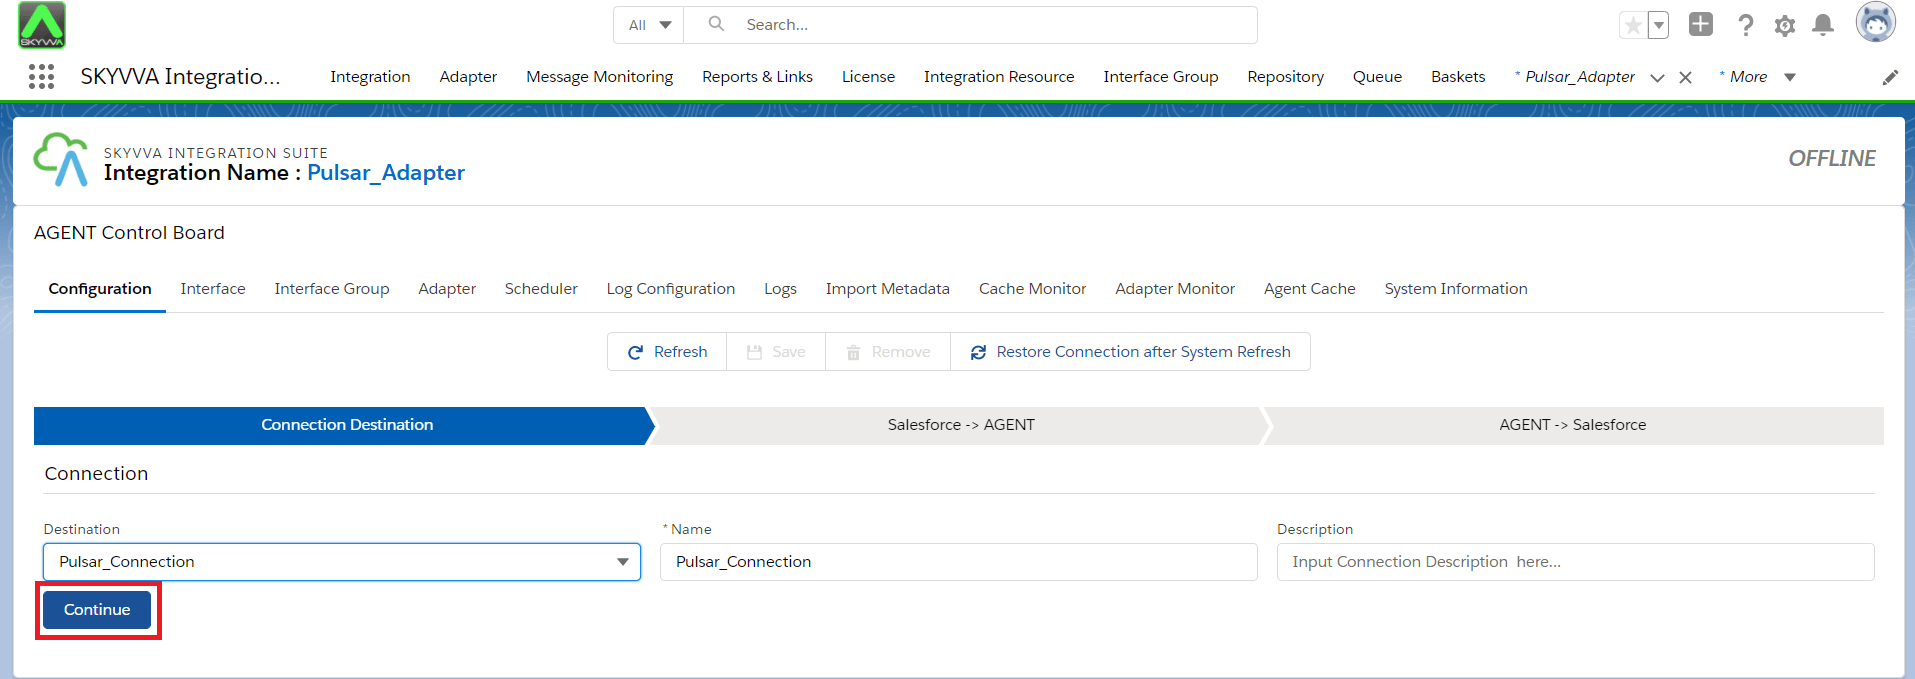
- Fill all the required fields in Salesforce > Agent.
- Click on the Ping Agent connection.
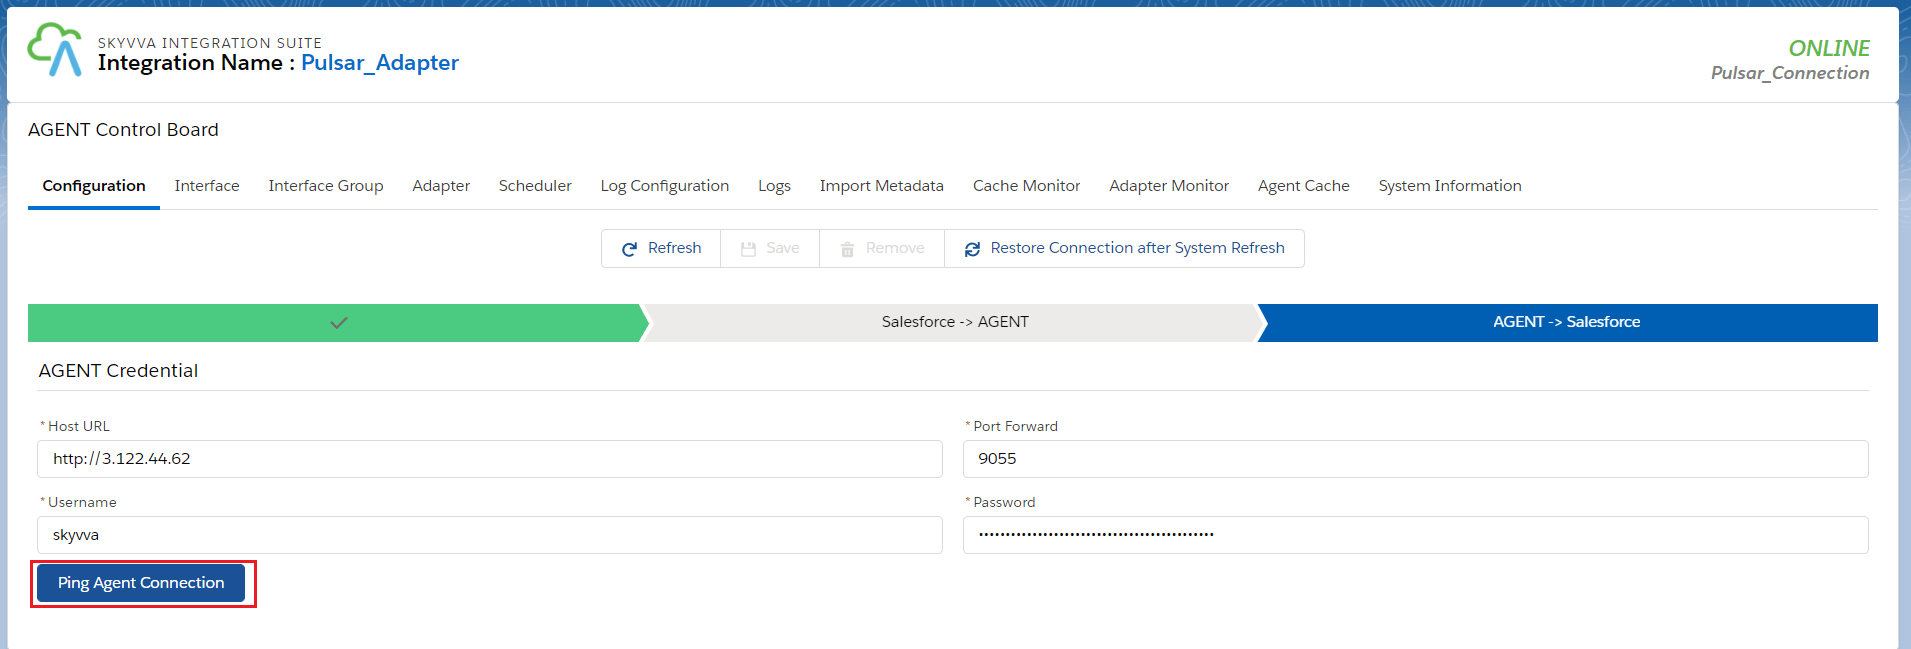
- Fill all the required fields in Agent > Salesforce.
- Click on the Ping Salesforce connection.
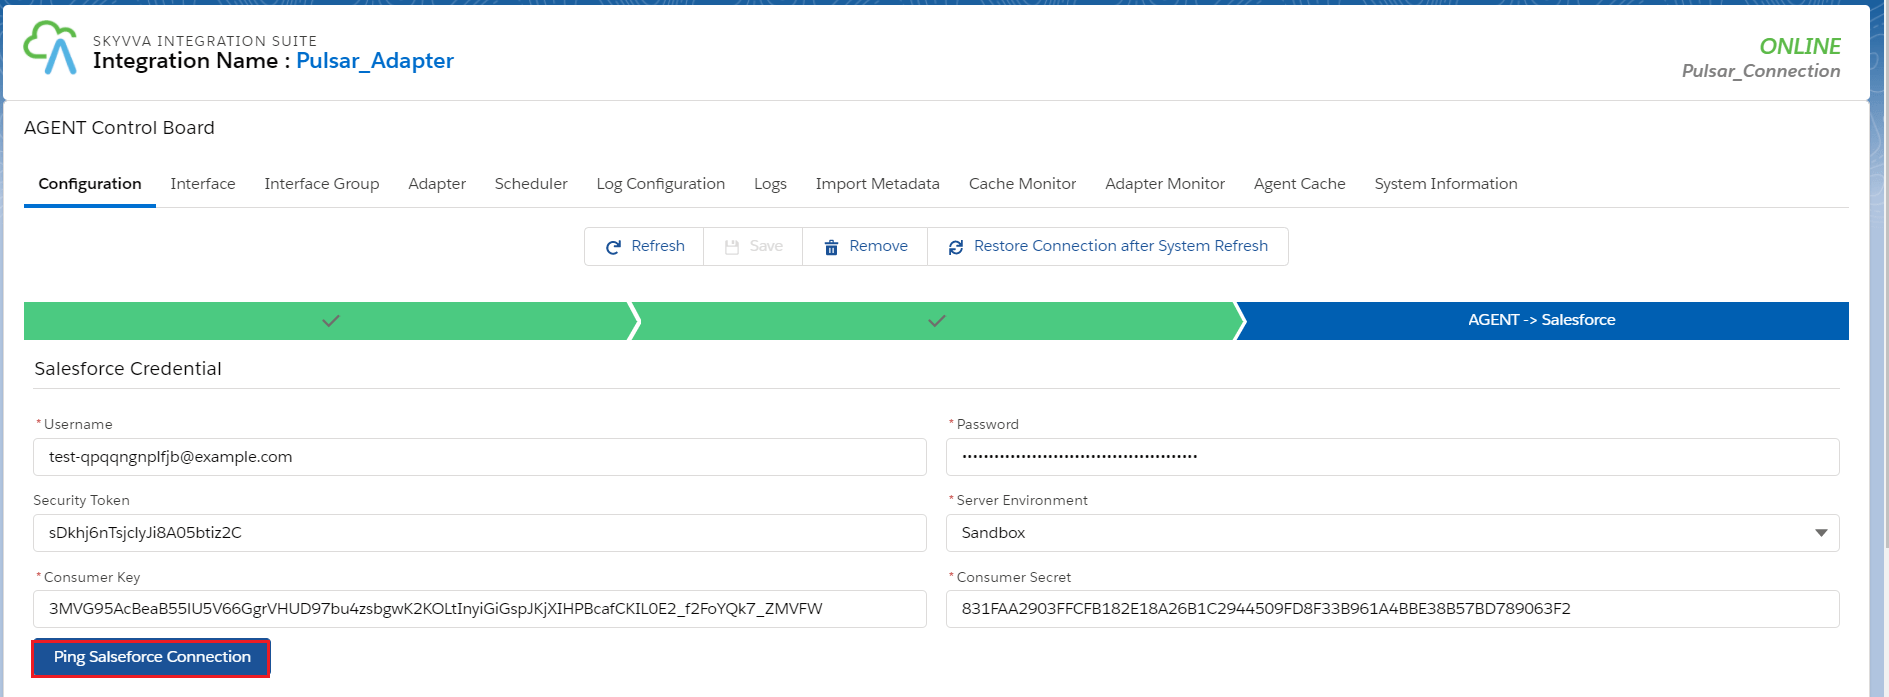
- And save it.

CASE 1: Use Case for file type CSV #
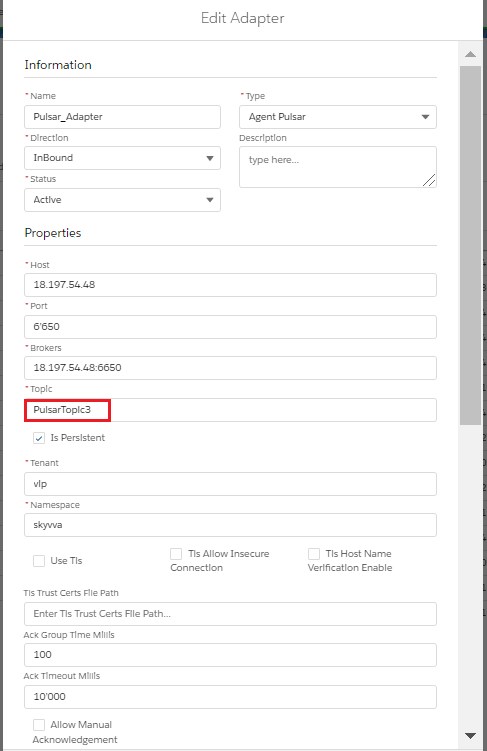
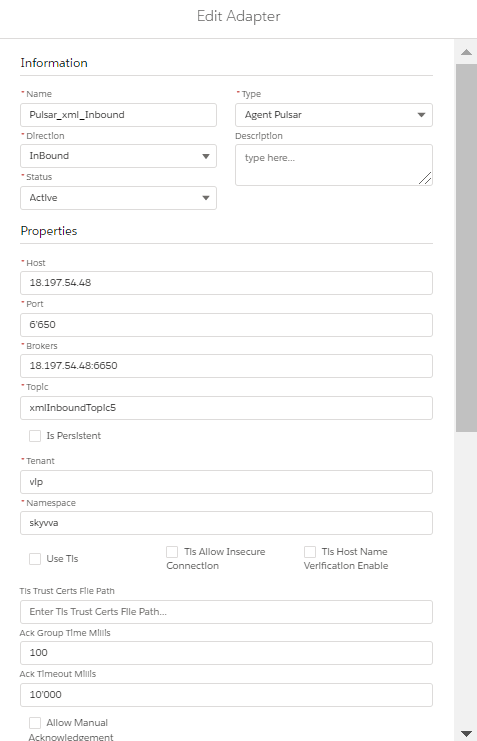
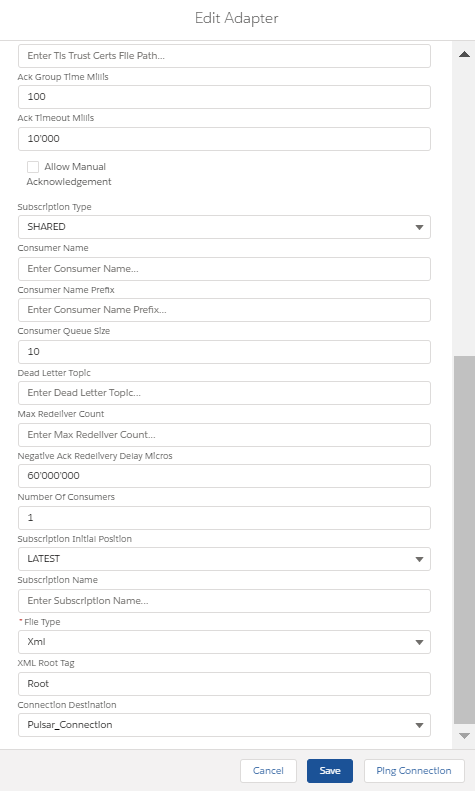
2. Create Adapter:
- Add any name in Topic and the topic will automatically be created on the Pulsar server.
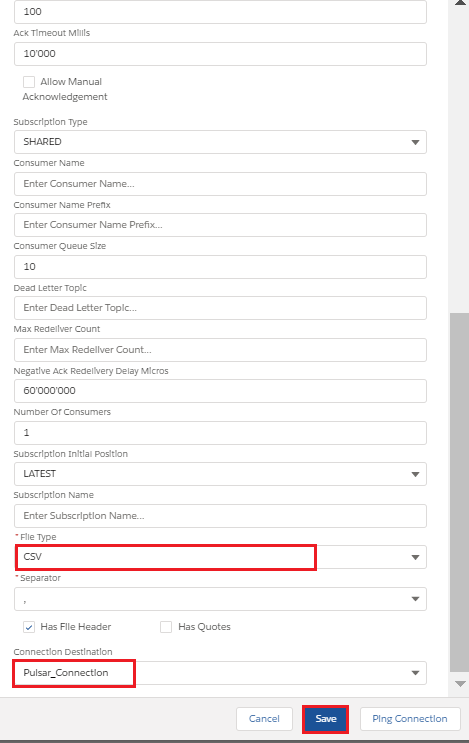
- Select File Type.
- Select Connection Destination which we have created recently.
3. Configure Interface page:
- Create Integration.
- Create Interface.
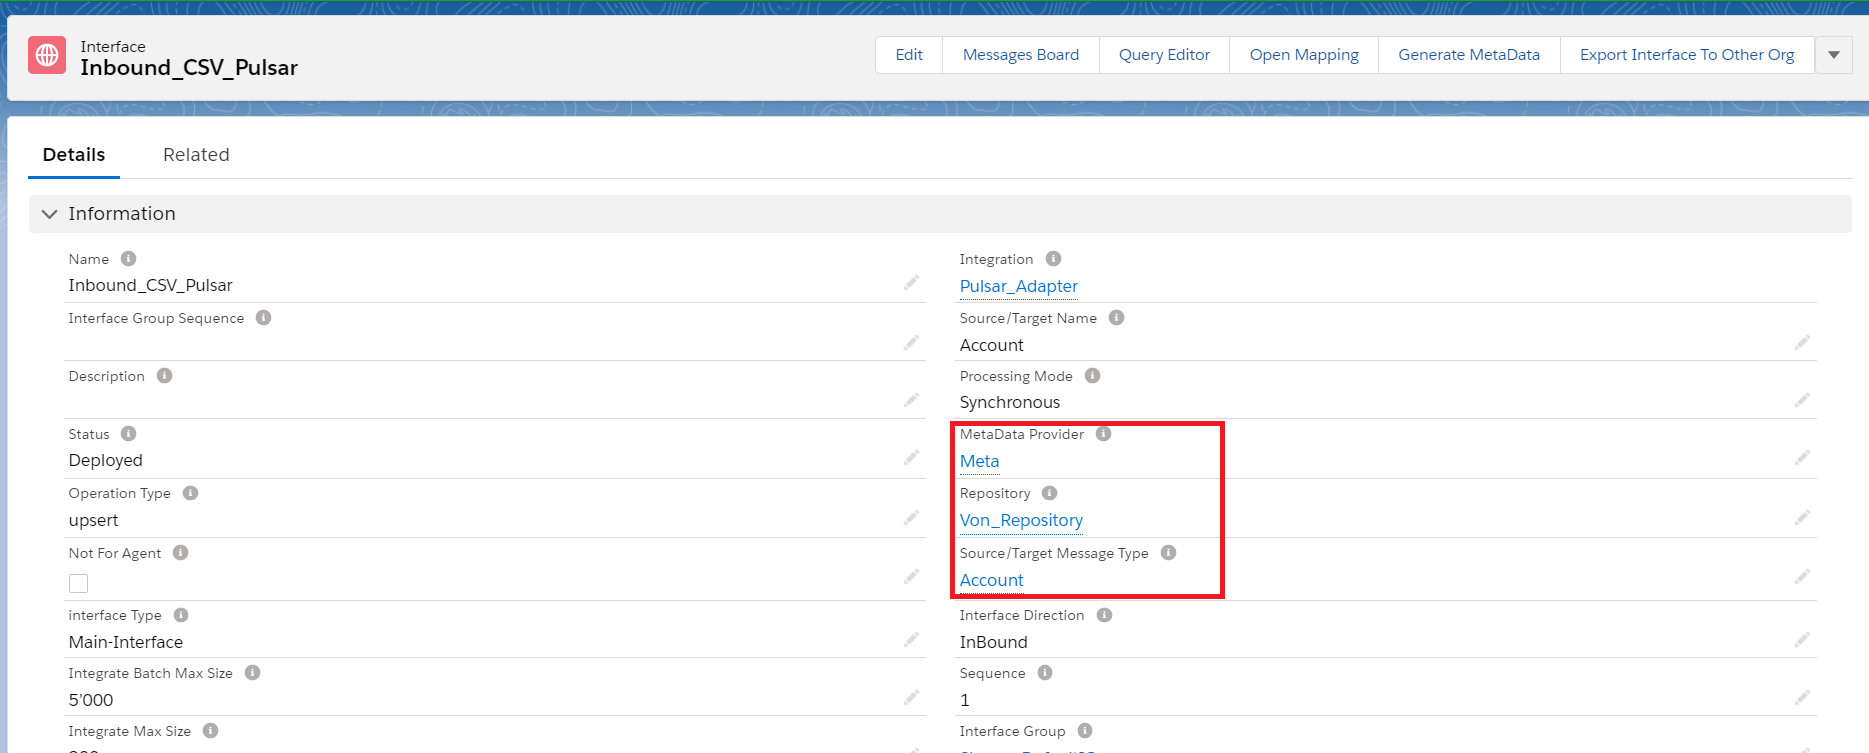
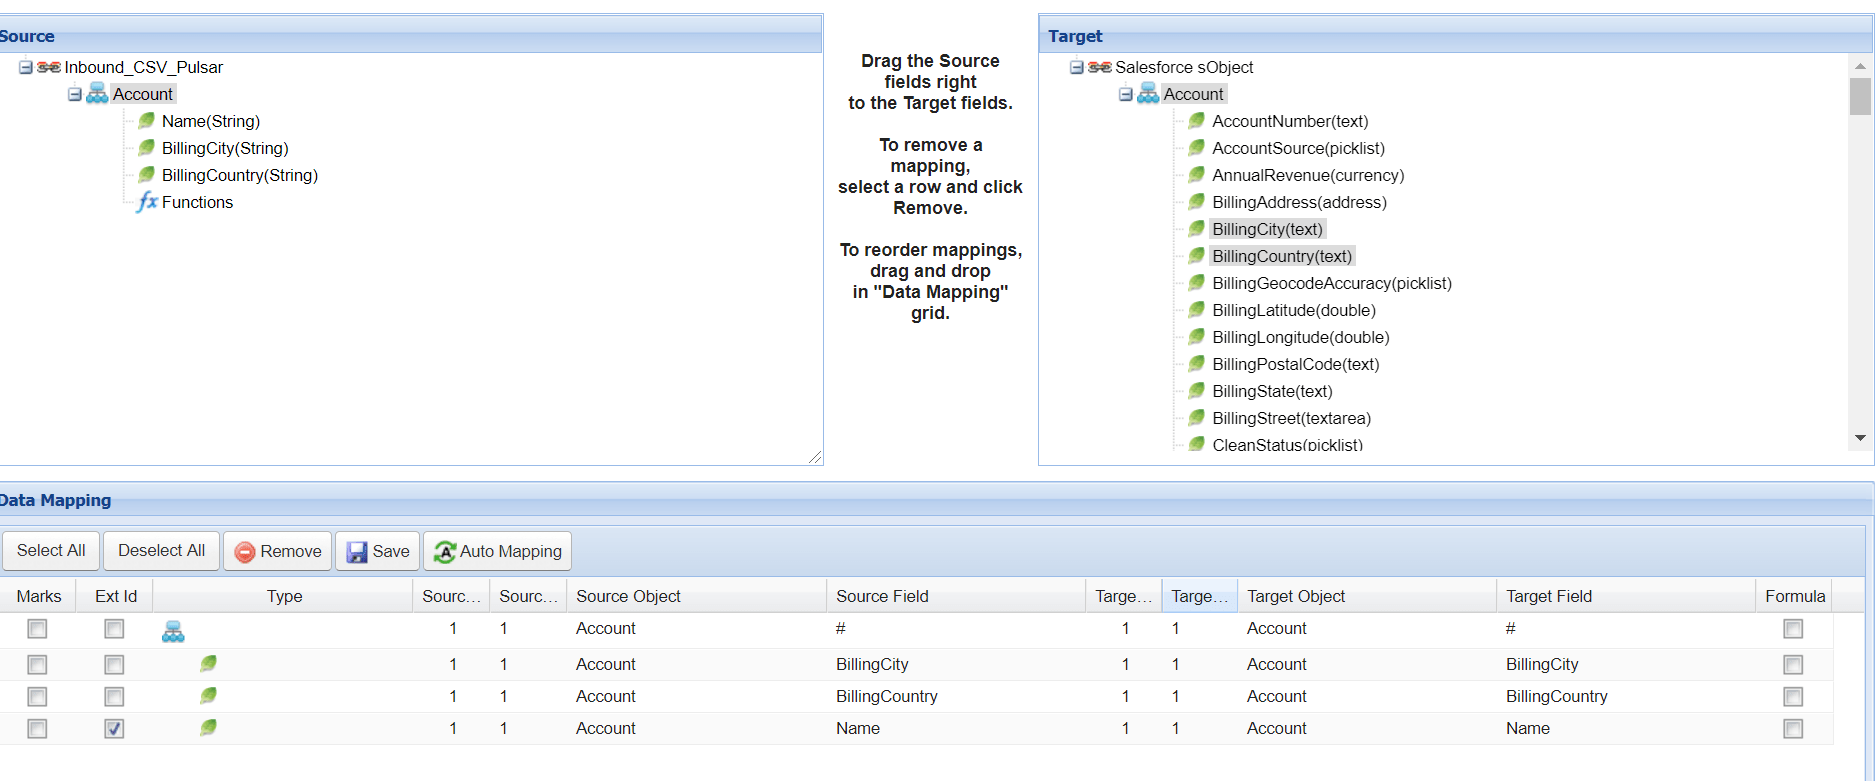
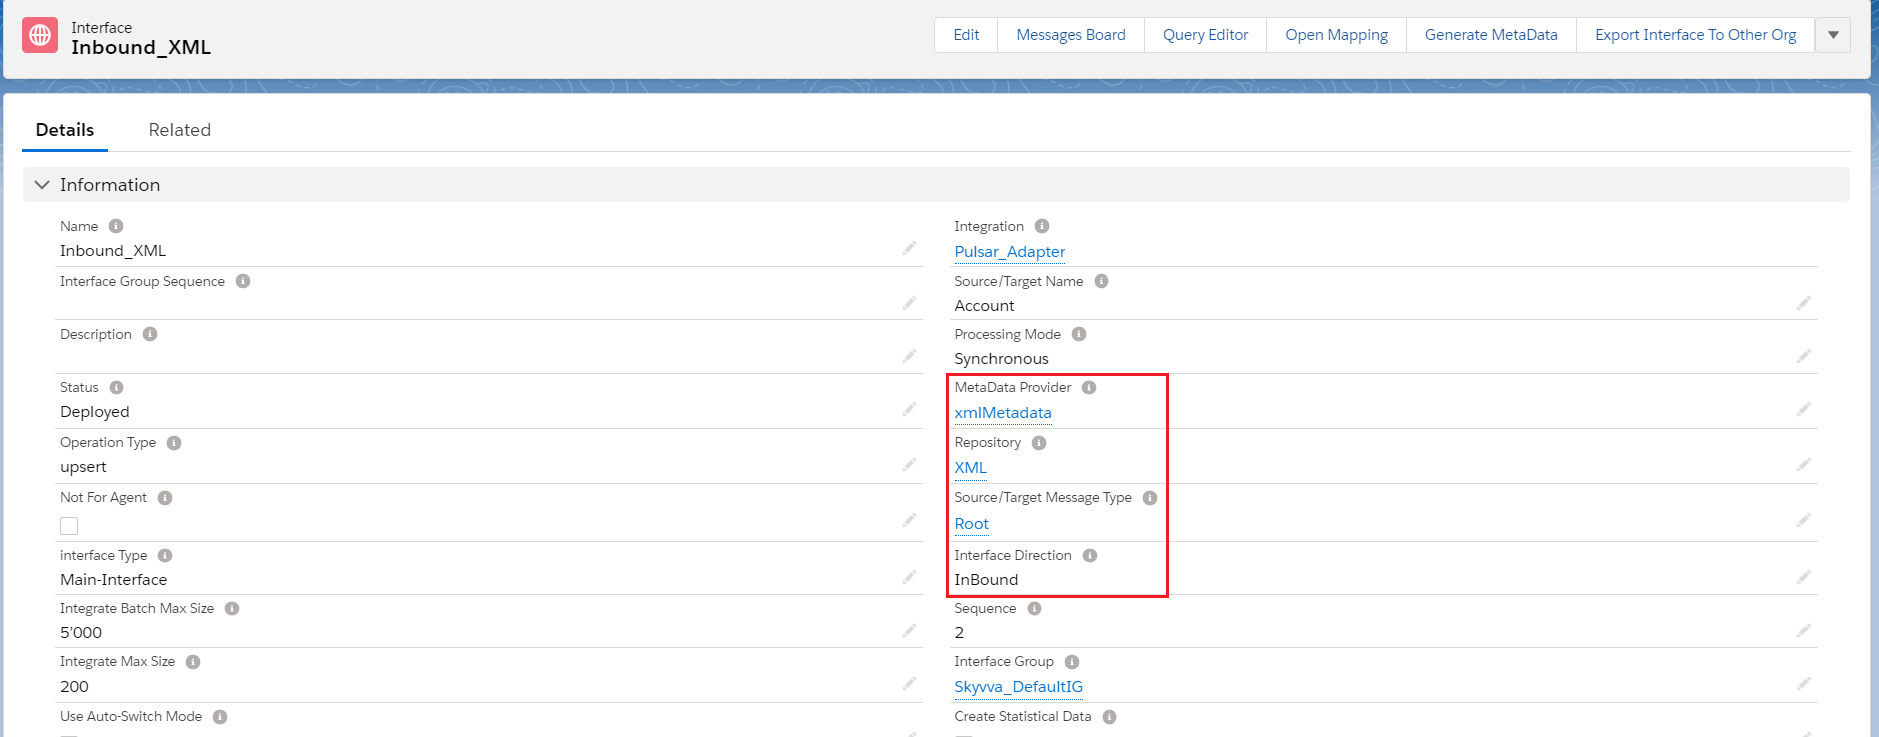
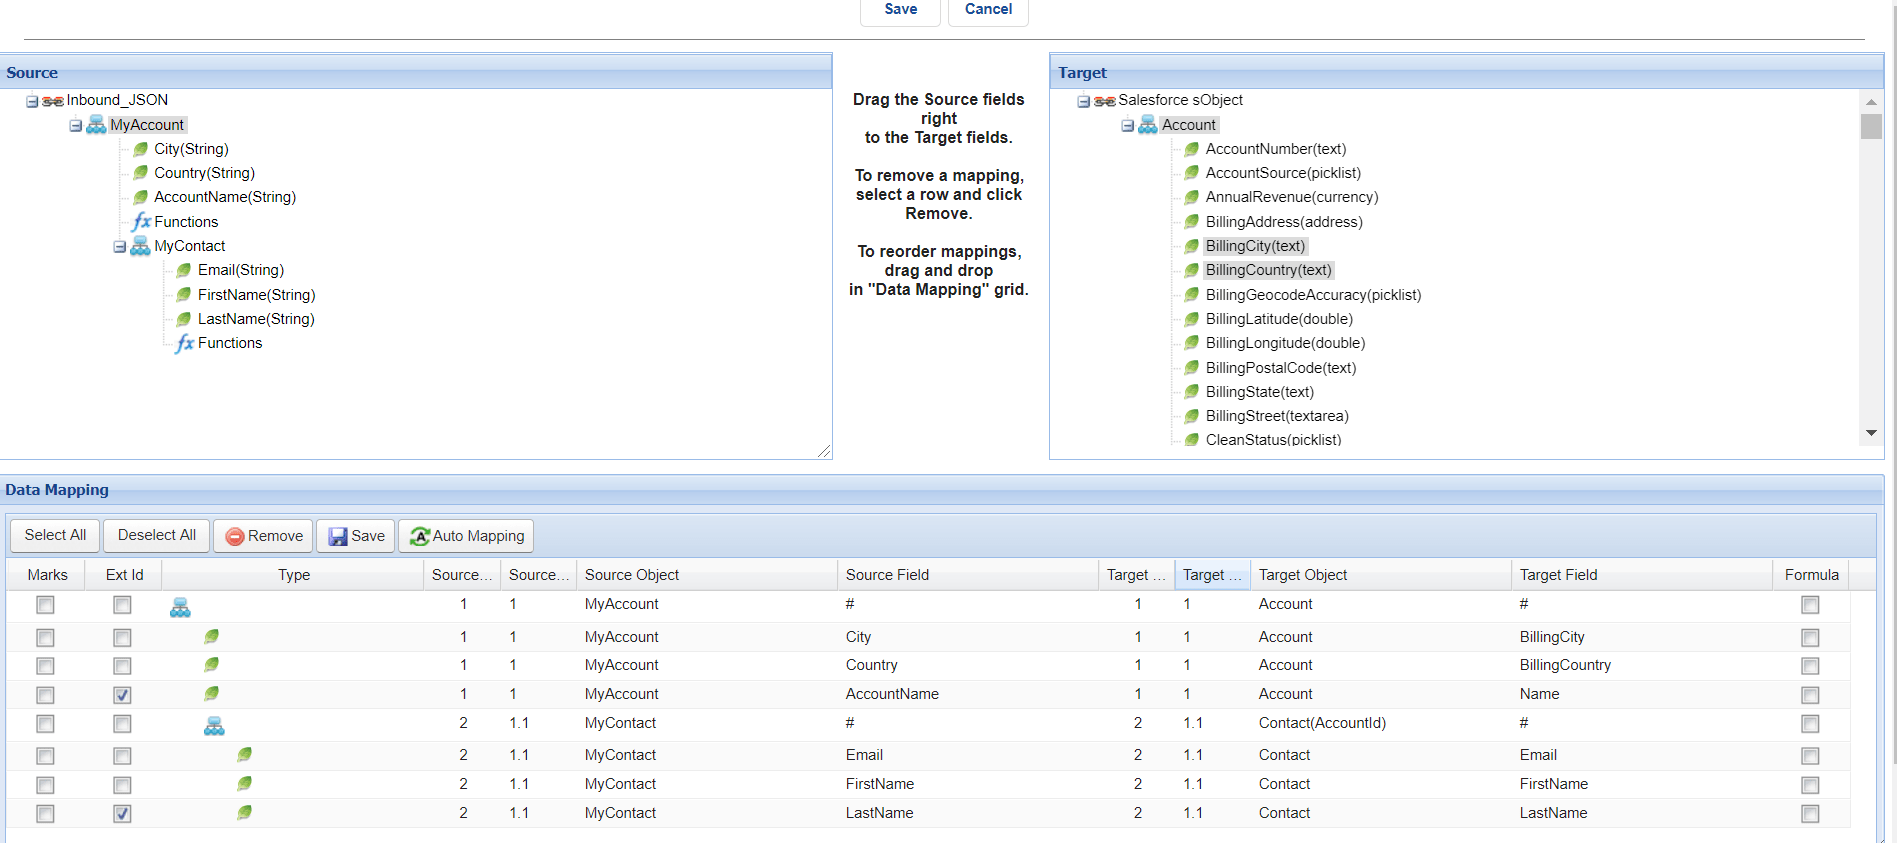
- Add Metadata Provider, Istructure Repository, and Message type to the interface page as shown below.
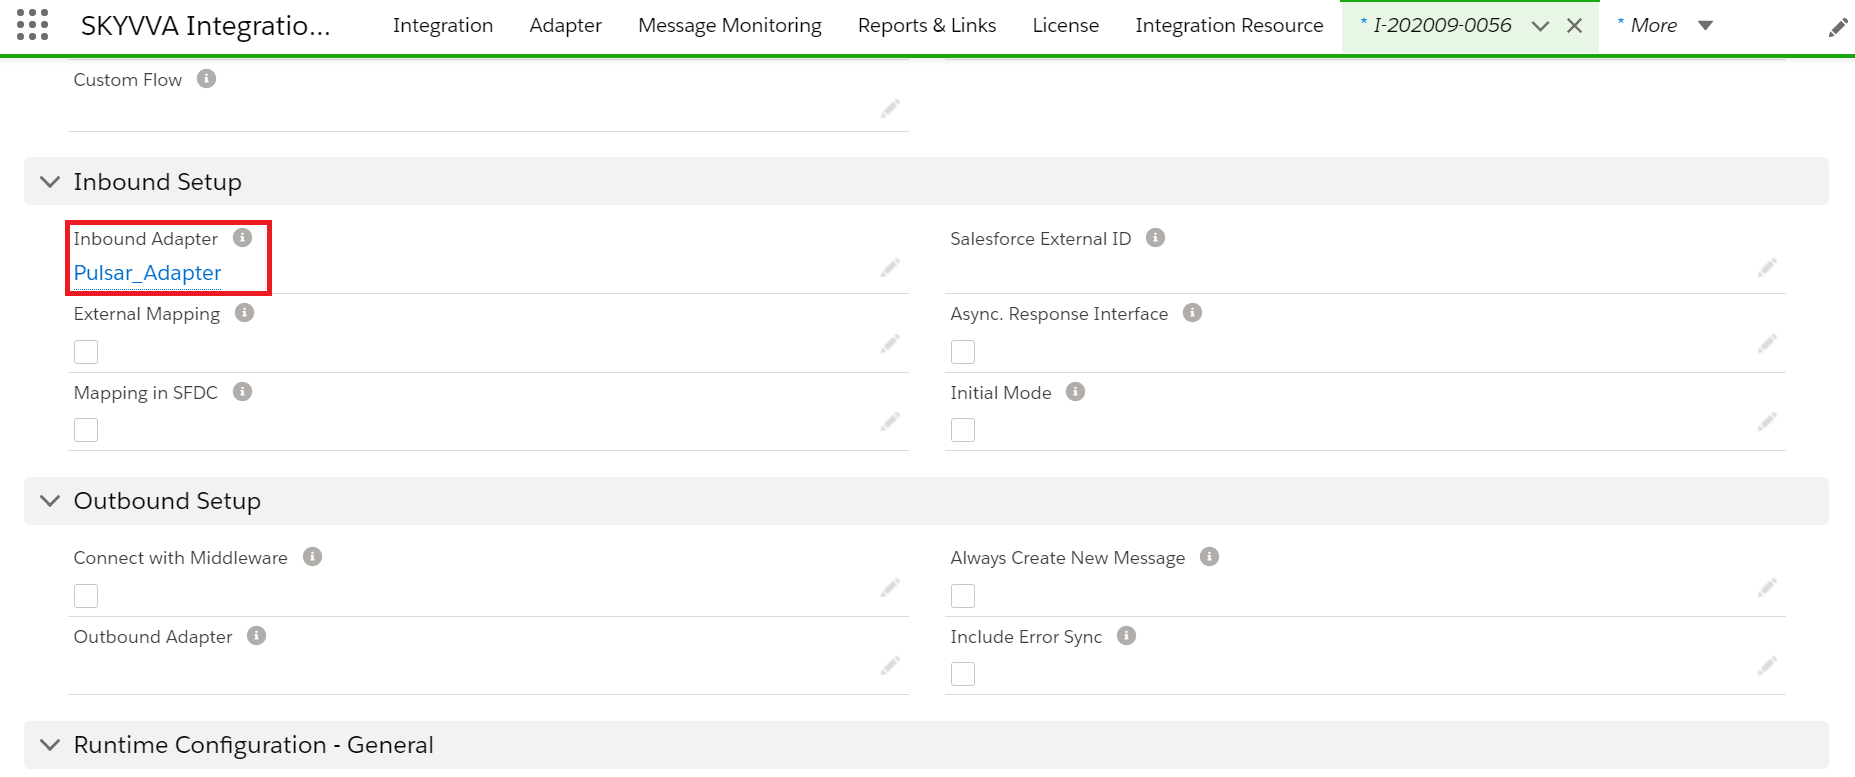
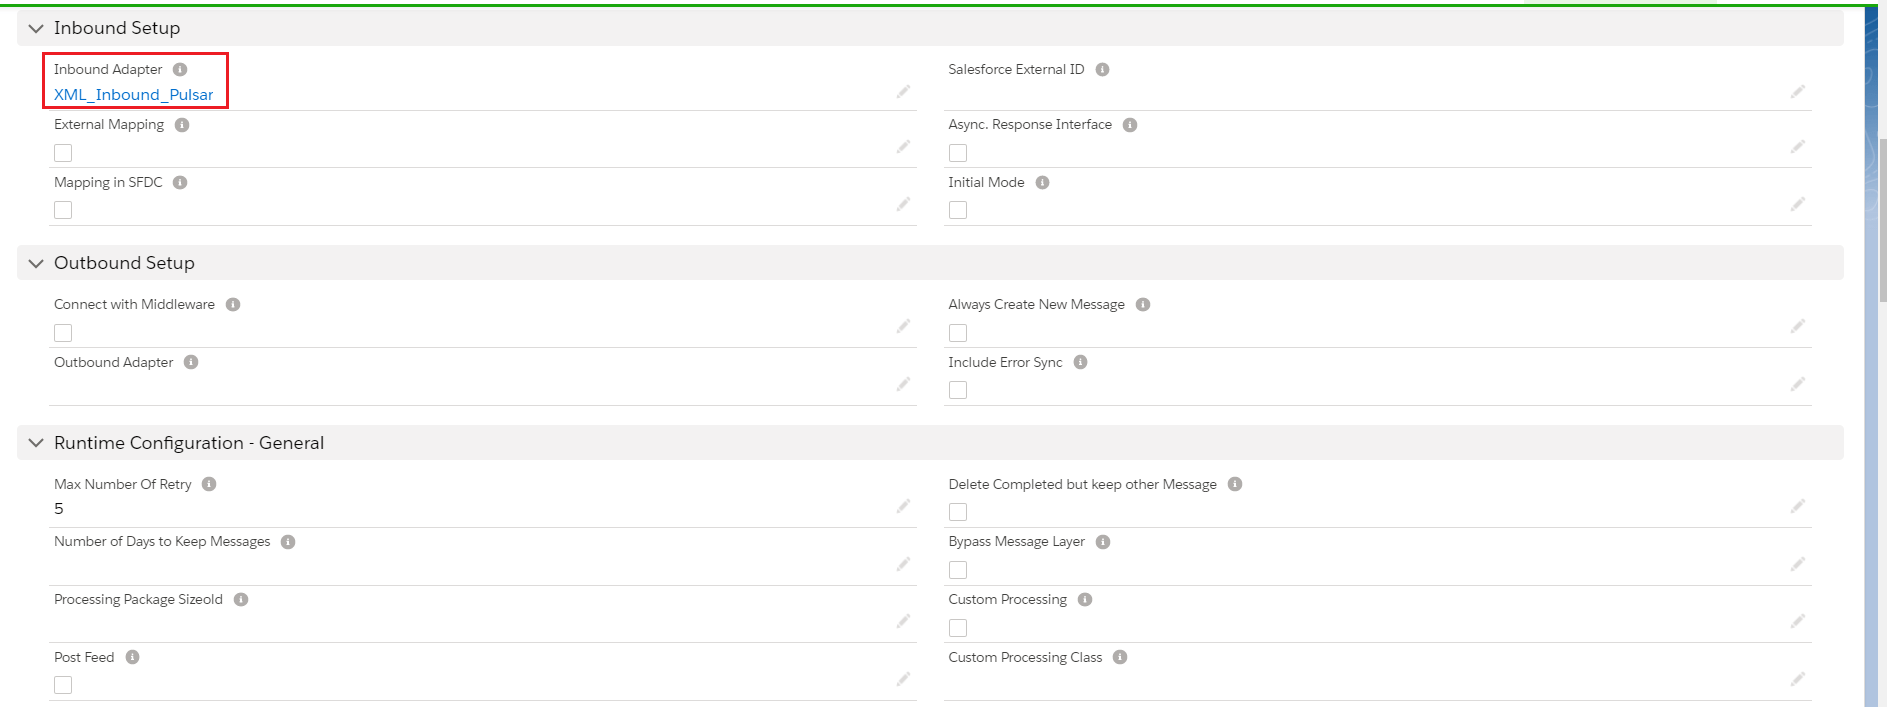
- Add Inbound Adapter
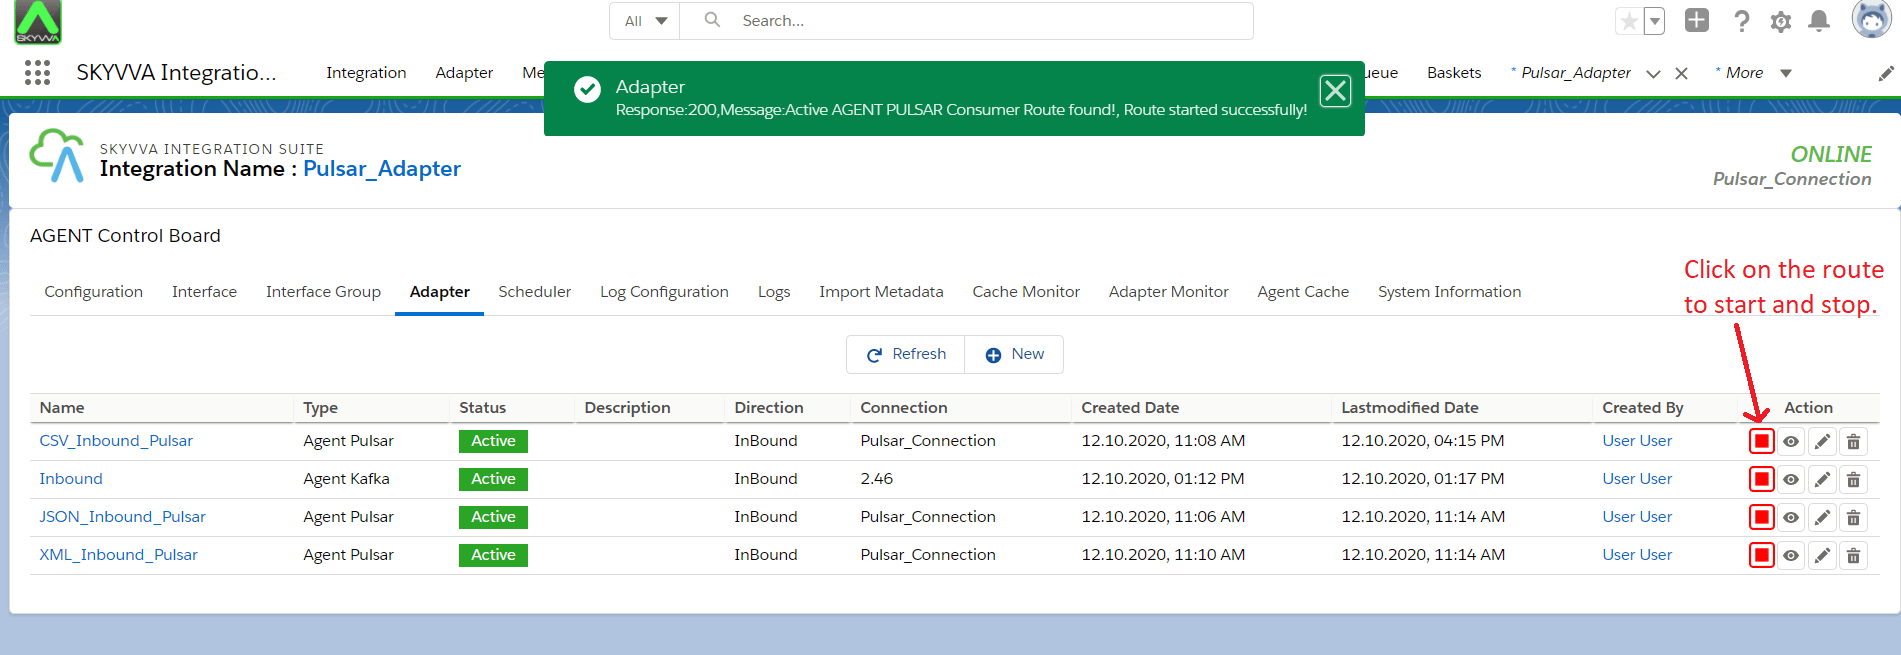
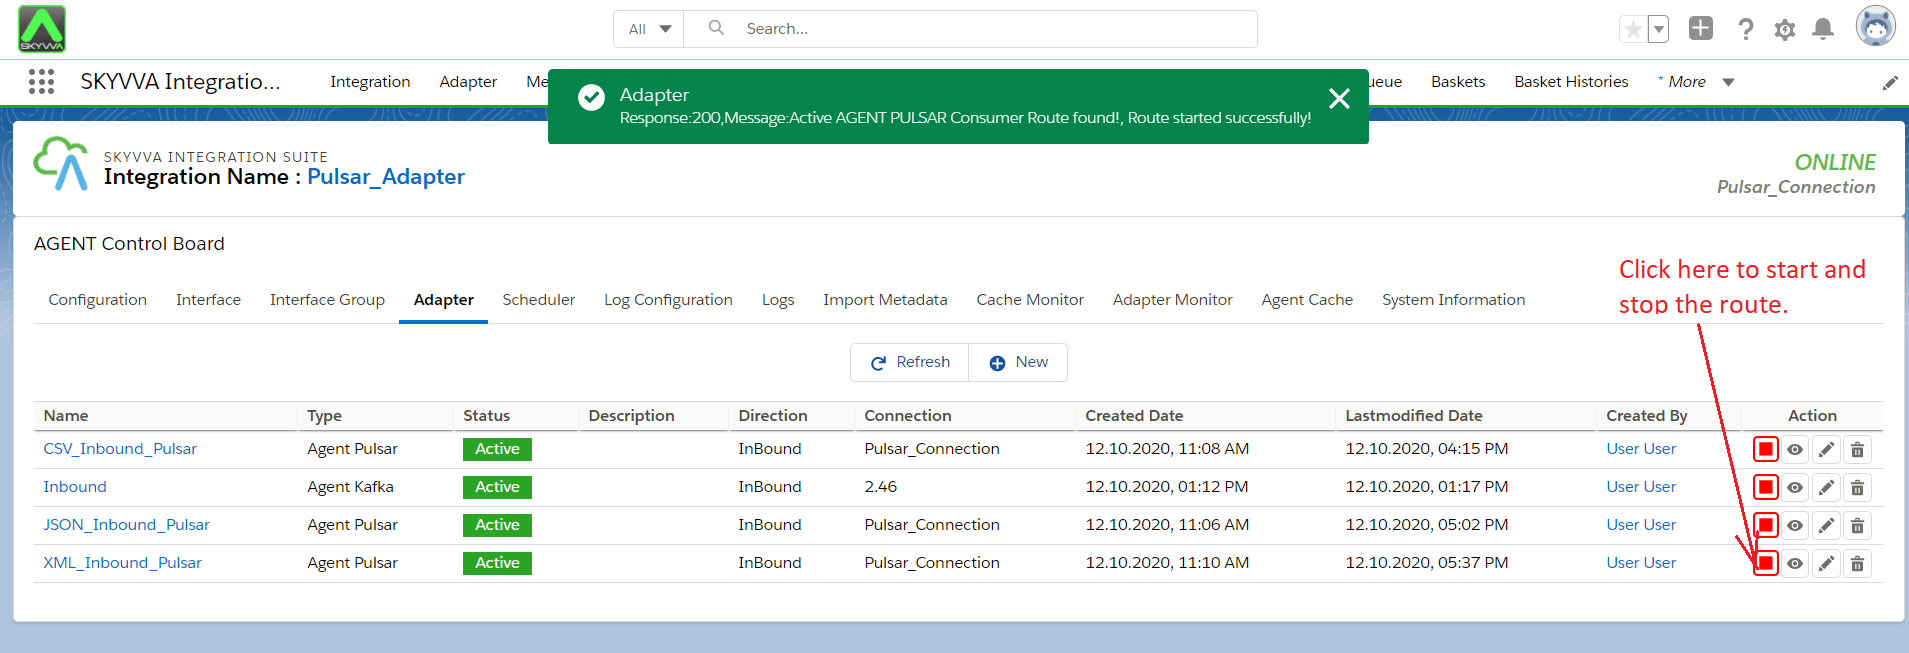
4. Start the route:
- We need to start the route.
6. Callout to Pulsar Server:
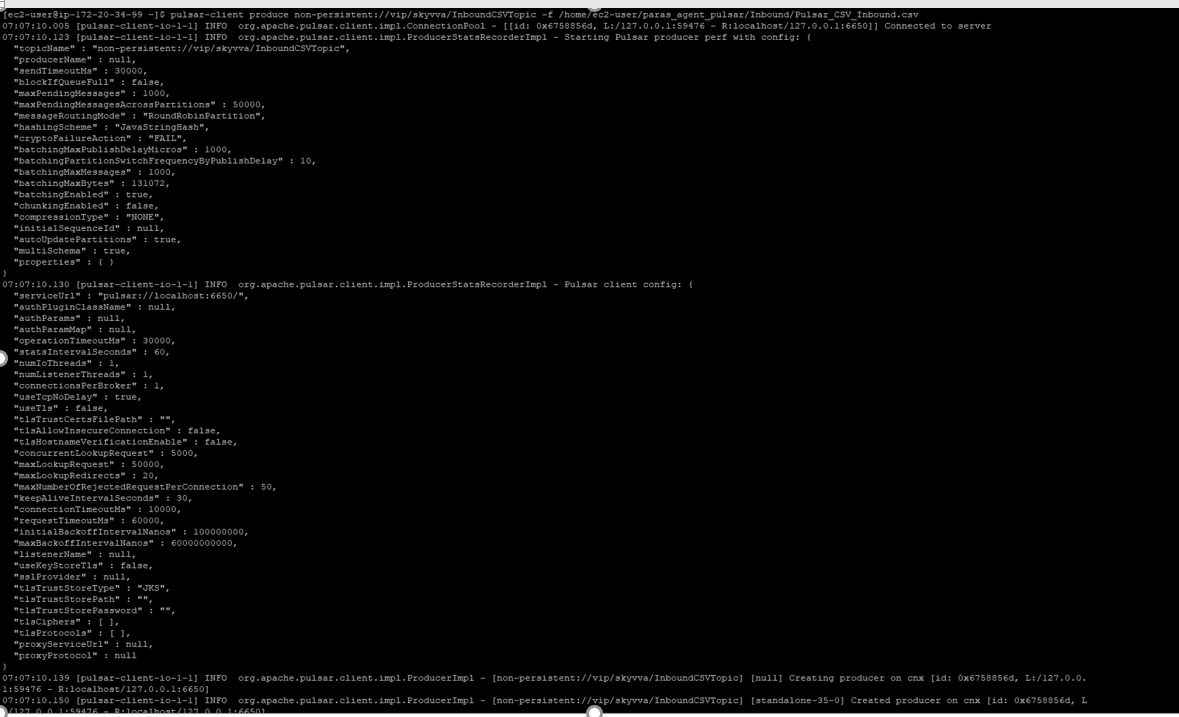
[aux_code language=”javascript” theme=”tomorrow” title=”” extra_classes=””] Command: (You need to create CSV file and also need to put File on agent-tools-server)
For example: /home/ec2-user/paras_agent_pulsar/Inbound/Pulsar_CSV_Inbound.csv
and execute the below command on Ec2 new agent-tools-server command prompt.
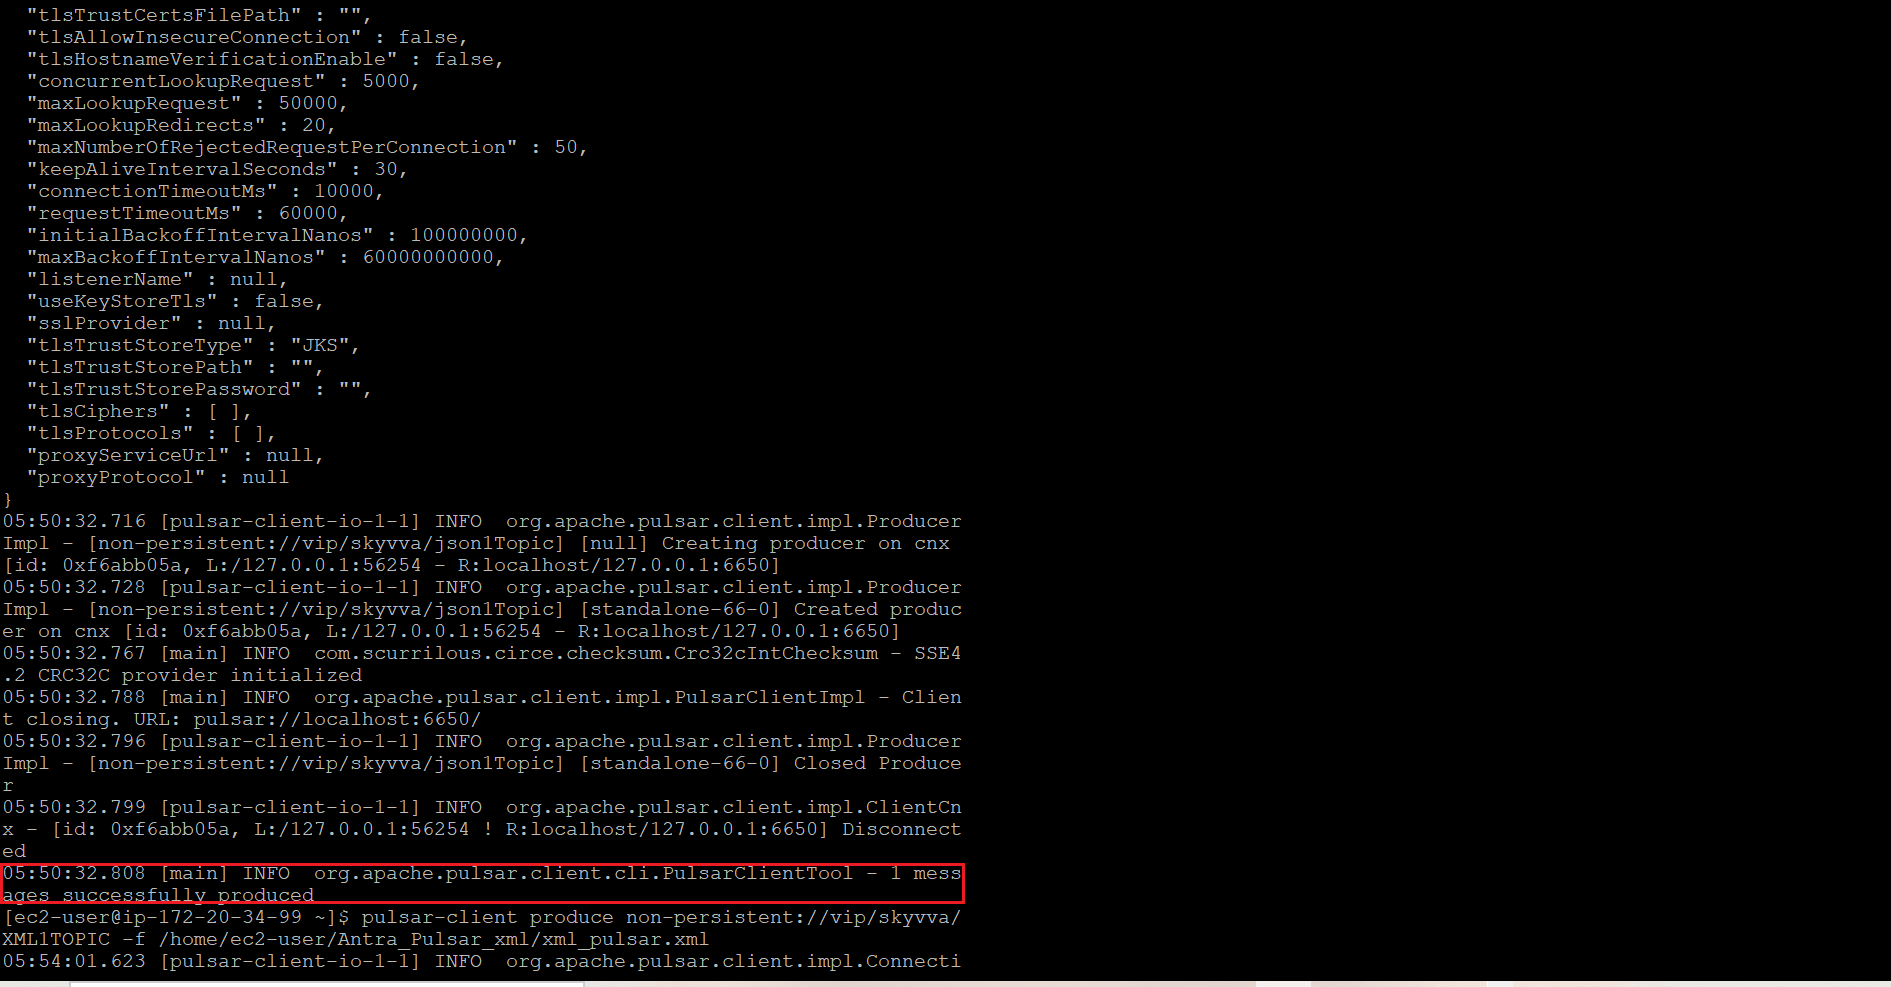
pulsar-client produce non-persistent://vip/skyvva/InboundCSVTopic -f /home/ec2-user/paras_agent_pulsar/Inbound/Pulsar_CSV_Inbound.csv
OR
When Is Persistent checkbox is true inside adapter property then you need to use Persistent command:
pulsar-client produce persistent://vip/skyvva/InboundCSVTopic -f /home/ec2-user/paras_agent_pulsar/Inbound/Pulsar_CSV_Inbound.csv
[/aux_code]
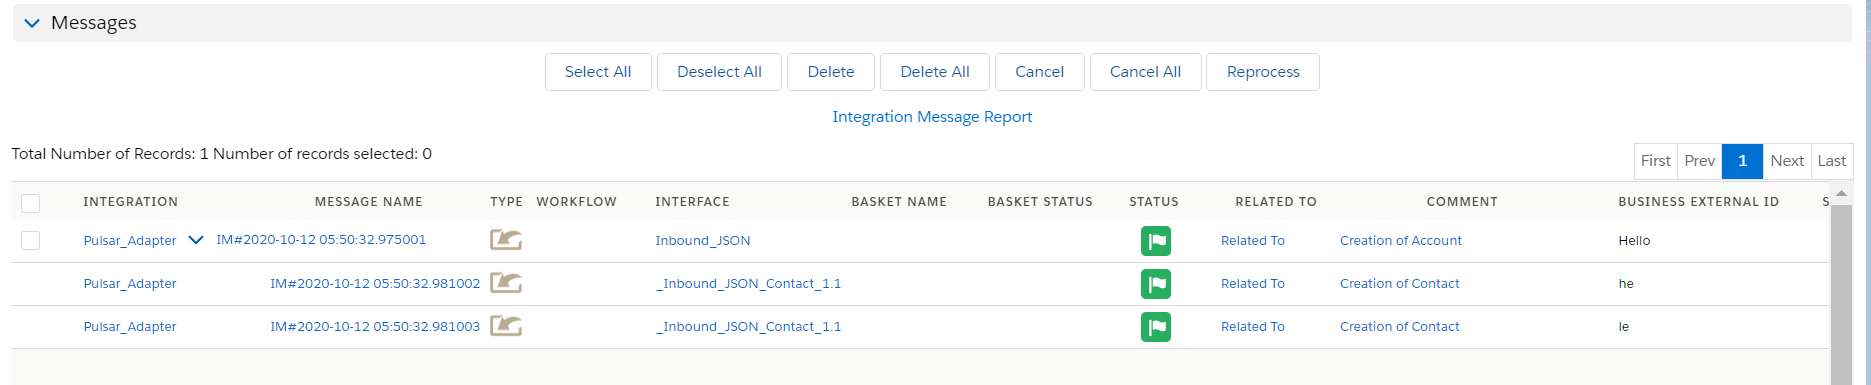
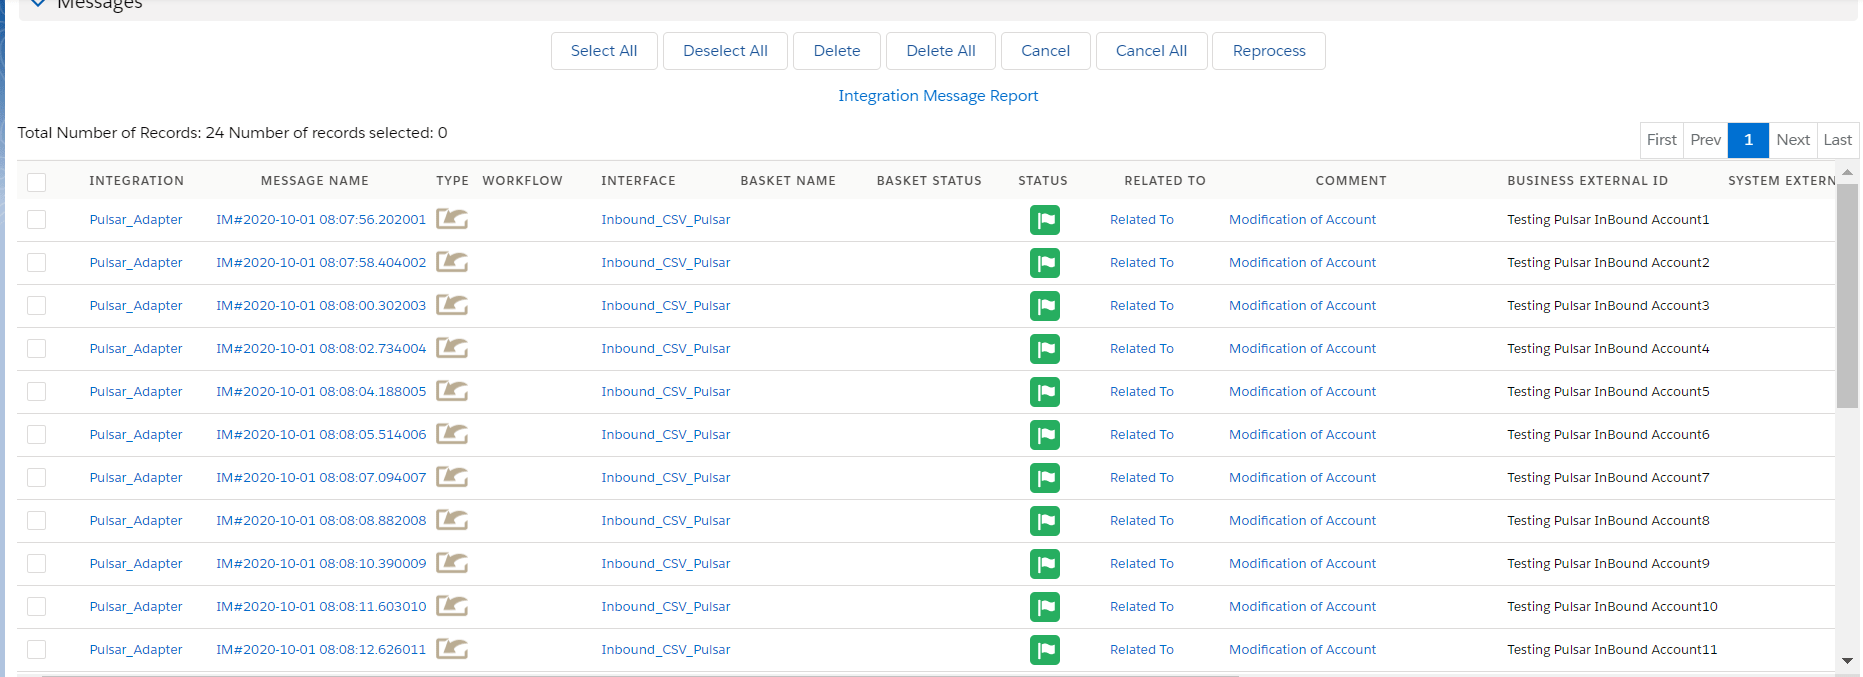
7. Message Monitoring:
CASE 2: Use Case for file type XML #
1. We need to do Agent control board configuration as we did in CSV. Don’t need to create new.
2. Create Adapter:
- Add any name in Topic and the topic will automatically be created on the Pulsar server.
- Select File Type.
- Select Connection Destination which we have created recently.
3. Configure Interface page:
- Create Integration.
- Create Interface.
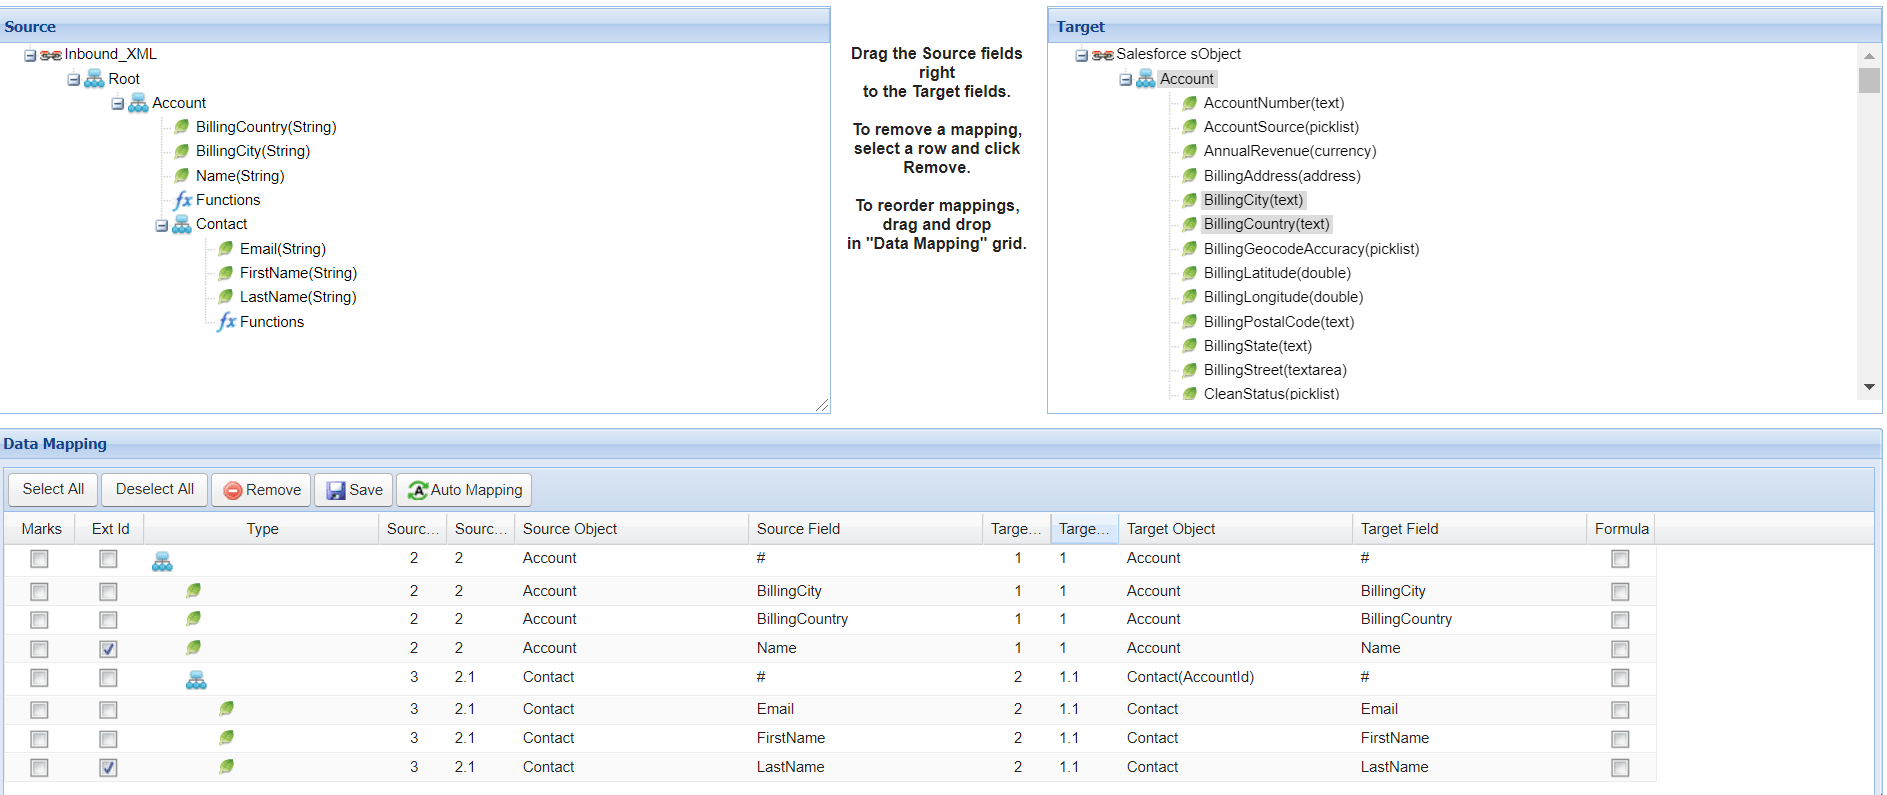
- Add Metadata Provider, Istructure Repository, and Message type to the interface page as shown below.
- Add Inbound Adapter
4. Start the route:
- We need to start the route.
6. Callout to Pulsar Server:
[aux_code language=”javascript” theme=”tomorrow” title=”” extra_classes=””]
Callout: (You need to execute below command in Ec2 new Agent-tools-server command prompt and also need to past XML file in one line.
1st Way:
Sample Data- In the Format we need to add namespace in the root.
<account xsi:schemaLocation=”http://schema.infor.com/InforOAGIS/2 http://schema.infor.com/2.12.x/InforOAGIS/BODs/SyncCustomerPartyMaster.xsd” xmlns:xsi=”http://www.w3.org/2001/XMLSchema-instance” xmlns=”http://schema.infor.com/InforOAGIS/2″> <MyAccount> <Name schemeVersionID=”Testing Pulsar InBound Account1″>Testing Pulsar InBound Account1</Name> <Description>Testing Pulsar InBound Account1 Description.</Description> <MyContact> <FirstName sequence=”Testing”>Testing</FirstName> <LastName sequence=”Pulsar InBound Contact1″>Pulsar InBound Contact1</LastName> <MyAsset> <Quantity currencyID=”15.00″>15.00</Quantity> <SerialNumber currencyID=”K_I_Asset001″>K_I_Asset001</SerialNumber> <Asset_Name currencyID=”Testing Pulsar InBound Asset1″>Testing Pulsar InBound Asset1</Asset_Name> </MyAsset> </MyContact> <MyContact> <FirstName sequence=”Testing”>Testing</FirstName> <LastName sequence=”Pulsar InBound Contact2″>Pulsar InBound Contact2</LastName> <MyAsset> <Quantity currencyID=”15.00″>15.00</Quantity> <SerialNumber currencyID=”K_I_Asset002″>K_I_Asset002</SerialNumber> <Asset_Name currencyID=”Testing Pulsar InBound Asset2″>Testing Pulsar InBound Asset2</Asset_Name> </MyAsset> </MyContact> </MyAccount> <MyAccount> <Name schemeVersionID=”Testing Pulsar InBound Account2″>Testing Pulsar InBound Account2</Name> <Description>Testing Pulsar InBound Account2 Description.</Description> <MyContact> <FirstName sequence=”Testing”>Testing</FirstName> <LastName sequence=”Pulsar InBound Contact3″>Pulsar InBound Contact3</LastName> <MyAsset> <Quantity currencyID=”15.00″>15.00</Quantity> <SerialNumber currencyID=”K_I_Asset003″>K_I_Asset003</SerialNumber> <Asset_Name currencyID=”Testing Pulsar InBound Asset3″>Testing Pulsar InBound Asset3</Asset_Name> </MyAsset> </MyContact> <MyContact> <FirstName sequence=”Testing”>Testing</FirstName> <LastName sequence=”Pulsar InBound Contact4″>Pulsar InBound Contact4</LastName> <MyAsset> <Quantity currencyID=”15.00″>15.00</Quantity> <SerialNumber currencyID=”K_I_Asset004″>K_I_Asset004</SerialNumber> <Asset_Name currencyID=”Testing Pulsar InBound Asset4″>Testing Pulsar InBound Asset4</Asset_Name> </MyAsset> </MyContact> </MyAccount> </account>
2nd Way:
Upload XML File on /home/ec2-user/paras_agent_pulsar/Inbound/Pulsar_XML_Inbound.xml
Command:
pulsar-client produce non-persistent://vip/skyvva/InboundXMLTopic -f /home/ec2-user/paras_agent_pulsar/Inbound/Pulsar_XML_Inbound.xml
[/aux_code]
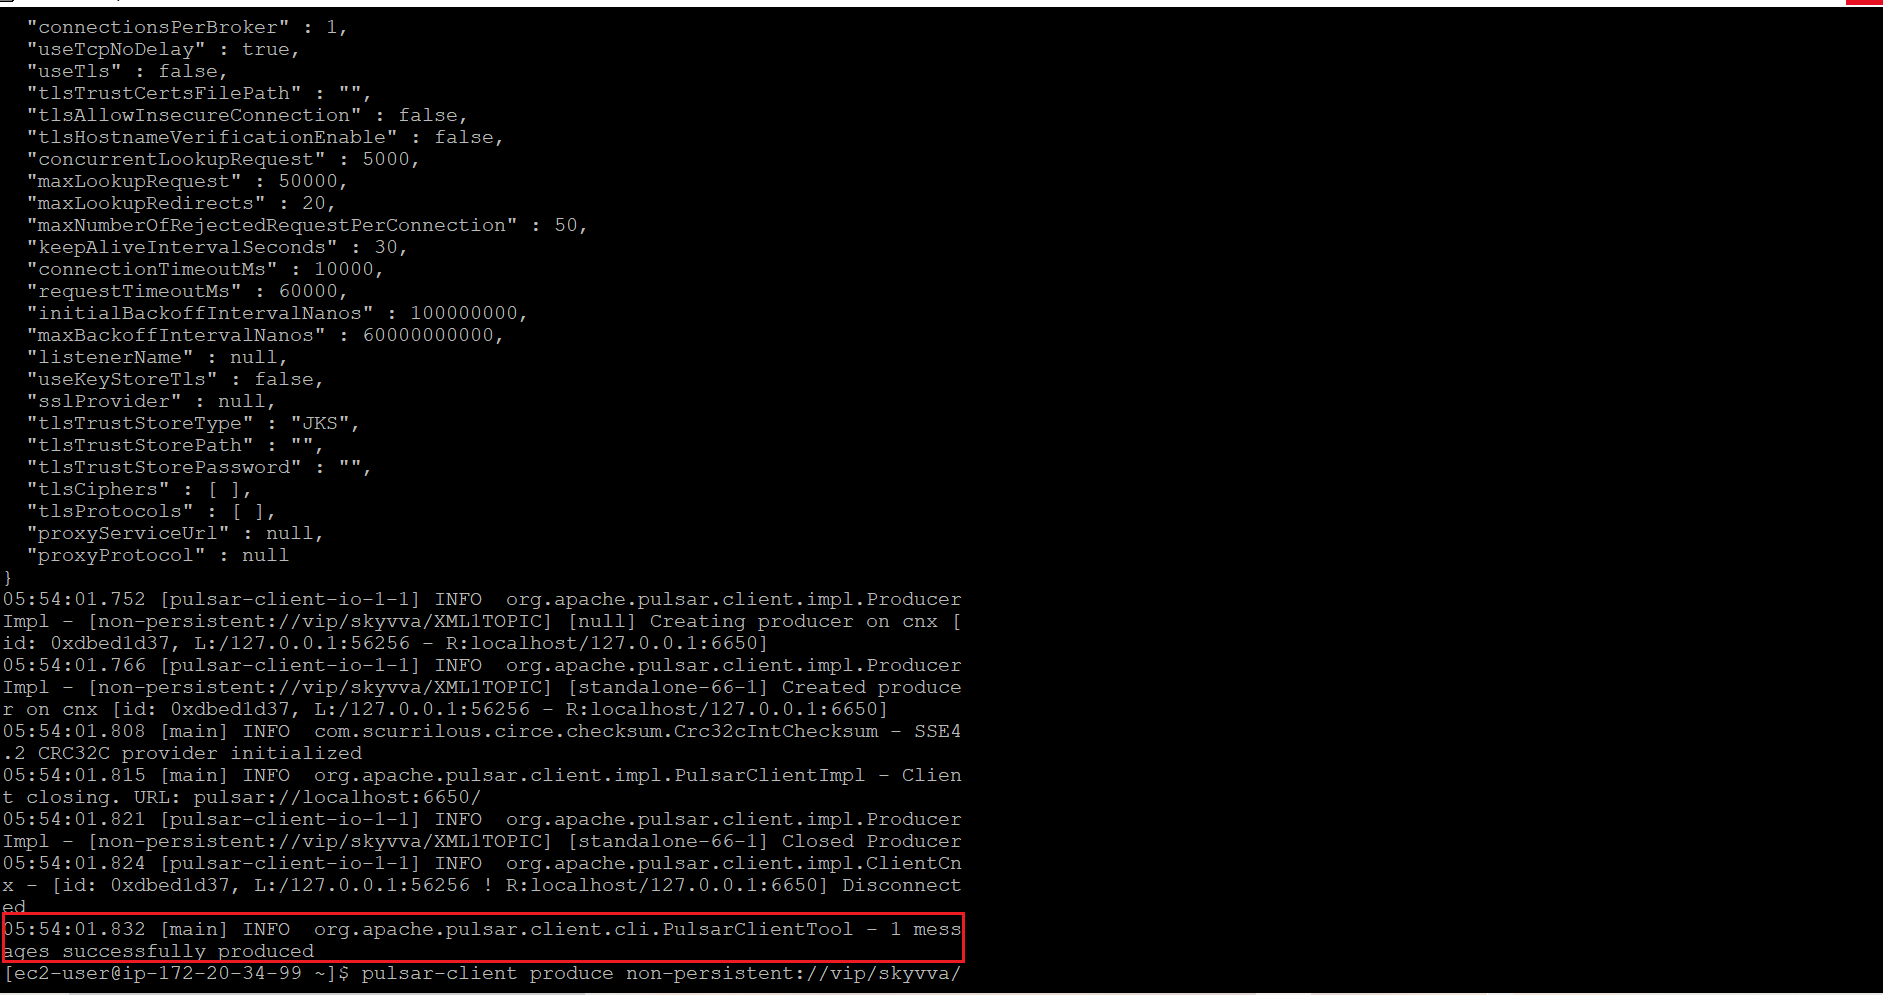
7. Message Monitoring:

CASE 3: Use Case for file type JSON #
1. We need to do Agent control board configuration as we did in CSV. Don’t need to create new.
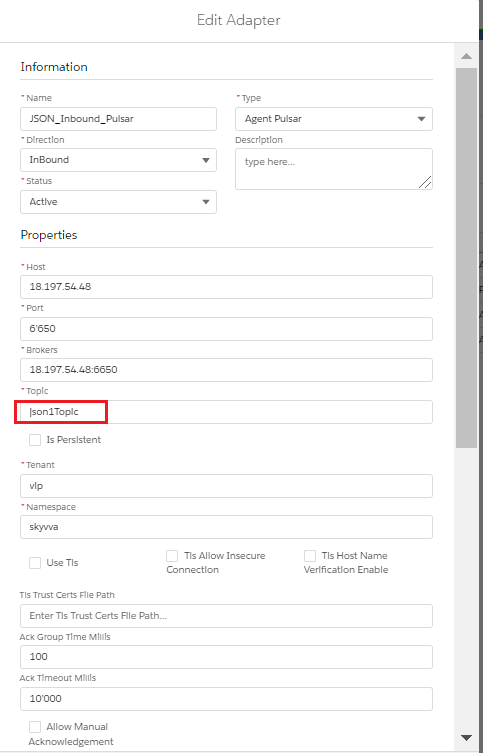
2. Create Adapter:
- Add any name in Topic and the topic will automatically be created on the Pulsar server.
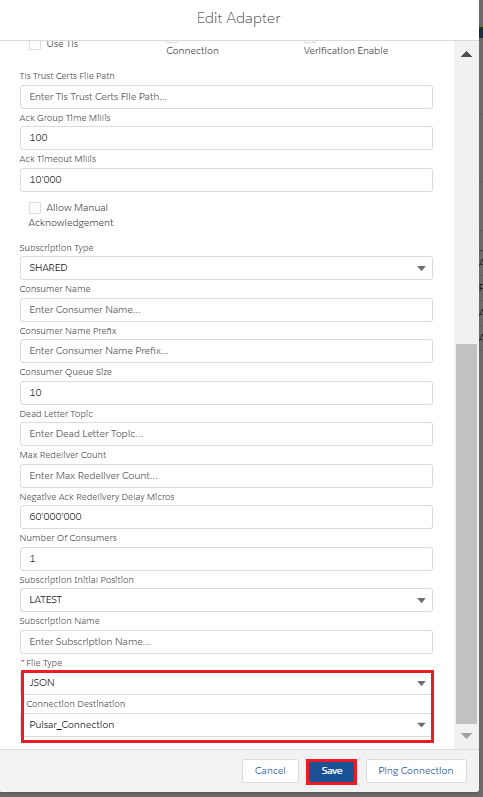
- Select File Type.
- Select Connection Destination which we have created recently.
3. Configure Interface page:
- Create Integration.
- Create Interface.
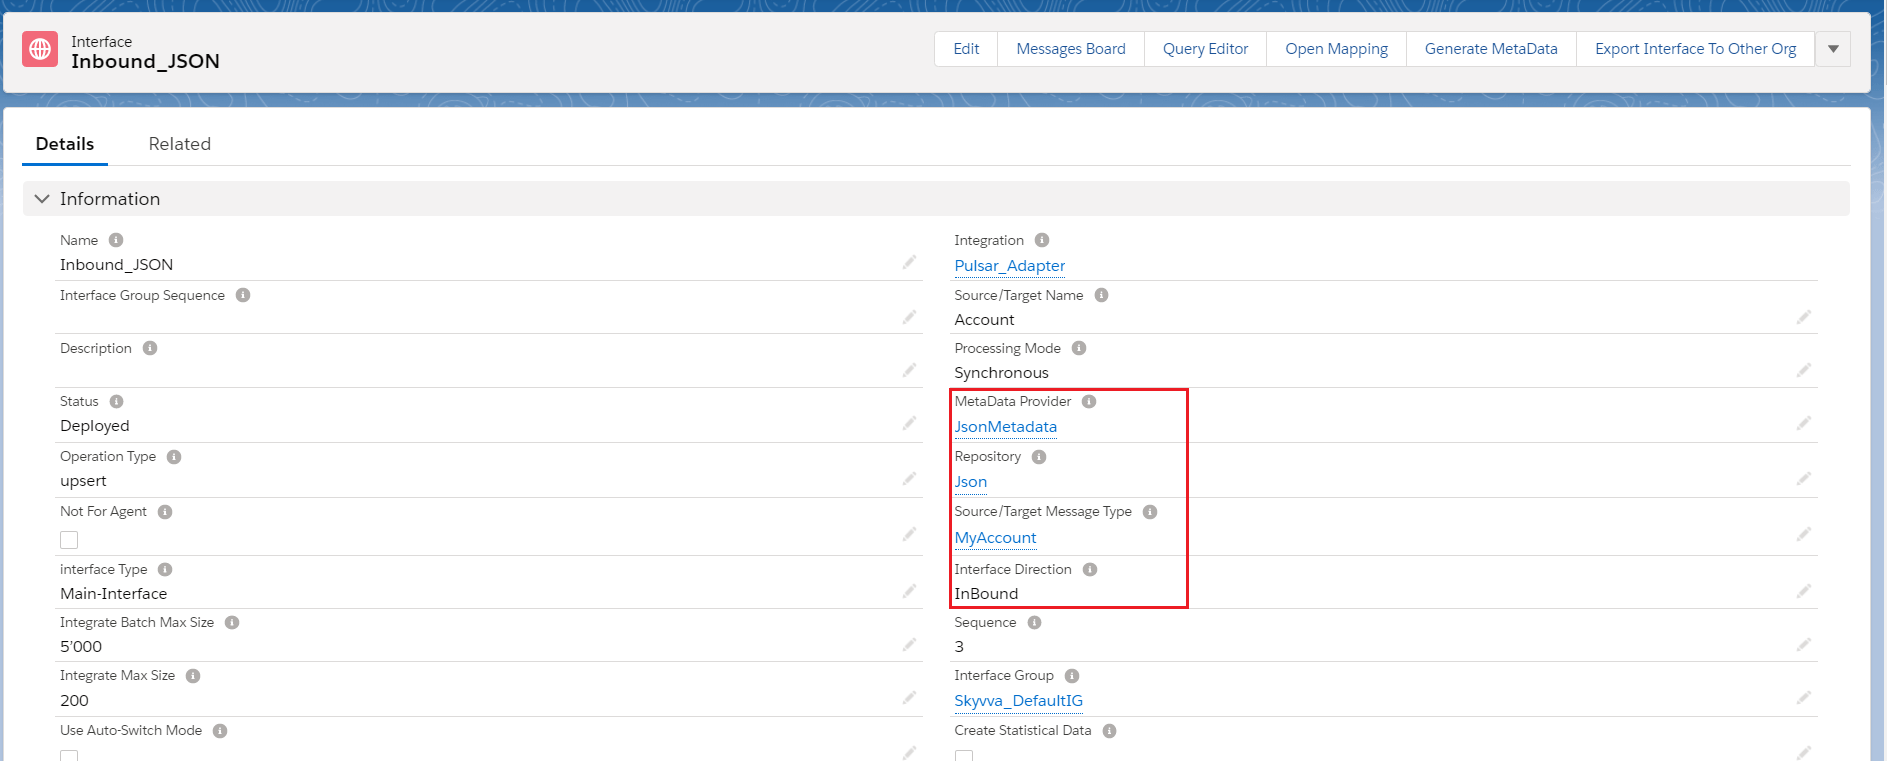
- Add Metadata Provider, Istructure Repository, and Message type to the interface page as shown below.
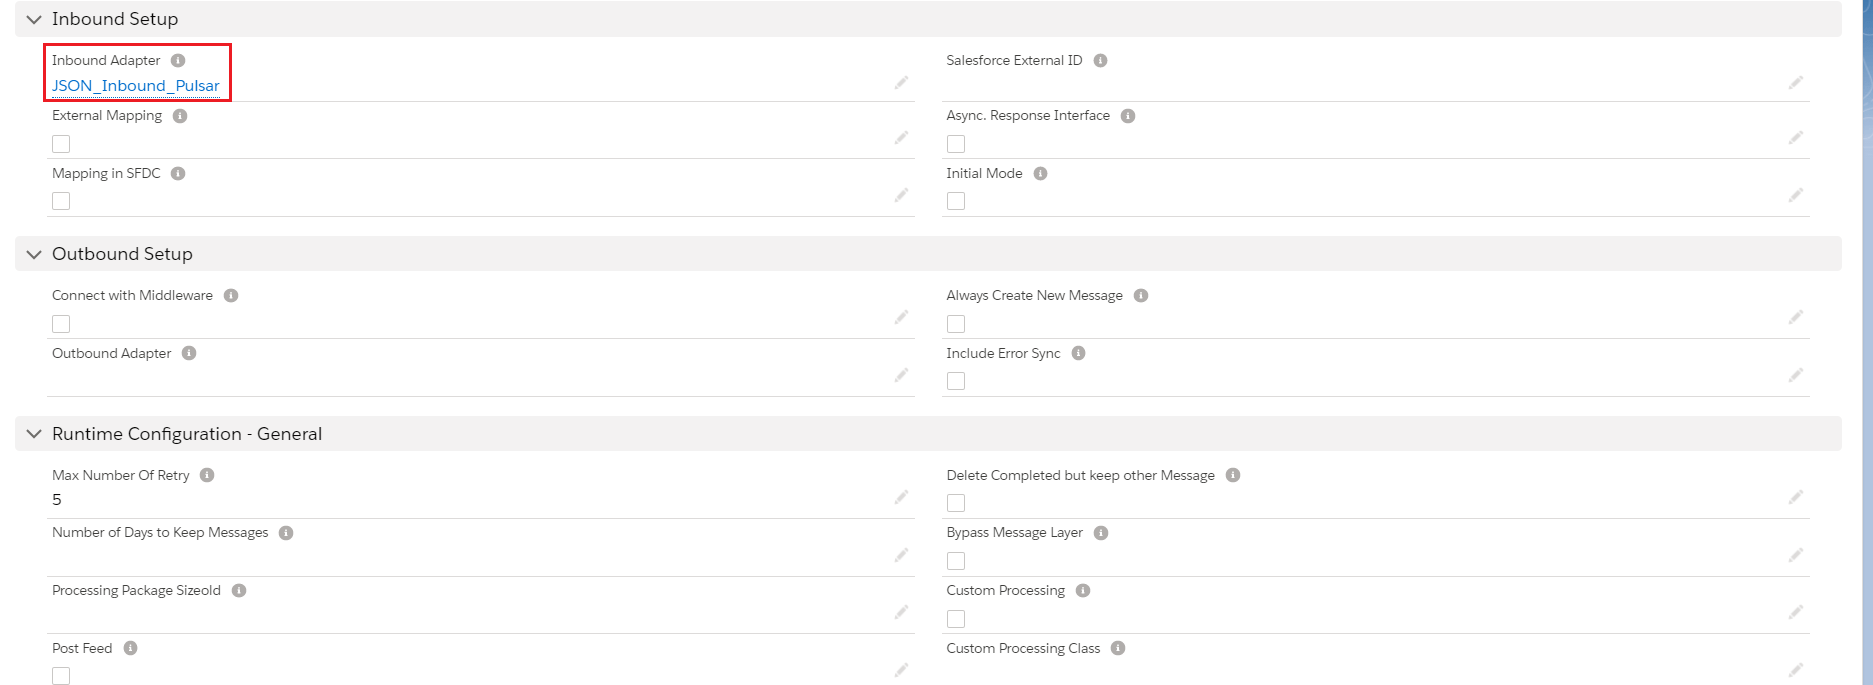
- Add Inbound Adapter
4. Start the route:
- We need to start the route.
6. Callout to Pulsar Server:
[aux_code language=”javascript” theme=”tomorrow” title=”” extra_classes=””]
Callout: (You need to execute below command in Ec2 new Agent-tools-server command prompt.
1st Way:
Sample Data-
{
“MyAccount”:{
“Name”:”Testing Pulsar InBound Account1″,
“Description”:”Testing Pulsar InBound Account1 Description”,
“MyContact”:{
“FirstName”:”Testing”,
“LastName”:”Pulsar InBound Contact1″,
“MyAsset”:{
“Quantity”:15.00,
“SerialNumber”:”K_I_Asset001″,
“Asset_Name”:”Testing Pulsar InBound Asset1″
}
}
}
}
2nd Way:
Upload JSON File on /home/ec2-user/paras_agent_pulsar/Inbound/Pulsar_JSON_Inbound.json
Command:
pulsar-client produce non-persistent://vip/skyvva/InboundJSONTopic -f /home/ec2-user/paras_agent_pulsar/Inbound/Pulsar_JSON_Inbound.json
[/aux_code]
7. Message Monitoring: