Introduction: #
- The source of an event can be from internal or external inputs. Events can generate from a user, like a mouse click or keystroke, an external source, such as a sensor output, or come from the system, like loading a program.
- This is the modern way of communication between different applications. It has two components: Publish and subscribe. For example, Netflix, youtube.
- An event is any significant occurrence or change in state for system hardware or software. An event is not the same as an event notification, which is a message or notification sent by the system to notify another part of the system that an event has taken place.
Pulsar Adapter is basically an Event-based communication. Event-based communication contains two main components: Publish (Producer) and Subscribe (Consumer). The work of a publisher is to publish messages into a queue or topic which is Kafka/Pulsar and the middleware tool like this will maintain the message, these adapters follow the principle of Publish and Subscribe. And they will deliver messages to the consumer. Then all the applications can subscribe.
For example, Netflix plays the role of a publisher. and we play the role of the subscriber(Consumer).
Event-based Communication: #
- An event-driven architecture can help organizations achieve a flexible system that can adapt to changes and make decisions in real-time. Real-time situational awareness means that business decisions, whether manual or automated, can be made using all of the available data that reflects the current state of your systems.
- Events are captured as they occur from event sources such as Internet of Things (IoT) devices, applications, and networks, allowing event producers and event consumers to share status and response information in real-time.
- Organizations can add event-driven architecture to their systems and applications to improve the scalability and responsiveness of applications and access to the data and context needed for better business decisions.
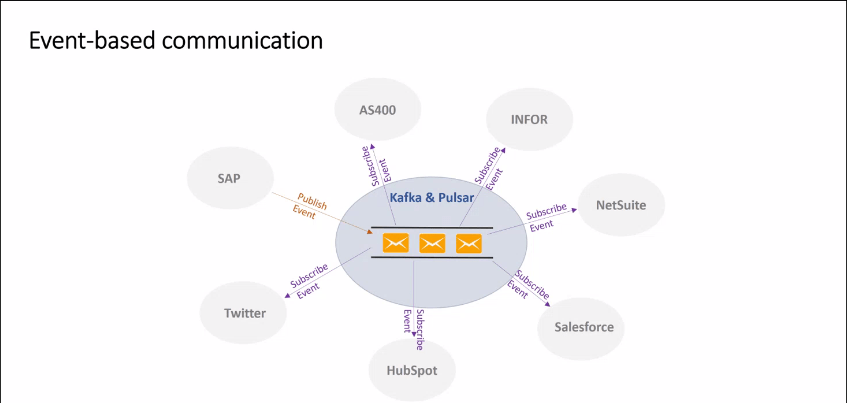
- This is the modern way of communication between different applications. It has two components: Publish and subscribe. For example, Netflix, youtube.
- We can see the picture given below for reference. The SAP is a producer who pushing messages and Kafka or Pulsar works here as middleware, and maintain messages. All other applications like Twitter, HubSpot, salesforce is a consumer or subscriber here. So SAP just needed to publish it one time, they don’t need to send it to different applications individually.
How does event-driven architecture work? #
SKYVVA Integration is a comprehensive set of integration and messaging technologies to connect applications and data across hybrid infrastructures. It is an agile, distributed, containerized, and API-centric solution. It provides service composition and orchestration, application connectivity and data transformation, real-time message streaming, change data capture, and API management—all combined with a cloud-native platform and toolchain to support the full spectrum of modern application development.
- The event-driven architecture is made up of event producers and event consumers. An event producer detects or senses an event and represents the event as a message. It does not know the consumer of the event or the outcome of an event.
- After an event has been detected, it is transmitted from the event producer to the event consumers through event channels, where an event processing platform processes the event synchronously. Event consumers need to be informed when an event has occurred. They might process the event or may only be impacted by it.
- The event processing platform will execute the correct response to an event and send the activity downstream to the right consumers. This downstream activity is where the outcome of an event is seen
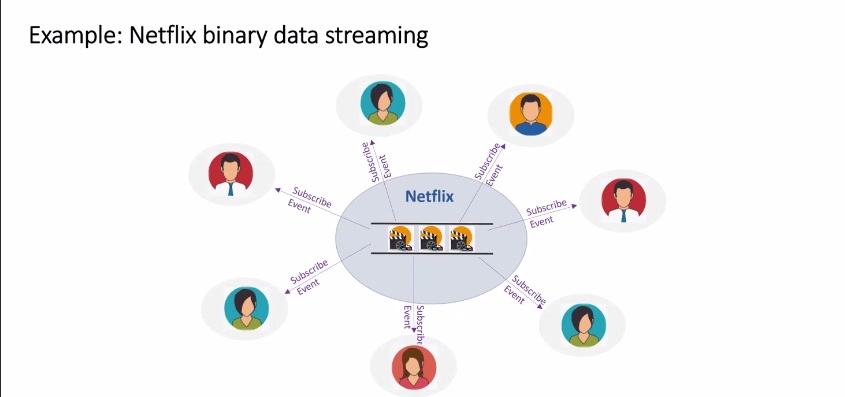
- One more example for better understanding.
We all use Netflix to watch movies. It uses the Queuing tool and streaming tool. Netflix here plays the role of producer and we play the role of the consumer. Netflix uploads Movie once and all others who are subscribers of Netflix can watch.
They do not need to request again and again. To send it individually it takes so much time, here we just needed to upload once and all the subscribers will get it.
#
Event-Driven Technology Terminology: #
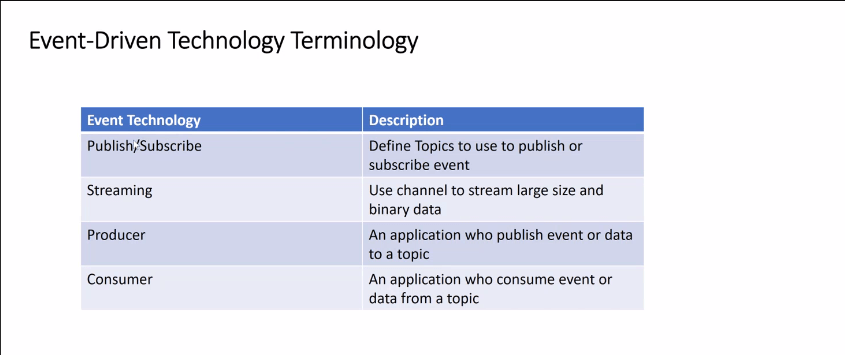
We have 5 main Event terminology.
- Publish
- Subscribe
- Streaming
- Producer
- Consumer
Check the picture below for a description.
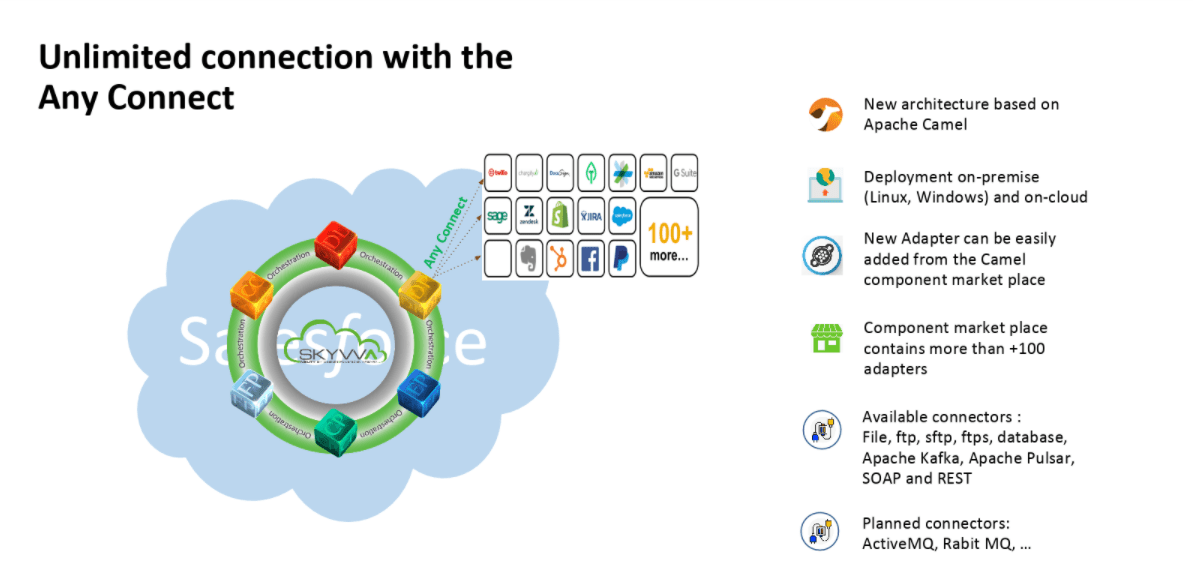
Any Connect: #
- Any connect is an easy tool that helps users to get their data into Salesforce objects.
- Any Connect can also be used to extract data from database objects into any of the destinations as per business requirements.
- Similarly, Agent can use to perform bulk deletions by exporting the ID fields for the data we wish to delete and using that source to specify deletions through the Any Connect.
- Many networks and server monitoring solutions use what are called “Any Connect” to get values from the machines they are monitoring. It is a program that runs on remote machines and communicates with the main monitoring system. Some merchants try to hide the fact that they use Any Connect. They will try to deliver things like they “deploy” to remote systems or use other words, but it all compresses to installing custom software on the remote machines.
- We have available connectors like Pulsar, Kafka, Database, File, ftp, ftps, sftp, SOAP and REST.
Pulsar Adapter: #
We have 2 Pulsar Adapter-
- Inbound/Consumer Pulsar Adapter:
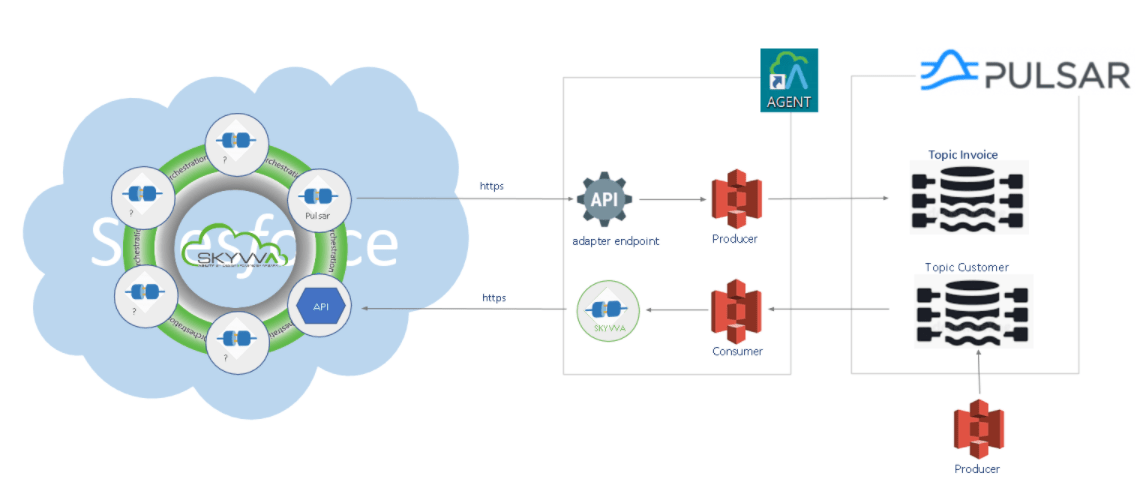
We use an Inbound Pulsar Adapter when somebody pushes the topic into a topic customer on the Kafka side, then we are consuming. We have an event-driven listener who is a camel consumer. We don’t need a scheduler. We can consume immediately. This is the Inbound process because we are receiving data here.
- Outbound/Producer Pulsar Adapter:
We need an Outbound Pulsar Adapter when we want to send data out from salesforce, here We need to create a topic first. From salesforce, we can send data messages to the API endpoint of our agent, and then we have a camel producer to publish into the topic invoice, which is on the Kafka side. This is the outbound process because we are sending data.
Check the picture given below for reference.
Case 1 #
How to use an Agent Pulsar adapter for consumers?
- Users will learn how the Agent Pulsar adapter works for Consumers. In simple words, an Agent pulsar adapter for Consumer means Inbound Pulsar Adapter.
- Users use an Inbound Pulsar Adapter when somebody pushes the topic into a topic customer on the Kafka side, then we are consuming. We have an event-driven listener who is a camel consumer. We don’t need a scheduler. We can consume immediately.
- This is the Inbound process because we are receiving data here. It plays the role of the consumer.
Step1: Click on Agent Control Board Tab
–How to use the Agent Control Board?
Since the user now completely understand; How to use the Agent Control Board, by hitting the upper link, now we understand the Architect of the Agent Control Board now follows below on Salesforce org.
- Use Case for file type CSV
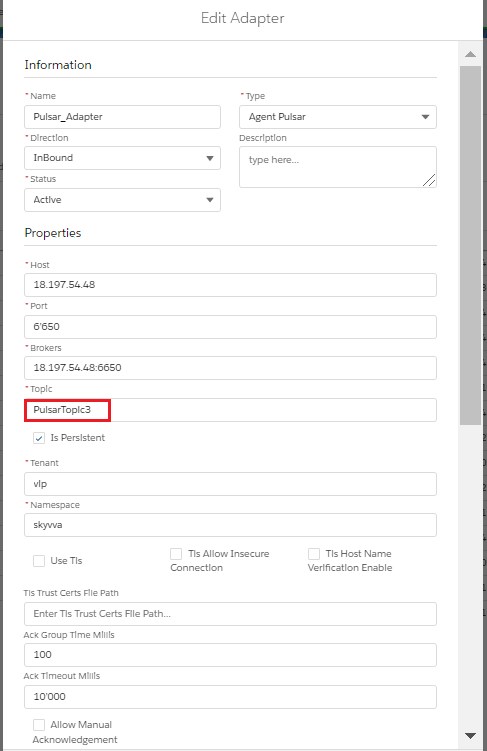
Step2: Create Adapter:
- Add any name in Topic and the topic will automatically be created on the Pulsar server.
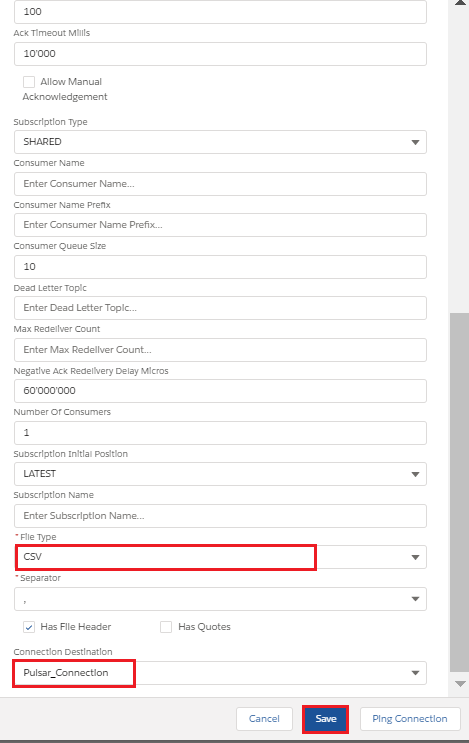
- Select File Type.
- Select Connection Destination which we have created recently.
Step3: Configure Interface page:
- Create Integration.
- Create Interface.
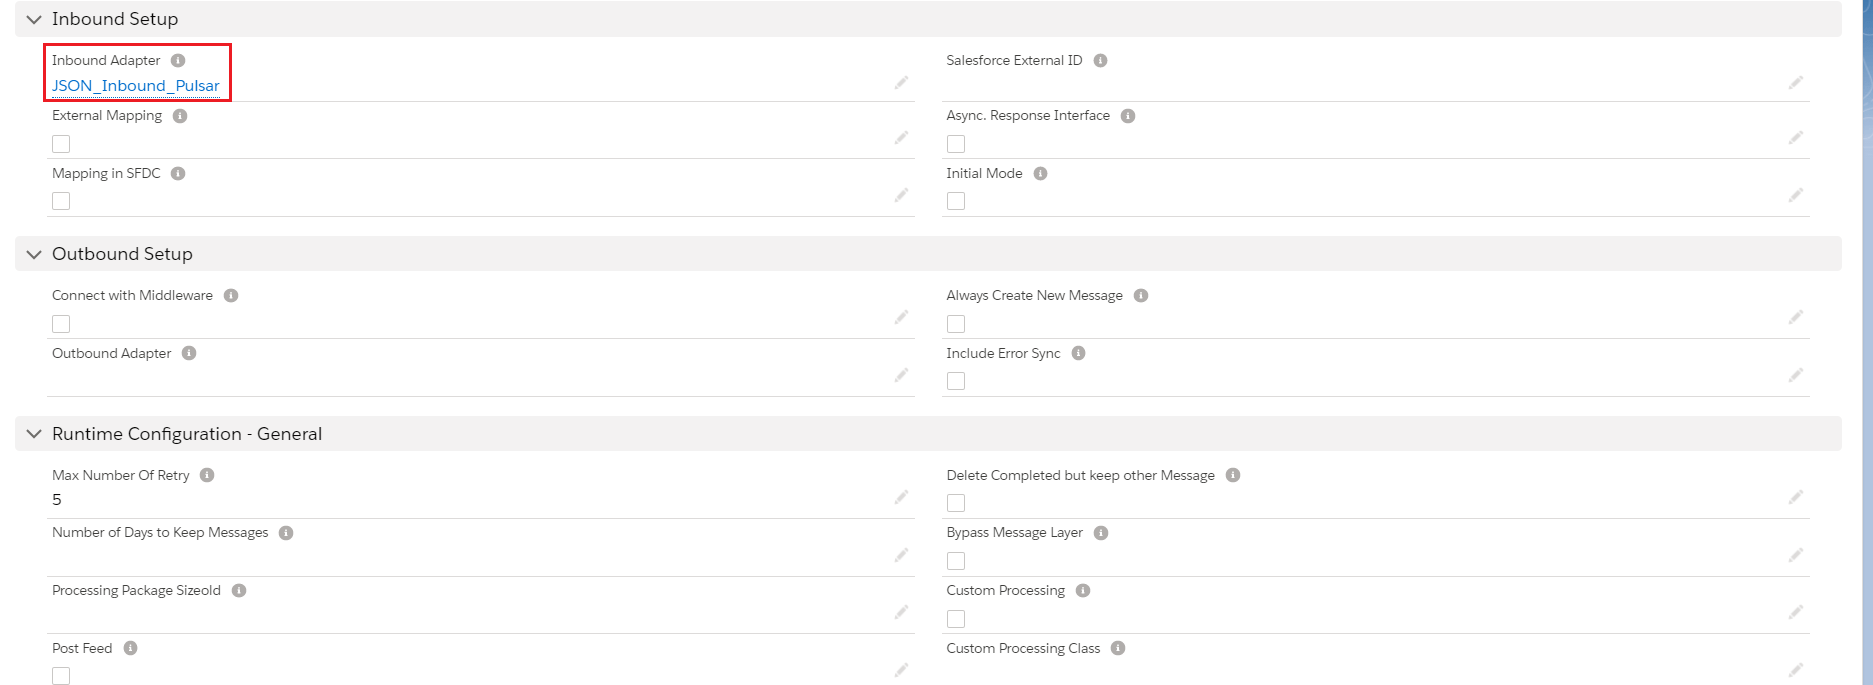
- Add Metadata Provider, Istructure Repository, and Message type to the interface page as shown below.
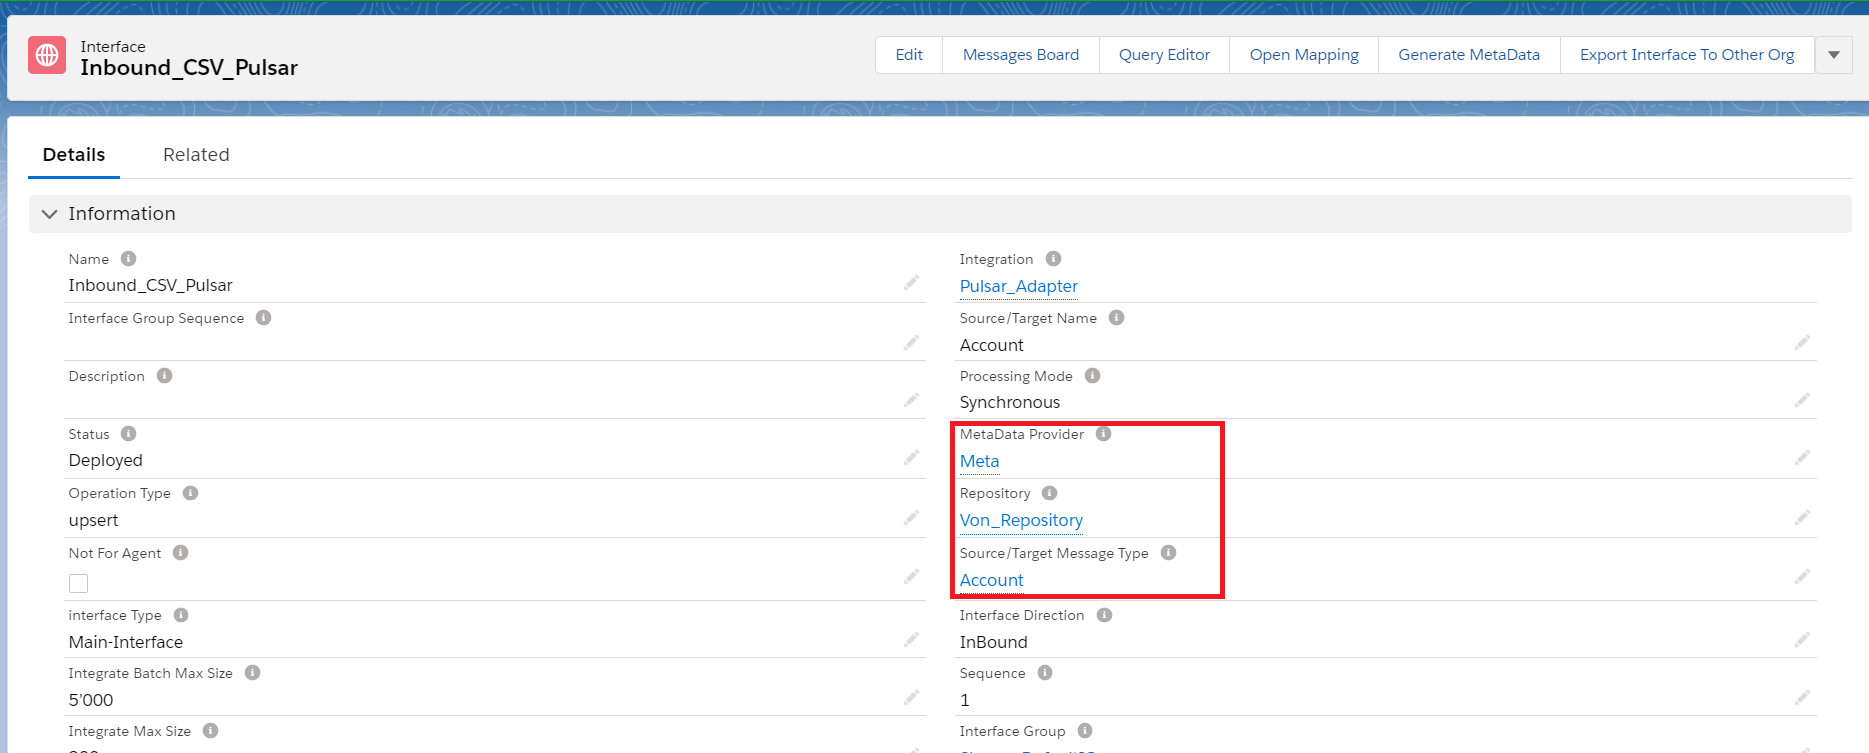
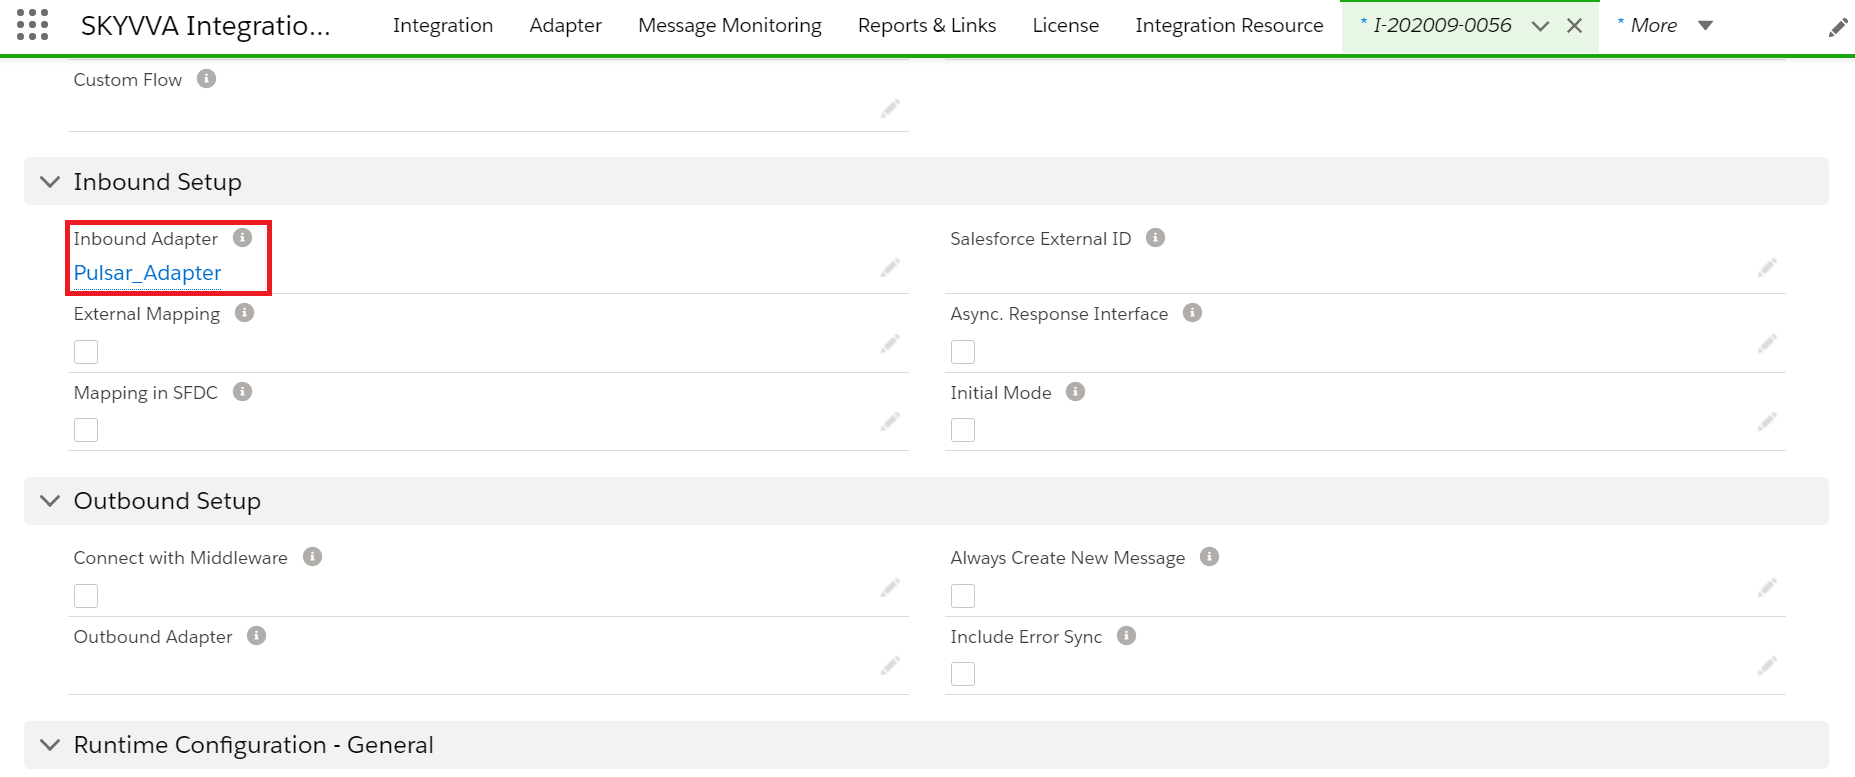
- Add Inbound Adapter
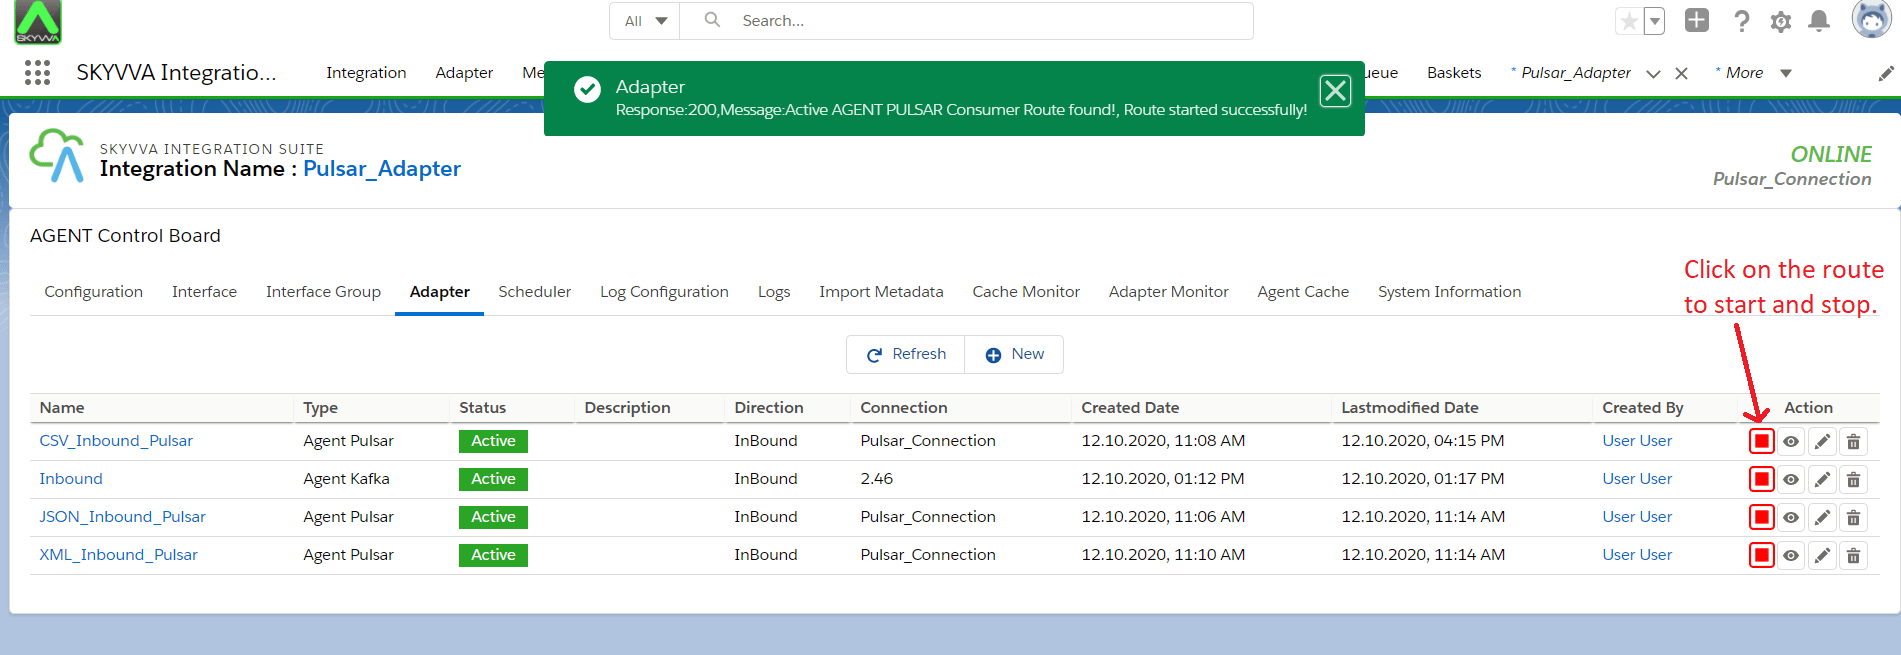
Step4: Start the route:
- We need to start the route.
[su_box title=”Note” box_color=”#2a8af0″ title_color=”#000000″]First we need to add the Adapter in interface section. Otherwise we will get an error while starting route.[/su_box]
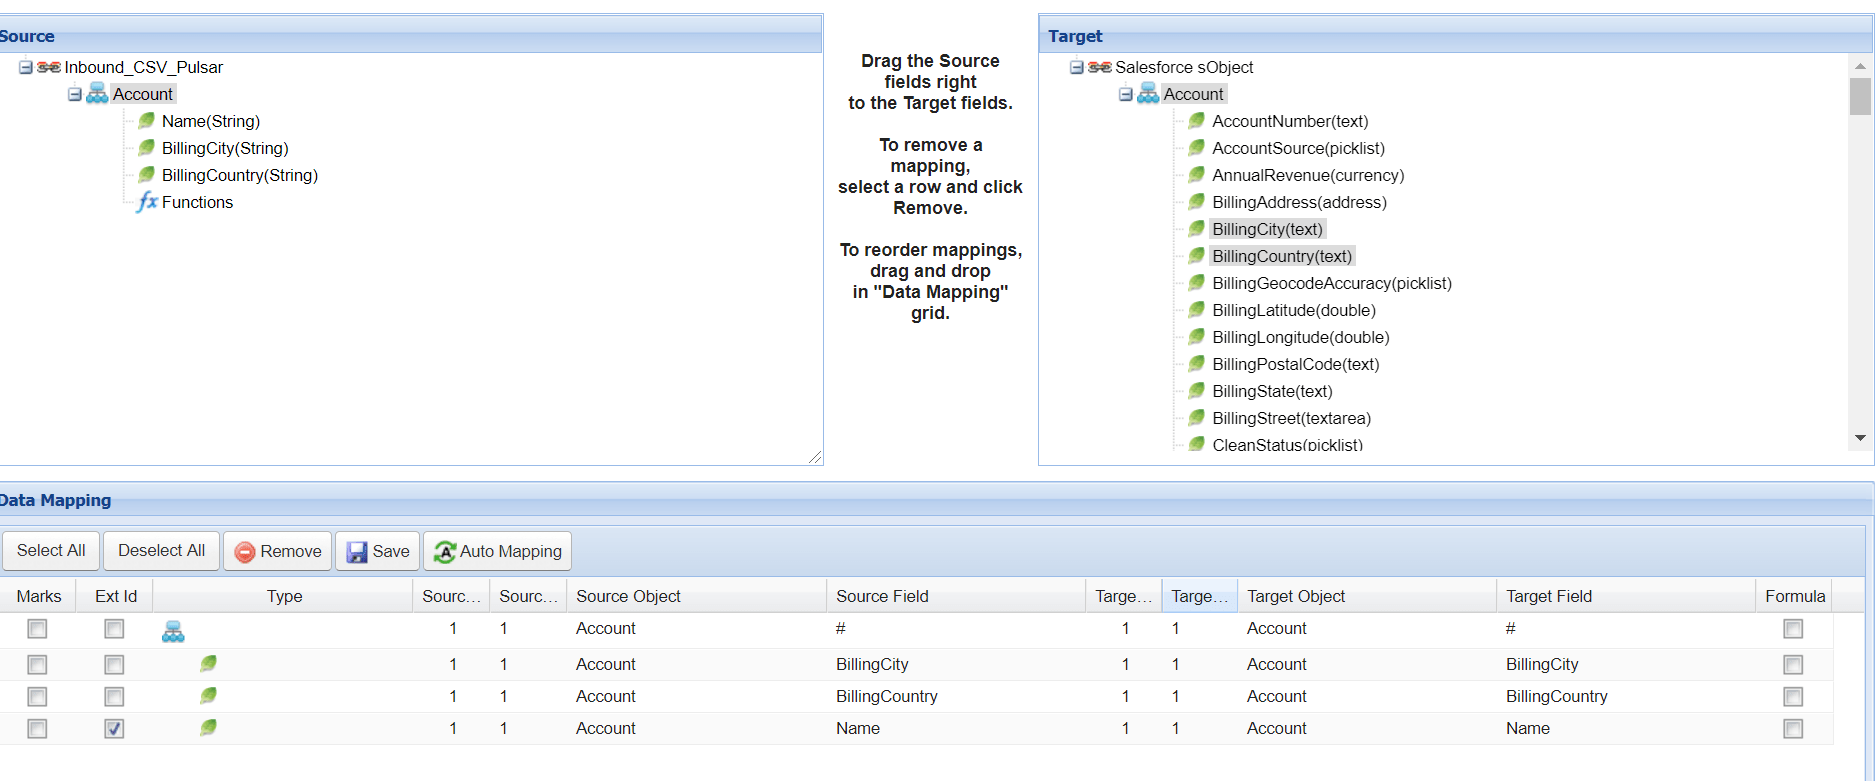
Step5: Do Mapping:
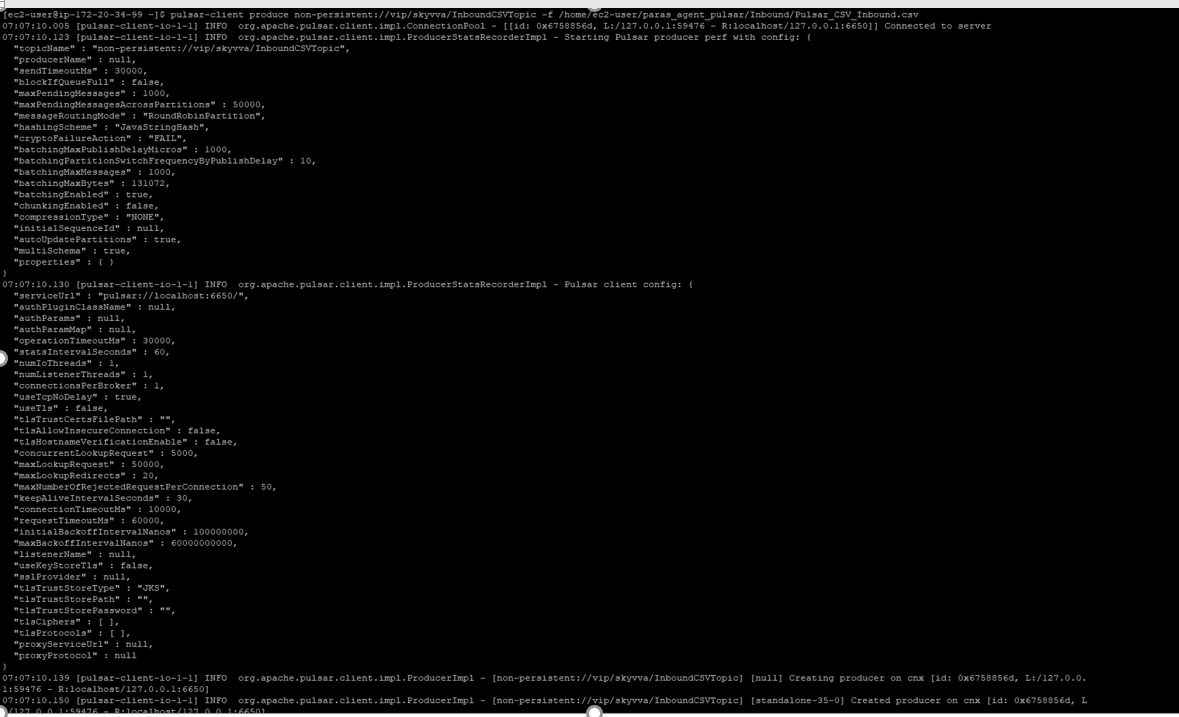
Step6: Callout to Pulsar Server:
[aux_code language=”javascript” theme=”tomorrow” title=”” extra_classes=””]
Command: (User need to create CSV file and also need to put File on agent-tools-server)
For example: /home/ec2-user/paras_agent_pulsar/Inbound/Pulsar_CSV_Inbound.csv
and execute the below command on Ec2 new agent-tools-server command prompt.
pulsar-client produce non-persistent://vip/skyvva/InboundCSVTopic -f /home/ec2-user/paras_agent_pulsar/Inbound/Pulsar_CSV_Inbound.csv
OR
When Is Persistent checkbox is true inside adapter property then you need to use Persistent command:
pulsar-client produce persistent://vip/skyvva/InboundCSVTopic -f /home/ec2-user/paras_agent_pulsar/Inbound/Pulsar_CSV_Inbound.csv
[/aux_code]
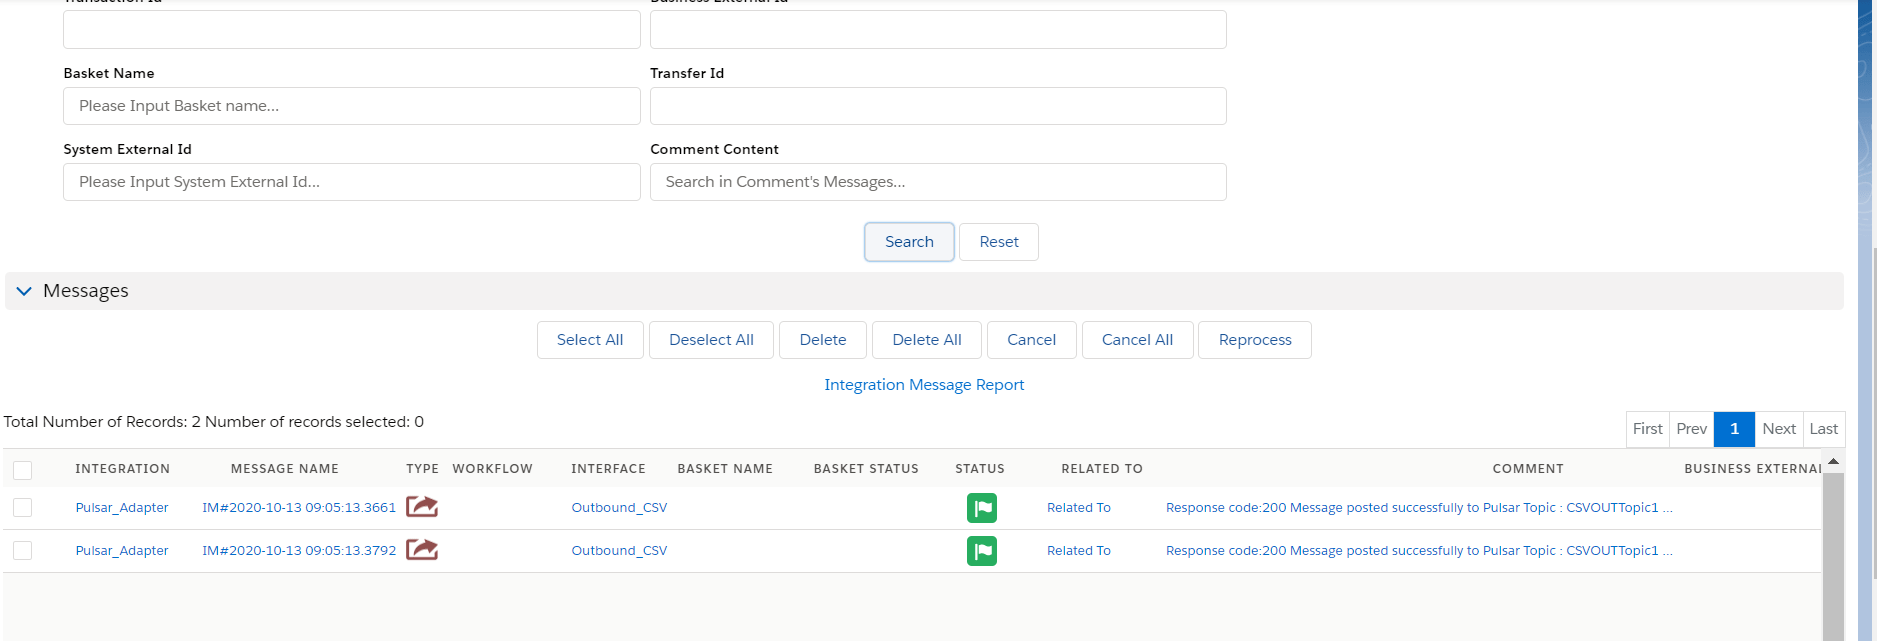
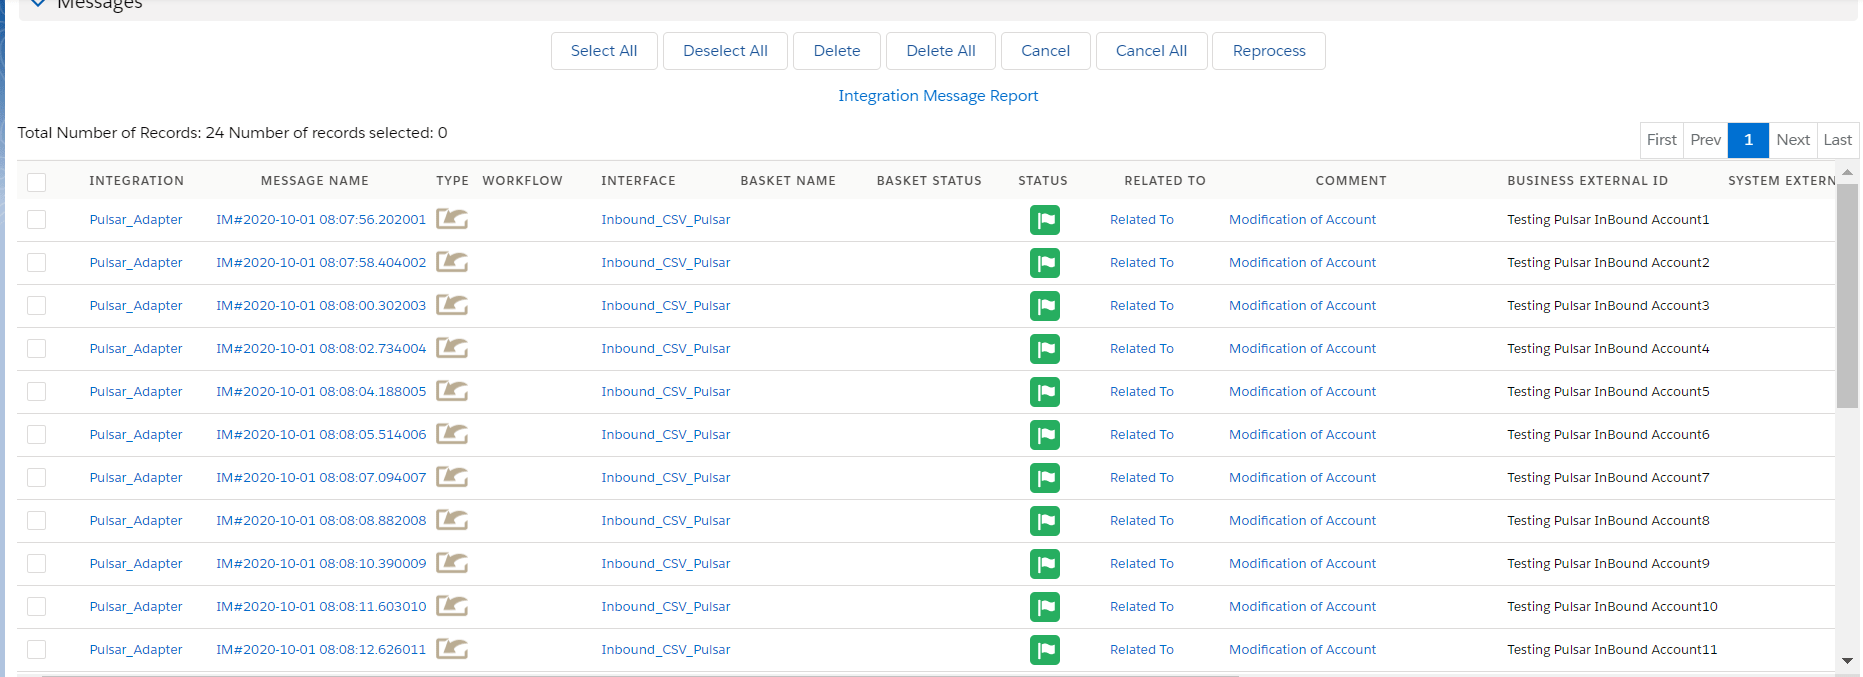
Step7: Message Monitoring:
- Use Case for file type XML
Step1: We need to do Agent control board configuration as we did in CSV. Don’t need to create new.
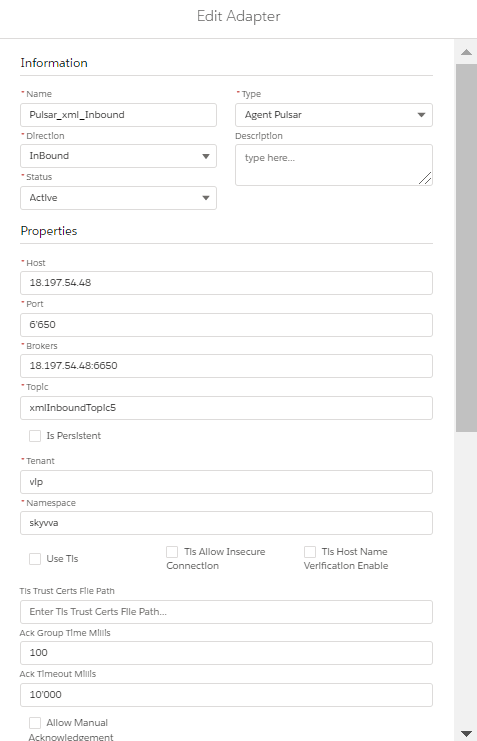
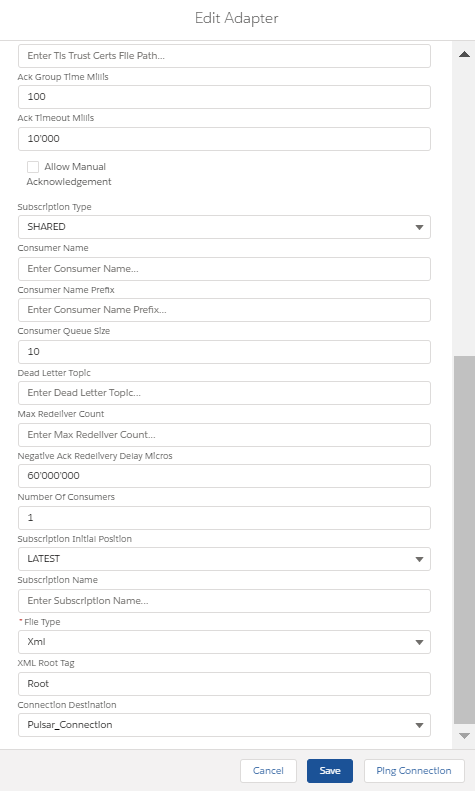
Step2: Create Adapter:
- Add any name in Topic and the topic will automatically be created on the Pulsar server.
- Select File Type.
- Select Connection Destination which we have created recently.
Step3: Configure Interface page:
- Create Integration.
- Create Interface.
- Add Metadata Provider, Istructure Repository, and Message type to the interface page as shown below.
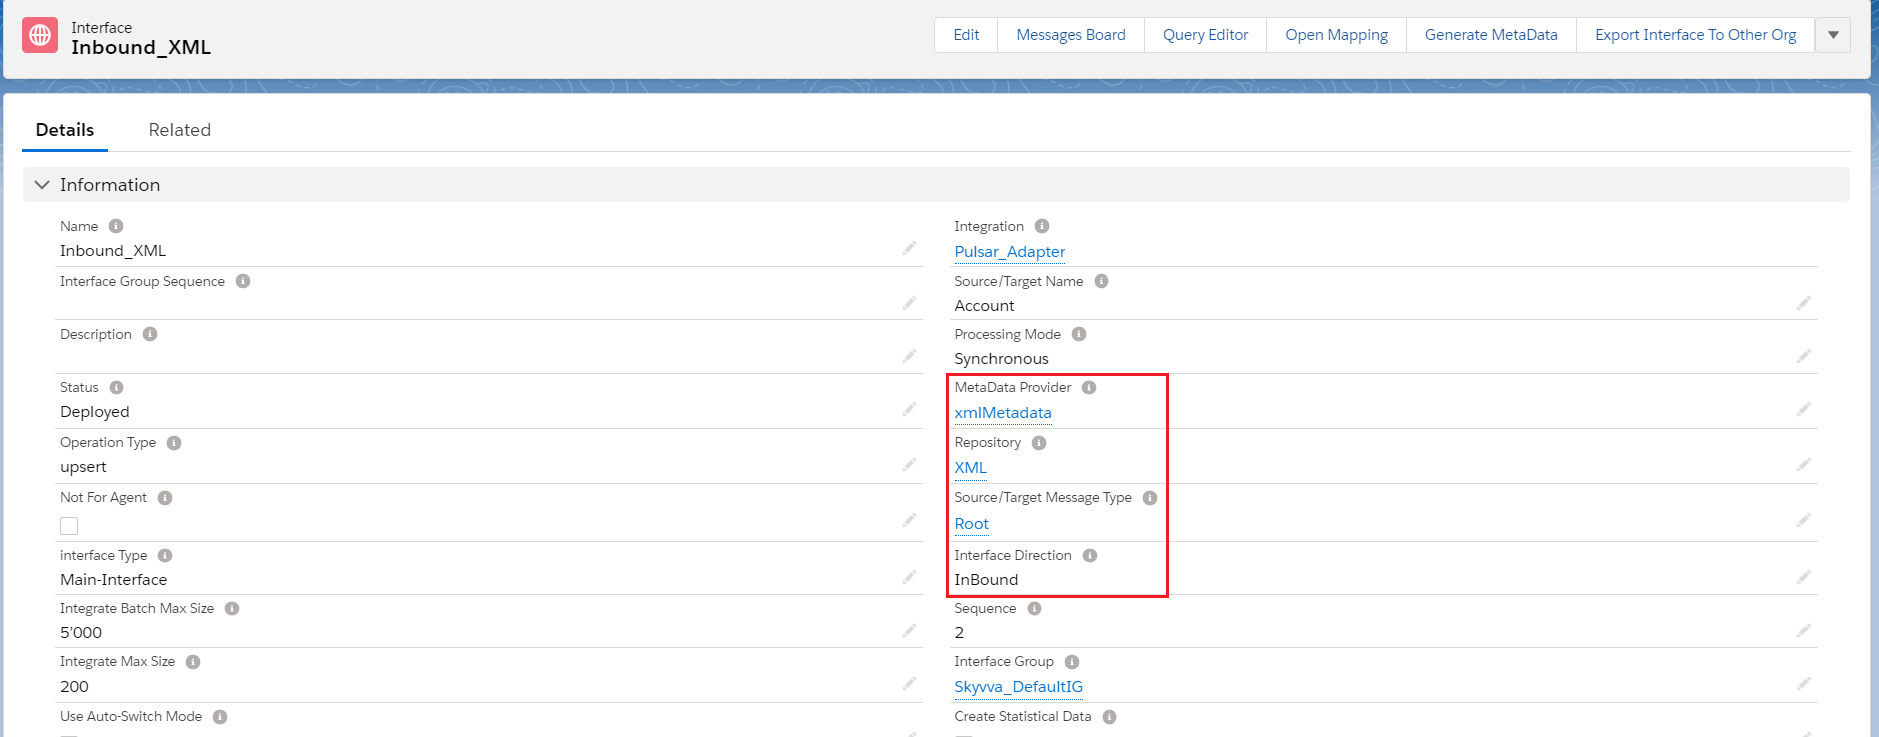
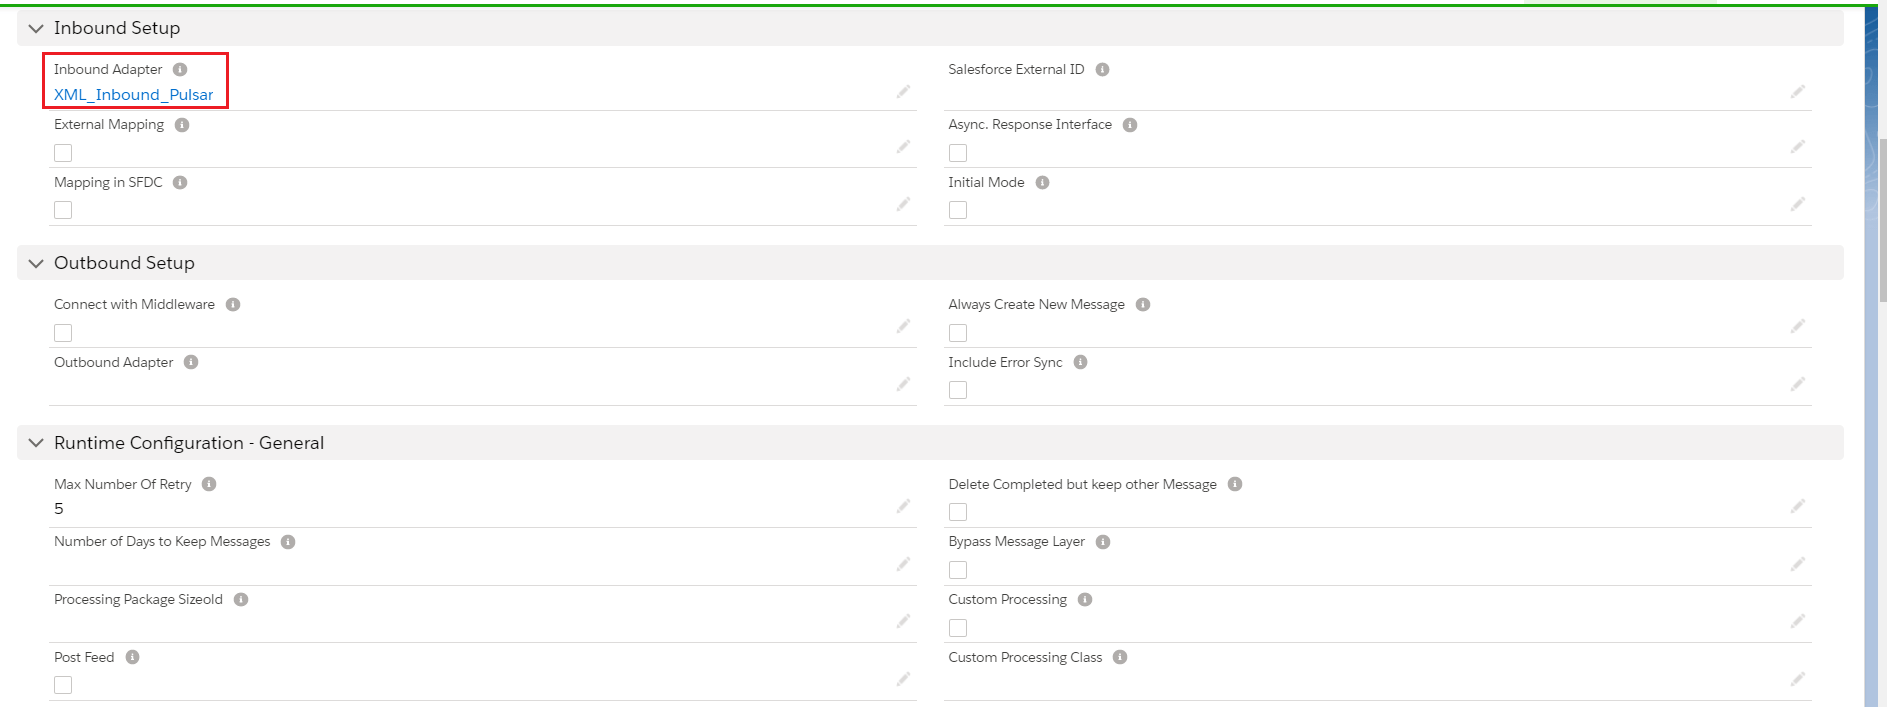
- Add Inbound Adapter
Step4: Start the route:
- We need to start the route.
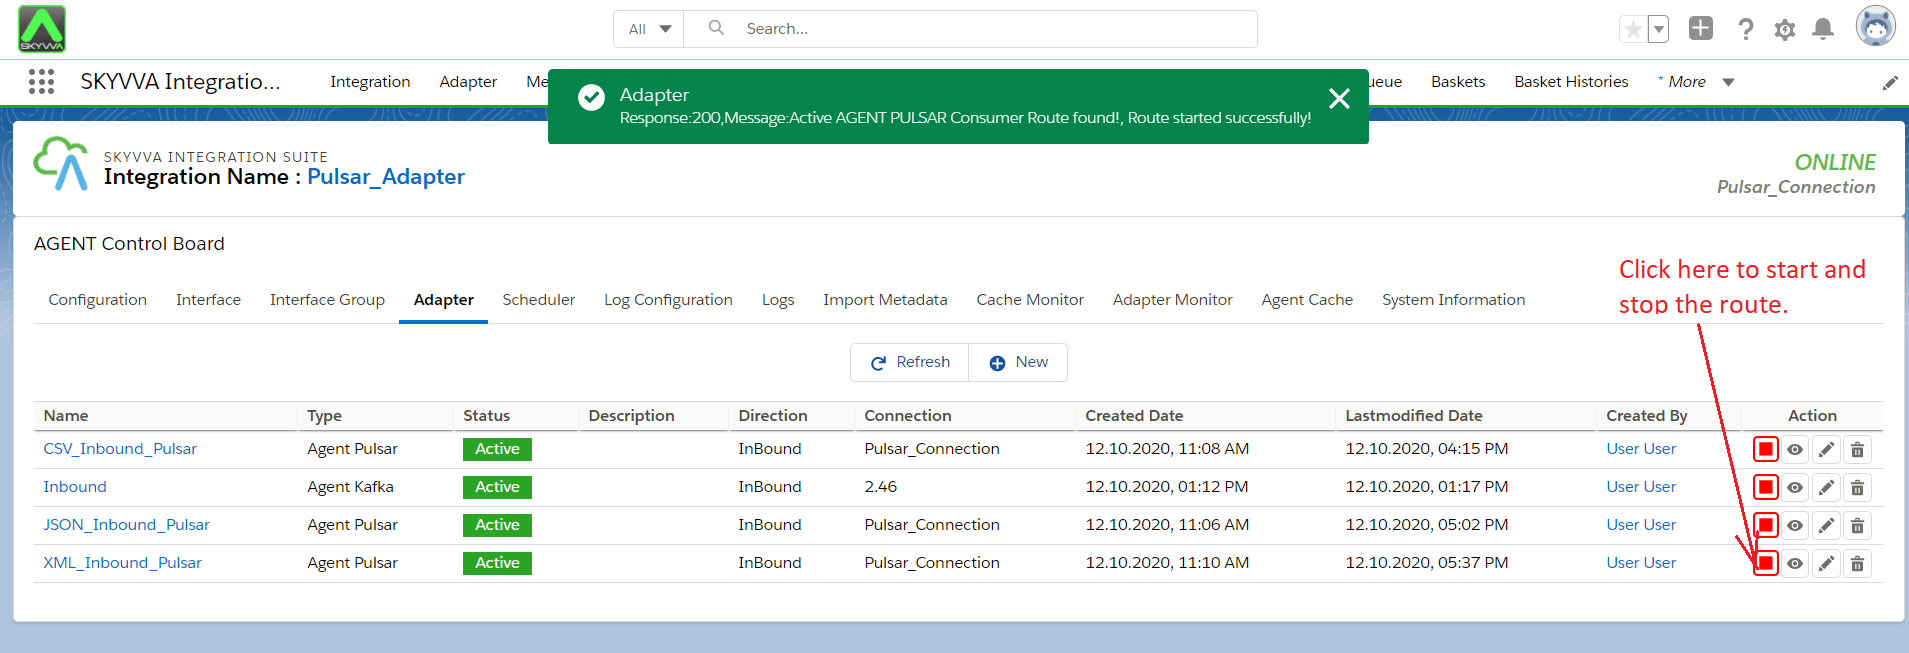
[su_box title=”Note” box_color=”#2a8af0″ title_color=”#000000″]First we need to add the Adapter in interface section. Otherwise we will get an error while starting route.[/su_box]
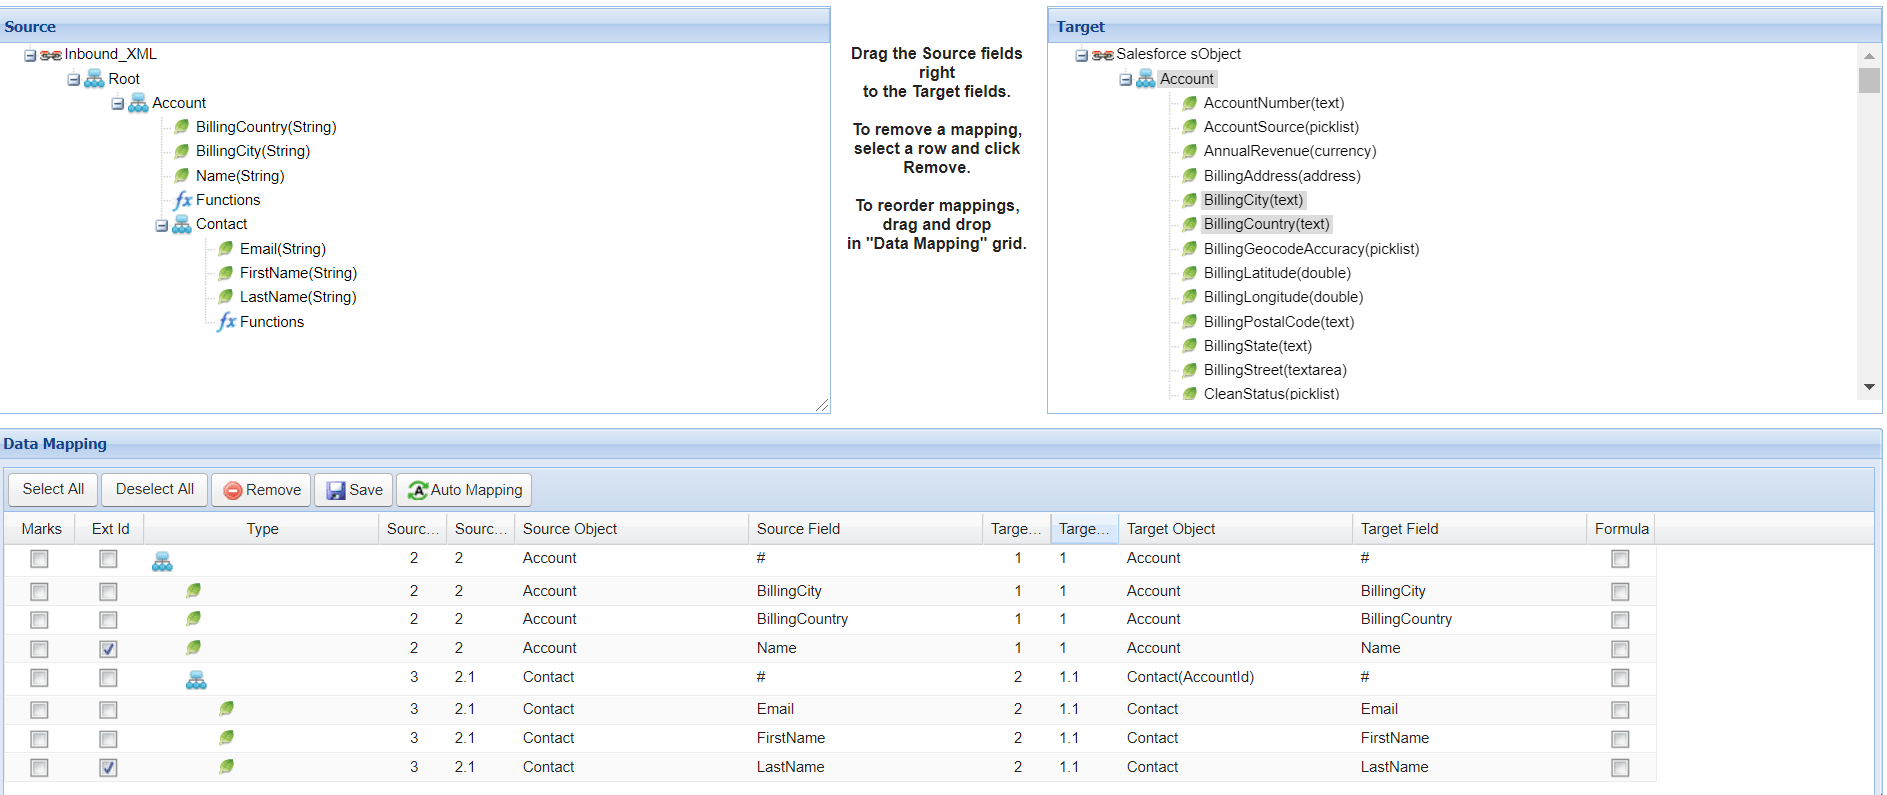
Step5: Do Mapping:
Step6: Callout to Pulsar Server:
[aux_code language=”javascript” theme=”tomorrow” title=”” extra_classes=””]
Callout: (You need to execute below command in Ec2 new Agent-tools-server command prompt and also need to past XML file in one line.
1st Way:
Sample Data- In the Format we need to add namespace in the root.
<account xsi:schemaLocation=”http://schema.infor.com/InforOAGIS/2 http://schema.infor.com/2.12.x/InforOAGIS/BODs/SyncCustomerPartyMaster.xsd” xmlns:xsi=”http://www.w3.org/2001/XMLSchema-instance” xmlns=”http://schema.infor.com/InforOAGIS/2″> <MyAccount> <Name schemeVersionID=”Testing Pulsar InBound Account1″>Testing Pulsar InBound Account1</Name> <Description>Testing Pulsar InBound Account1 Description.</Description> <MyContact> <FirstName sequence=”Testing”>Testing</FirstName> <LastName sequence=”Pulsar InBound Contact1″>Pulsar InBound Contact1</LastName> <MyAsset> <Quantity currencyID=”15.00″>15.00</Quantity> <SerialNumber currencyID=”K_I_Asset001″>K_I_Asset001</SerialNumber> <Asset_Name currencyID=”Testing Pulsar InBound Asset1″>Testing Pulsar InBound Asset1</Asset_Name> </MyAsset> </MyContact> <MyContact> <FirstName sequence=”Testing”>Testing</FirstName> <LastName sequence=”Pulsar InBound Contact2″>Pulsar InBound Contact2</LastName> <MyAsset> <Quantity currencyID=”15.00″>15.00</Quantity> <SerialNumber currencyID=”K_I_Asset002″>K_I_Asset002</SerialNumber> <Asset_Name currencyID=”Testing Pulsar InBound Asset2″>Testing Pulsar InBound Asset2</Asset_Name> </MyAsset> </MyContact> </MyAccount> <MyAccount> <Name schemeVersionID=”Testing Pulsar InBound Account2″>Testing Pulsar InBound Account2</Name> <Description>Testing Pulsar InBound Account2 Description.</Description> <MyContact> <FirstName sequence=”Testing”>Testing</FirstName> <LastName sequence=”Pulsar InBound Contact3″>Pulsar InBound Contact3</LastName> <MyAsset> <Quantity currencyID=”15.00″>15.00</Quantity> <SerialNumber currencyID=”K_I_Asset003″>K_I_Asset003</SerialNumber> <Asset_Name currencyID=”Testing Pulsar InBound Asset3″>Testing Pulsar InBound Asset3</Asset_Name> </MyAsset> </MyContact> <MyContact> <FirstName sequence=”Testing”>Testing</FirstName> <LastName sequence=”Pulsar InBound Contact4″>Pulsar InBound Contact4</LastName> <MyAsset> <Quantity currencyID=”15.00″>15.00</Quantity> <SerialNumber currencyID=”K_I_Asset004″>K_I_Asset004</SerialNumber> <Asset_Name currencyID=”Testing Pulsar InBound Asset4″>Testing Pulsar InBound Asset4</Asset_Name> </MyAsset> </MyContact> </MyAccount> </account>
2nd Way:
Upload XML File on /home/ec2-user/paras_agent_pulsar/Inbound/Pulsar_XML_Inbound.xml
Command:
pulsar-client produce non-persistent://vip/skyvva/InboundXMLTopic -f /home/ec2-user/paras_agent_pulsar/Inbound/Pulsar_XML_Inbound.xml
[/aux_code]
Step7: Message Monitoring:

- Use Case for file type JSON
Step1: We need to do Agent control board configuration as we did in CSV. Don’t need to create new.
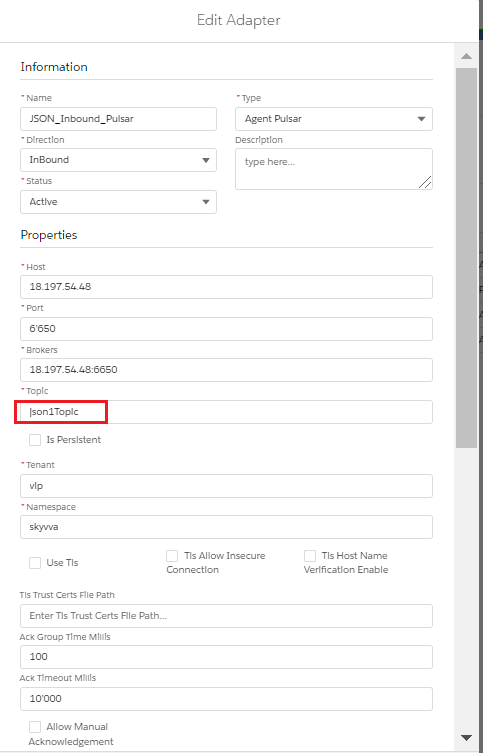
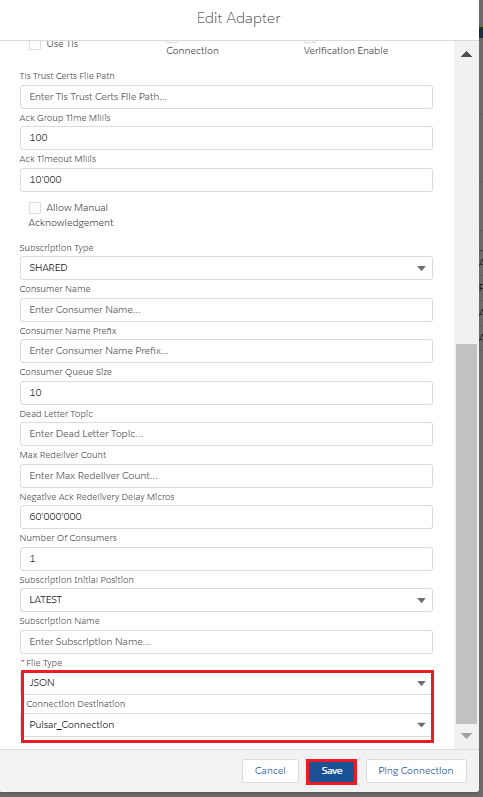
Step2: Create Adapter:
- Add any name in Topic and the topic will automatically be created on the Pulsar server.
- Select File Type.
- Select Connection Destination which we have created recently.
Step3: Configure Interface page:
- Create Integration.
- Create Interface.
- Add Metadata Provider, Istructure Repository, and Message type to the interface page as shown below.
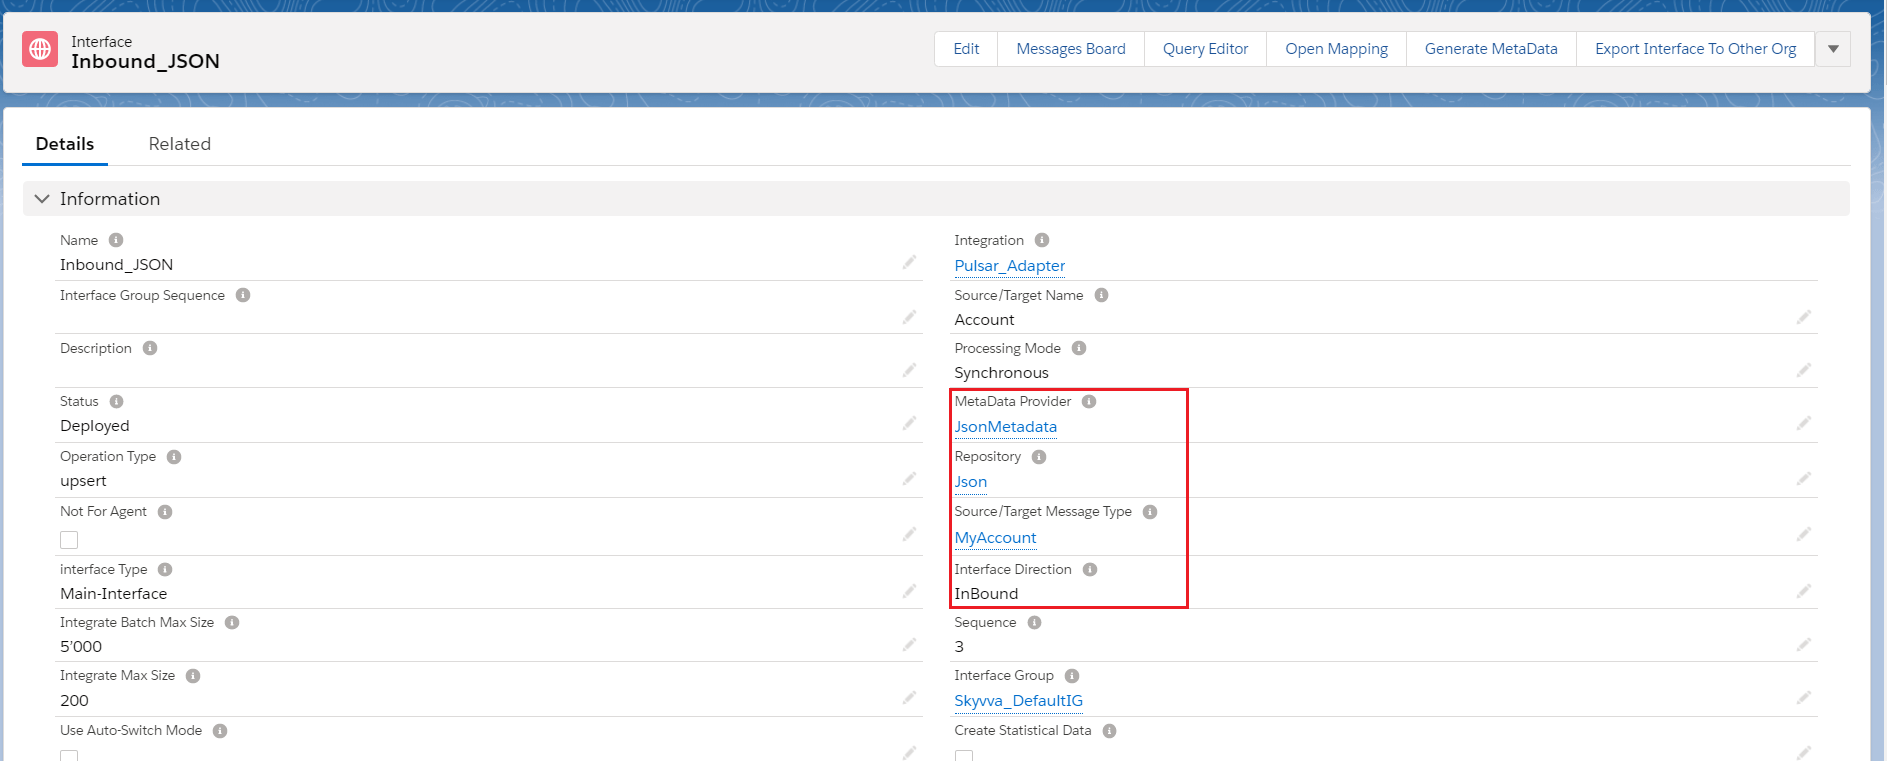
- Add Inbound Adapter
Step4: Start the route:
- We need to start the route.
[su_box title=”Note” box_color=”#2a8af0″ title_color=”#000000″]First we need to add the Adapter in interface section. Otherwise we will get an error while starting route.[/su_box]
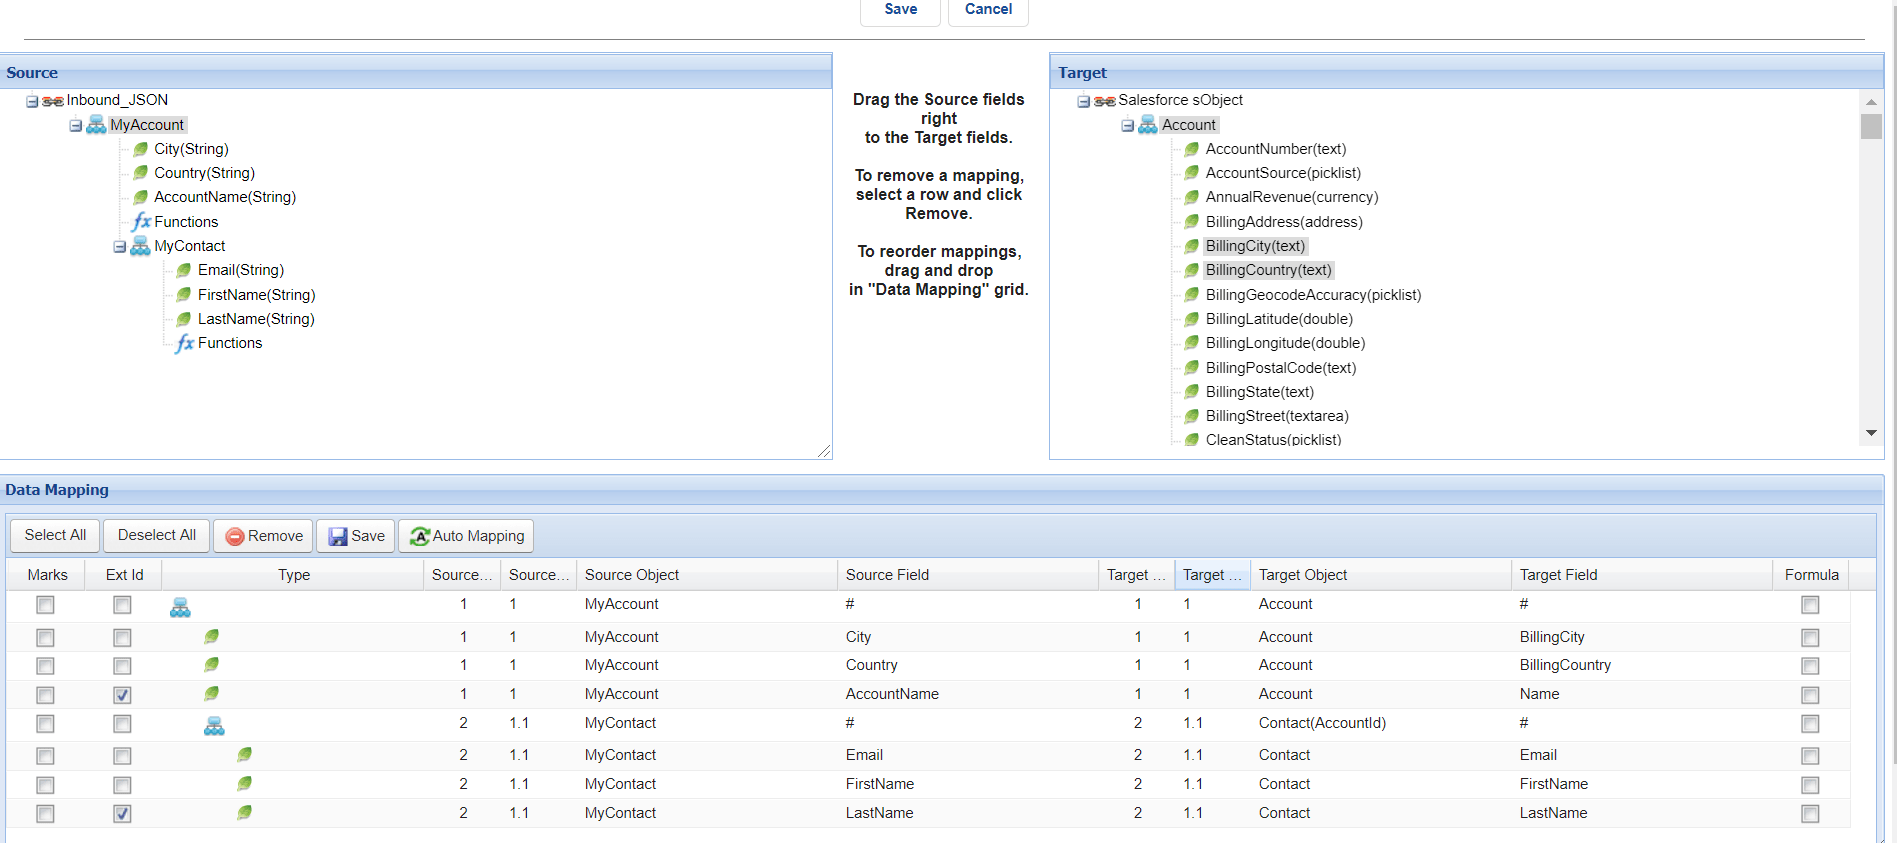
Step5: Do Mapping:
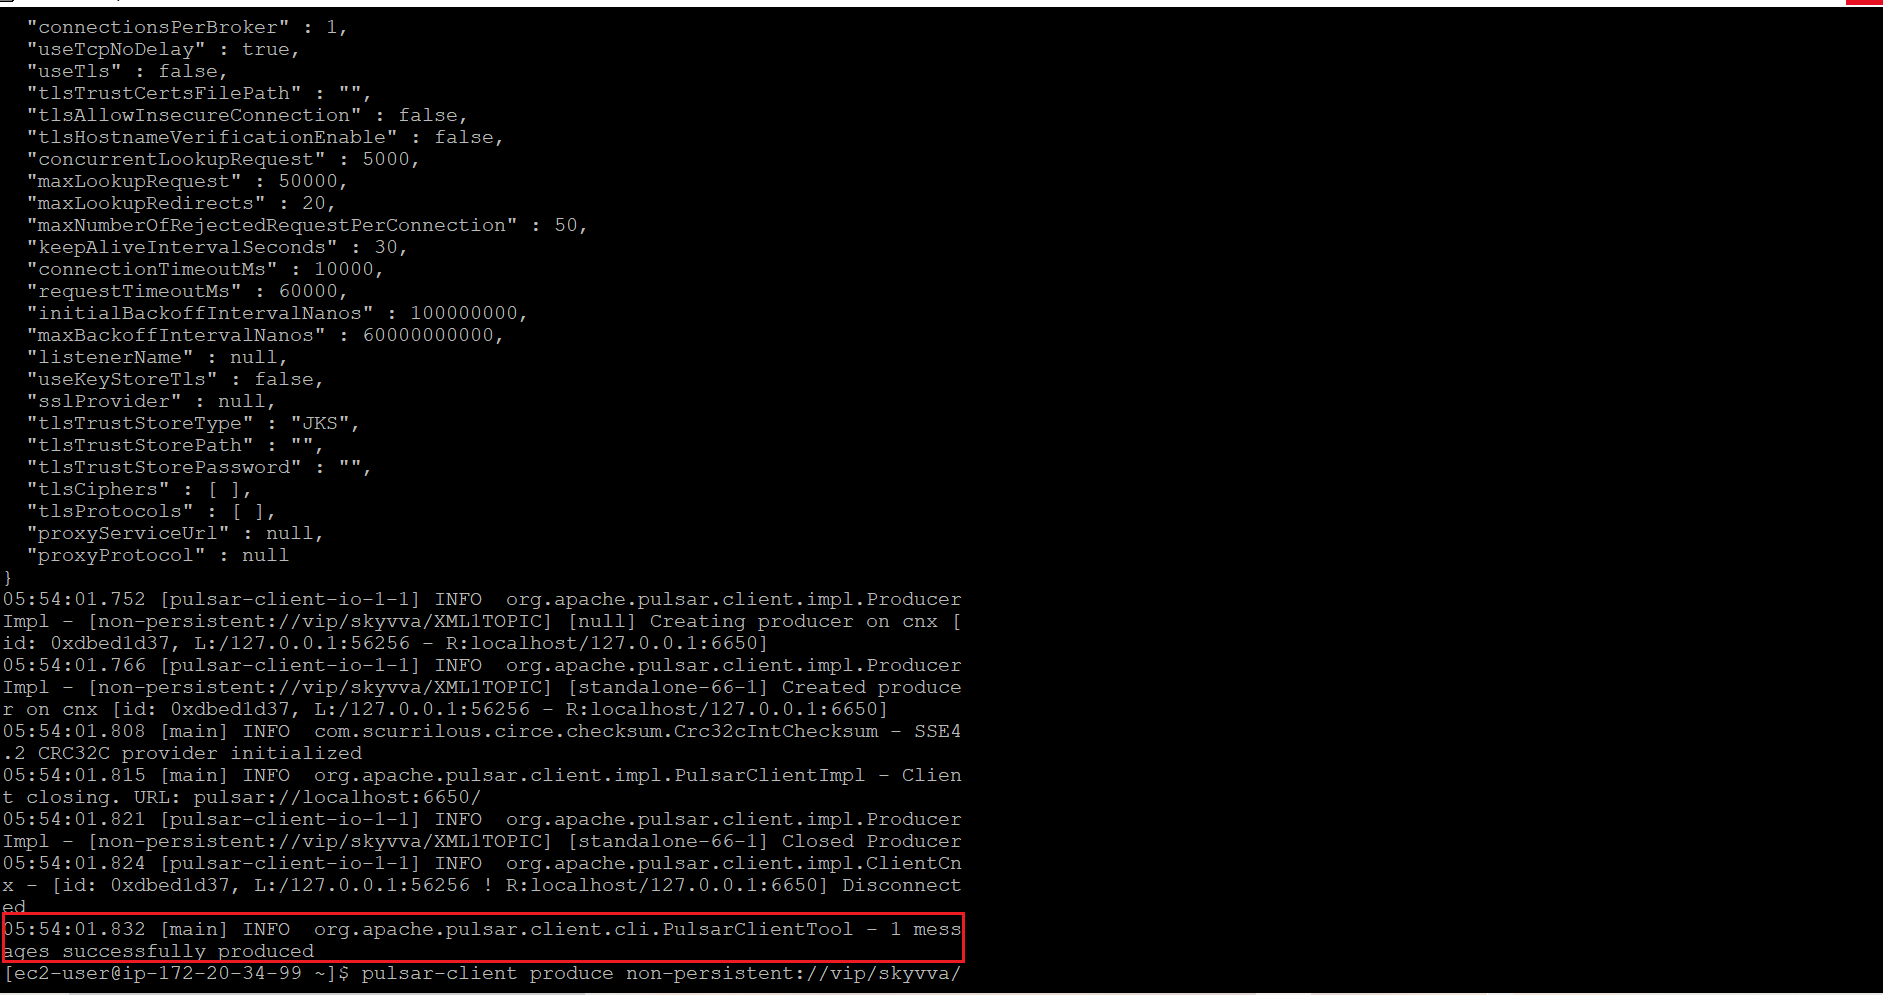
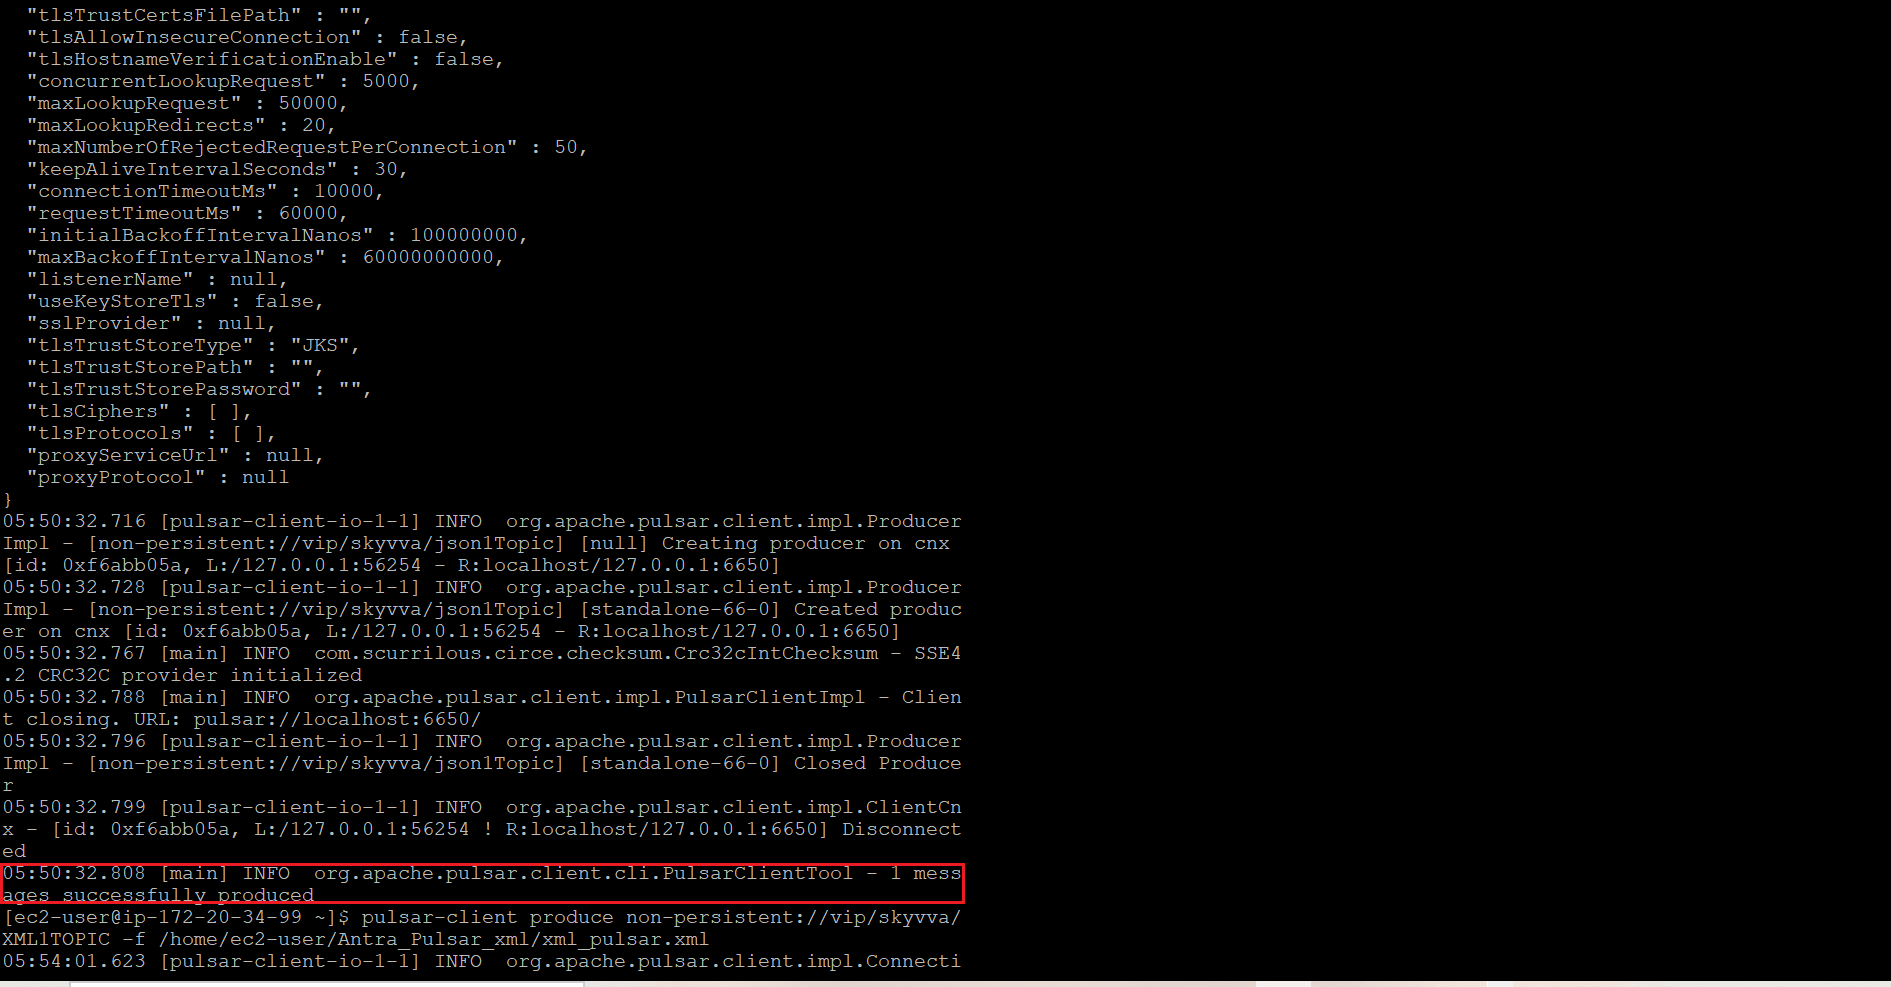
Step6: Callout to Pulsar Server:
[aux_code language=”javascript” theme=”tomorrow” title=”” extra_classes=””]
Callout: (You need to execute below command in Ec2 new Agent-tools-server command prompt.
1st Way:
Sample Data-
{
“MyAccount”:{
“Name”:”Testing Pulsar InBound Account1″,
“Description”:”Testing Pulsar InBound Account1 Description”,
“MyContact”:{
“FirstName”:”Testing”,
“LastName”:”Pulsar InBound Contact1″,
“MyAsset”:{
“Quantity”:15.00,
“SerialNumber”:”K_I_Asset001″,
“Asset_Name”:”Testing Pulsar InBound Asset1″
}
}
}
}
2nd Way:
Upload JSON File on /home/ec2-user/paras_agent_pulsar/Inbound/Pulsar_JSON_Inbound.json
Command:
pulsar-client produce non-persistent://vip/skyvva/InboundJSONTopic -f /home/ec2-user/paras_agent_pulsar/Inbound/Pulsar_JSON_Inbound.json
[/aux_code]
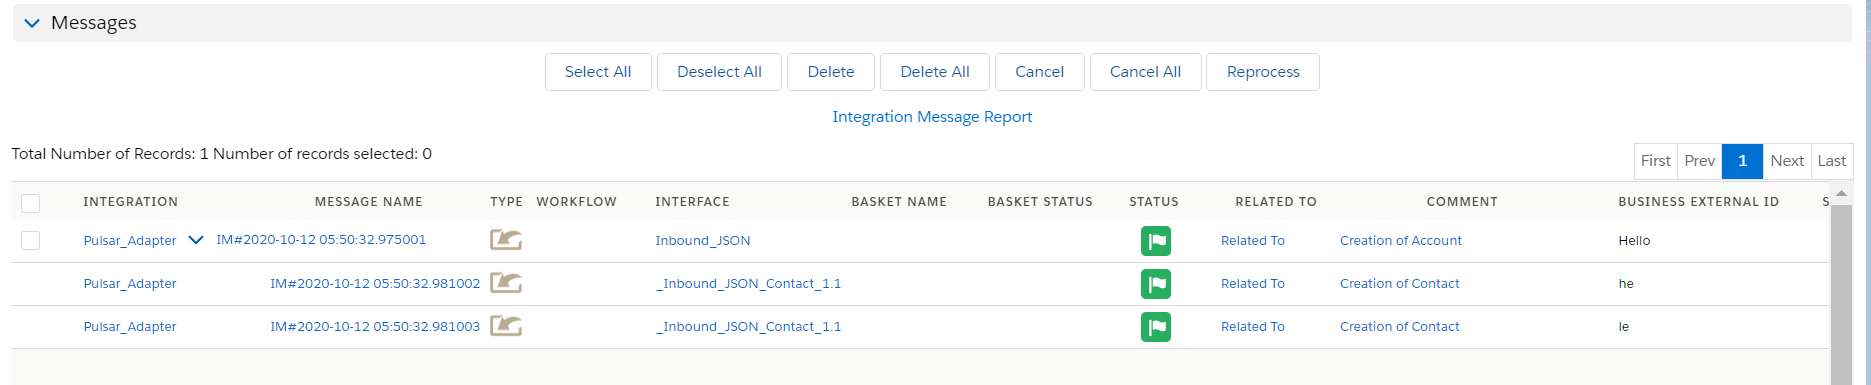
Step7: Message Monitoring:
Case 2 #
How to use an Agent Pulsar adapter for Producer?
- Users will learn how the Agent Pulsar adapter works for Producers. In simple words, an Agent pulsar adapter for Producer means Outbound Pulsar Adapter.
- Users need an Outbound Pulsar Adapter when we want to send data out from salesforce, where users need to create a topic first. From salesforce, we can send data messages to the API endpoint of our agent, and then we have a camel producer to publish into the topic invoice, which is on the Kafka side.
- This is the outbound process because we are sending data out here, It plays the role of Producer.
Step1: Click on Agent Control Board Tab
–How to use the Agent Control Board?
Since the user now completely understand; How to use the Agent Control Board, by hitting the upper link, now we understand the Architect of the Agent Control Board now follows below on Salesforce org.
- Use Case for file type CSV
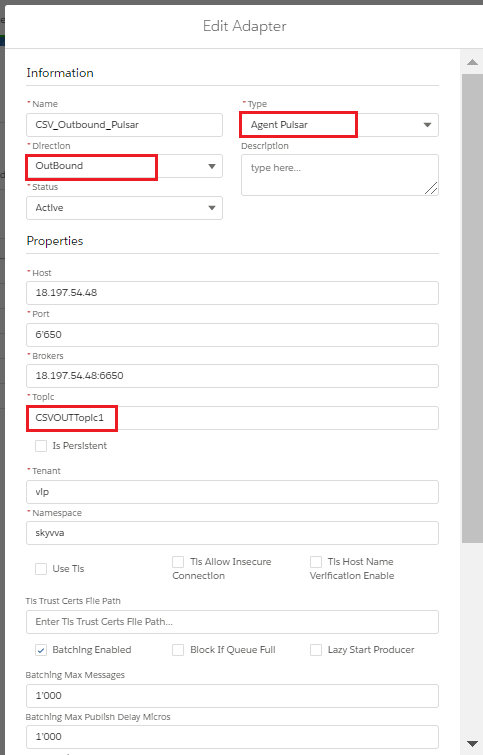
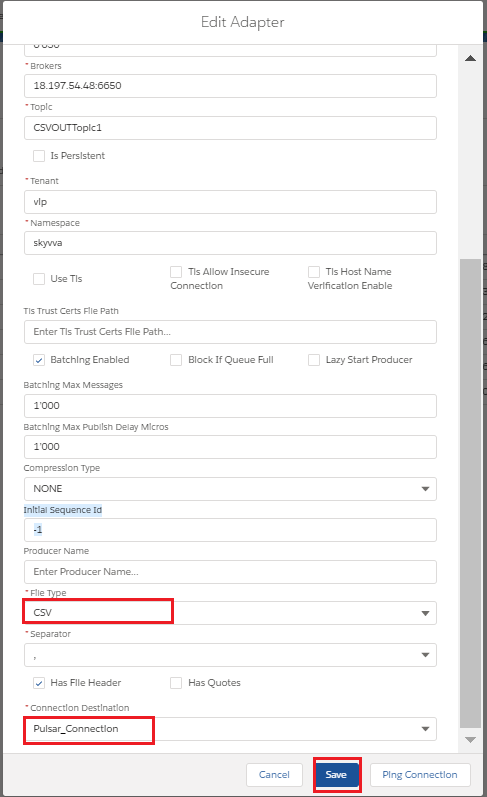
Step2: Create Adapter:
- Add any name in Topic and the topic will automatically be created on the Pulsar server.
- Select Direction Outbound.
- Select Type Agent Pulsar
- Select File Type.
- Select Connection Destination which we have created recently.
Step3: Configure Interface page:
- Create Integration.
- Create Interface.
- Add Metadata Provider, Istructure Repository, and Message type to the interface page as shown below.
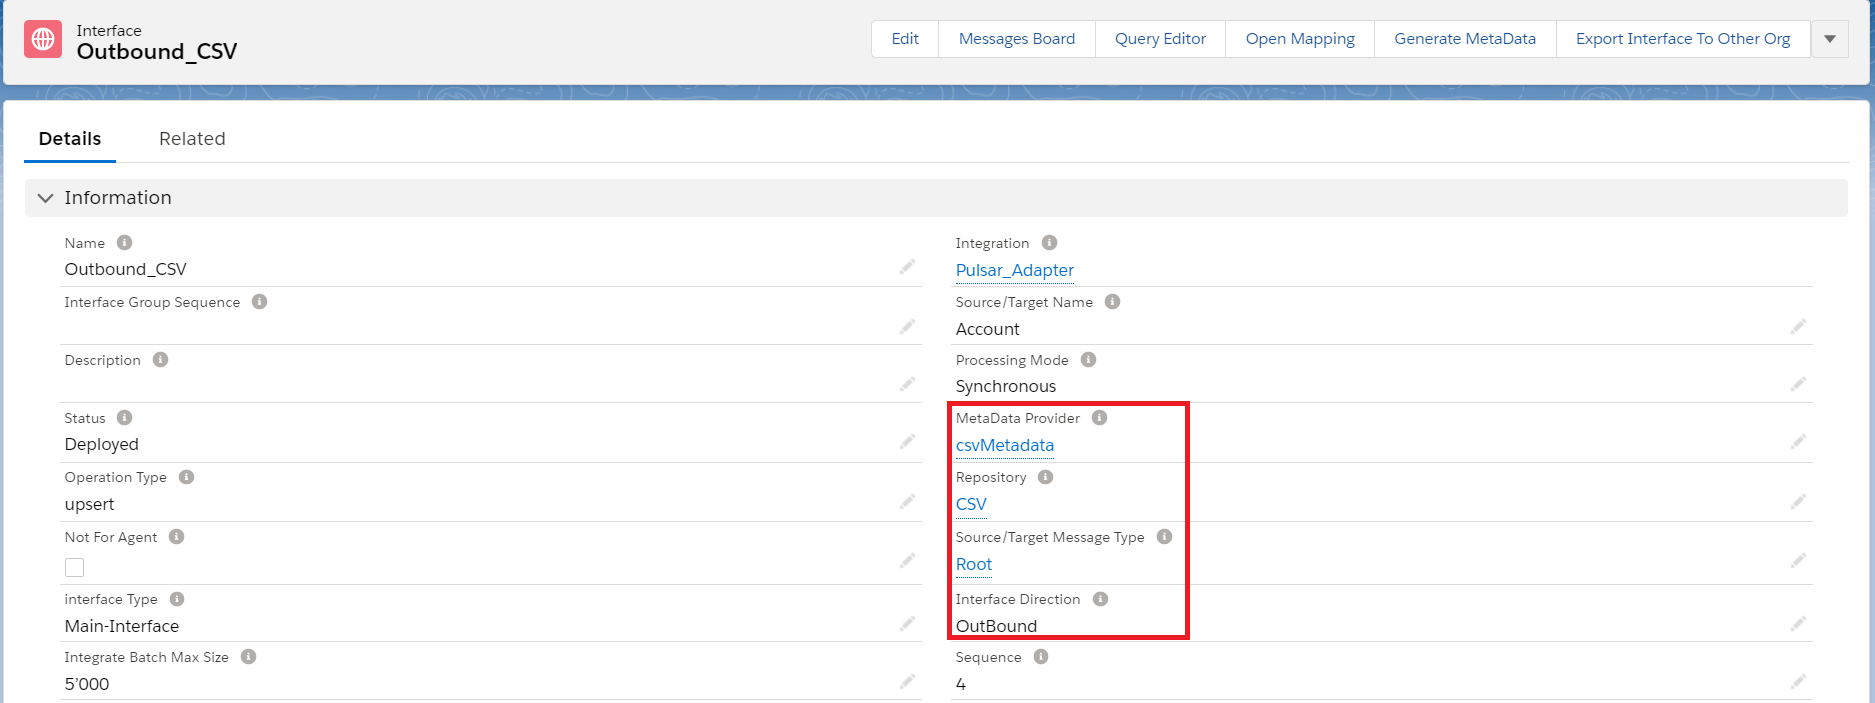
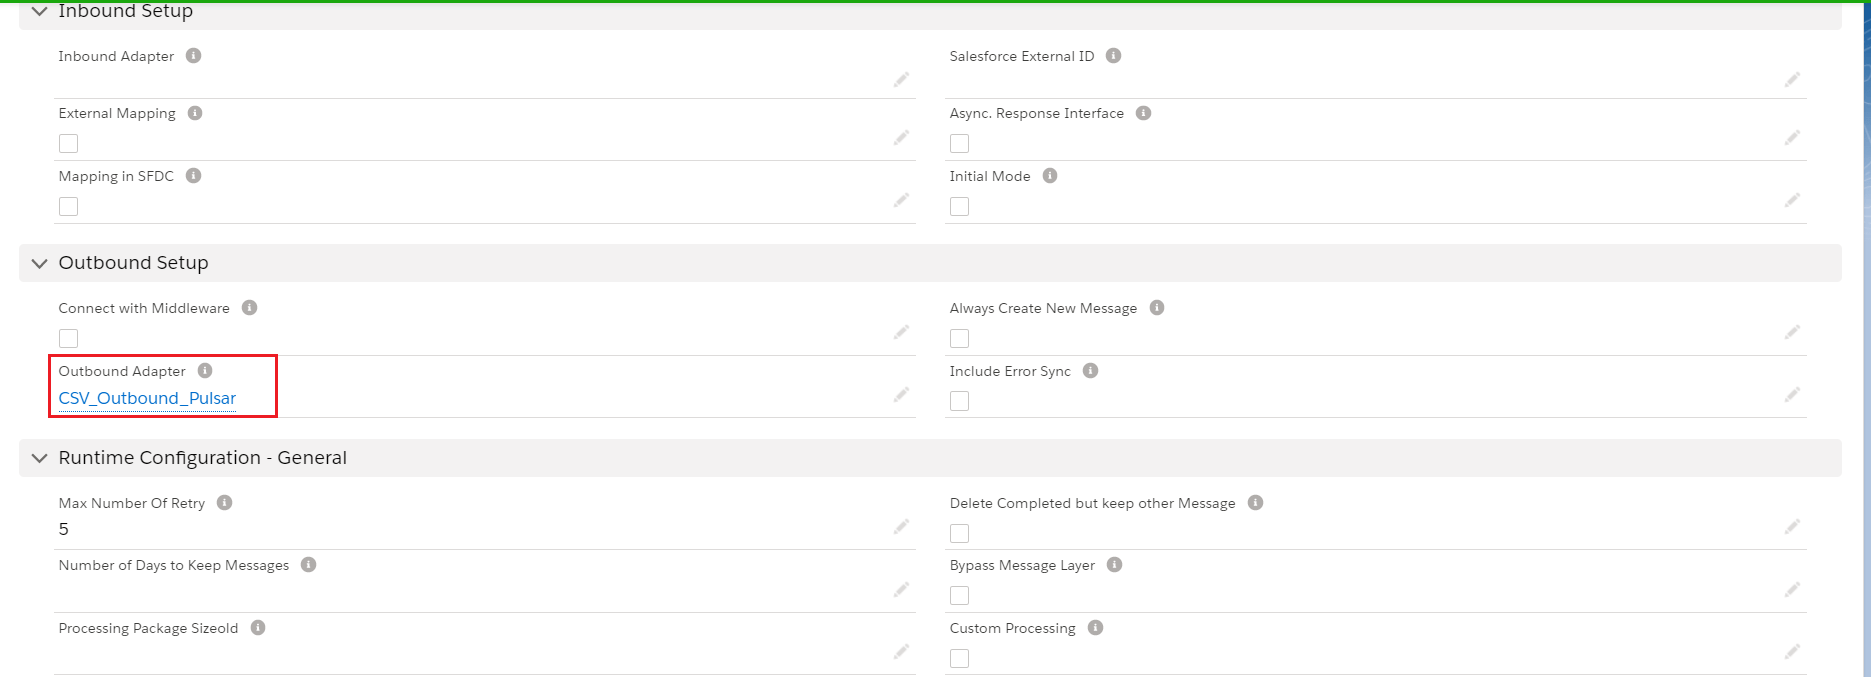
- Add Inbound Adapter
Step4: Do Mapping:
Step5: Callout:
[aux_code language=”javascript” theme=”tomorrow” title=”” extra_classes=””]
skyvvasolutions.CallOutControl c = new skyvvasolutions.CallOutControl();
c.returnJSONComplete=true;
c.actionDoIntegrate=true;
c.isCreateMessage=true;
String[] ids= new String[]{‘0016E00001CHaYWQA1′,’0016E00001CHaYXQA1’}; //Account Record Ids
List<skyvvasolutions.CalloutResponse> result = skyvvasolutions.Iservices.invokeCalloutV3(‘Agent_Pulsar_Adapter’,’Pulsar_CSV_Outbound’,ids,’SYNC’,c);
[/aux_code]
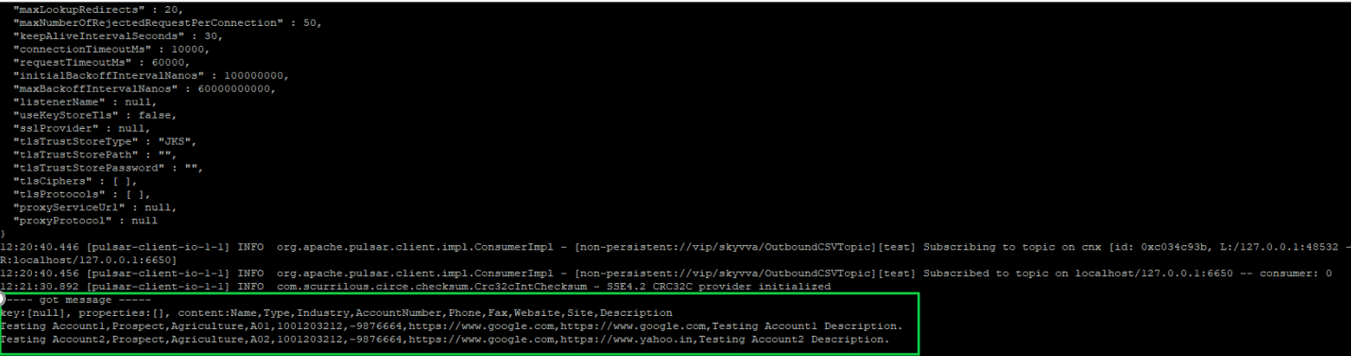
Step6: Callout to pulsar server:
[aux_code language=”javascript” theme=”tomorrow” title=”” extra_classes=””]
Command 🙁 You need to execute below command on ec2 new agent-tools-server command prompt).
pulsar-client consume -n 0 -s test non-persistent://vip/skyvva/OutboundCSVTopic
Separator: Comma ( , ) OR Semi Colon ( ; ) OR Tab ( Tab ) OR Pipe ( | )
[/aux_code]
Step7: Message Monitoring: