Introduction #
As you know, our inbound processing requires the definition of external keys to create a unique key for upserting, deleting, and updating data in Salesforce. We have enhanced our mapping tool to handle complex external key definitions and added a ‘Define External Key’ button to the Mapping tool. This button allows you to define keys using AND or OR clauses customize the logic, or create a custom class to build your own key logic.
We provide these four options to build the external Key
- All of the conditions are met (AND) means this is the default we currently have as the only available solution.
- Any of the conditions are met (OR) means you want to provide. With this option, we can have 3 fields f1, f2, and f3 defined as key fields. But when the sender sends only f1, we use f1 as the key. If the sender sends f1 and f2 we use these two fields, and if it sends all three fields f1, f2, and f3 we use these 3 fields and choose one of them.
- Customize the logic means the user has to define the logic like 1 AND (2 OR 3)
- Custom Class means you can build your own key logic by creating your apex code.
In this section, you will learn how to define the external key with a new design as following below:
Option 1: All of the conditions are met (AND) #
Pre-requisite
- Create Integration and Inbound interface with operation upsert
- Create a message type
- Link a message type for the inbound interface
- To perform the mapping, click the ‘Open Mapping’ button located on the ‘Interface Detail’ page.

- Mapping
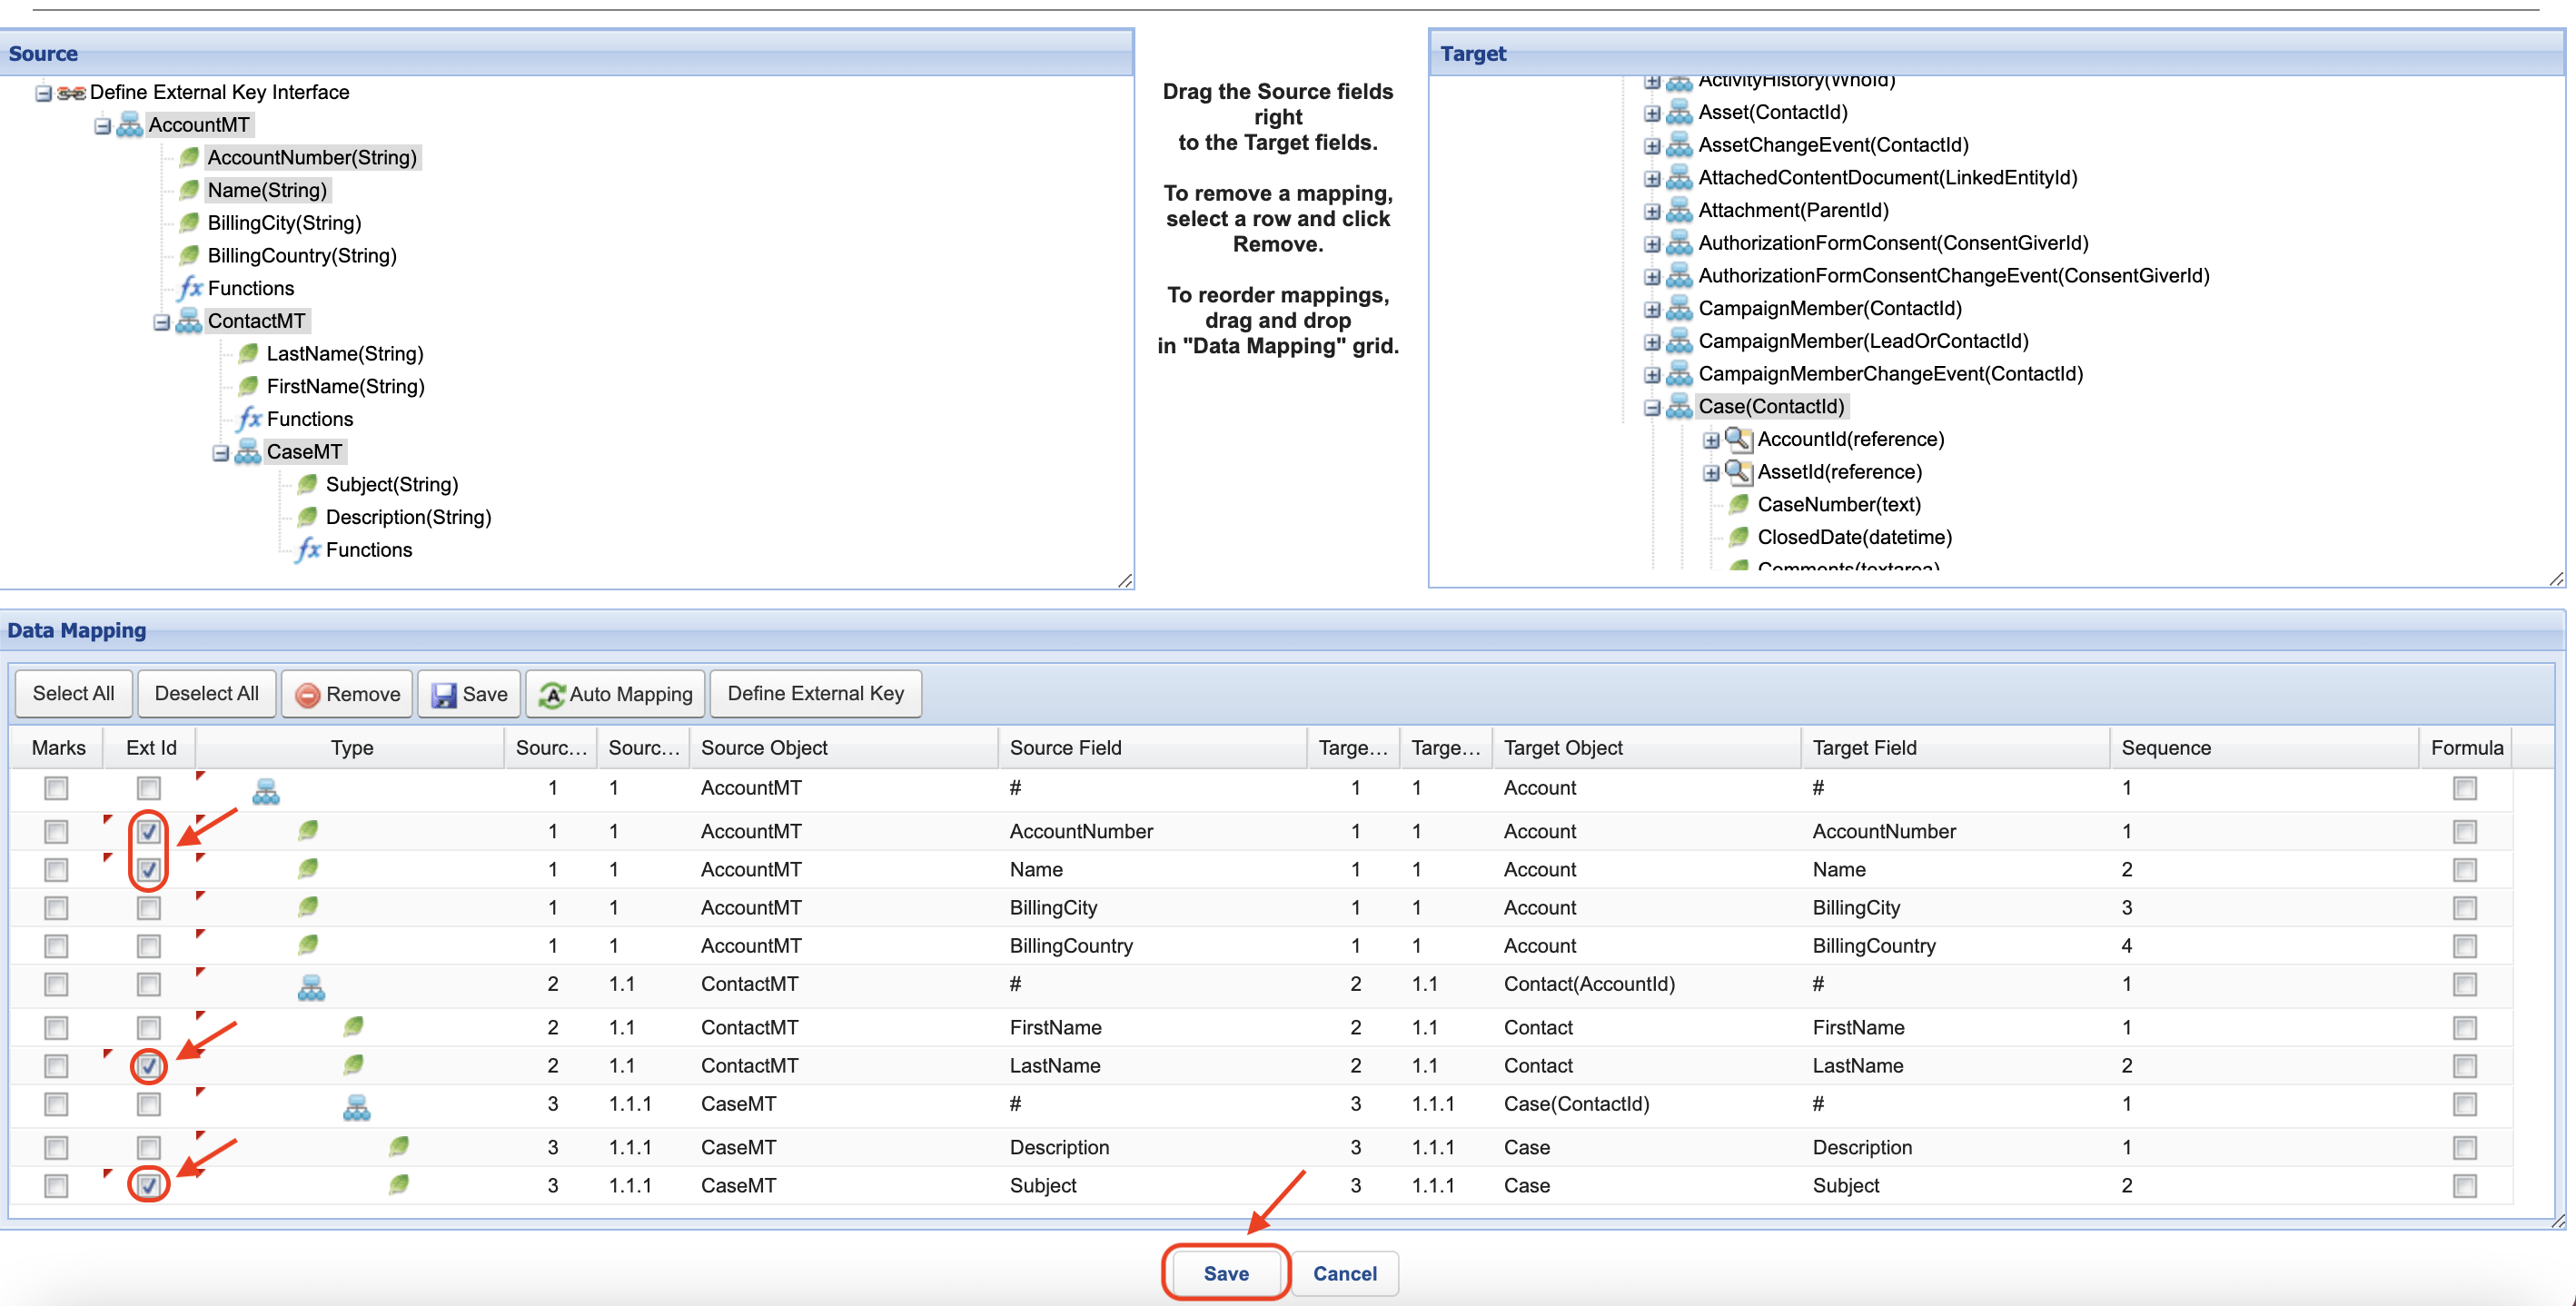
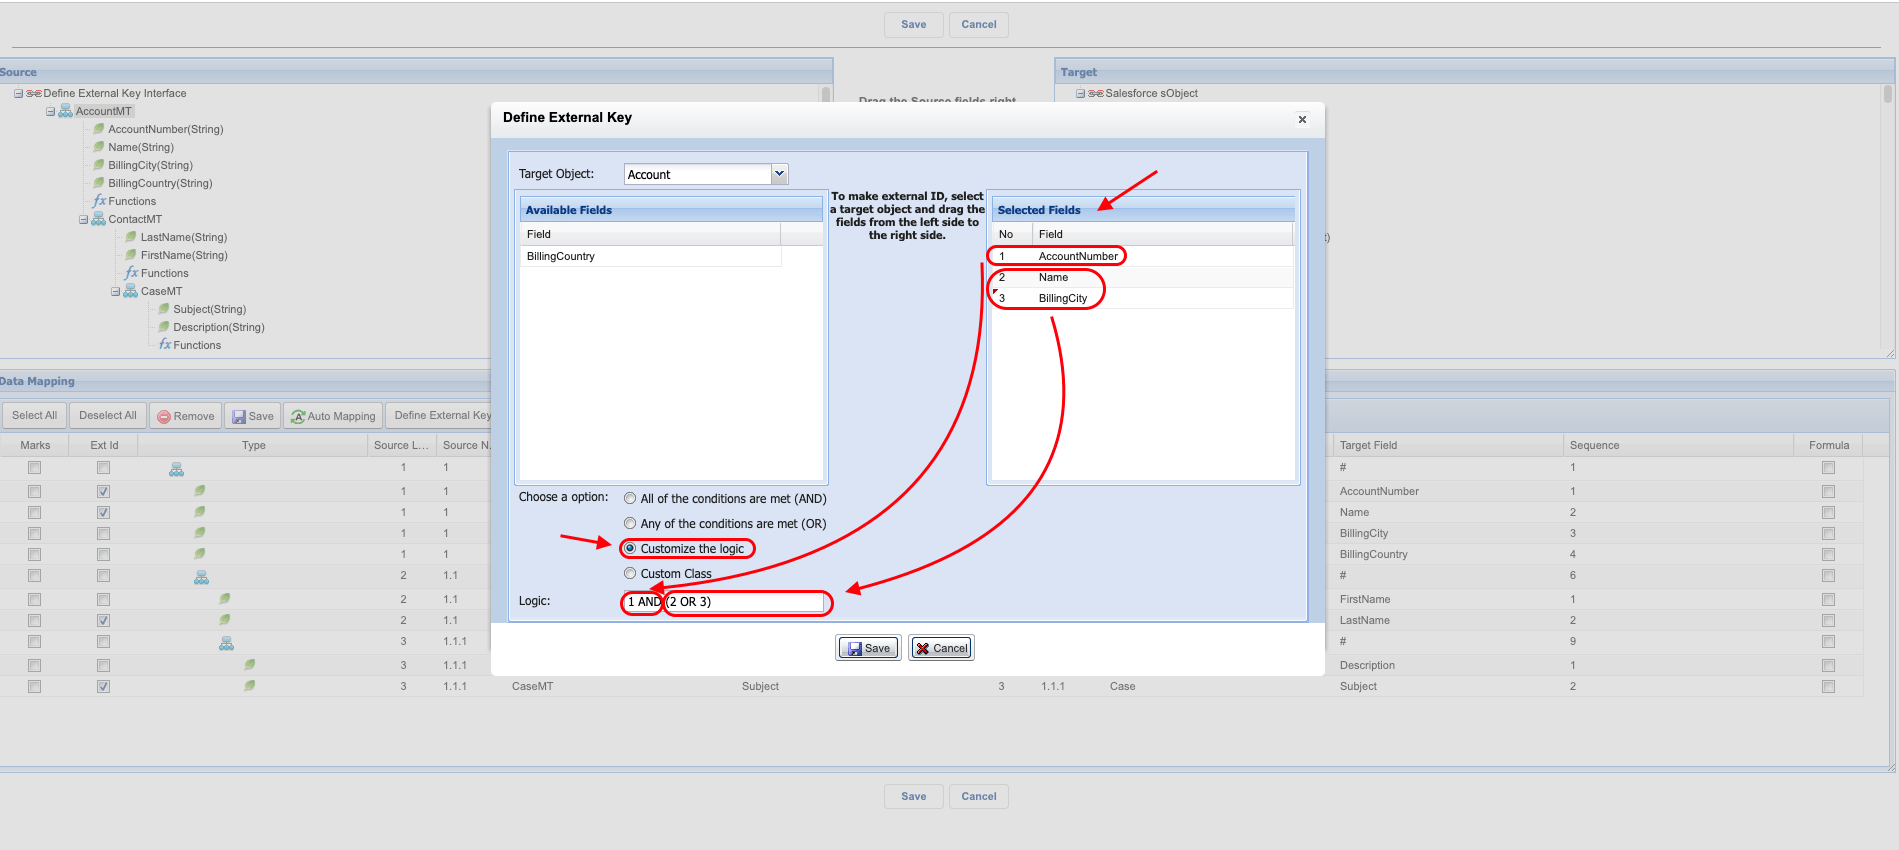
- To define a specific external key for mapping, click the ‘Define External Key’ button. This will display a pop-up screen that allows you to select the node in the target object. Once you have made your selection, the screen will display the fields in the ‘Available Fields’ column. You can then drag and drop the desired fields from the ‘Available Fields’ to the ‘Selected Fields’ column to create the key. If you have a sub-node, you will need to append an arrow icon to the selected node in order to set the external key for the sub-node.
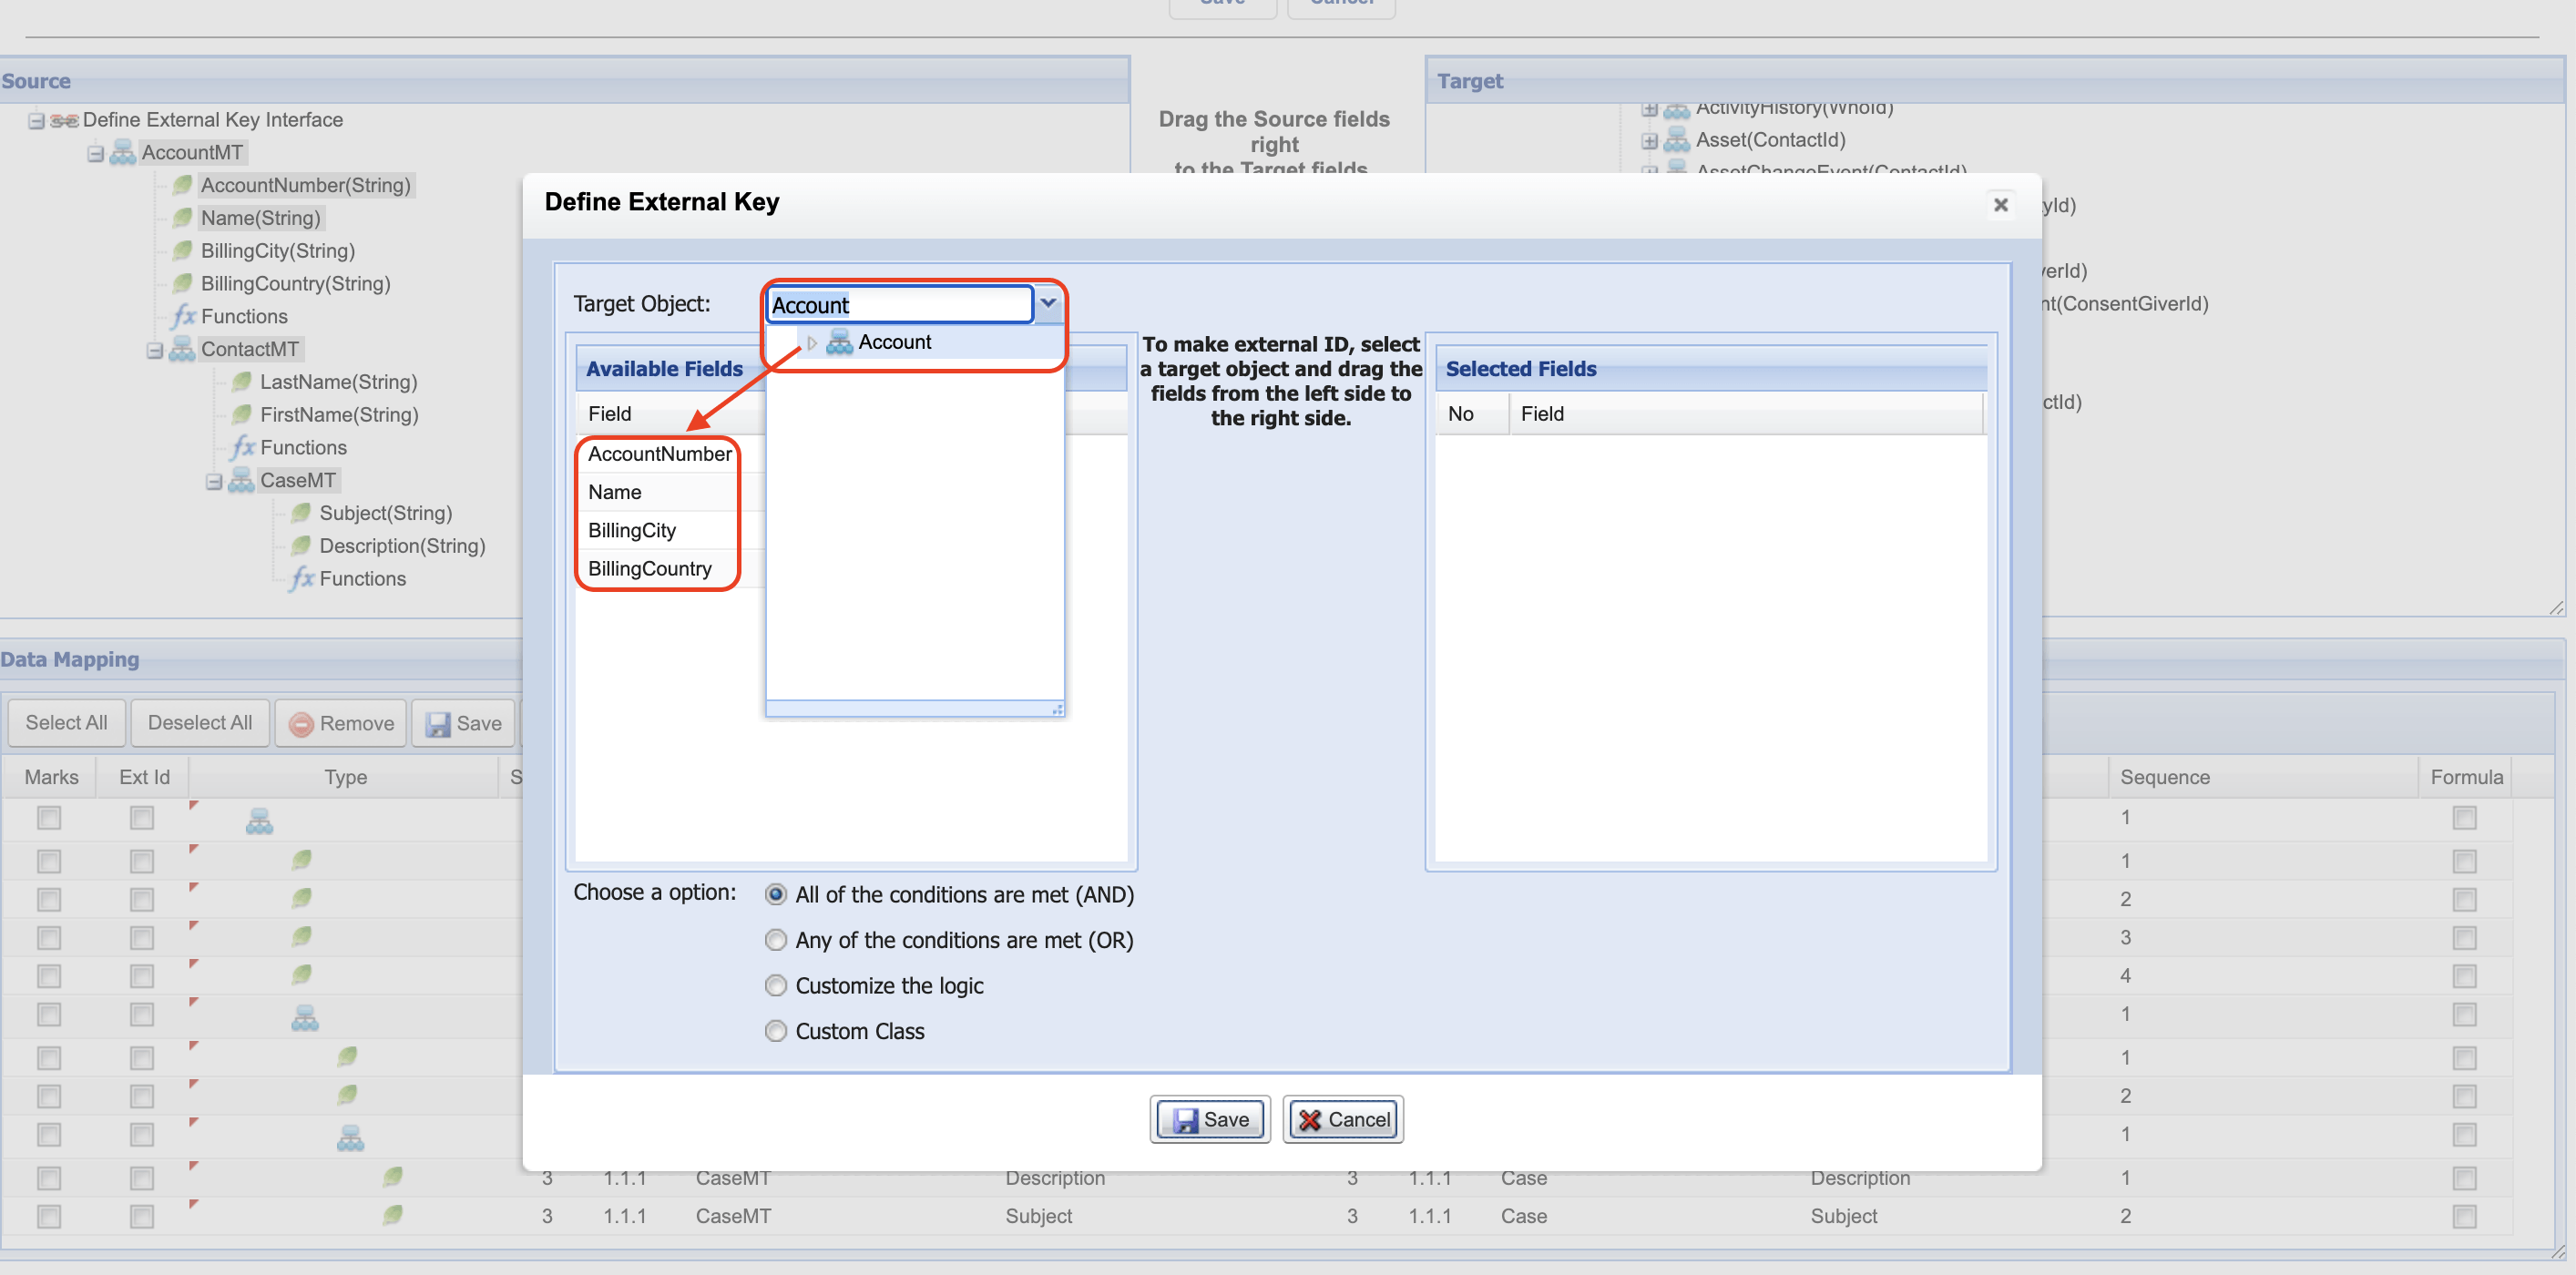
- In this case, we will show you how to use the ‘All of the conditions are met (And)’ option to define the external key. This option is already selected by default.
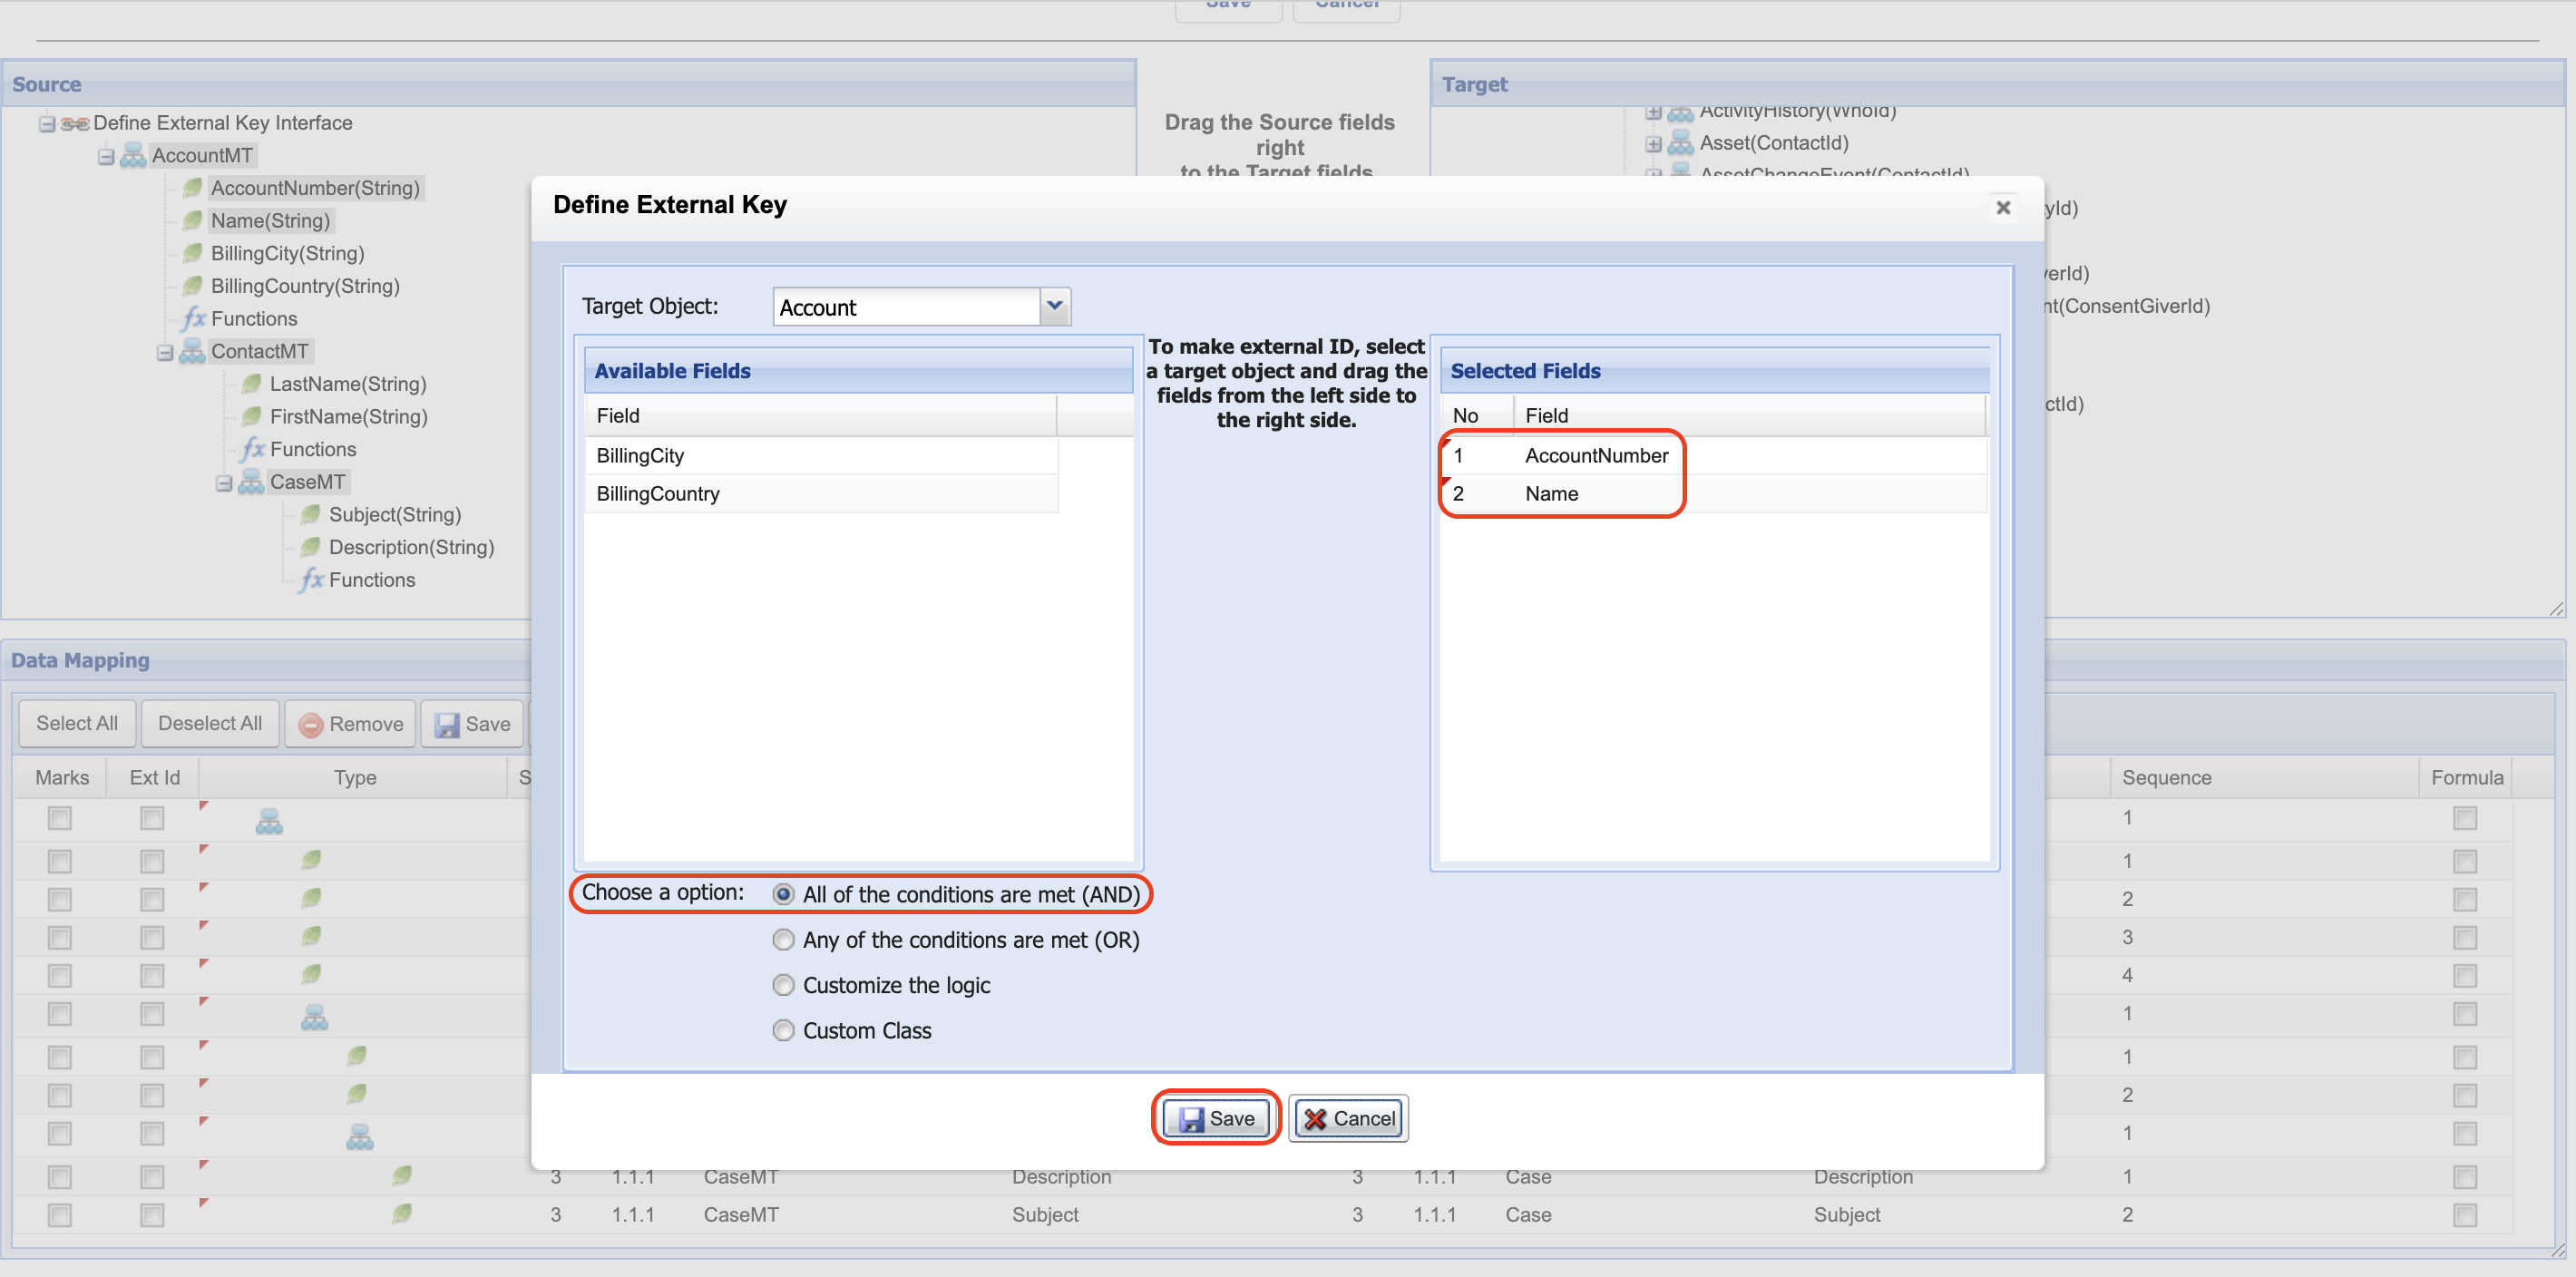
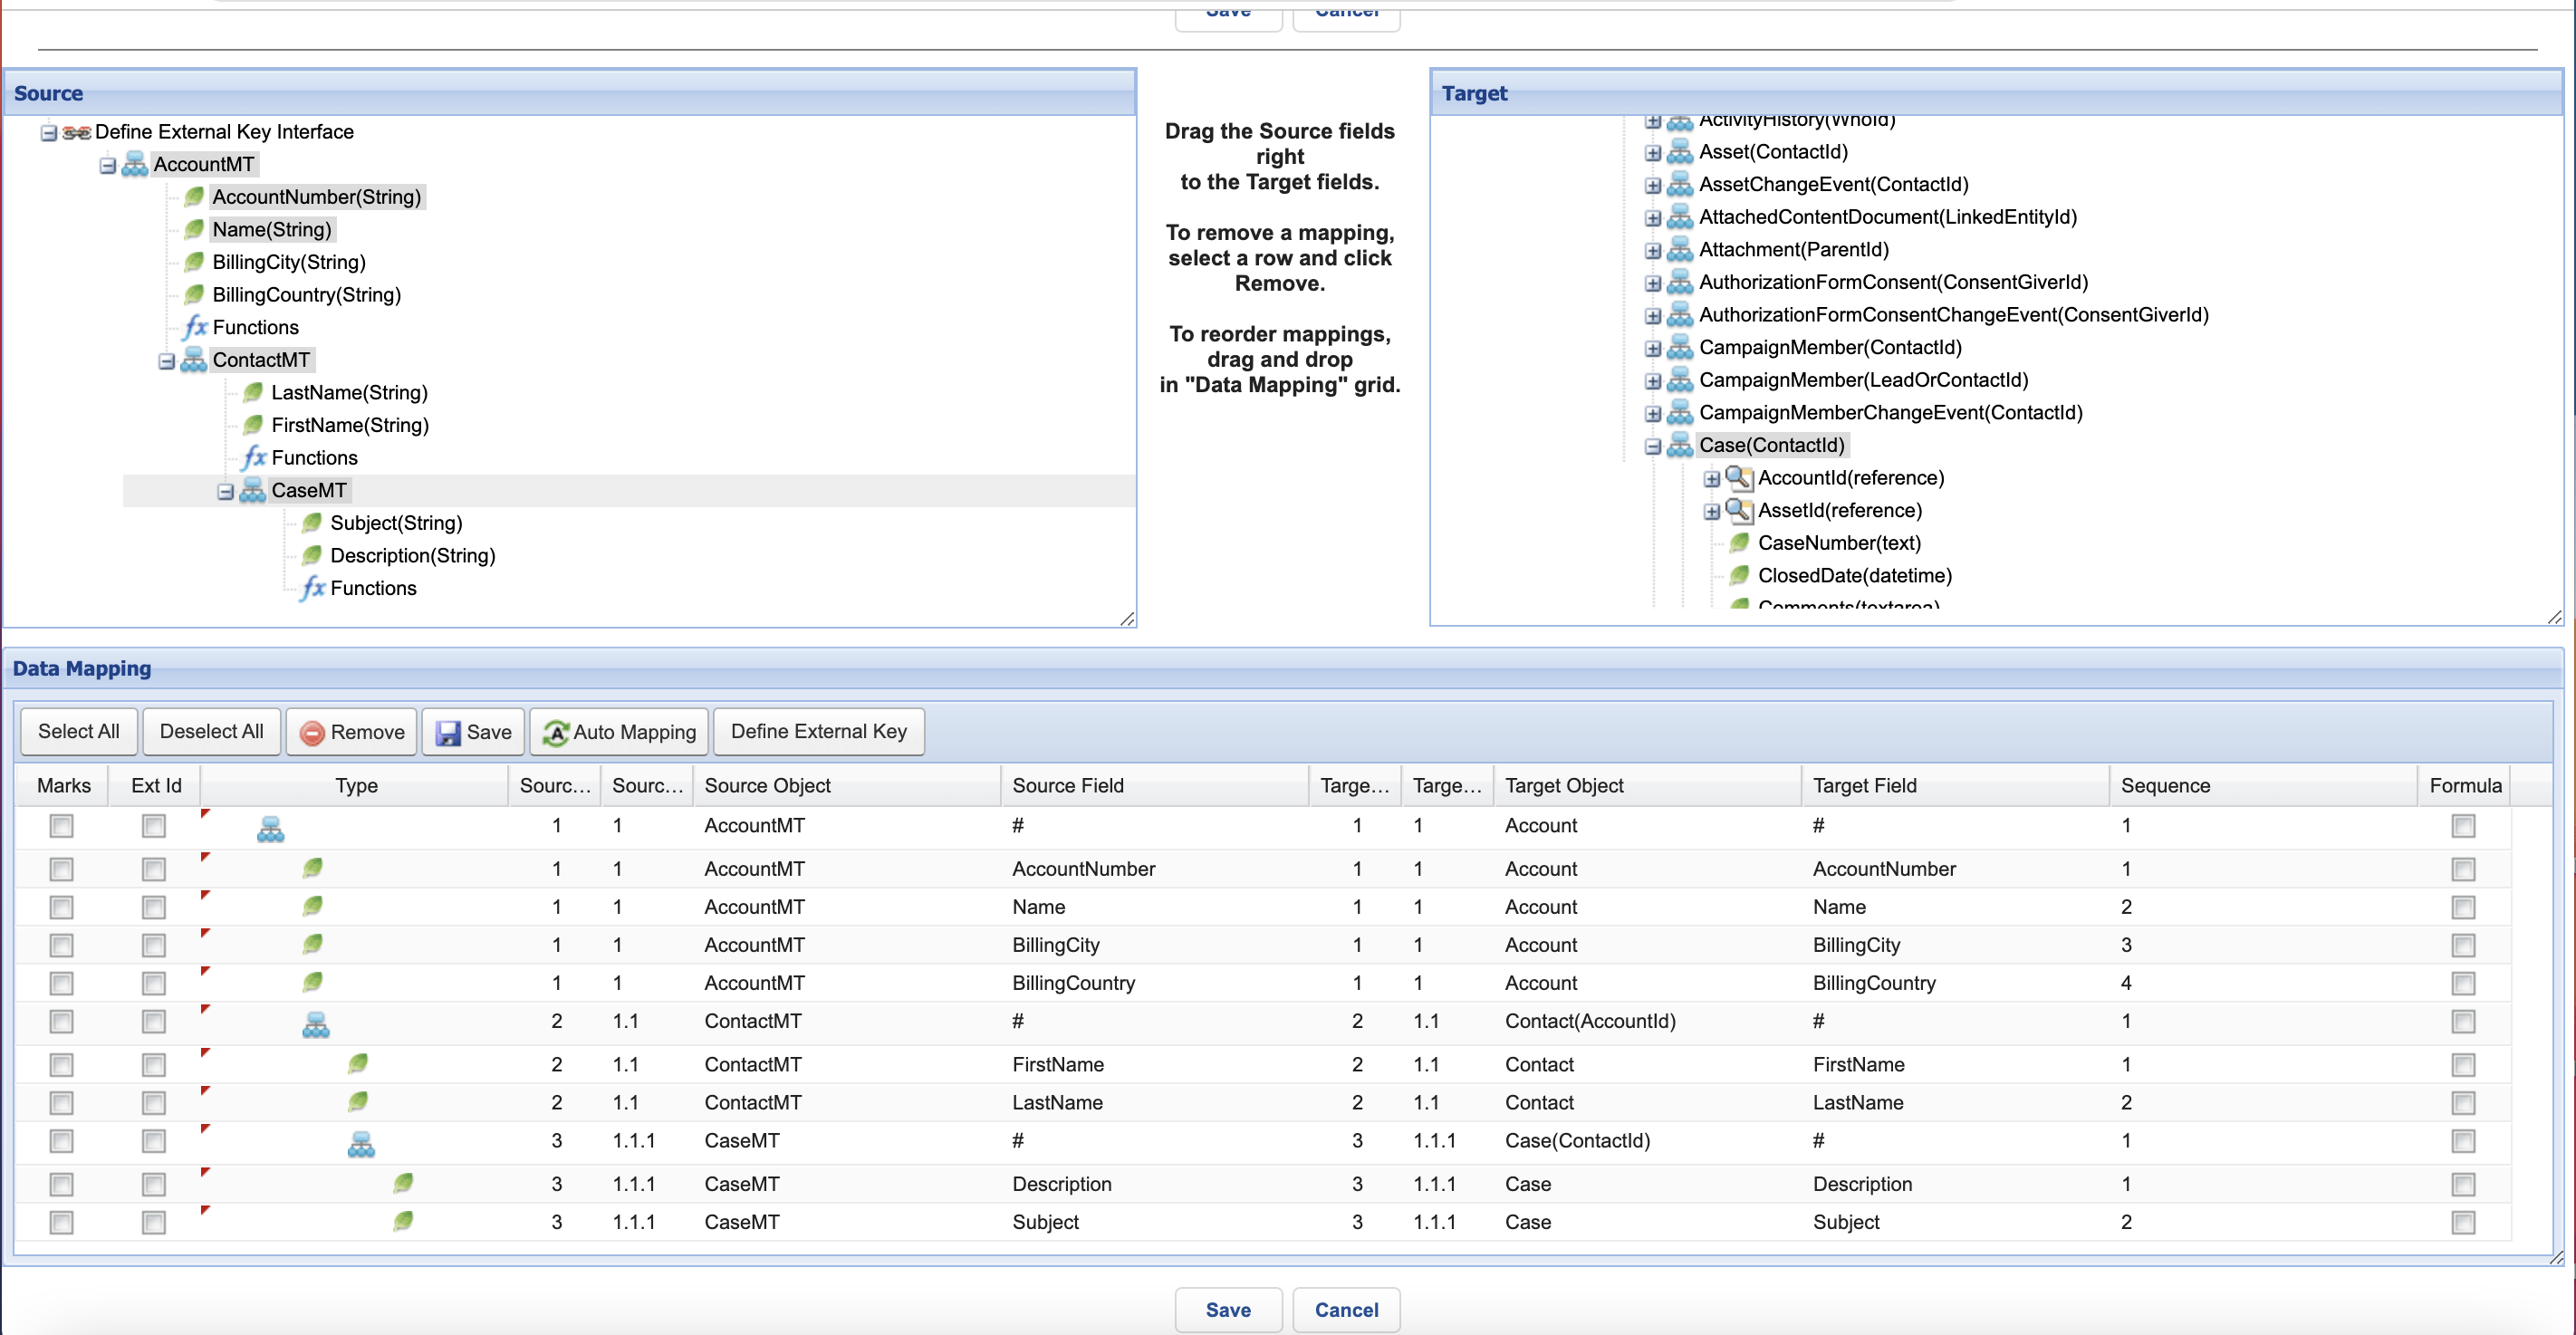
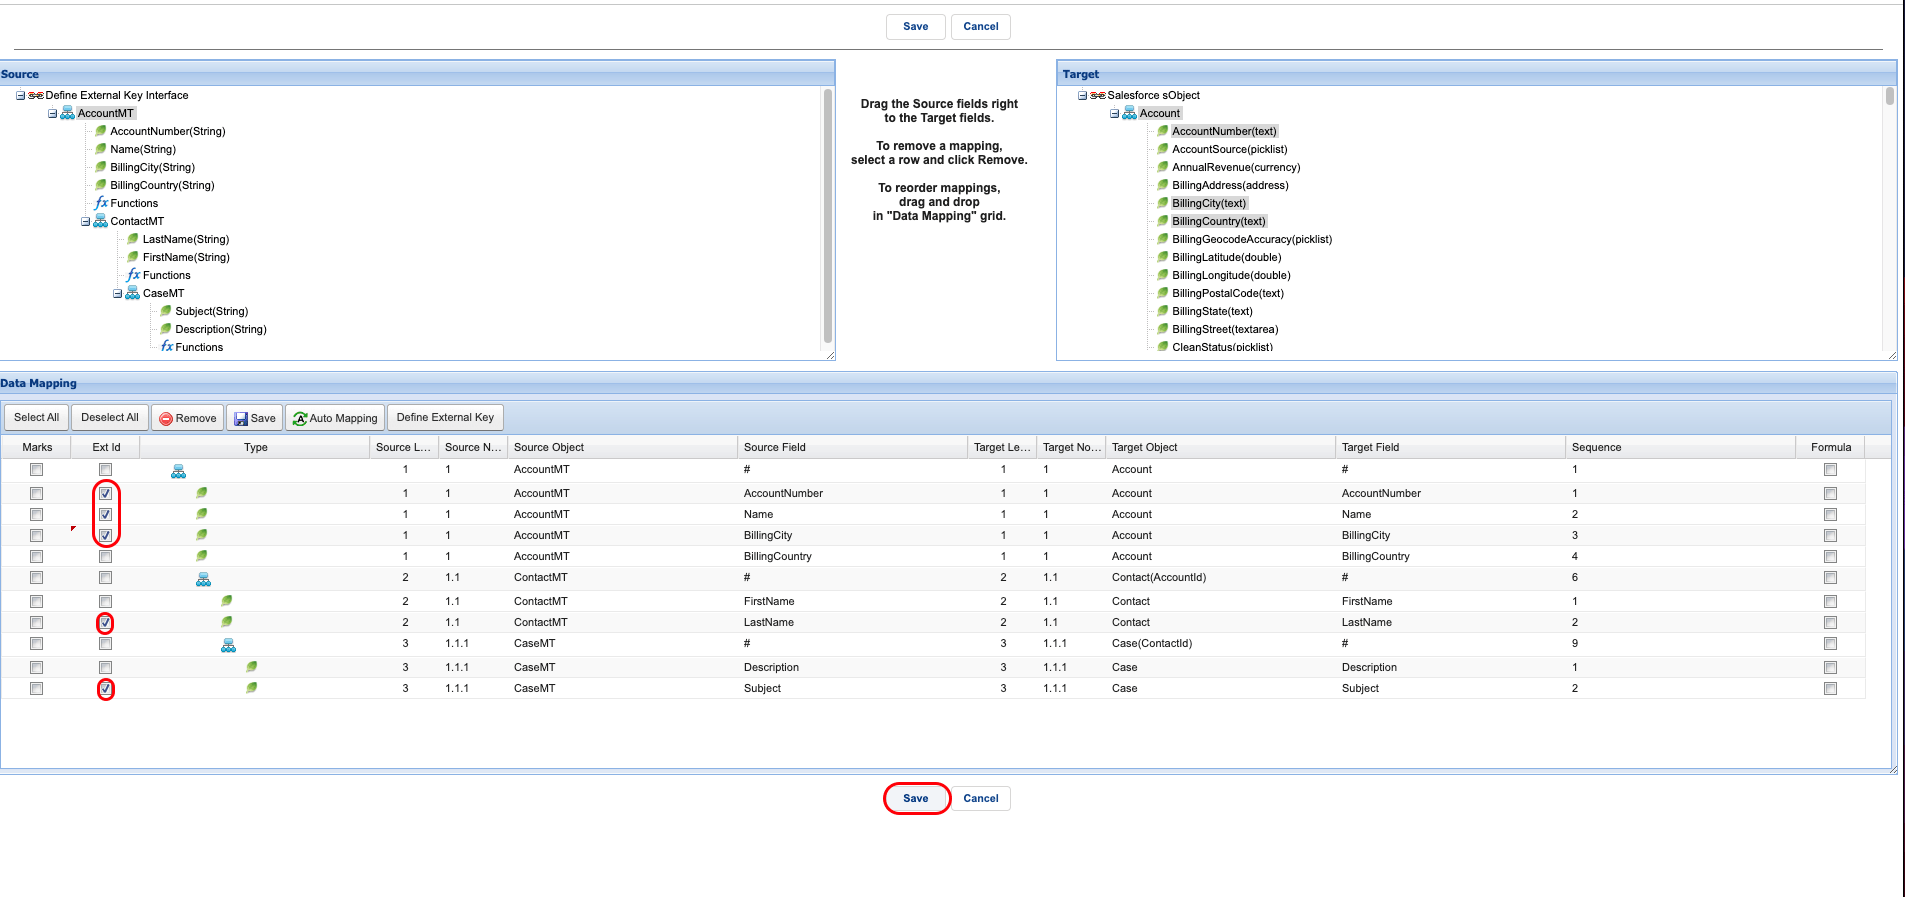
We have now selected two fields, AccountNumber and Name, for the Account object to create the external key. These fields are combined to form the external key. Additionally, we have set the LastName field for Contact and Subject as keys. Once you have finished, please click the ‘Save’ button.
- Here is the mapping after we have defined the external key. Please click the ‘Save’ button to save the mapping record.
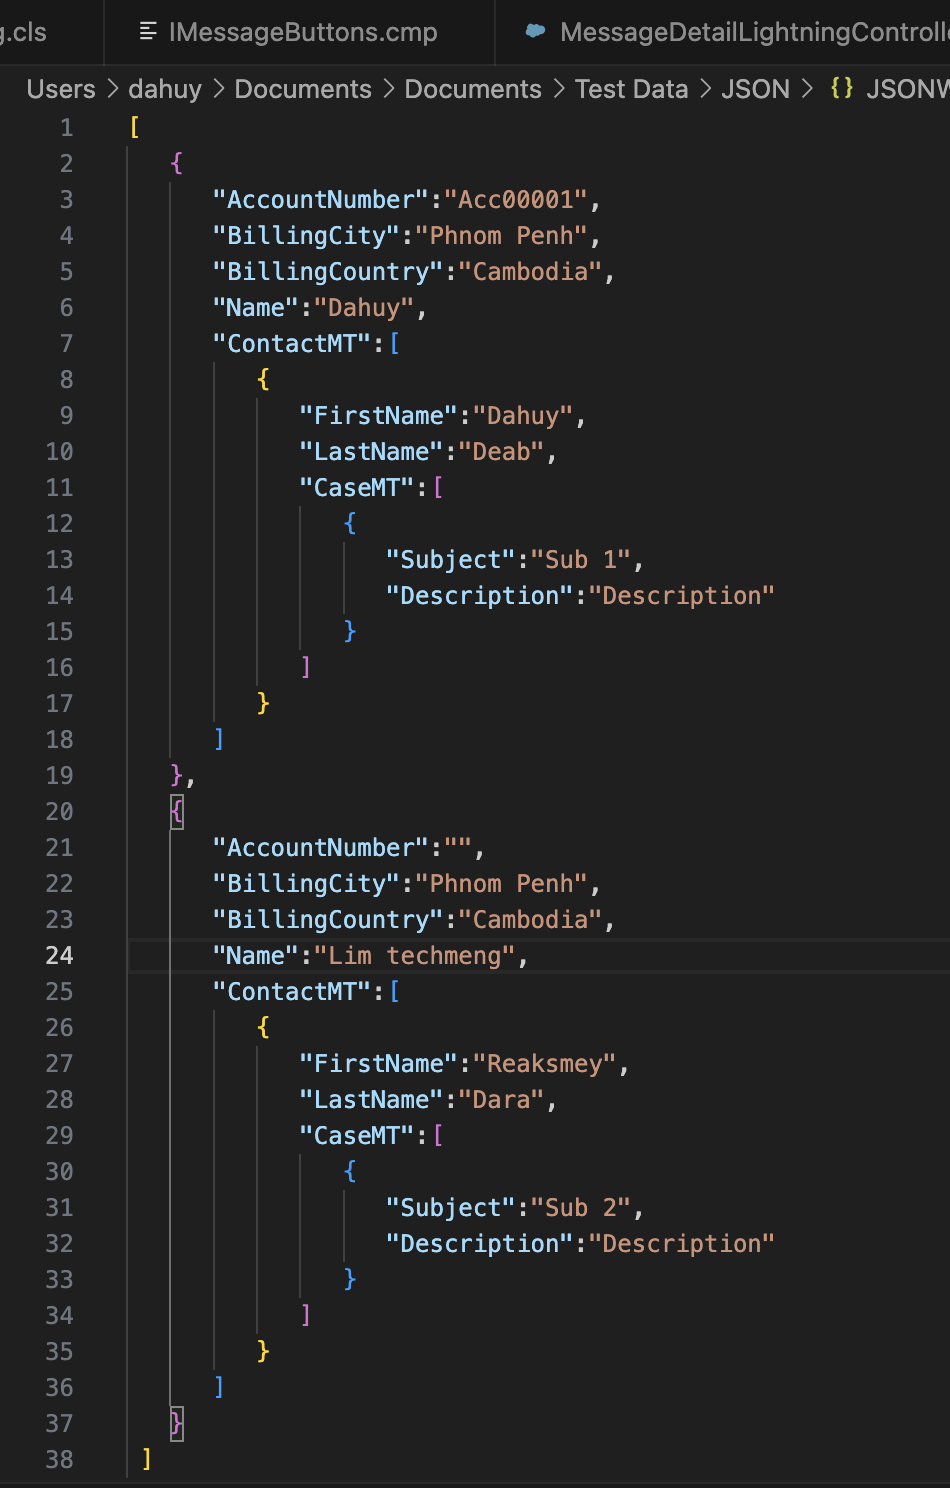
- Here is the same JSON payload

As an example, we use our SKYVVA Data Loader to push the sample JSON file above
- Enter to Integration Detail Page, then click the Data Loader link in the Custom Links section.

- Choosing Import Data Function.
- Select Interface and click next.
- Select Format Data Type and click next.
- Click Upload file to choose a file and click the upload button.
- Select records and click the push button.
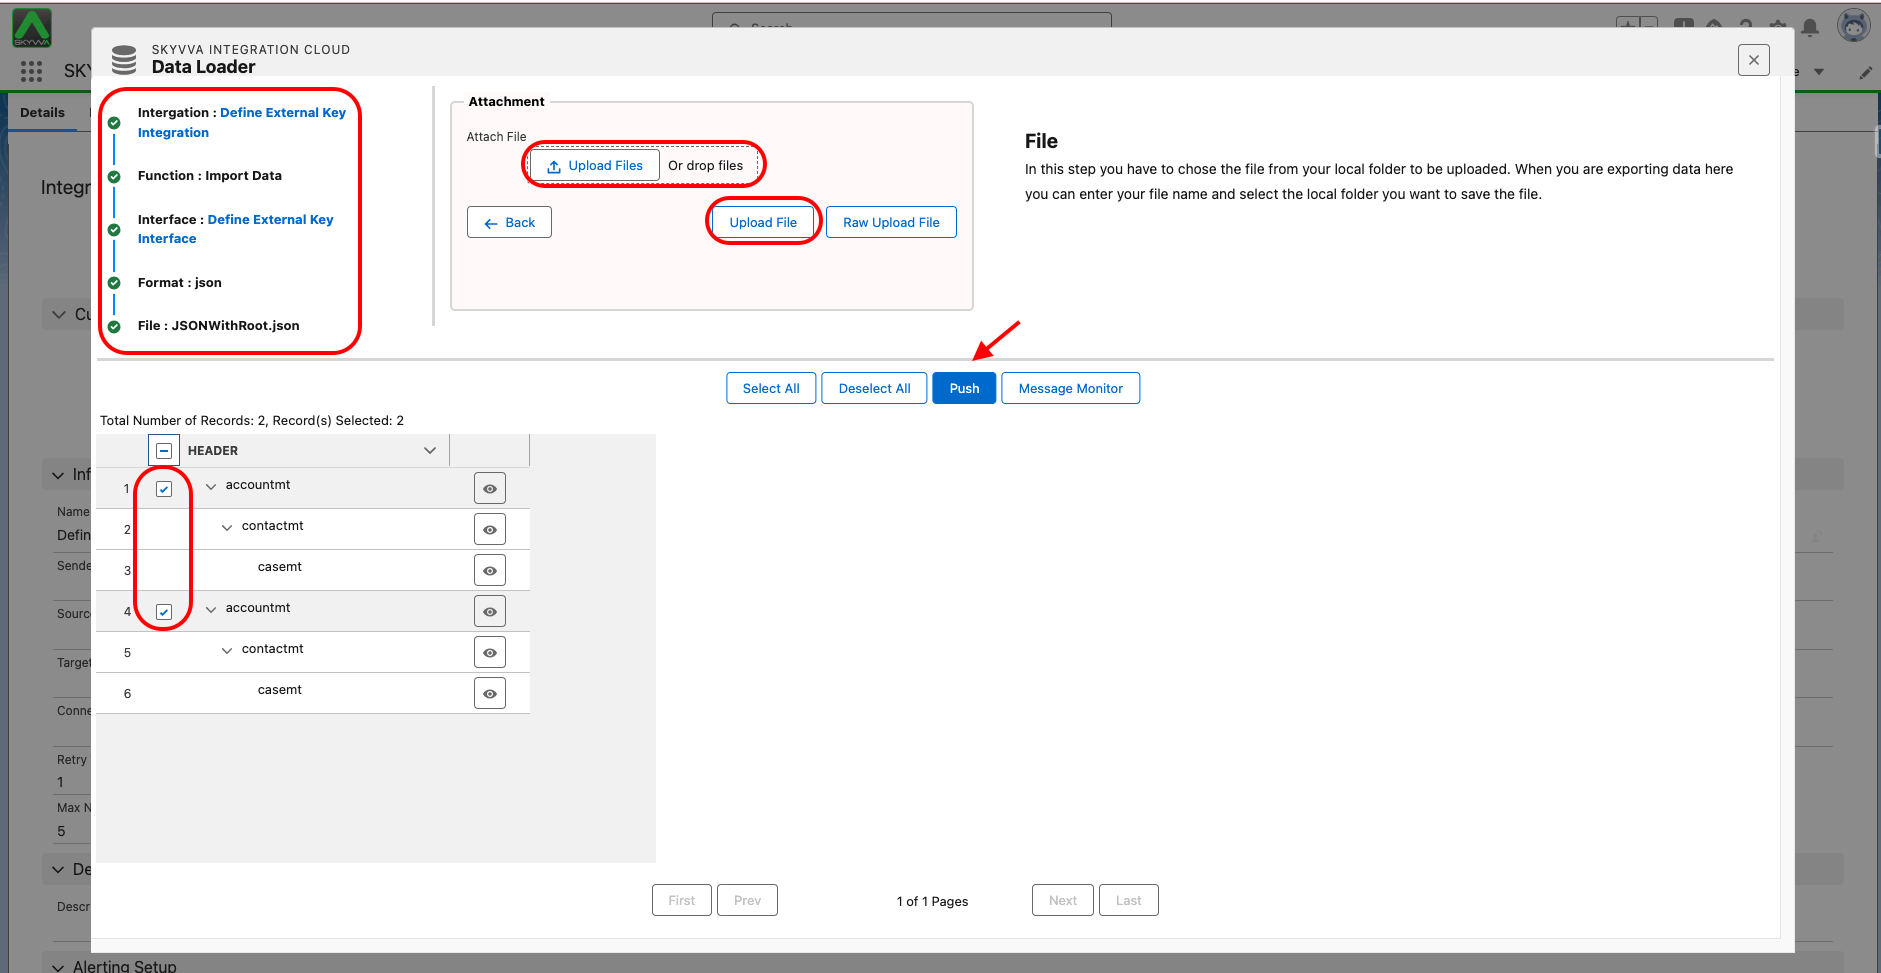
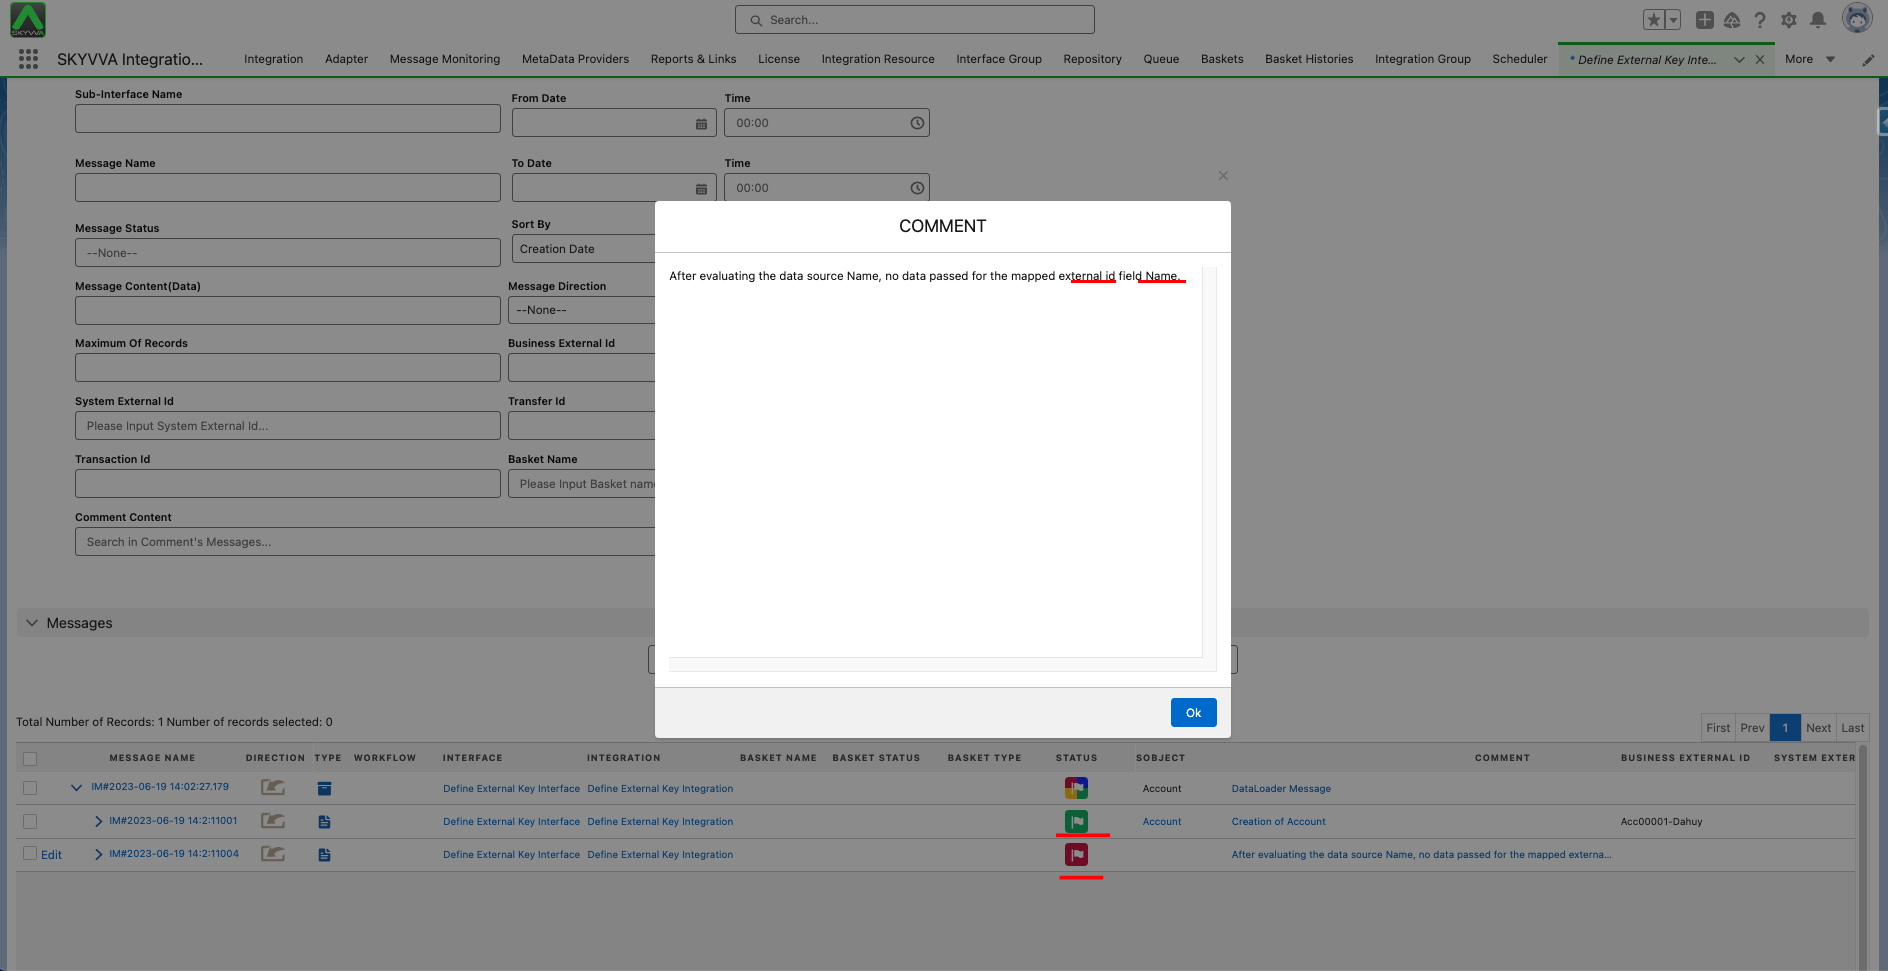
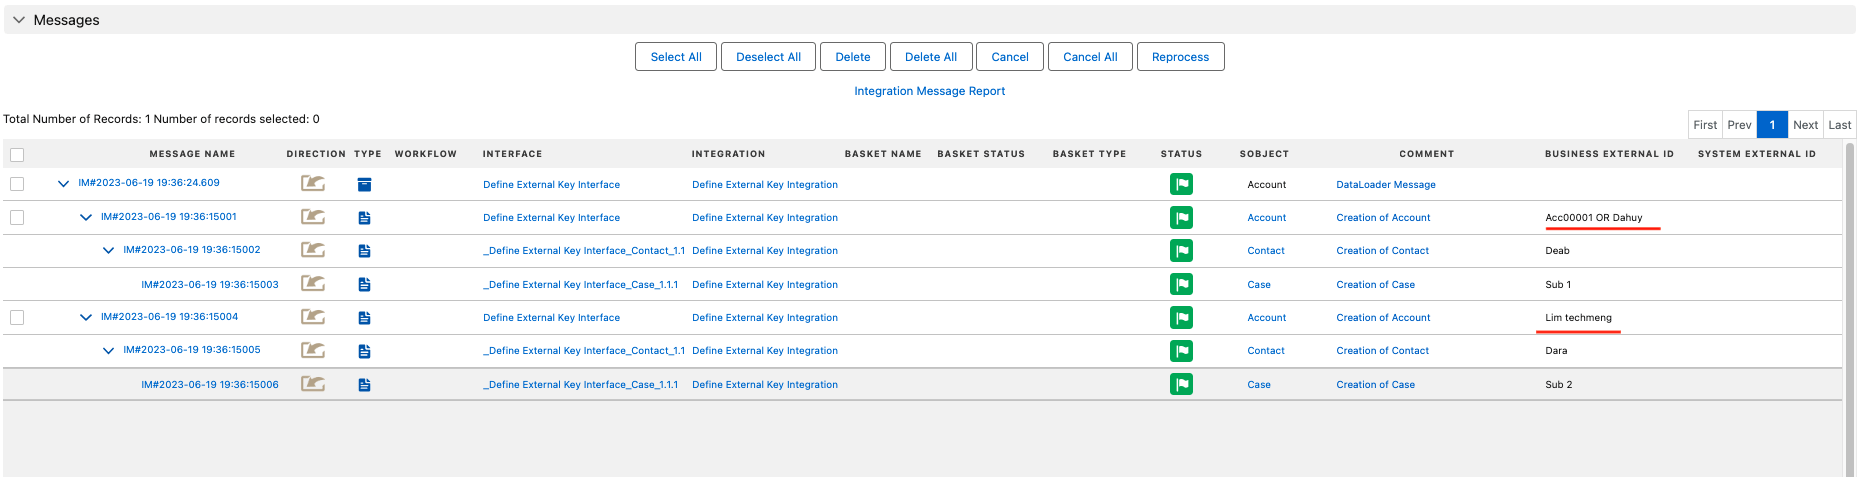
As a result, the first Account record will be successfully upserted because it has both external keys, namely the AccountNumber and Name fields. However, the second Account record will not be upserted because it is missing the Name field, which serves as the external key.
Option 2: Any of the conditions are met (OR) #
Pre-requisite
- Create Integration and Inbound interface with operation upsert
- Create a message type
- Link a message type for the inbound interface
- To perform the mapping, click the ‘Open Mapping’ button located on the ‘Interface Detail’ page.
- Mapping
- To define a specific external key for mapping, click the ‘Define External Key’ button. This will display a pop-up screen that allows you to select the node in the target object. Once you have made your selection, the screen will display the fields in the ‘Available Fields’ column. You can then drag and drop the desired fields from the ‘Available Fields’ to the ‘Selected Fields’ column to create the key. If you have a sub-node, you will need to append an arrow icon to the selected node in order to set the external key for the sub-node.
- In this case, we will show you how to use the ‘All of the conditions are met (OR)’ option to define the external key.
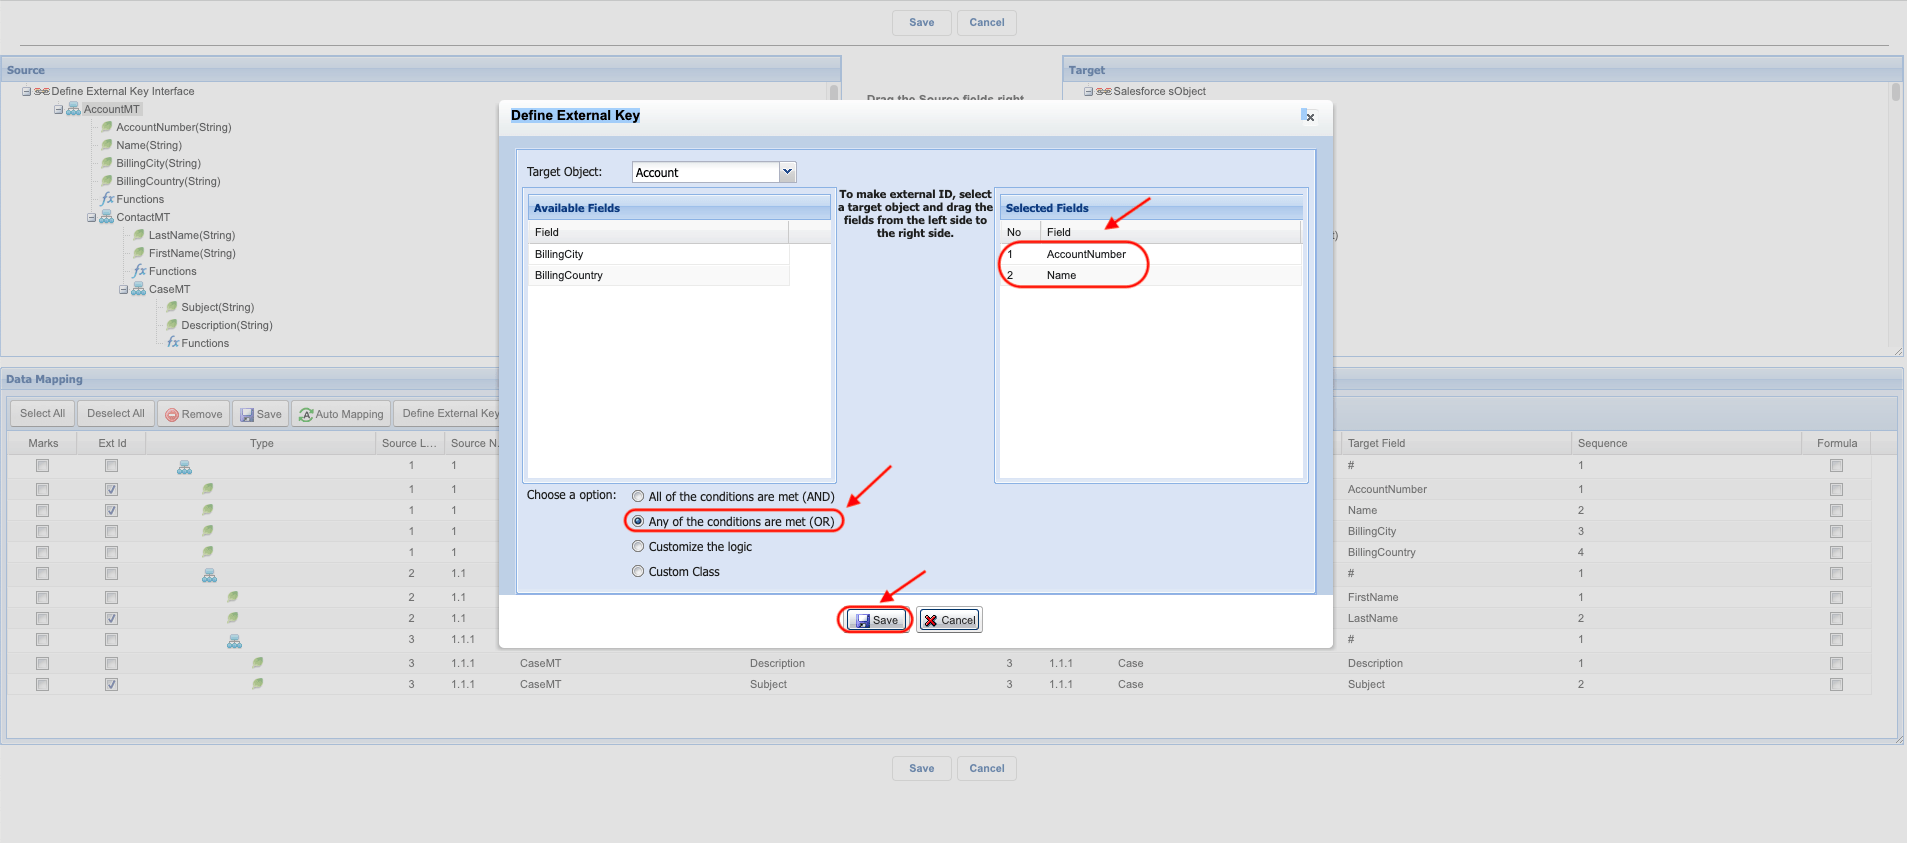
We have now selected two fields, AccountNumber and Name, for the Account object to create the external key. Additionally, we have set the LastName field for Contact and Subject as keys, and then select ‘Any of the conditions are met (OR)’. Once you have finished, please click the ‘Save’ button.
- Here is the mapping after we have defined the external key. Please click the ‘Save’ button to save the mapping record.
- Here is the same JSON payload
As an example, we use our SKYVVA Data Loader to push the sample JSON file above
- Enter to Integration Detail Page, then click the Data Loader link in the Custom Links section.
- Choosing Import Data Function.
- Select Interface and click next.
- Select Format Data Type and click next.
- Click Upload file to choose a file and click the upload button.
- Select records and click the push button.
As a result, both Account records will be successfully upserted because the ‘OR’ clause will ensure that data is upserted as long as any of the selected fields for the external key have a value.
Option 3: Customize the logic #
Pre-requisite
- Create Integration and Inbound interface with operation upsert
- Create a message type
- Link a message type for the inbound interface
- To perform the mapping, click the ‘Open Mapping’ button located on the ‘Interface Detail’ page.
- Mapping
- To define a specific external key for mapping, click the ‘Define External Key’ button. This will display a pop-up screen that allows you to select the node in the target object. Once you have made your selection, the screen will display the fields in the ‘Available Fields’ column. You can then drag and drop the desired fields from the ‘Available Fields’ to the ‘Selected Fields’ column to create the key. If you have a sub-node, you will need to append an arrow icon to the selected node in order to set the external key for the sub-node.
- In this case, we will show you how to use the ‘Customize the logic’ option to define the external key. With this option, you can define the logic using expressions such as ‘1 AND (2 OR 3)’.
We have now selected three fields, AccountNumber Name, and BillingCity for the Account object to create the external key. and then select ‘Customize the logic’ then please fill in the logic ‘1 AND(2 OR 3)’. Additionally, we have set the LastName field for Contact and Subject as keys, with the default option ‘All of the conditions are met (AND)’ . Once you have finished, please click the ‘Save’ button.
- Here is the mapping after we have defined the external key. Please click the ‘Save’ button to save the mapping record.
- Here is the same JSON payload
As an example, we use our SKYVVA Data Loader to push the sample JSON file above
- Enter to Integration Detail Page, then click the Data Loader link in the Custom Links section.
- Choosing Import Data Function.
- Select Interface and click next.
- Select Format Data Type and click next.
- Click Upload file to choose a file and click the upload button.
- Select records and click the push button.
Option 4: Custom Class #
Pre-requisite
- Create Integration and Inbound interface with operation upsert
- Create a message type
- Link a message type for the inbound interface
- To perform the mapping, click the ‘Open Mapping’ button located on the ‘Interface Detail’ page.
- Mapping
- To define a specific external key for mapping, click the ‘Define External Key’ button. This will display a pop-up screen that allows you to select the node in the target object. Once you have made your selection, the screen will display the fields in the ‘Available Fields’ column. You can then drag and drop the desired fields from the ‘Available Fields’ to the ‘Selected Fields’ column to create the key. If you have a sub-node, you will need to append an arrow icon to the selected node in order to set the external key for the sub-node.
- In this case, we will show you how to use the ‘Custom Class‘ option to define the external key. By using this option, you can define complex logic using your own custom class. Please follow an example to create the apex class to define the external key.
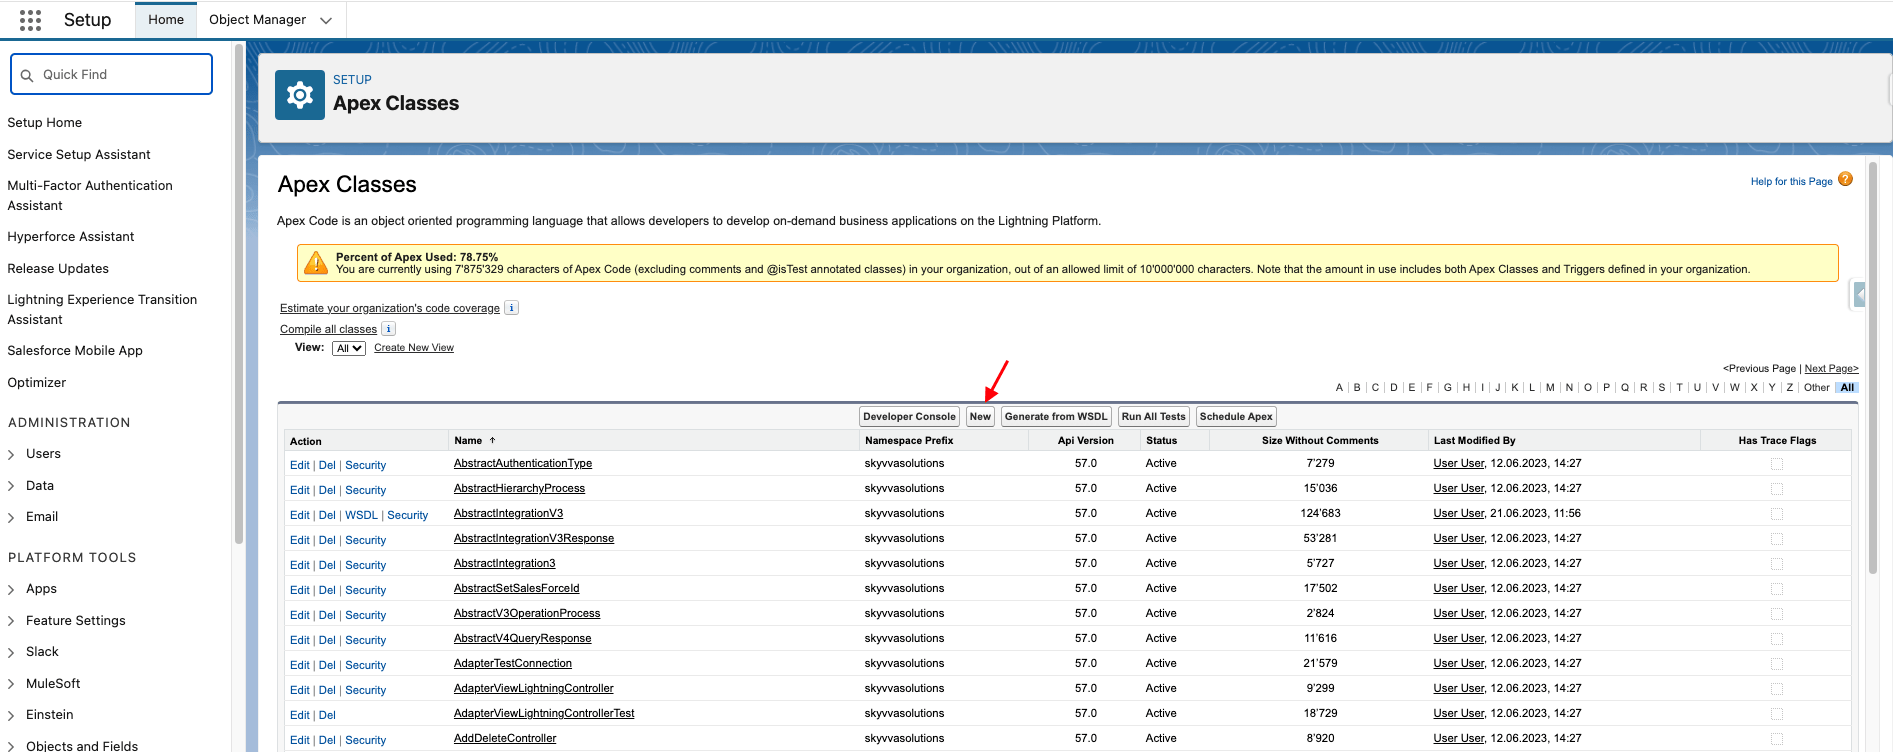
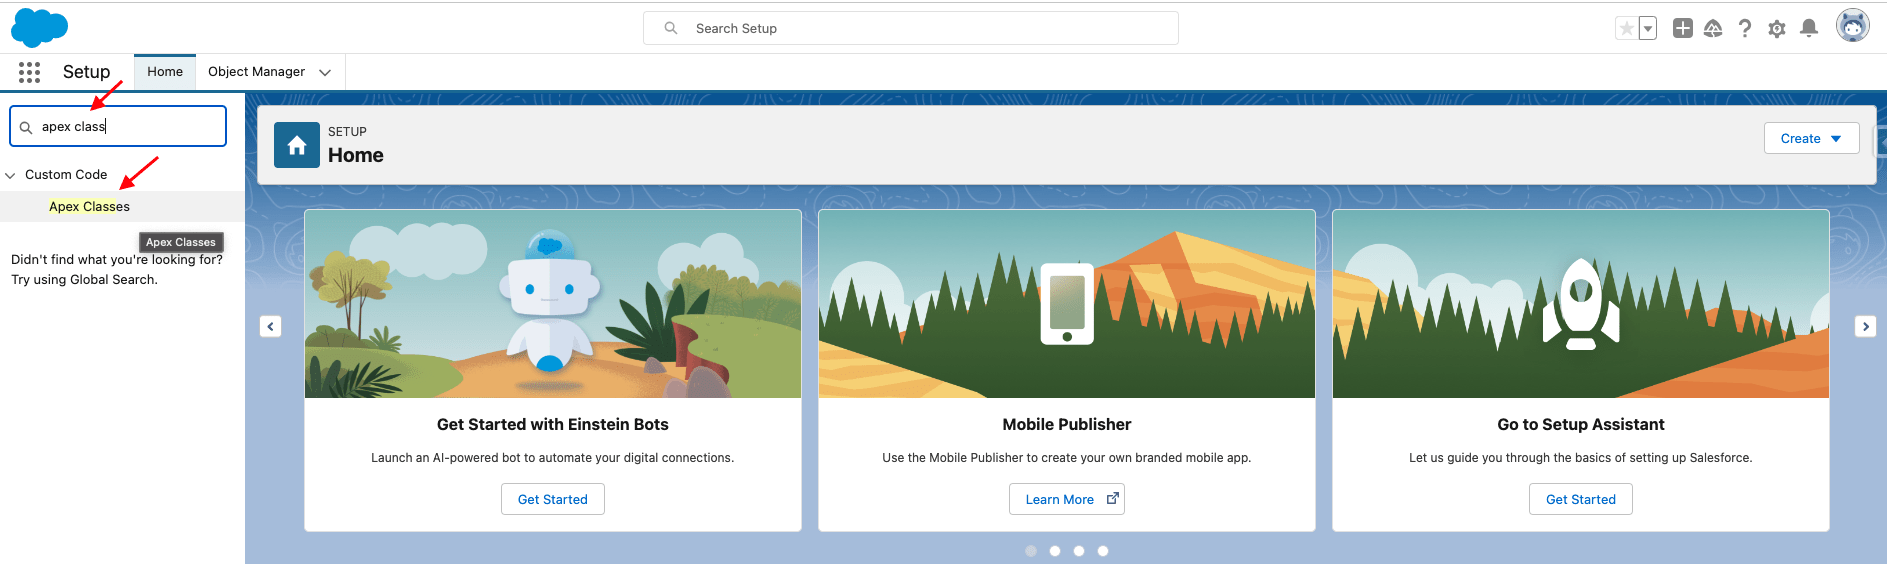
- You can click “Setup” on the top of the interface page.
- In the “Quick Find” box type the word “Apex Classes”.
- Click on “Apex Classes”
- Click the New Button to create a custom apex class for Define External Key