
For outbound processing, we have two categories:-
- Synchronous:- Apex code wait for the response of the HTTP callout.
- Asynchronous:- Apex code doesn’t wait for the response of the HTTP callout. It can have a response which is an asynchronous response. This response can come at any time.
Synchronous interface mostly has a response which means that we will create a response interface to handle the response. An asynchronous interface mostly doesn’t have a response. But this is not true for all cases. We could have an asynchronous interface which has a response interface. In this case, the apex code doesn’t wait and get blocked. The response will come back at a later time. In this case, we have an asynchronous scenario with an asynchronous response. But for the synchronous interface, we should always expect to have a response and the apex code is waiting as long as it will take time until the response is coming back. If the response doesn’t come back at the allowed time e.g. 120 sec. then we will get a governor limit exception time out.
How to build outbound interface? #
The outbound interface we can do in a different way:-
- Using a button on, for example, a sObject Account and put the code to do the callout with invokeCallout2().
- Using a trigger. In this case, it fires when a record is changed.
- Using the process builder. This is quite the same as the trigger. The difference here is that you have a graphical design tool to define the condition when a record should be sent.
How to create real-time outbound Interface using Button:- #
This feature uses our invokeCallout2() method. This method support SAP, SAP-PI, SAP-R/3, SFDC2SAPPI, SOAP, REST adapter types. The response could be a text of JSON, XML, List<Map<String,String>> based on given flag parameters in CallOutControl and Apex of each adapter handle setting when execute callout. InvokeCallout2() method support different mode:
1. SYNC
2. FUTURE
3. BATCH
4. AUTO
We get a real-time response in SYNC mode only.
Input Parameters:
-Integration name: Integration Name
-Interface name: Interface name
-ids: Collection of sObject id
-Mode: SYNC, FUTURE, BATCH, AUTO
| CallOutControl | Flag | CalloutResponse (Attributes) | SAP | SAP-PI | SAP-R/3 | SFDC2SAPPI | SOAP | REST |
| returnJSONComplete | true | String payloadJSON | no | no | no | no | yes | yes |
| returnXml | true | String payloadXML | no | no | no | yes | yes | yes |
| returnListRecord | true | List<Map<String,String>> records | yes | yes | yes | yes | yes | yes |
| returnIMessages | true | no | no | no | no | no | no | |
| actionDoIntegrate | false | Does not process interface invoke call In/Out | ||||||
| actionDoMapping | true | Does nothing with this flag | ||||||
| isCreateMessage | false | Does not upsert message only in mode SYNC, Otherwise message will upsert. | ||||||
| isBypassDML | true | Does not upsert messages, interface, log file | ||||||
Pre-Requisite:-
- Create Integration.
- Create Adapter.
Step 1:- Create Outbound Interface:-

- Select Outbound adapter as shown in the picture below:-
- Add SOQL statement.
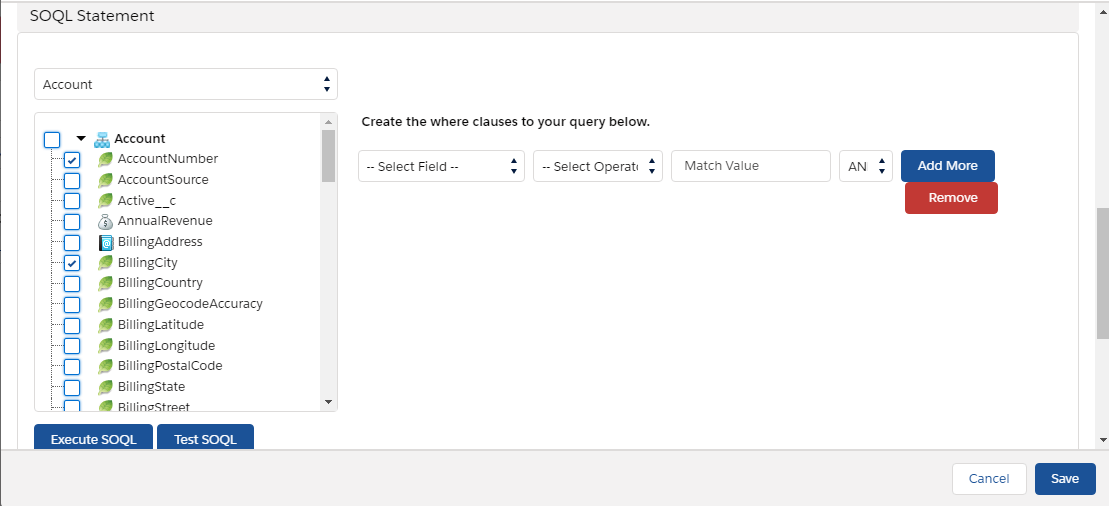
We have to select fields on which we have to build the query. For example, here we have selected three fields AccountNumber, BillingCity, and Name. And mapping data.
Click on the outbound interface to show detail and do mapping data as shown below:

Step 2:- Execute Apex code in the developer console:-
- Navigate to the developer console.
- Click on debug.
- Open Anonymous window.
- Enter Code.
“The code and the picture is shown below”
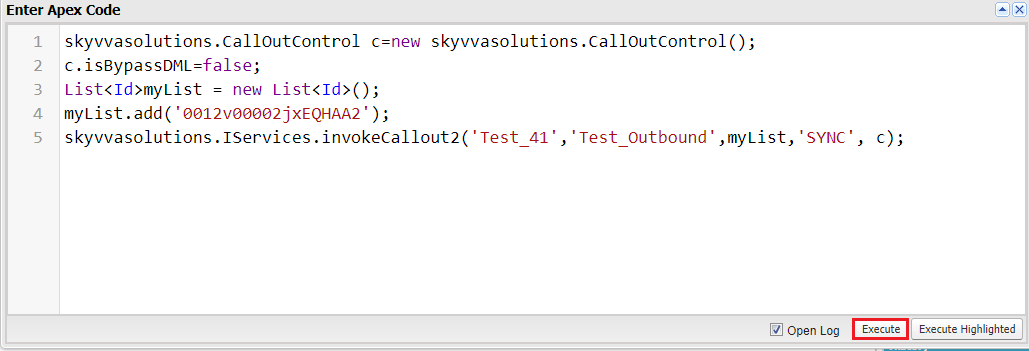
[aux_code language=”javascript” theme=”tomorrow” title=”” extra_classes=””]skyvvasolutions.CallOutControl c=new skyvvasolutions.CallOutControl();
c.isBypassDML=false;
List<Id>myList = new List<Id>();
myList.add(‘0012v00002jxEQHAA2’);
skyvvasolutions.IServices.invokeCallout2(‘Test_41′,’Test_Outbound’,myList,’SYNC’, c);[/aux_code]
Check it on message monitoring:- #

How to create real-time outbound Interface using Trigger #
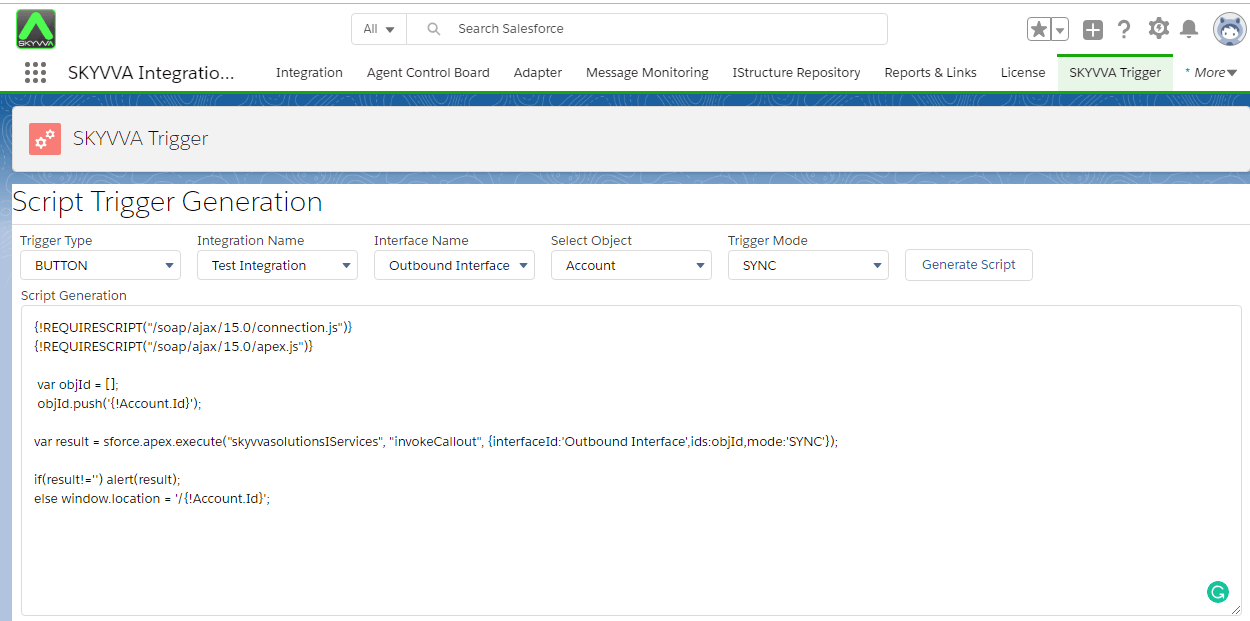
In integration admin, there is a new tab called “SKYVVA Trigger” which allows the user to configure in a graphical user interface the following settings:
– Select box “Triggering Method”: Button, APEX Trigger
– Select box “Mode”: Immediate, Batch
– SFDC object: List of all Objects in the Org
– Interface to trigger: List of all Interfaces in the Org
SKYVVA Trigger tab uses to generate script trigger automatic for Button and Apex Trigger. Go to “Integration Admin” tab > click on the tab “SKYVVA Trigger”
It can generate two kinds of the script:-
- Generate Script Trigger Button
- Generate Script Trigger Apex
1. Generate Script Trigger Button
- Select the Trigger Type “BUTTON”
- Select your Integration Name
- Select your Interface Name (show only outbound interface)
- Select SObject Name
- Select Trigger Mode: Sync,Future,Batch
- Click button “Generate Script”
- Now you will see the script trigger button in the box and can copy to use it
2. Generate Script Trigger Apex
- Select Trigger Type “APEX TRIGGER”
- Tick Trigger Event (can tick more than one)
- Select your Integration Name
- Select your Interface Name (show only outbound interface)
- Select SObject Name
- Select Trigger Mode : None,Auto,Future,Batch
- Click button “Generate Script”
- Now you will see the script apex trigger in the box and can copy to use it
- In the script, change to your own name <trigger name> to your own name

At the last select with Trigger Mode, button “Generate Script” will visible.


