
Introduction #
We cannot always rely on our cache monitor showing that all entries are green. Sometimes due to unknown bugs the monitor show green but the entries are missing in the h2 database. Currently, we are calling a URL from h2 and look to the table to verify. We need one place to verify this and therefore this tab will show the table of the h2 database so that we can view and verify the content against the Salesforce database.
Agent cache #
The user has to click on the drop-down on Table Name picklist as per the business requirement
- ADAPTER
- ADAPTER_PROPERTIES
- AGENT_PROPERTIES
- AGENT_SETTING
- ICHAINED_INTERFACE
- IMAPPING
- INTERFACE
- INTERFACE_GROUP
- IWORKFLOW
- SCHEDULER_SETTING
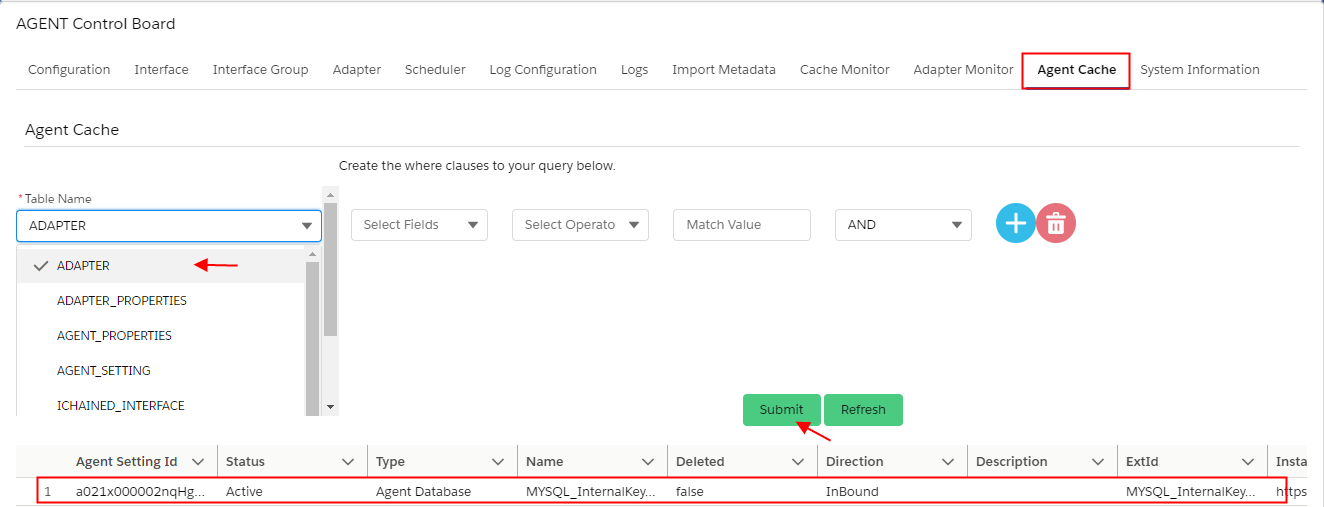
1. When the user selects the ADAPTER value now here we can see all the related table field entries.
- Agent Setting Id
- Status
- Type
- Name
- Deleted
- Direction
- Description
- ExId
- Instance url
- Adapter Id
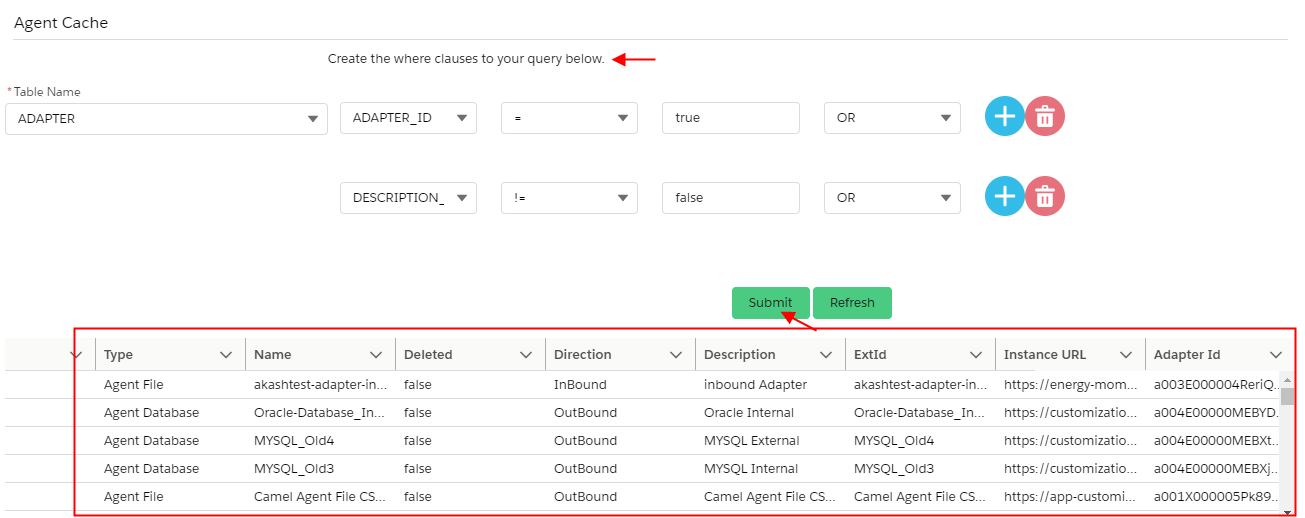
Similarly, the user can easily use a query table and create the where clauses eg. here user write a query on ADAPTER Table which says ADAPTER_ID = true OR DISCRIPTION__C != false click on the submit button, and below the list of the query is run successfully.
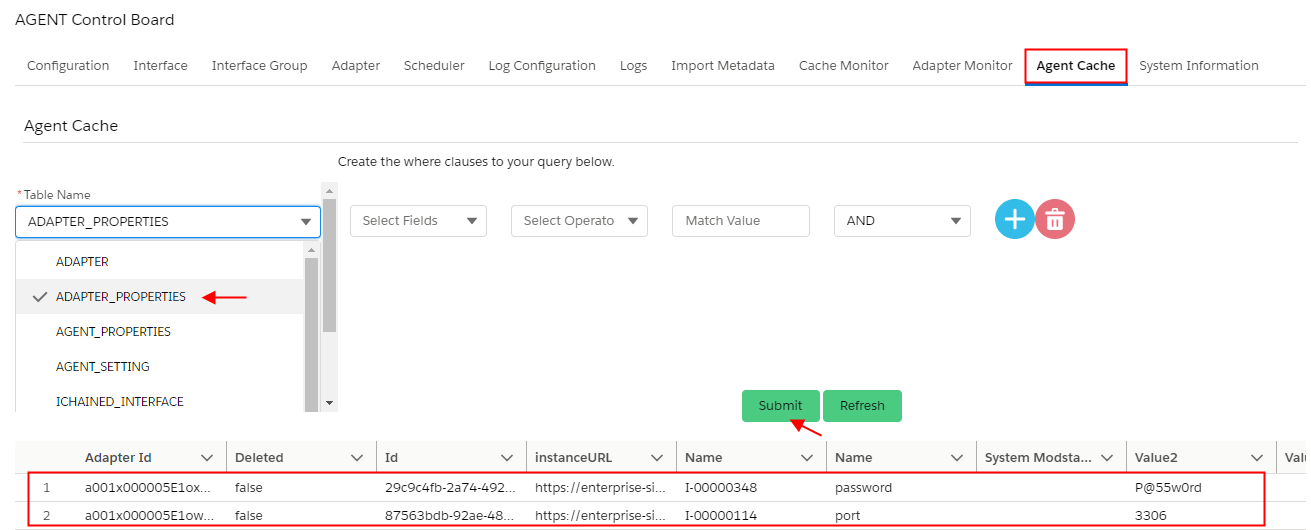
2. When the user selects the ADAPTER_PROPERTIES value now here we can see all the related table field entries.
- Adapter Id
- Deleted
- Id
- instanceURL
- Name
- Name__C
- System_Modstamp
- Value
- Value2
- Value_Long
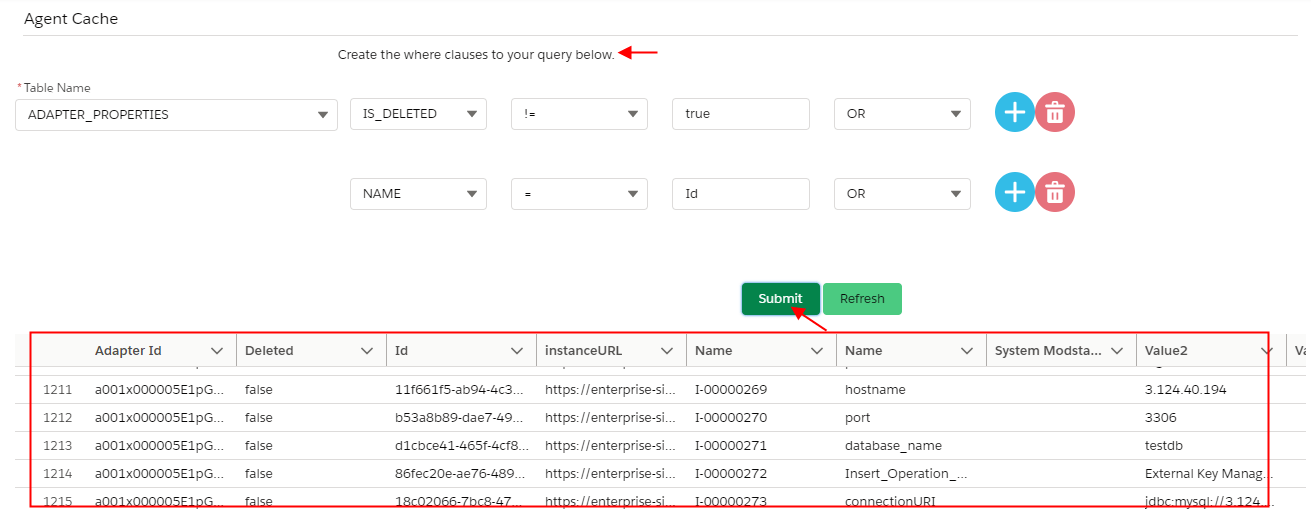
Similarly, the user can easily use a query table and create the where clauses eg. here user write a query on ADAPTER_PROPERTIES Table which says IS_DELETED != true OR NAME = Id click on the submit button, and below the list of the query is run successfully.
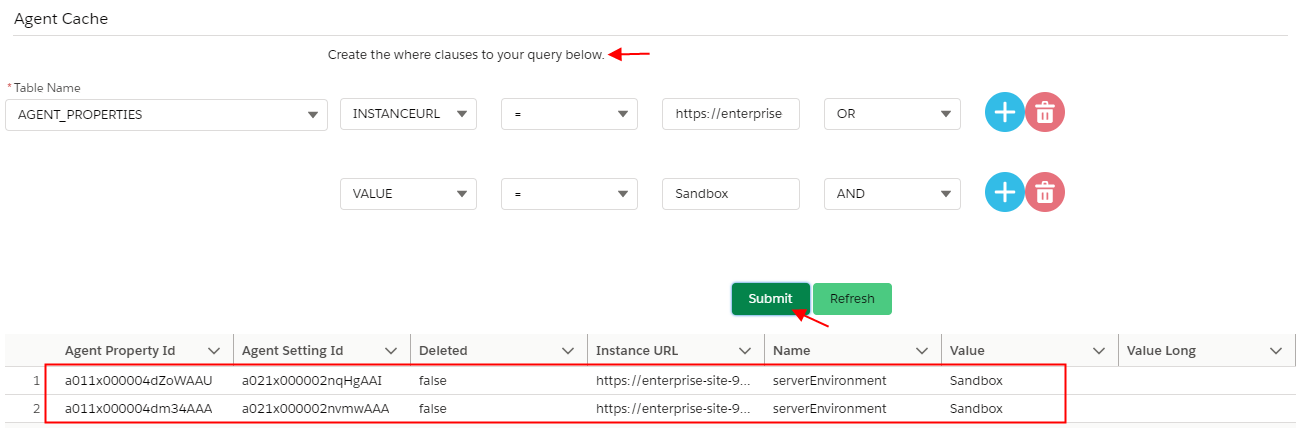
3. When the user selects the AGENT_PROPERTIES value now here we can see all the related table field entries.
- Agent Property ID
- Agent Setting Id
- Deleted
- Instance URL
- Value
- Value Long

Similarly, the user can easily use a query table and create the where clauses eg. here user writes a query on the AGENT_PROPERTIES Table which says INSTANCEURL= https://enterprise-site-9150-dev-ed.lightning.force.com OR VALUE = SANDBOX click on the submit button, and below the list of the query is run successfully.
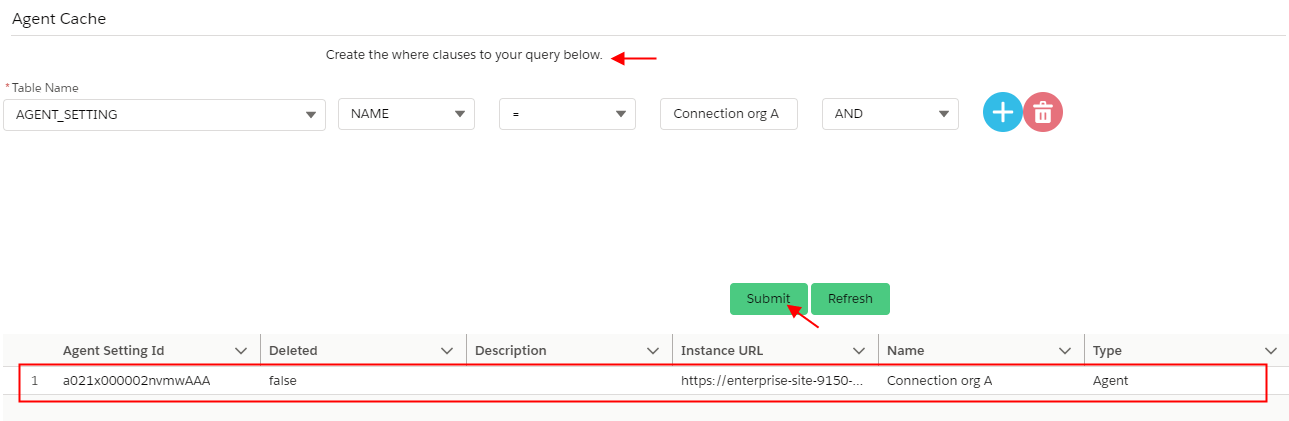
4. When the user selects the AGENT_SETTING value now here we can see all the related table field entries.
- Agent Setting Id
- Deleted
- Description
- Instance URL
- Name
- Type
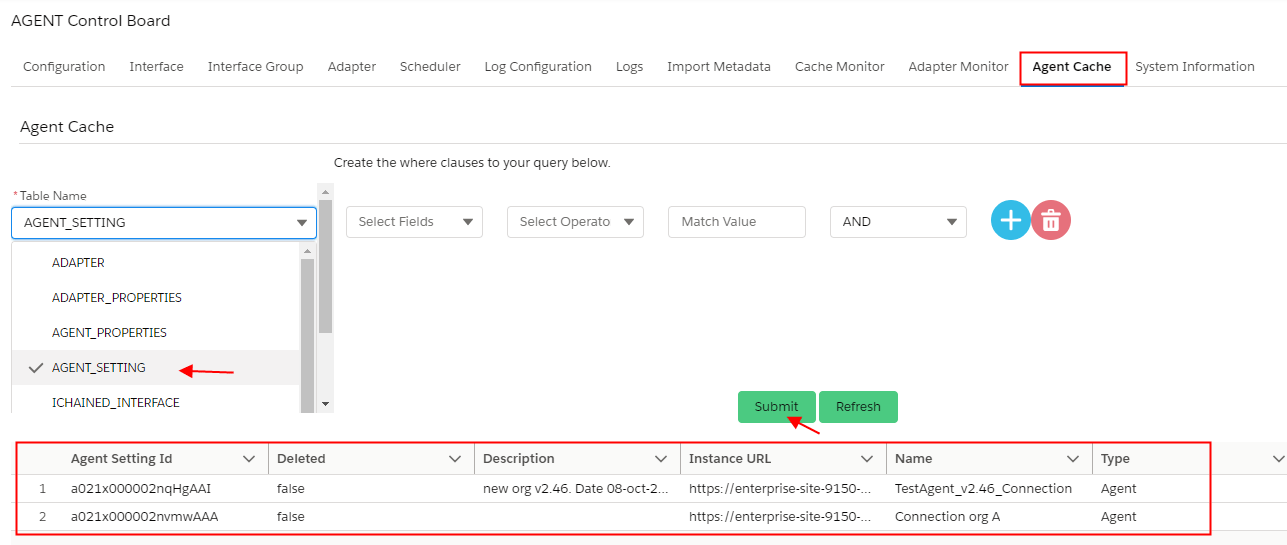
Similarly, the user can easily use a query table and create the where clauses eg. here the user writes a query on the AGENT_SETTING Table which says NAME= Connection org A click on the submit button, and below the list of the query is run successfully.
5. When the user selects the ICHAINED_INTERFACE value now here we can see all the related table field entries.
- Ichained Id
- Deleted
- Init Operation
- Interface Name
- Instance URL
- Parent Relationship Name
- Sequence
- Type
- Child Interface Id
- Parent Interface Id
- Root Interface Id
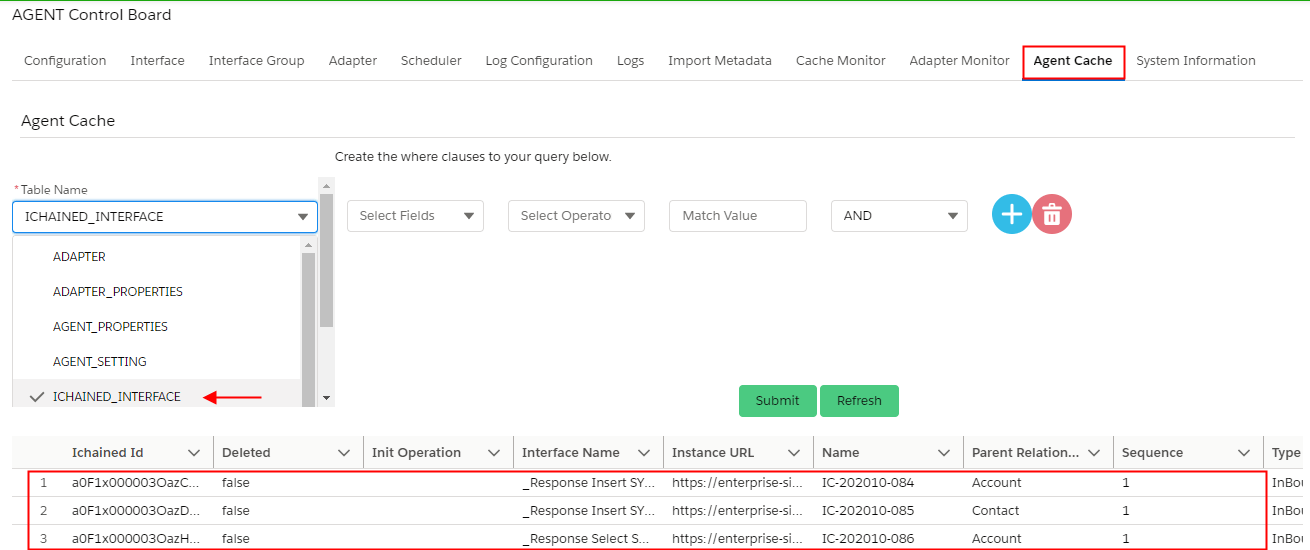
Similarly, the user can easily use a query table and create the where clauses eg. here the user writes a query on the ICHAINED_INTERFACE Table which says PARENT_RELATIONSHIP_NAME__C= Account OR TYPE__C= Outbound click on the submit button, and below the list of the query is run successfully.
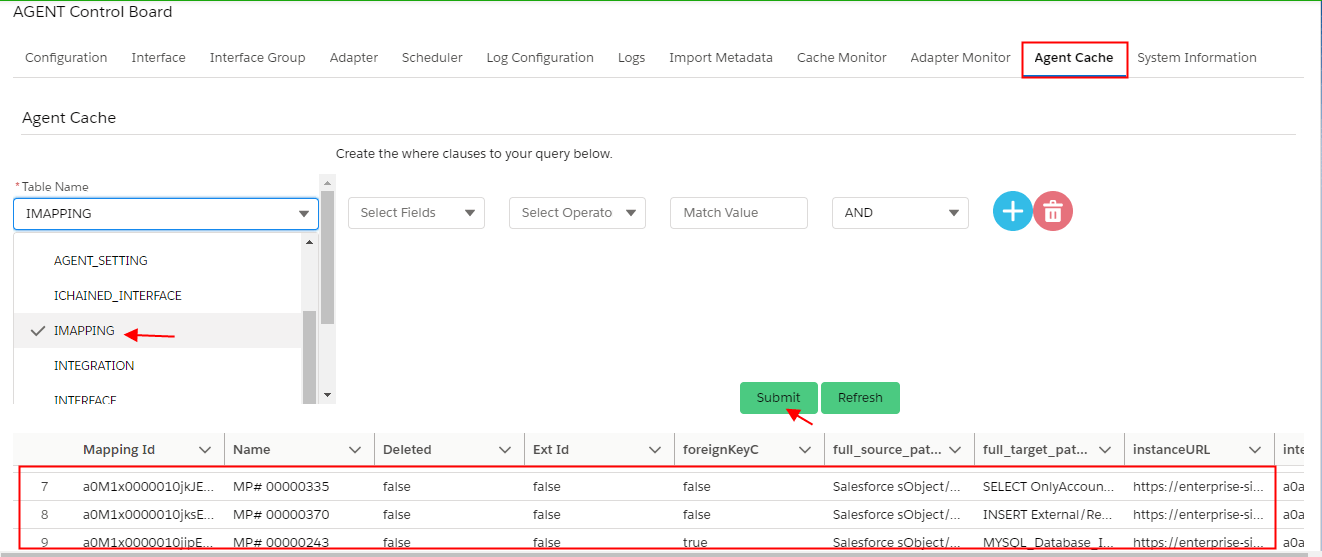
6. When the user selects the IMAPPING value now here we can see all the related table field entries.
- Mapping Id
- Name
- Deleted
- Ext Id
- foreignKeyC
- full_source_path
- full_target_path
- instanceURL
- interfaceTableId
- namespace
- parent__c
- refrence_parent_field_and_above__c
- refrence_field_uncle__c
- source2__c
- source_Object__c
- source_level__c
- source_long__c
- source_node_level__c
- source_path__c
- source_type__c
- target_Object__c
- target__c
- target_level__c
- target_node__level
- target_path__c
- target_type__c
- type__c
- usageType__c
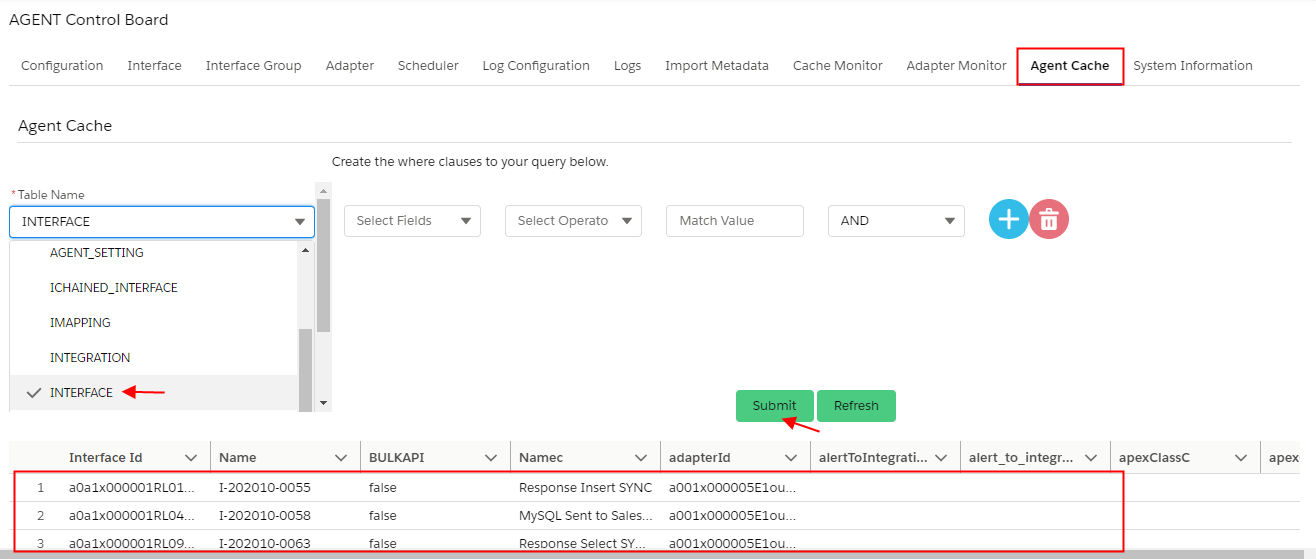
7. When the user selects the INTERFACE value now here we can see all the related table field entries.
- Interface Id
- Name
- BULKAPI
- Namec
- adapterId
- alertToIntegrationSetupC
- alert_to_interation_setup__c
- apexClassC
- apexClassForFilterSObjectC
- apexClass__c
- apex_class_for_filter_sObject__c
- asynchronize__c
- batchMode__c
- batch_job_id__c
- bulk_Package_size__c
- bulk_Version__c
- databaseQueryC
- description
- extId__c
- external_mapping__c
- failed_message_handling__c
- faultInterface__c
- filter_query__c
- frequencyActiveC
- frequency_active__c
- fromIMapping__c
- inbResponse_handling__c
- inboundPostingBehaviour__c
- initializationQueryC
- initialization_Query__c
- instanceURL
- integrate_Batch_Max_Size__c
- integrate_Max_Size__c
- integrationId
- interfaceGroupId
- interface_mode__c
- interface_type__c
- isStreamingAPIC
- isTransactionalC
- mapping_in_SFDC__c
- max_number_Of_retry__c
- messageType__c
- metaDataProviderC
- metaData_provider__c
- notPersistMessage__c
- operationType__c
- package_size__c
- parent_interface__c
- pi__c
- postfeed__c
- priority__c
- query__c
- responseInterface__c
- runtime_behaviour__c
- sObjectFieldExtId__c
- sequence2__c
- source_name__c
- status_c
- streamingAPI__c
- transactional__c
- type_c
- use_apex_class__c
- use_auto_switch__c
- use_batch_optimized_mode__c
- use_skyvva_outScheduler__c
- wf_runtime_behaviour__c
- workflowStatusHandling__c
Similarly, the user can easily use a query table and create the where clauses eg. here the user writes a query on the INTERFACE Table which says PARENT_RELATIONSHIP_NAME__C= Account OR TYPE__C= Outbound click on the submit button, and below the list of the query is run successfully.
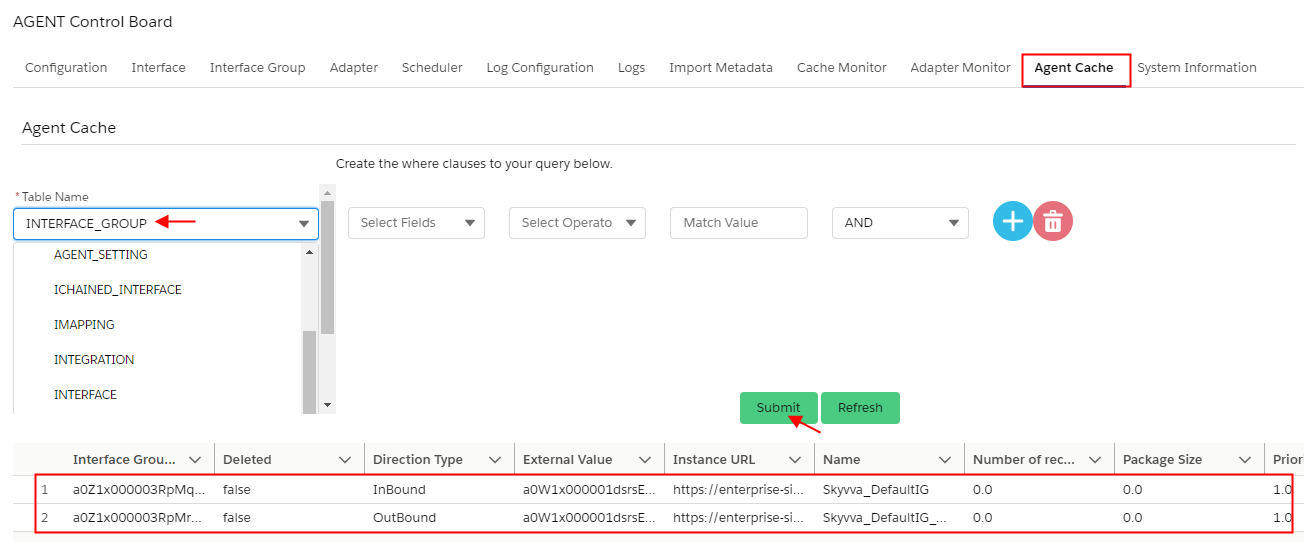
8. When the user selects the INTERFACE_GROUP value now here we can see all the related table field entries.
- Interface Group Id
- Deleted
- Direction Type
- External Value
- Instance URL
- Name
- Number of record per batch
- Package Size
- Priority Sequence
- Priority
- Running CDD
- Running Scheduler
- Type
- Integration Id
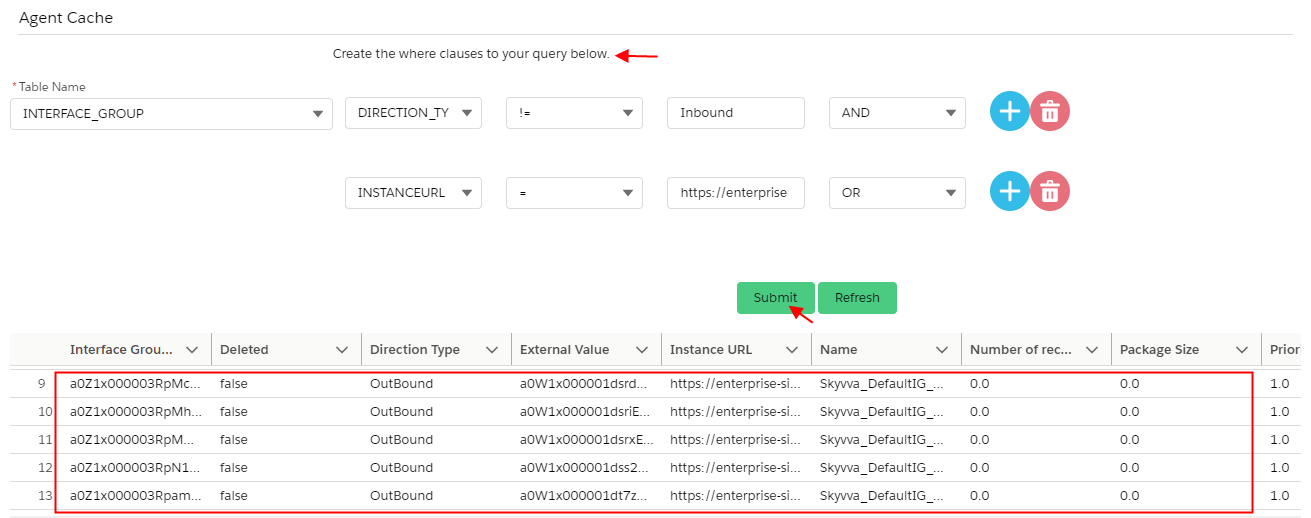
Similarly, the user can easily use a query table and create the where clauses eg. here the user writes a query on the INTERFACE Table which says
DIRECTION_TYPE__C != Inbound AND INSTANCEURL= https://enterprise-site-9150-dev-ed.lightning.force.com click on the submit button, and below the list of the query is run successfully.
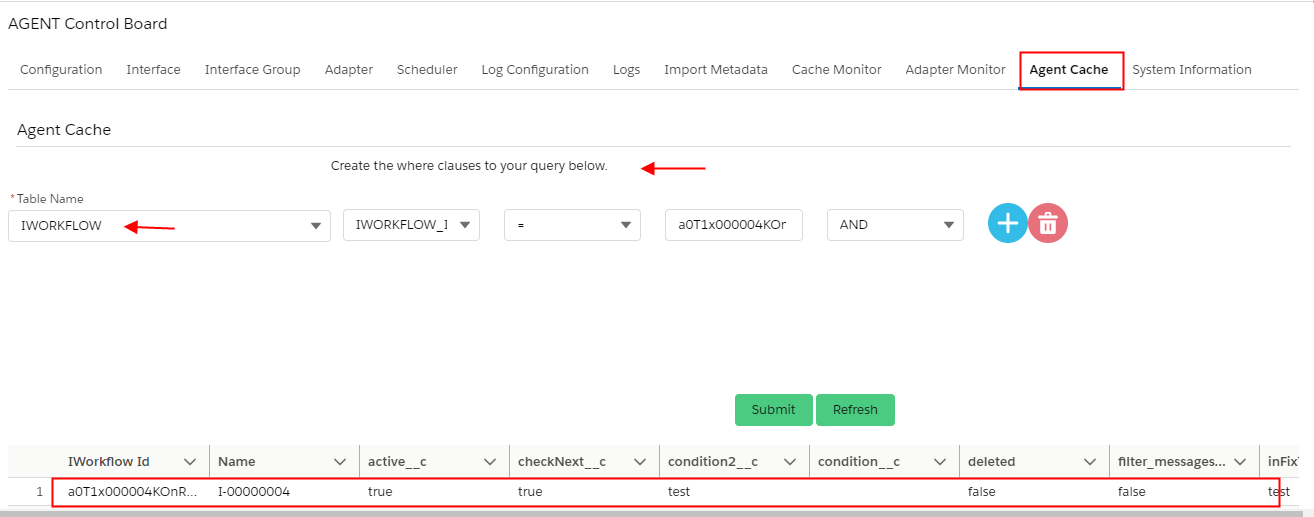
9. When the user selects the IWORKFLOW value now here we can see all the related table field entries.
- IWorkflow Id
- Name
- active__c
- checkNext__c
- condition2__c
- condition__c
- deleted
- filter_messages__c
- inFixToPostFix__c
- instanceURL
- integrationId
- message__c
- old_id__c
- operation_Type__c
- sequence__c
- sourceInterfaceId
- targetInterfaceId
Similarly, the user can easily use a query table and create the where clauses eg. here the user writes a query on the IWORKFLOW Table which says
IWORKFLOWW_ID= a0T1x000004KOnREAW click on the submit button, and below the list of the query is run successfully.
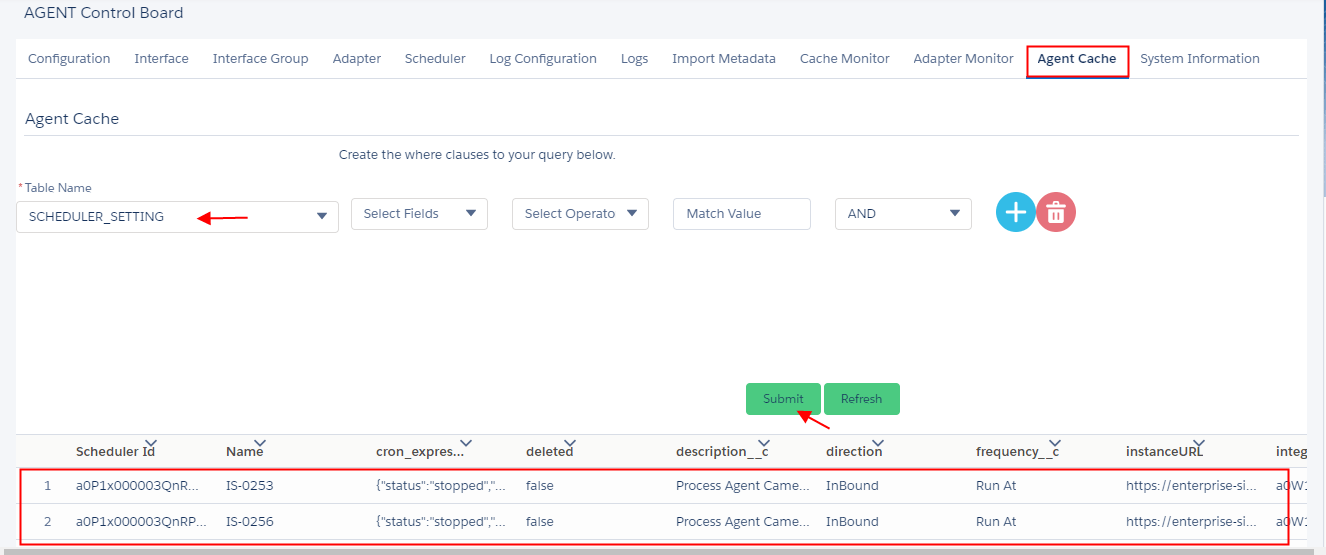
10. When the user selects the SCHEDULER_SETTING value now here we can see all the related table field entries.
- Scheduler Id
- Name
- cron_expression__c
- deleted
- description__c
- direction
- frequency__c
- instanceURL
- integrationId
- interfaceGroup
- interfaceTable
- job_name__c
- messageReprocessPerInterface
- scheduler_type2__c
- scheduler_type__c
- status__c
- systemModeStamp
- time_interval__c
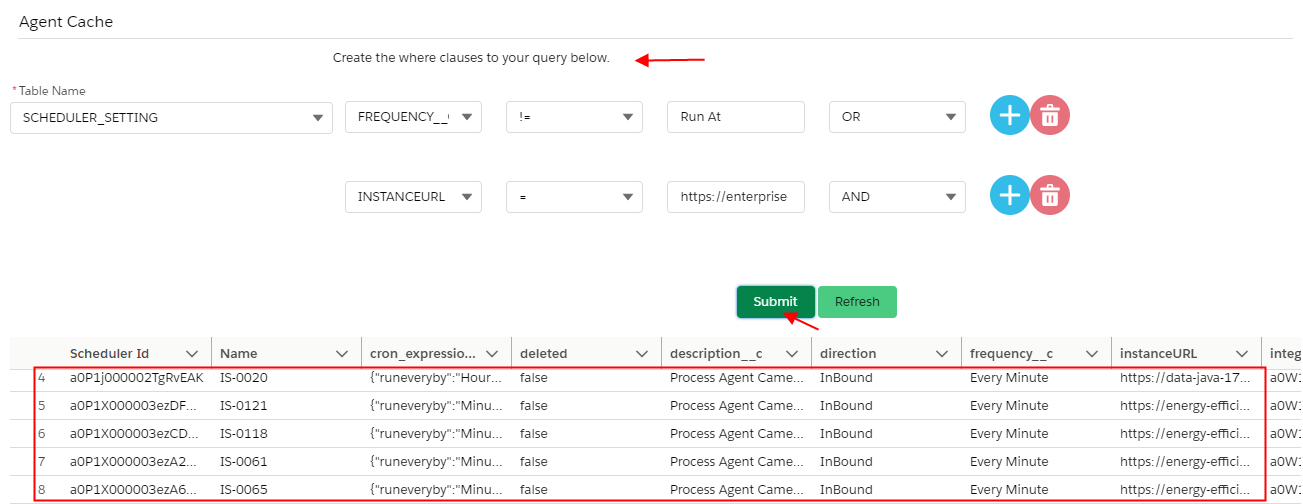
Similarly, the user can easily use a query table and create the where clauses eg. here the user writes a query on the SCHEDULER_SETTING Table which says
FREQUENCY_C != Run At OR INSTANCEURL= https://enterprise-site-9150-dev-ed.lightning.force.com click on the submit button, and below the list of the query is run successfully.
Summary In this tutorial user learns about, How to run a query by writing a where clause on all table names by selecting different standard and custom fields under the Agent Cache tab.


