
Introduction #
This tutorial will guide you on how to send data in multiple objects from Salesforce to the multi-table in the database as synchronously and asynchronously through Agent V3 or Any Connect. We will know about Transactional and Non-Transaction mode during processing. Creating an adapter, called Database Adapter within Internal Key Management for insert record to the database. MYSQL Database is used for example below to Insert record to the database and it located on EC2 instance.
Pre-required
- Create Integration and configuration on the new Agent Control Board
- Create database adapter (for outbound and inbound) on new Agent Control Board
- Create Metadata Provider, Repository and generate Message Type from the database
- Create outbound Interface (Request) and inbound Interface (Response)
- Checking Cache monitoring status
- Callout v3 to new Agent
- Transactional and None-Transactional mode
How to do insert operation using a Synchronous outbound interface? #
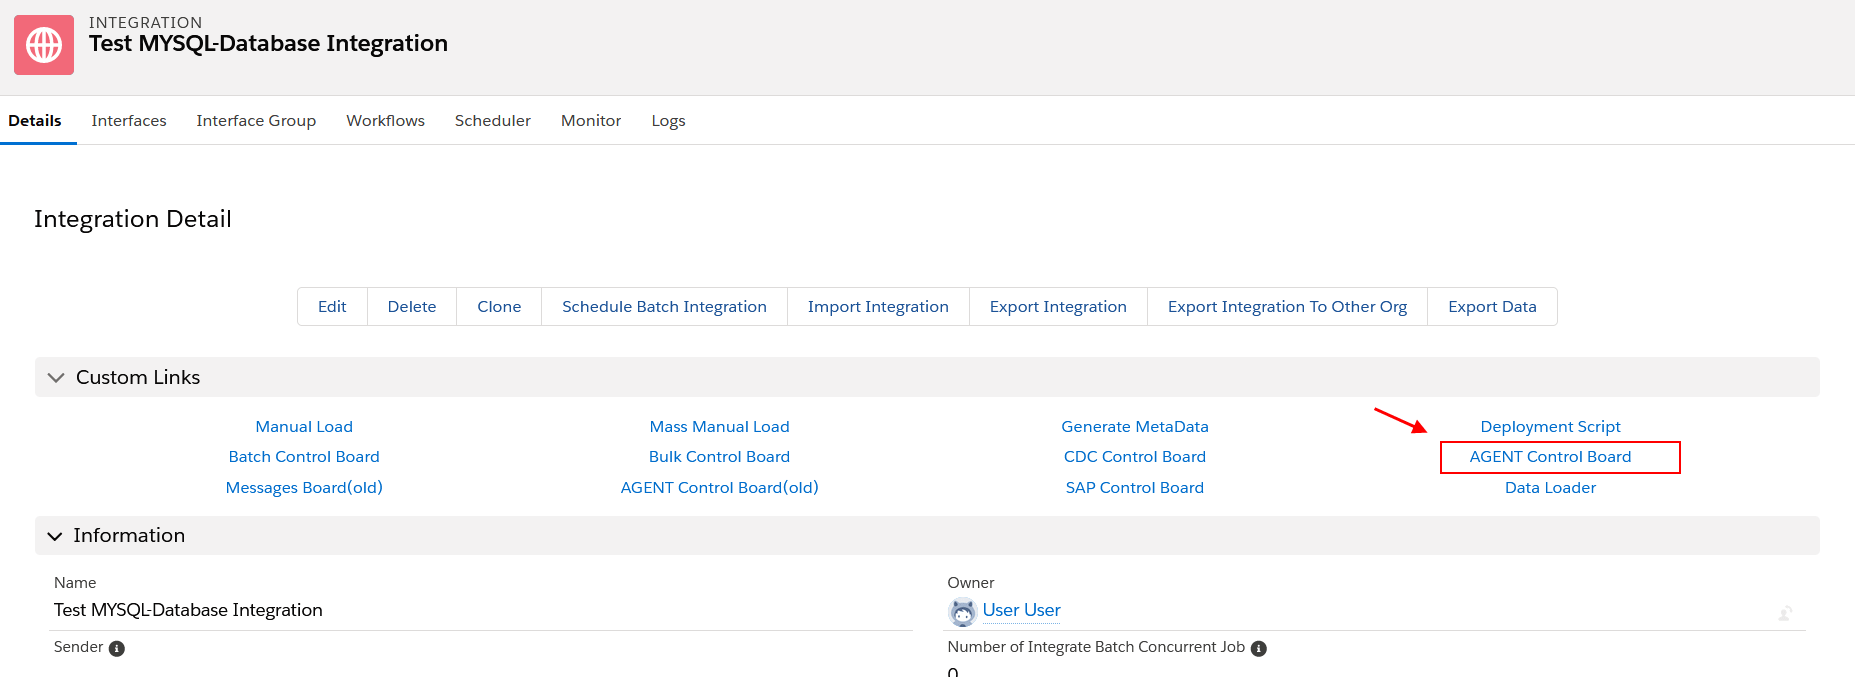
Step-1: Create Integration and test connection destination. For creating new Integration by followed to this guide https://docs.skyvva-dev.com/docs/tutorial-v2-41-lightning/what-is-an-integration-and-how-to-create-it/
- After Integration created and then navigate to AGENT Control Board
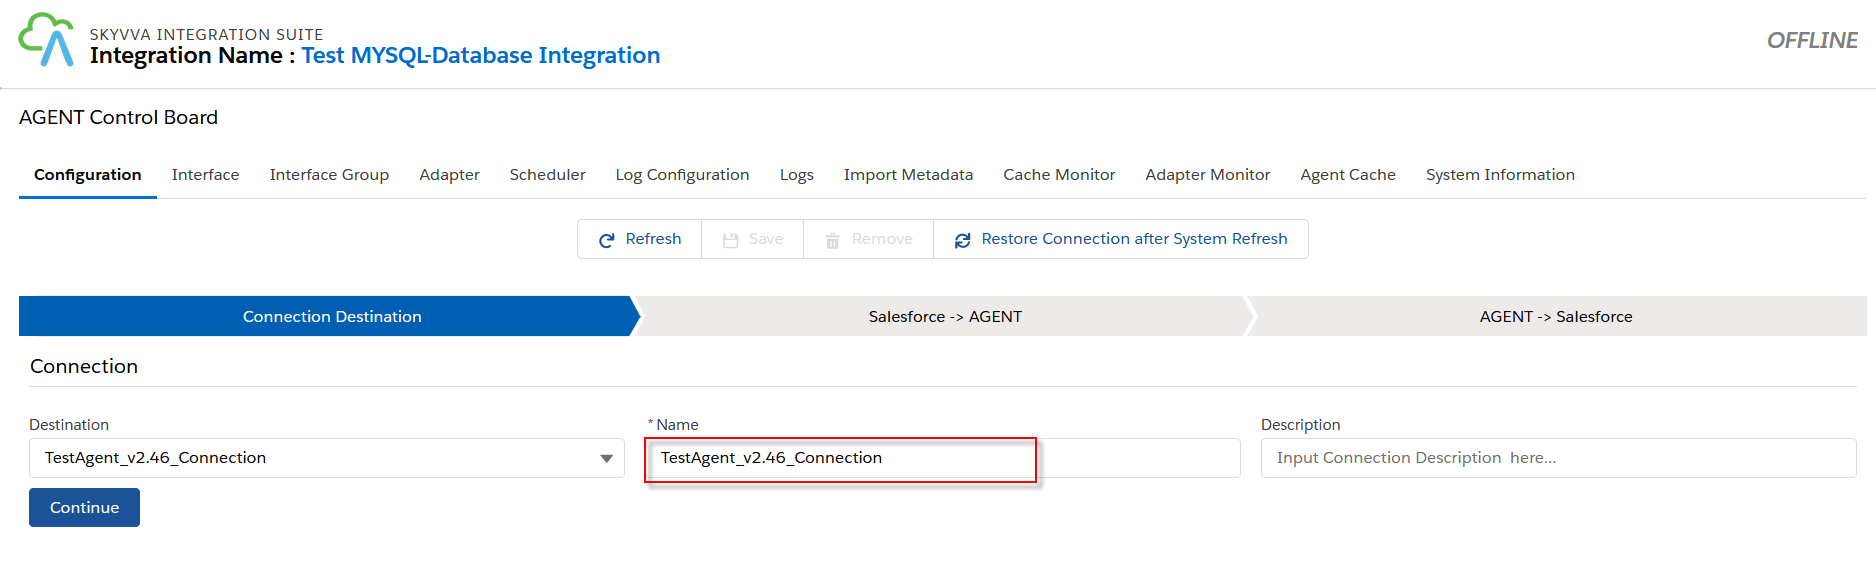
- Choose the connection destination name and click the button Continue
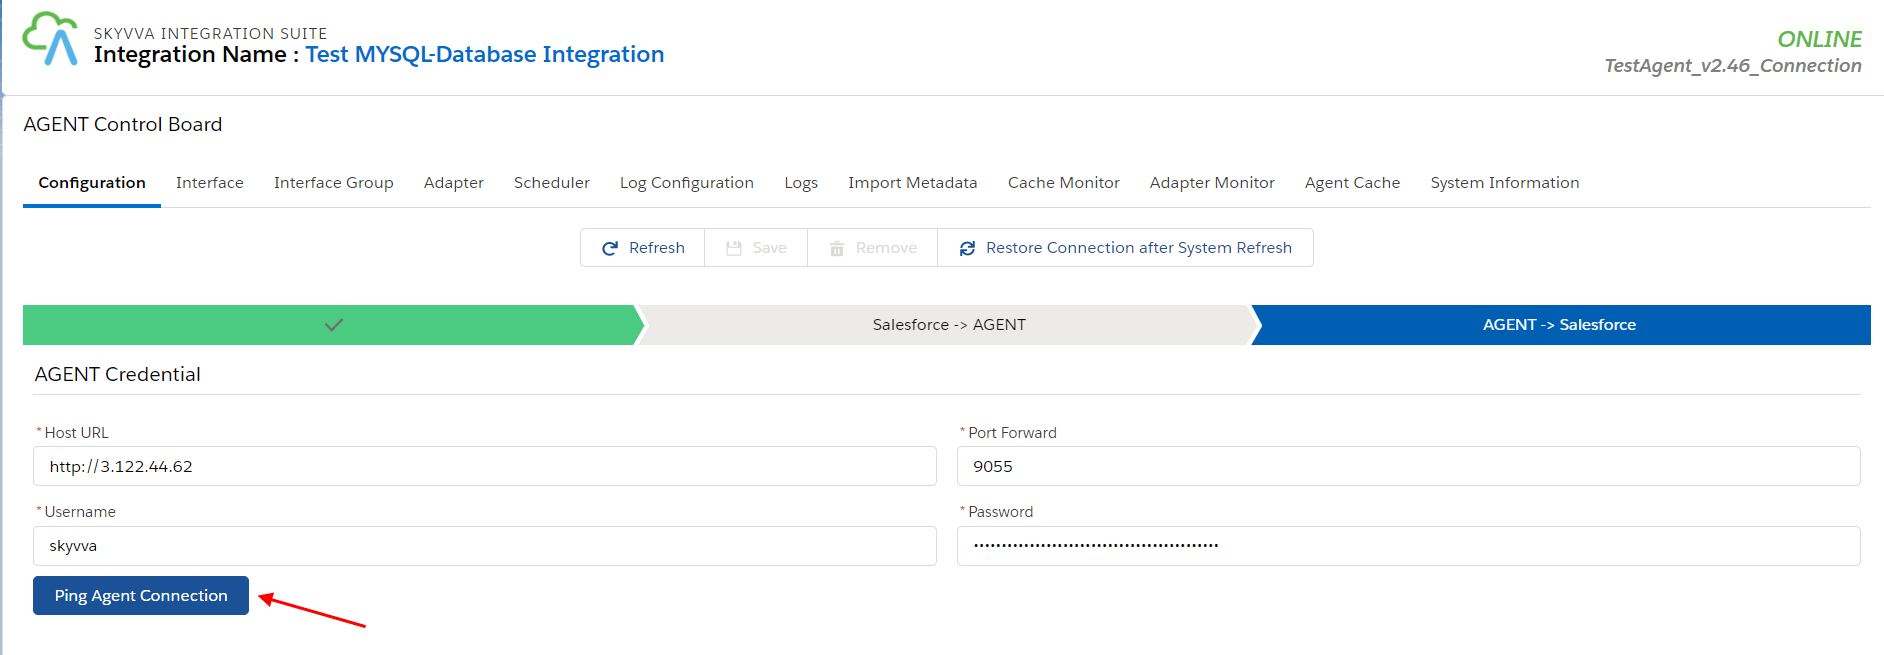
- Click button Ping Agent Connection
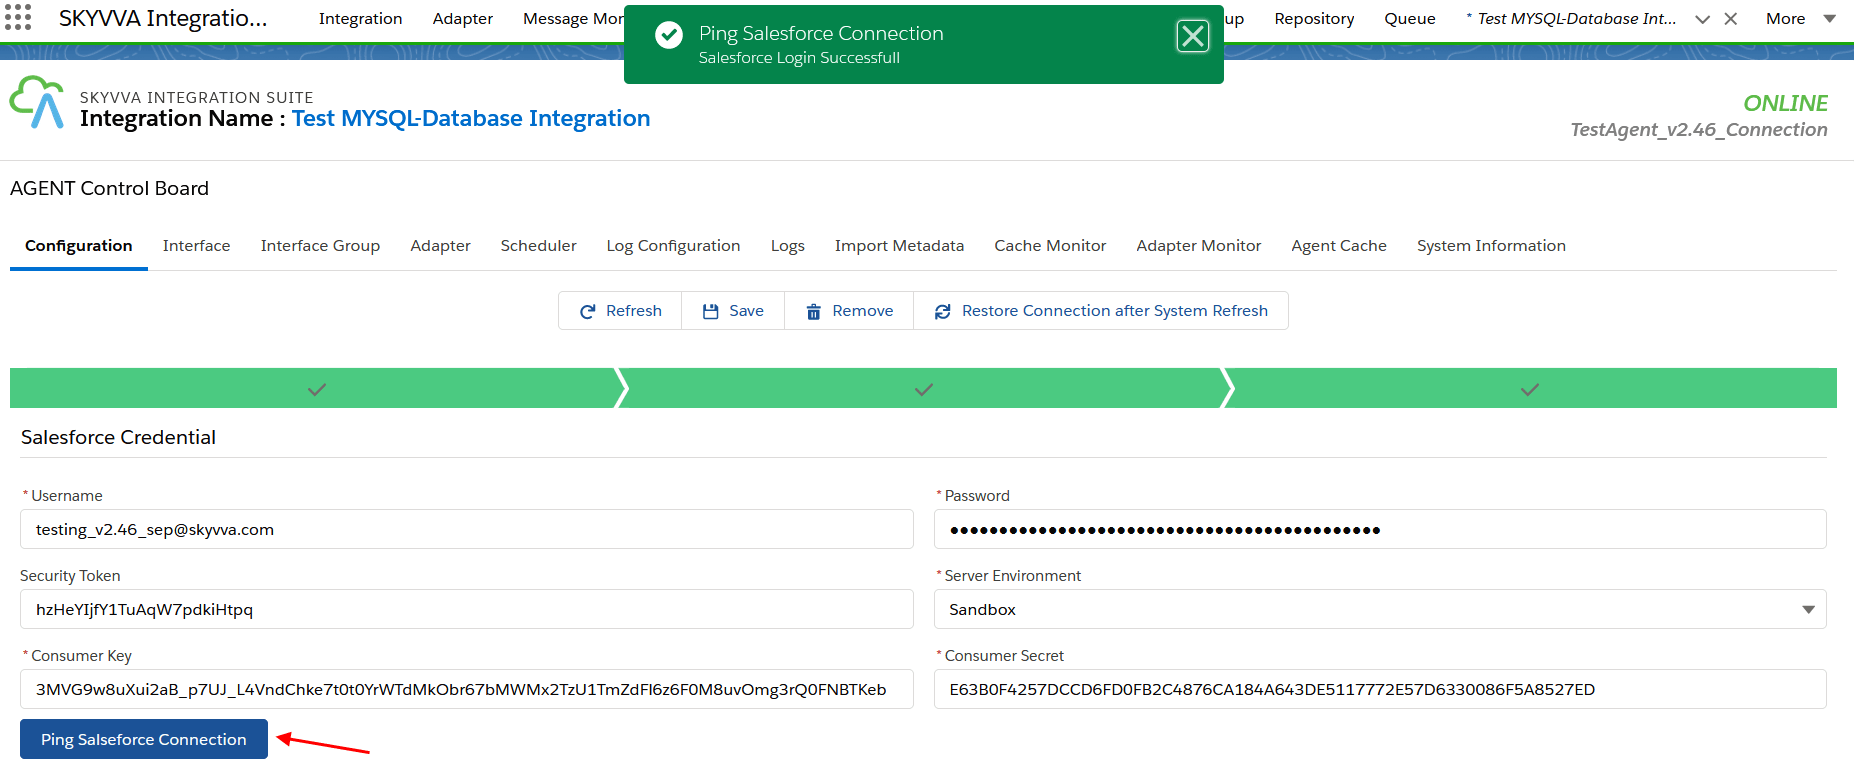
- Click button Ping Salesforce Connection
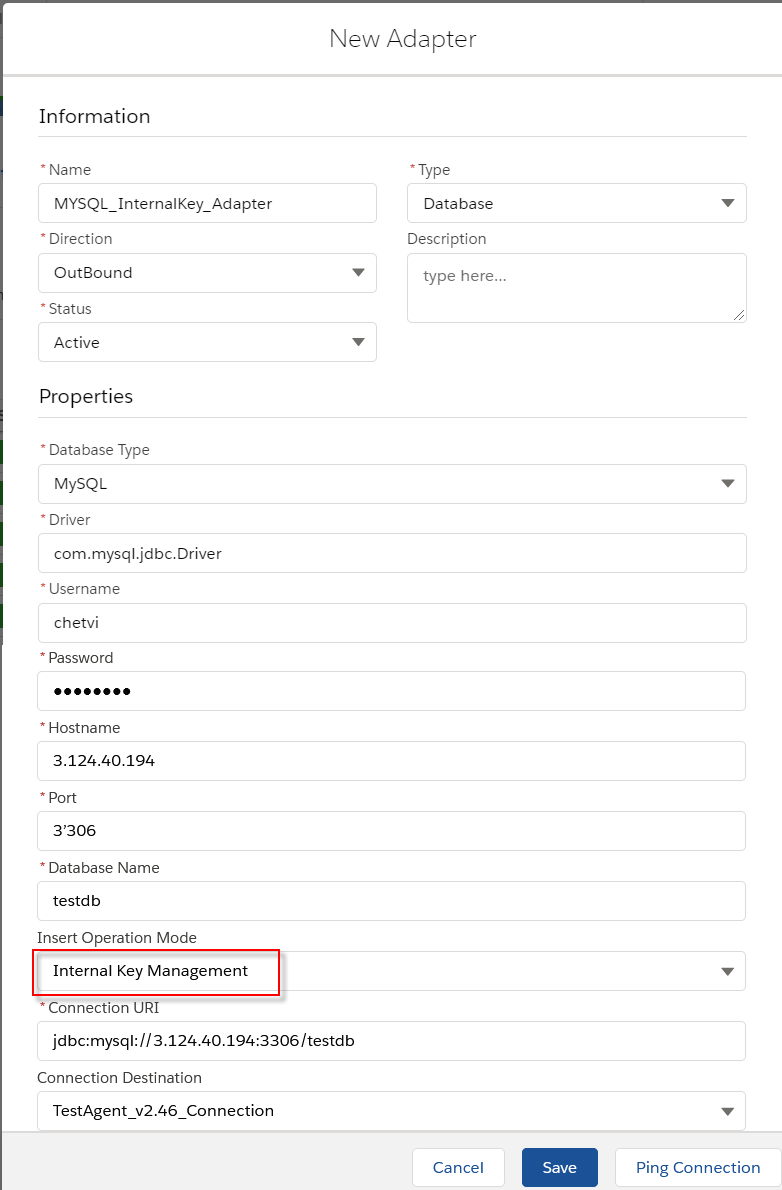
Step-2: Create outbound Database Adapter on the new Agent Control Board
- Navigate to the Adapter tab after that click the button New

Fill all required field
- Name: any name
- Type: Agent Database
- Direction: Outbound
- Status: Active
- Database Type: MySQL
- Driver: mysql.jdbc.Driver
- Username: (your user name on database)
- Password: (your password on the database)
- Hostname: 124.40.1949 (public ipv4 on EC2 AWS)
- Port: 3306(default)
- Database Name: your database name
- Insert Operation Mode: Internal Key Management
- Connection URI: jdbc:mysql://3.124.40.194:3306/testdb (connection URL format is protocol//[hosts][/database])
- Connection Destination: your destination name
**Connection URL is different due to Database type:
- SQL Sever= jdbc:sqlserver://3.124.40.194:1433;databaseName=dbName
- Oracle= jdbc:oracle:thin:@//ec2-3-124-40-194.eu-central-1.compute.amazonaws.com:1521/orcl
- PostgreSQL= jdbc:postgresql://3.124.40.194:5432/dbName
*** on EC2, make sure you have allowed MYSQL port 3306 on Group Policy for connectivity from other systems.
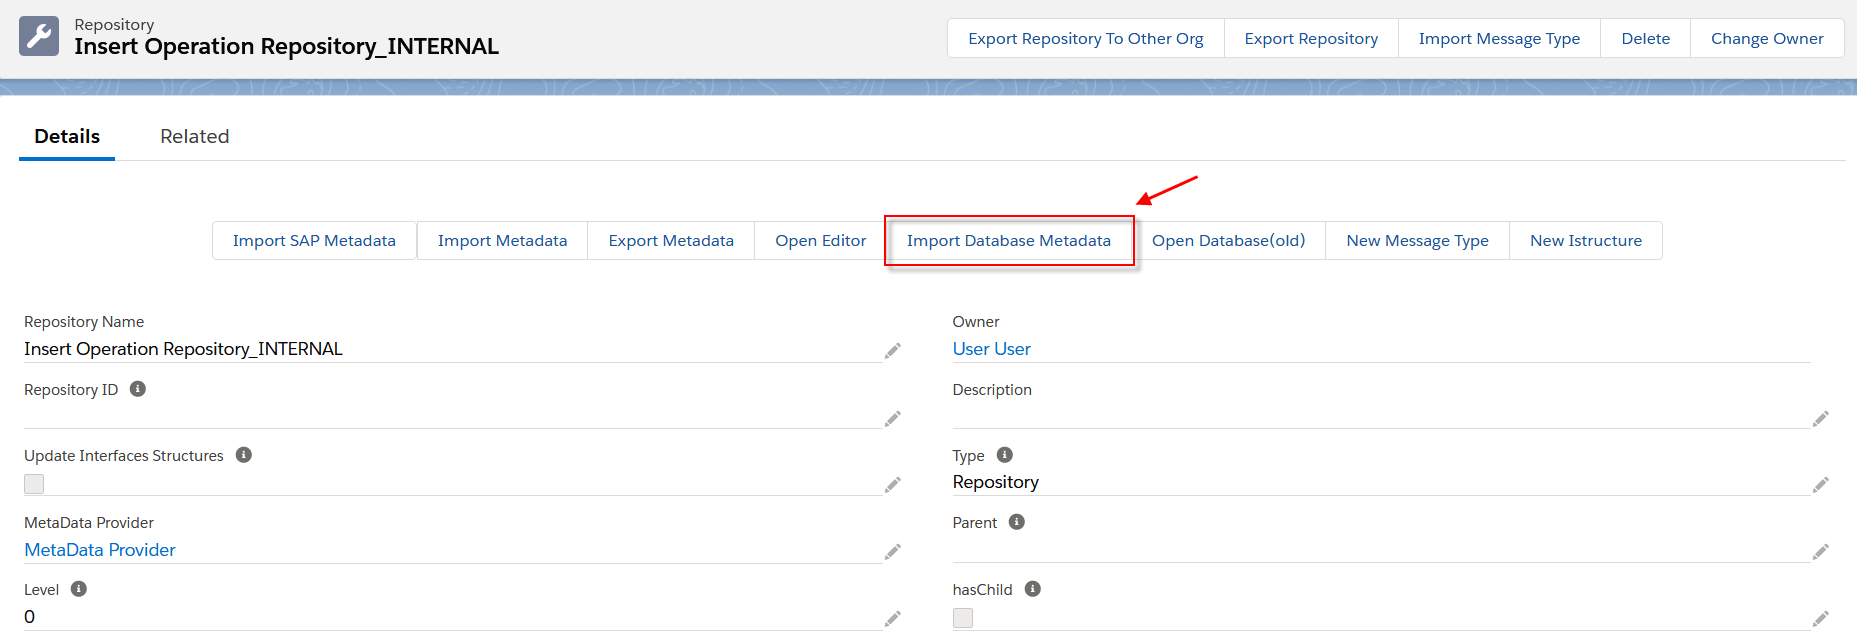
- Step-3 Generate Message Type from the database
- Create Metadata Provider
- Create a Repository for using Insert operation
- Go to the Repository details page, click the Import Database Metadata button
- Fill all required field then click Retrieve Database to get the Table’s record
- Agent Instance: your instance name
- Adapter Name: your adapter name
- Object Type: Table, View, Procedure
- Database Operation: Select (database’s template will be generated based on operation)
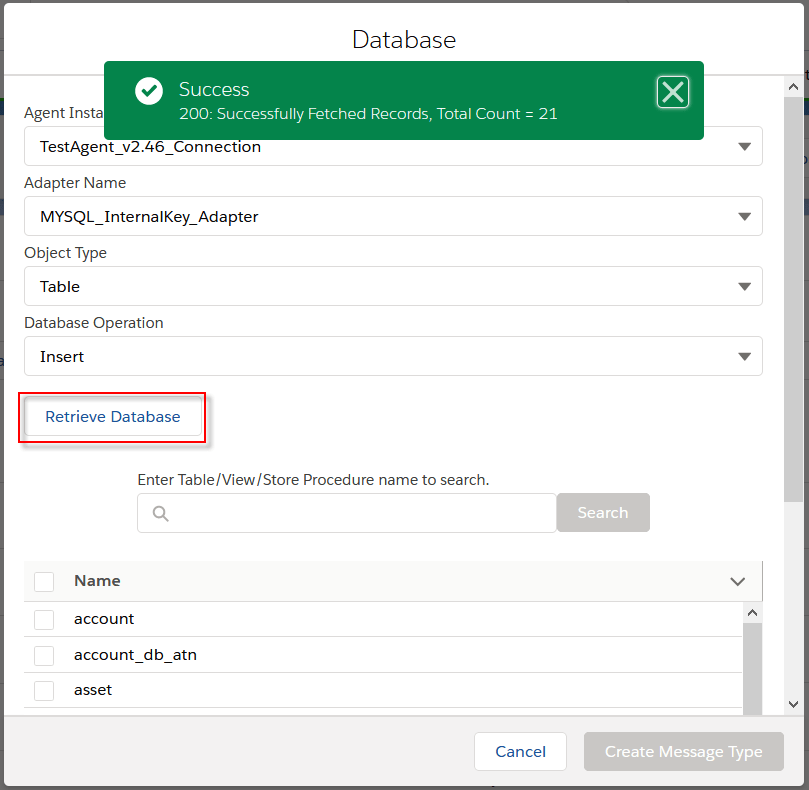
- Choose Table’s name for creating Message Type
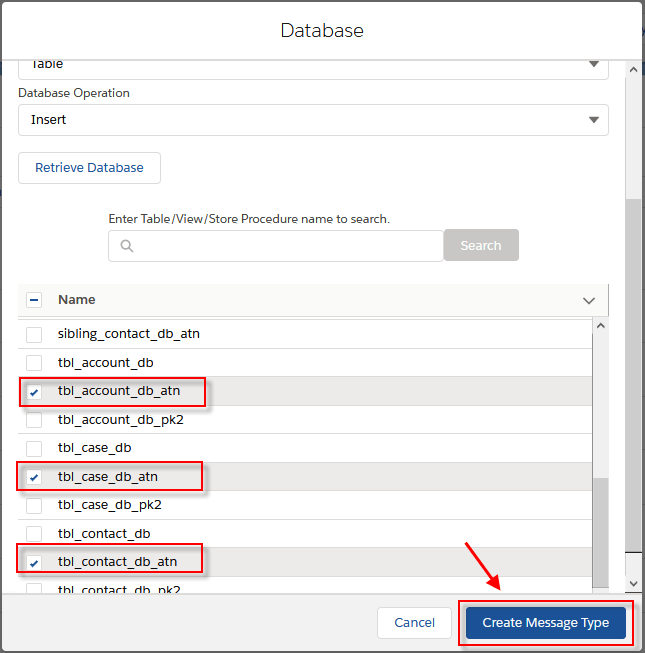
- After that, we got the Message Type generated from the database
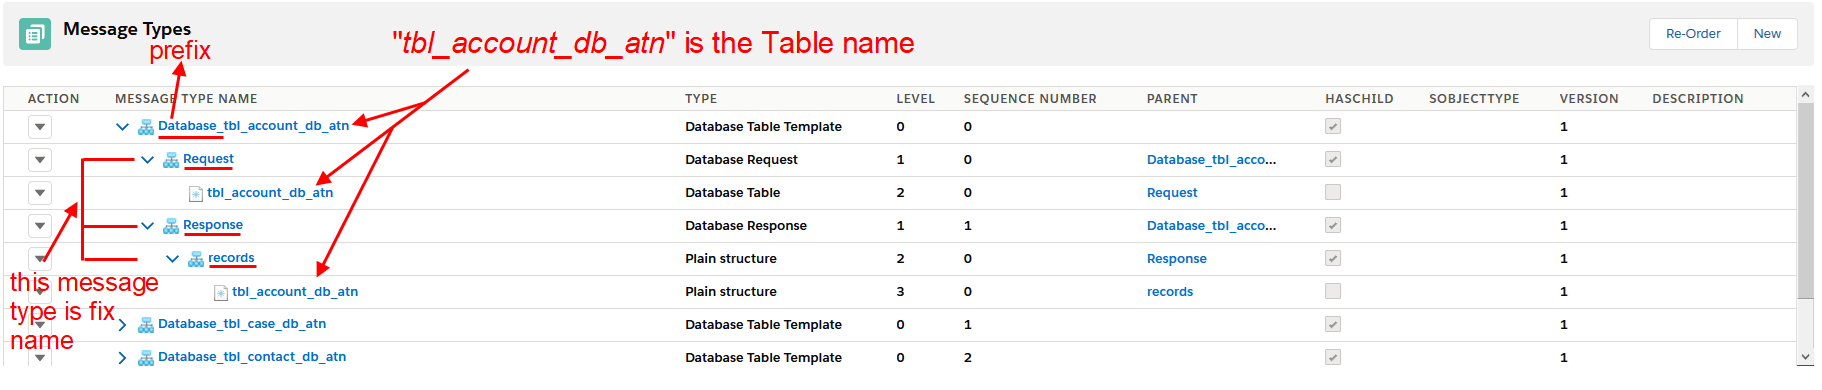
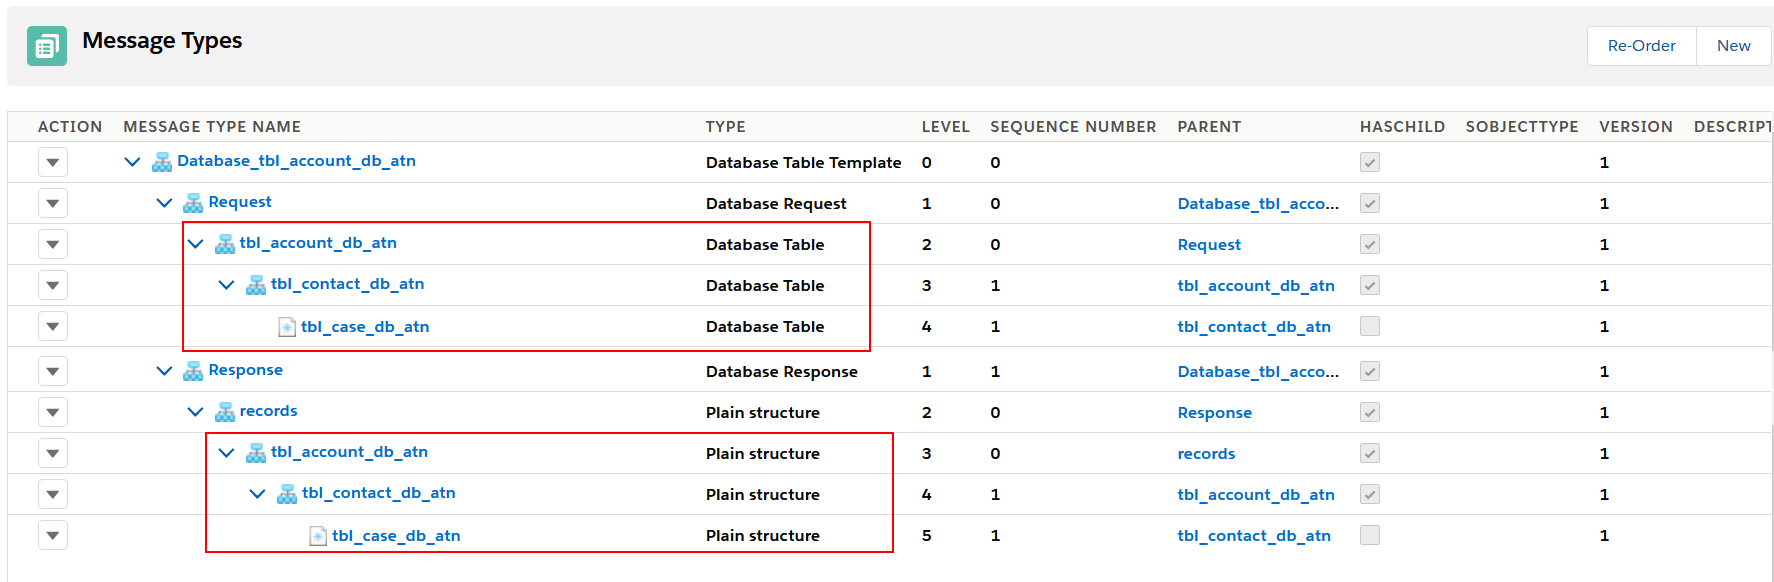
- Here the example for the Table called: “tbl_account_db_atn”

– Create a root Message Type with prefix “Database_” + “Table’s name” within type as “Database Table Template”
– Create two Message Type as a child of the root with the fixed name. The first one is “Request”, type as “Database Request”. And the other one is “Response”, type as “Database Response”
– Under “Request”, create a Message Type as the child. The Table’s name is used for this Message Type within type as “Database Table”. i.e: tbl_account_db_atn. In this Message Type, was generated the field name like on Table
– Under “Response”, create a Message Type as the child with the fixed name “records” within type as “Plain structure”
– Under “records”, create a Message Type as the child. The Table’s name is used for this Message Type within type as “Plain structure”. In this Message Type, was generated the fixed field name: “Id” and “databaseRecordId”
Step-4 Setup Interface
- For creating the Interface need to follow this guide https://docs.skyvva-dev.com/docs/tutorial-v2-41-lightning/what-is-an-interface-and-how-to-create-it/
- Define the request Interface
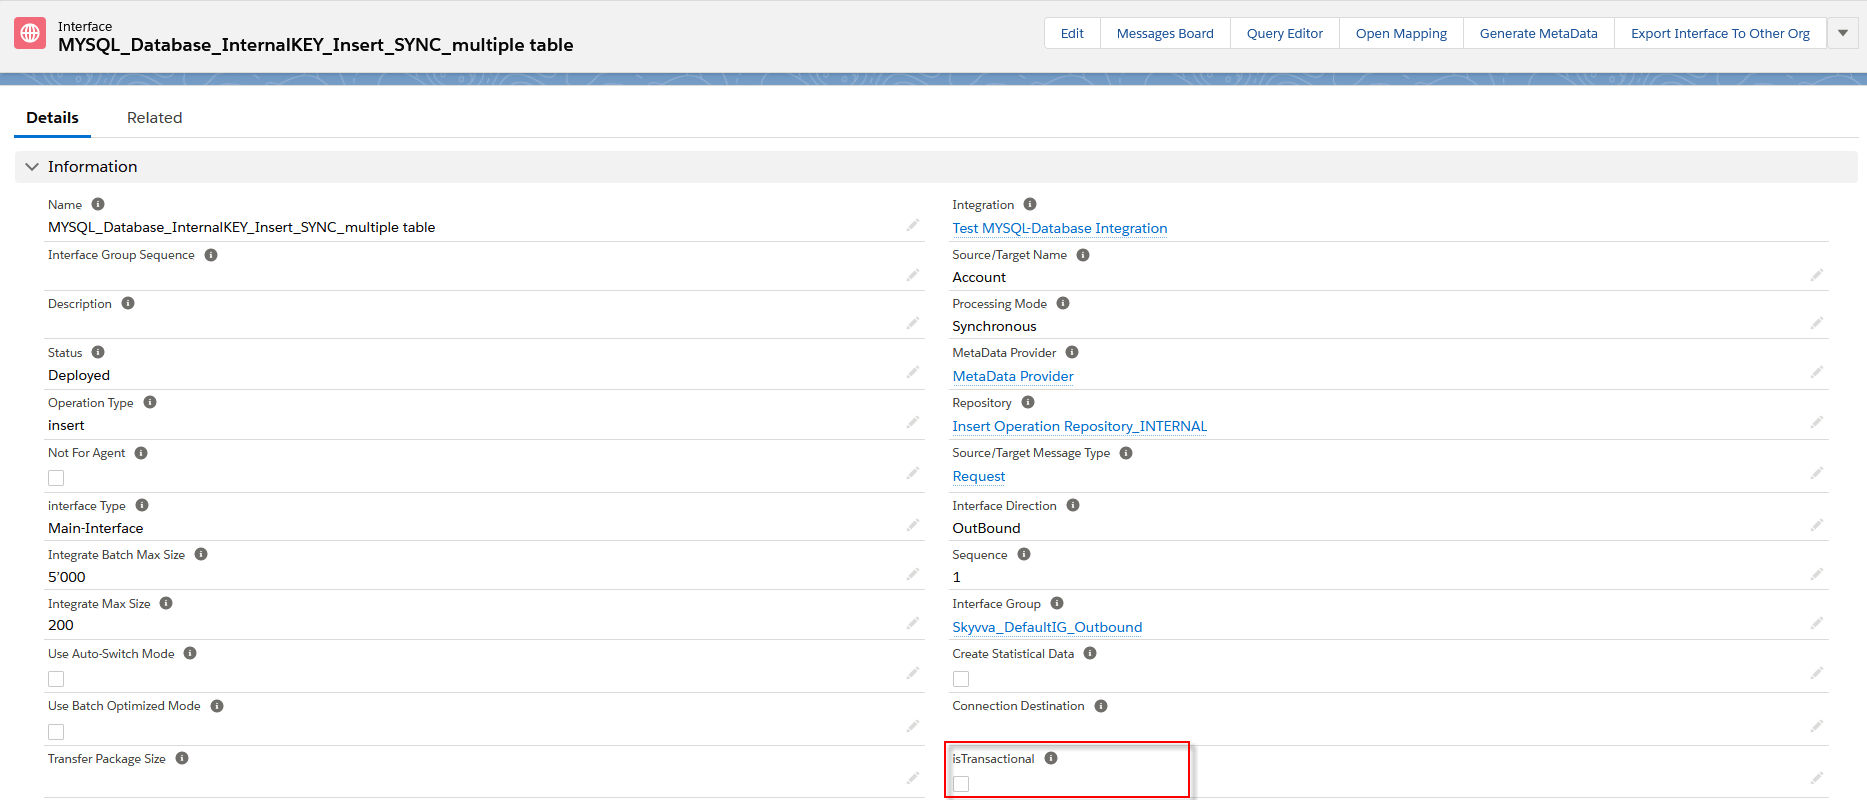
Create outbound Interface for Synchronous mode, operation(insert), choose Adapter, Metadata Provider, Repository, and Message Type (Request)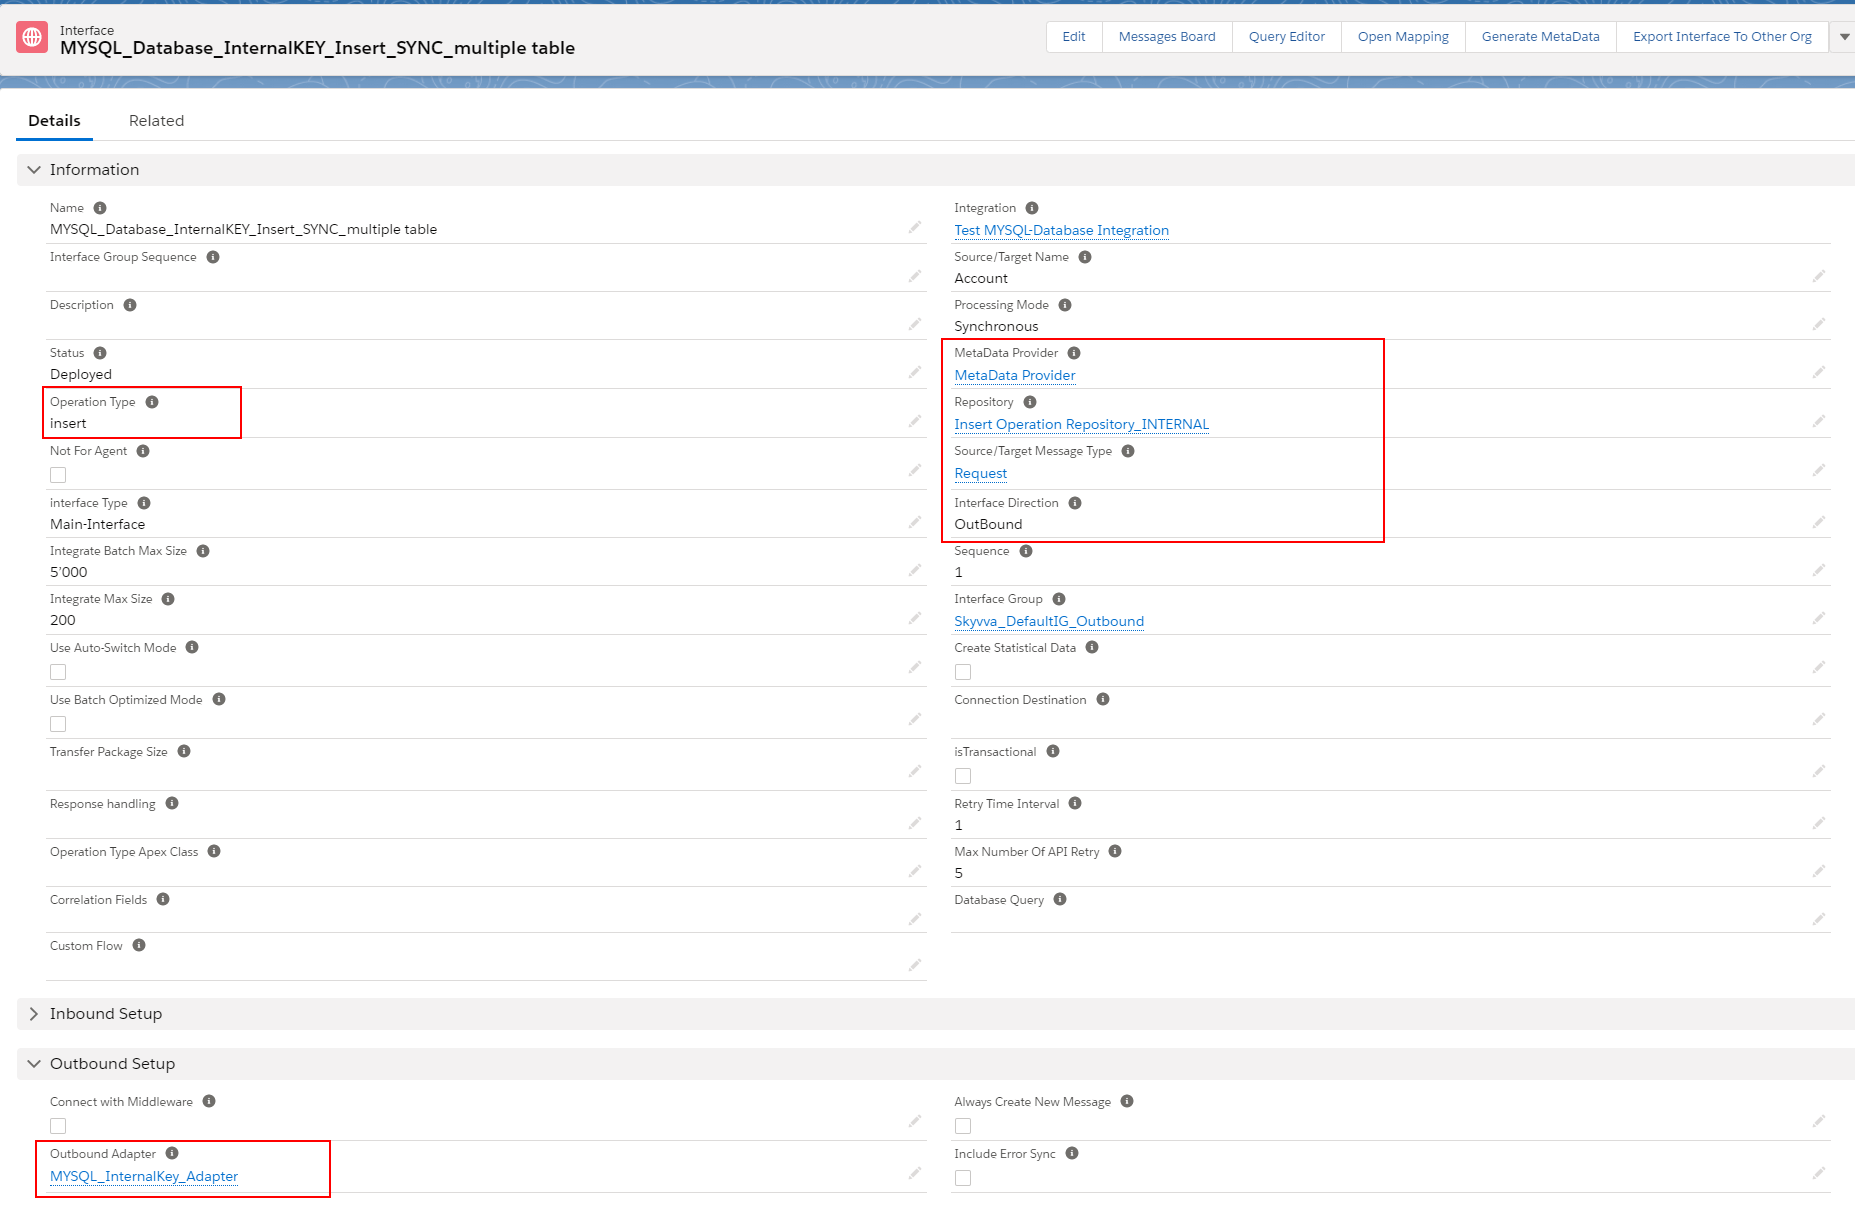
- On the Interface details page, click the button Open Mapping
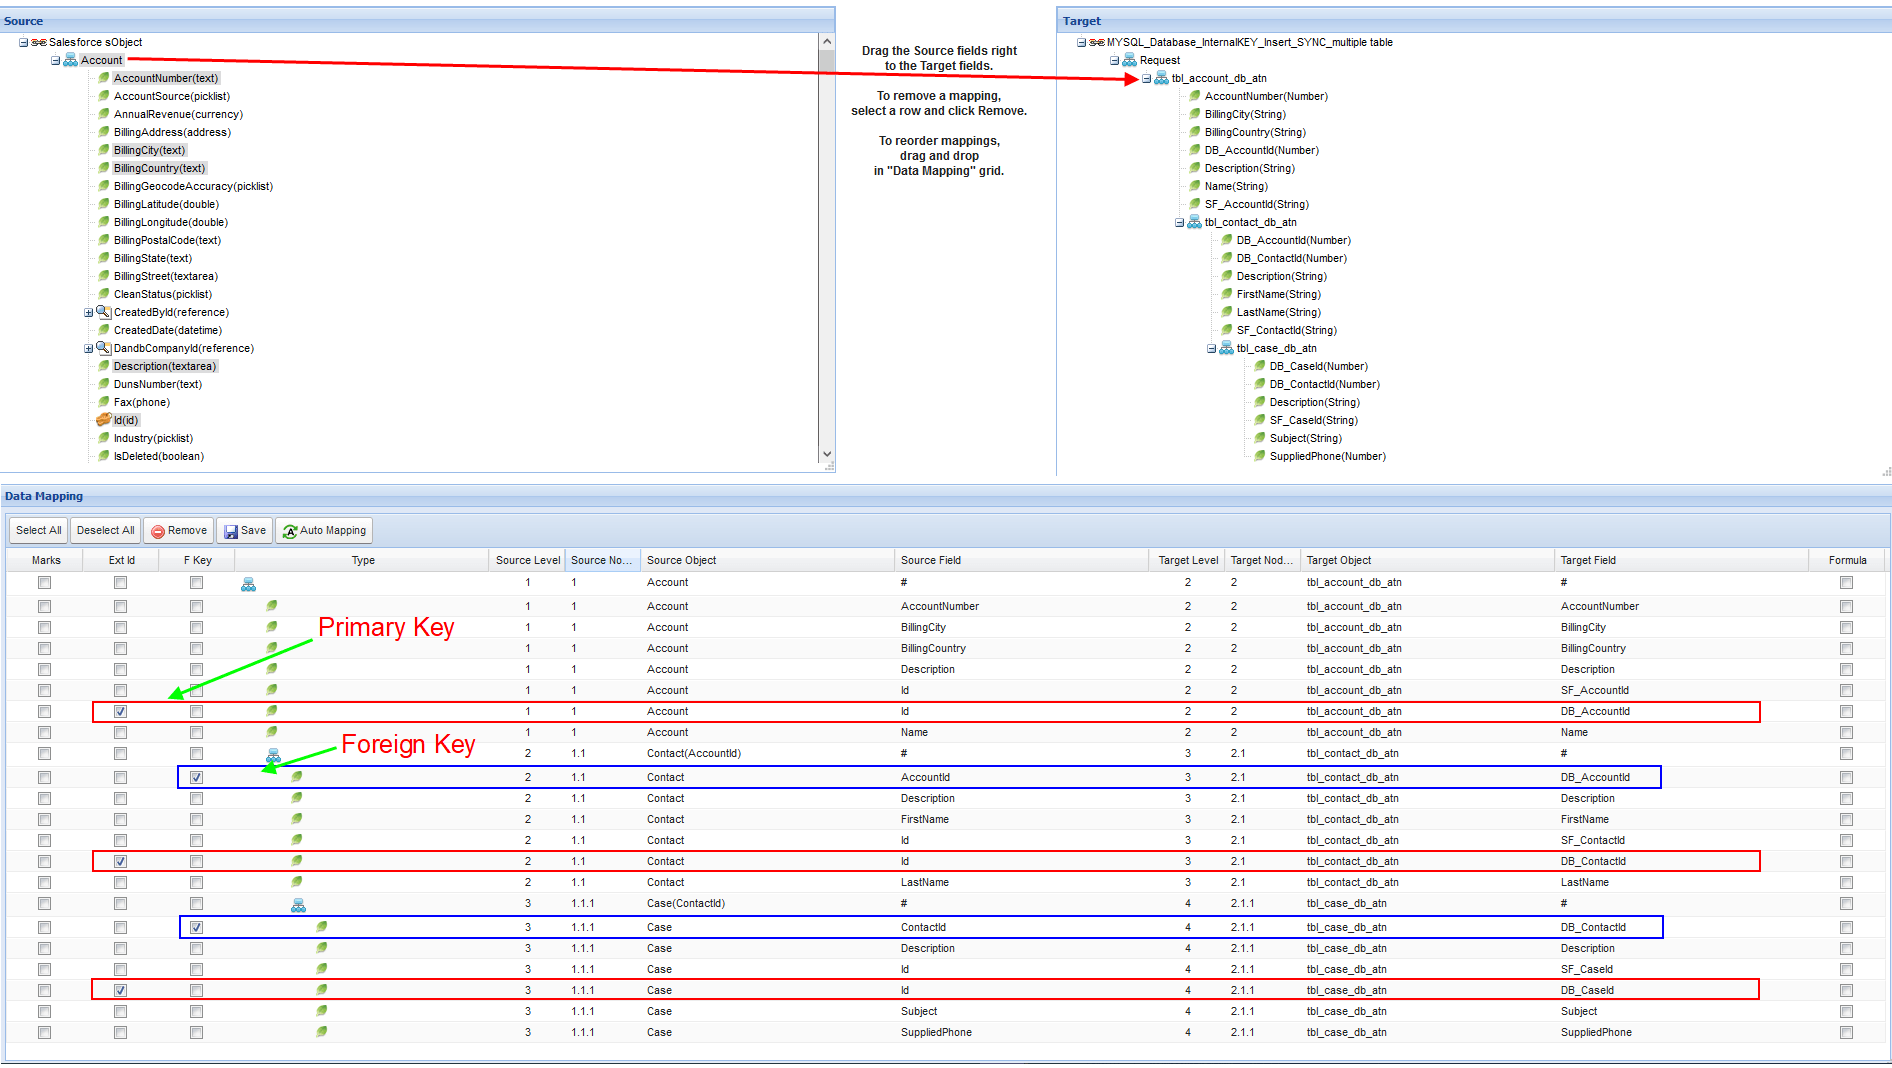
NoteFor INSERT operation, the field Primary Key and Foreign Key must be map in the mapping tool and then define as Primary Key by checking the flag “Ext Id” and Foreign Key by checking the flag “F Key” - Define the response Interface
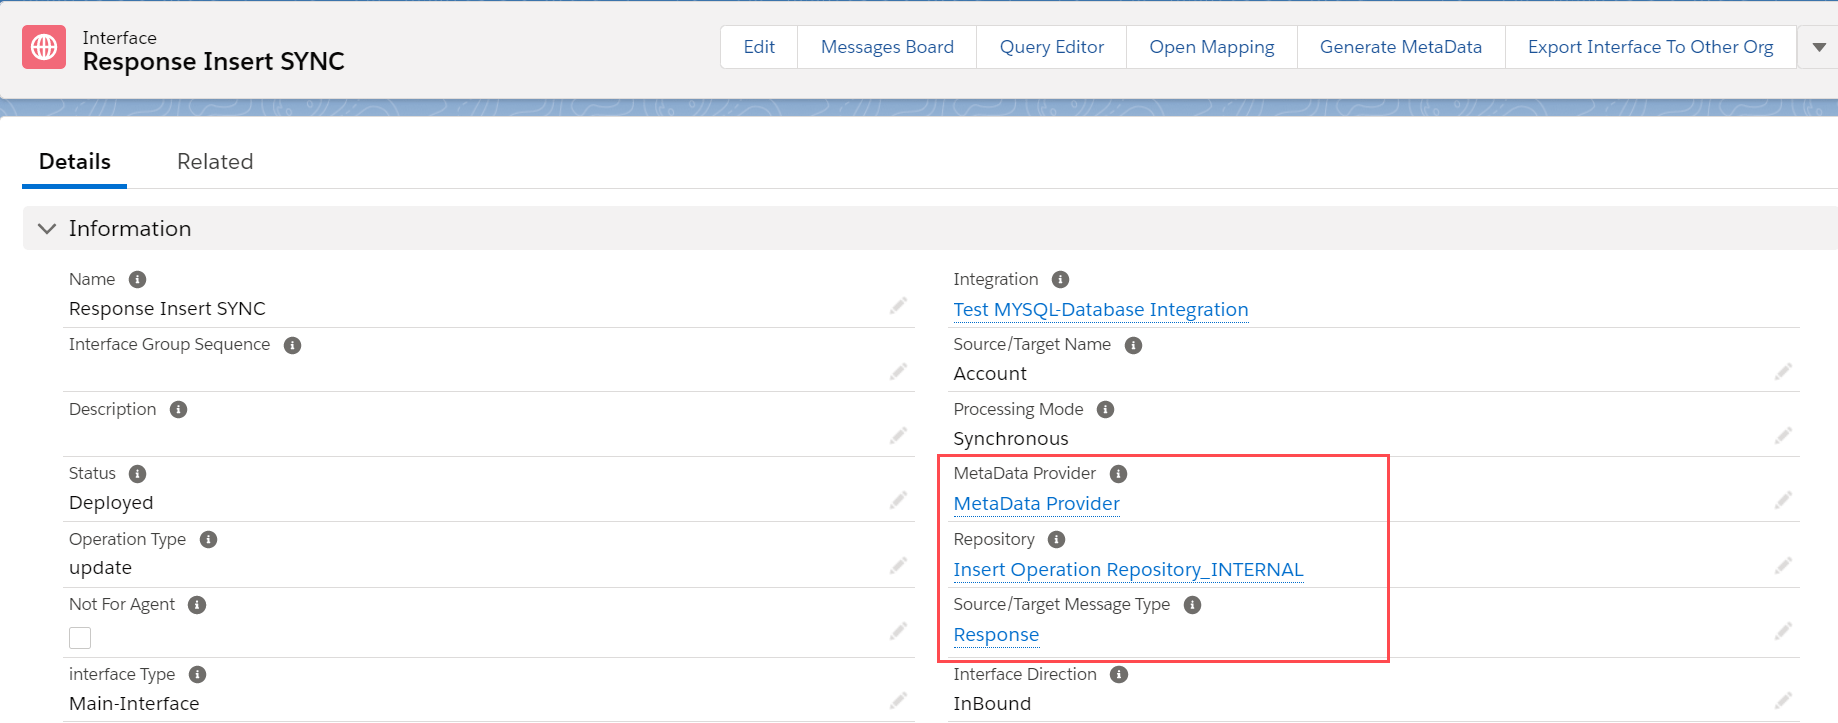
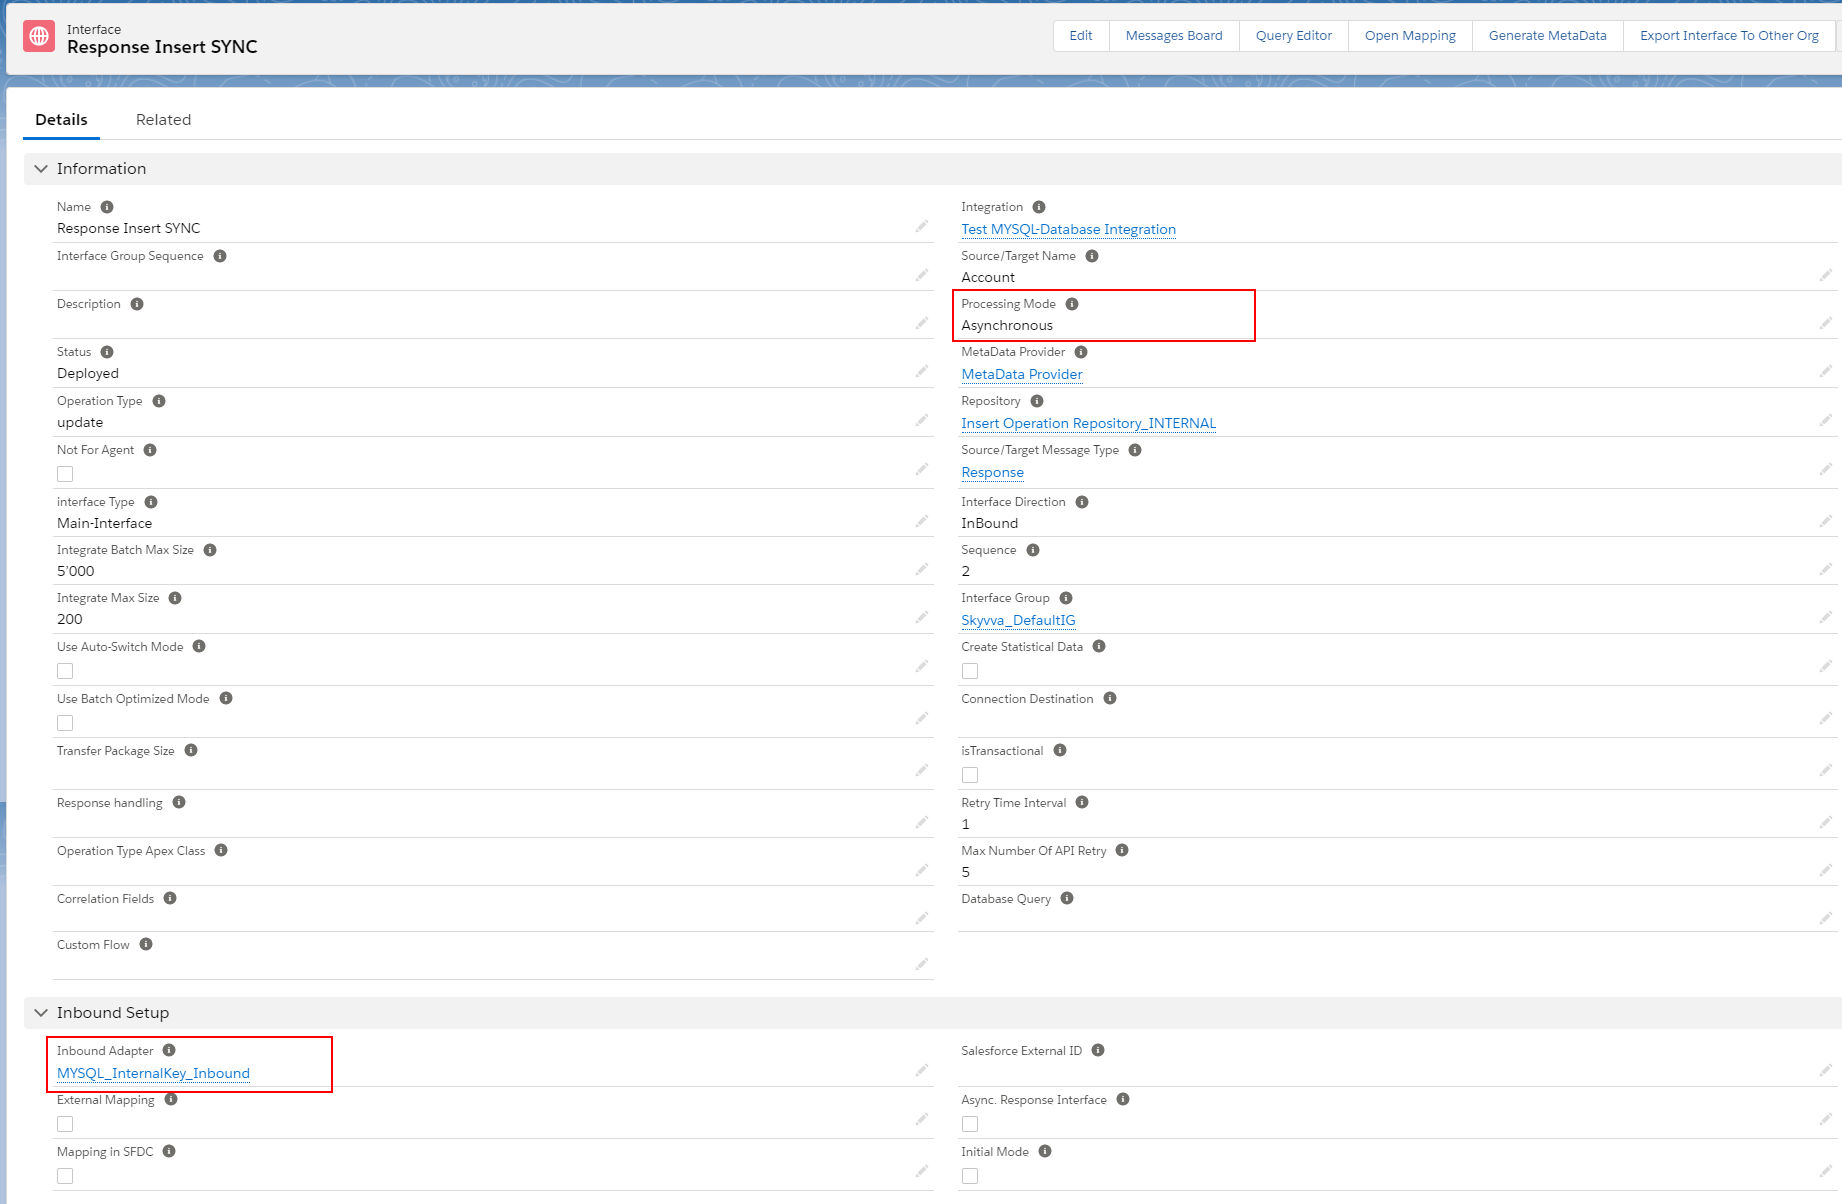
We need to define a response Interface because of INSERT operation within the Internal Key Management mode, the value of the Primary Key did not send from Salesforce, it is auto-generated by the database. In this case, Agent will return the Id (Primary Key) to Salesforce. The user can take this response to do Inbound V3. For example, the user can update on the existing Account’s object to make sure the record on Salesforce and database, are the same.
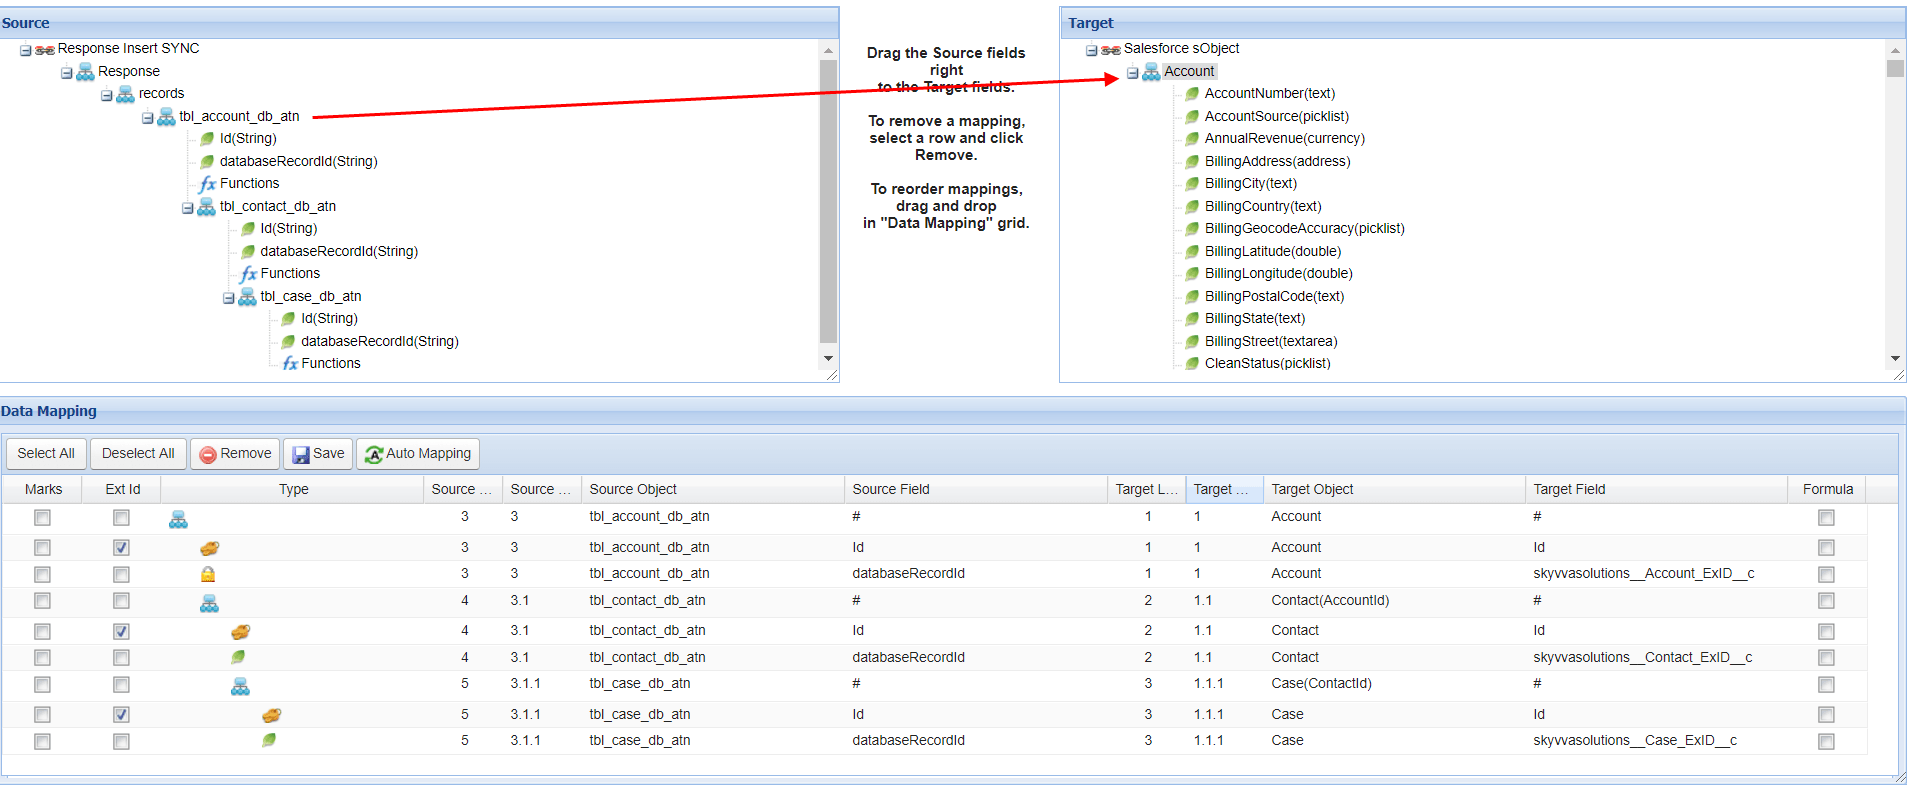
- Create inbound Interface with Synchronous mode, operation(update), choose Metadata Provider, Repository, and Message Type (Response)
- In the example below, we use the response from Agent to update the existing sObject
- Mapping
Adding Response Interface (Inbound) to Request Interface (Outbound)
- Go to the Request Interface details page then add Response Interface on-field Response Interface. In this example, the Request interface was named “MYSQL_Database_InternalKEY_Insert_SYNC_multiple table” and the Response interface is “Response Insert SYNC”

Step- 5: Checking Cache record to ensure it synchronized to new Agent.
Go to Agent control board then click Cache Monitor
- Navigate to Setup gear icon => Developer Console => Debug menu => Open Execute Anonymous Window then put sample code below and click the Execute button.
[aux_code language=”javascript” theme=”tomorrow” extra_classes=””] skyvvasolutions.CallOutControl c = new skyvvasolutions.CallOutControl();
c.returnJSONComplete=true;
c.actionDoIntegrate=true;
c.isCreateMessage=true;
String[] ids= new String[]{‘0014E00001C8fAwQAJ’};//Account Id
skyvvasolutions.Iservices.invokeCalloutV3(‘Test MYSQL-Database Integration’,’MYSQL_Database_InternalKEY_Insert_SYNC_multiple table’,ids,’SYNC’,c);
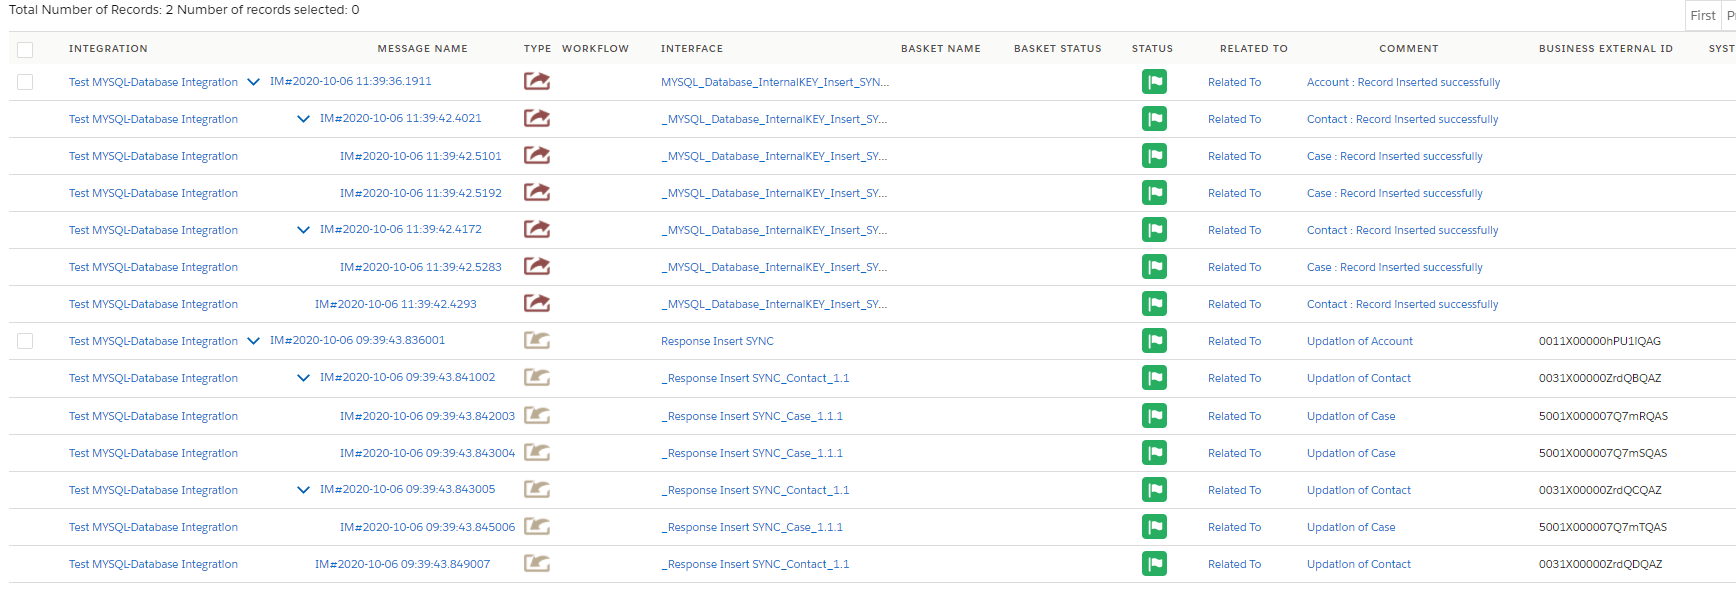
[/aux_code] - After callout, the record is inserted into the database then its response back to update the relevant object. As shown the result on Message Monitoring below:
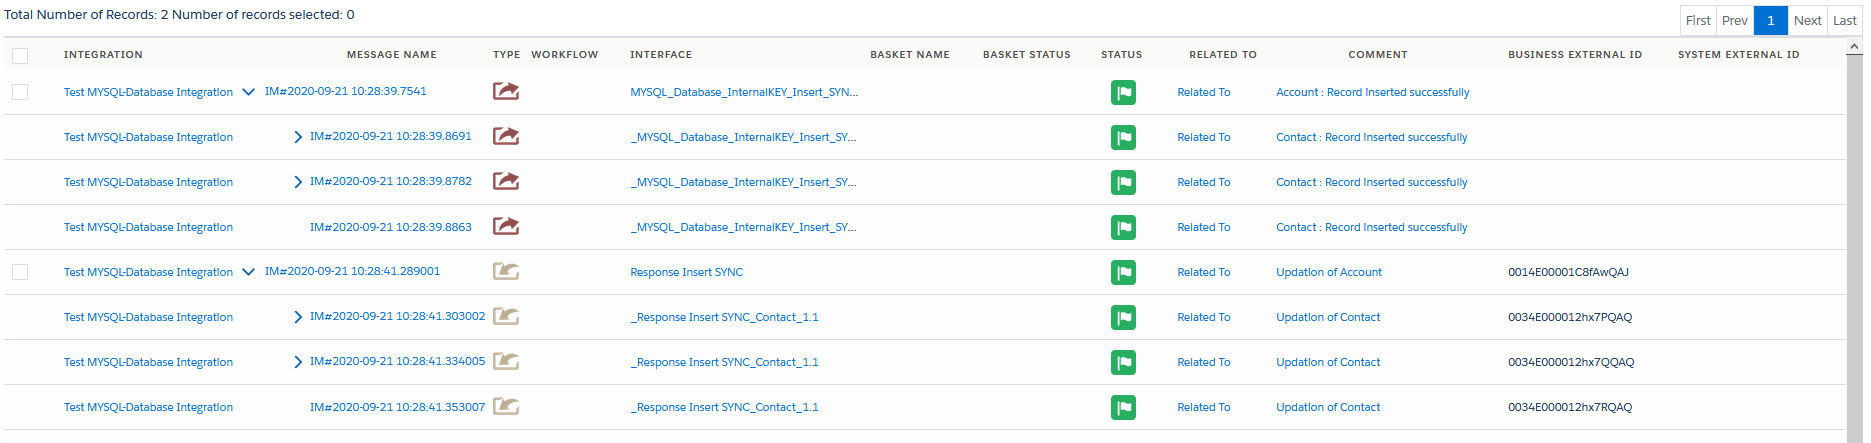
- The example below has shown the response is updated to the Account’s object
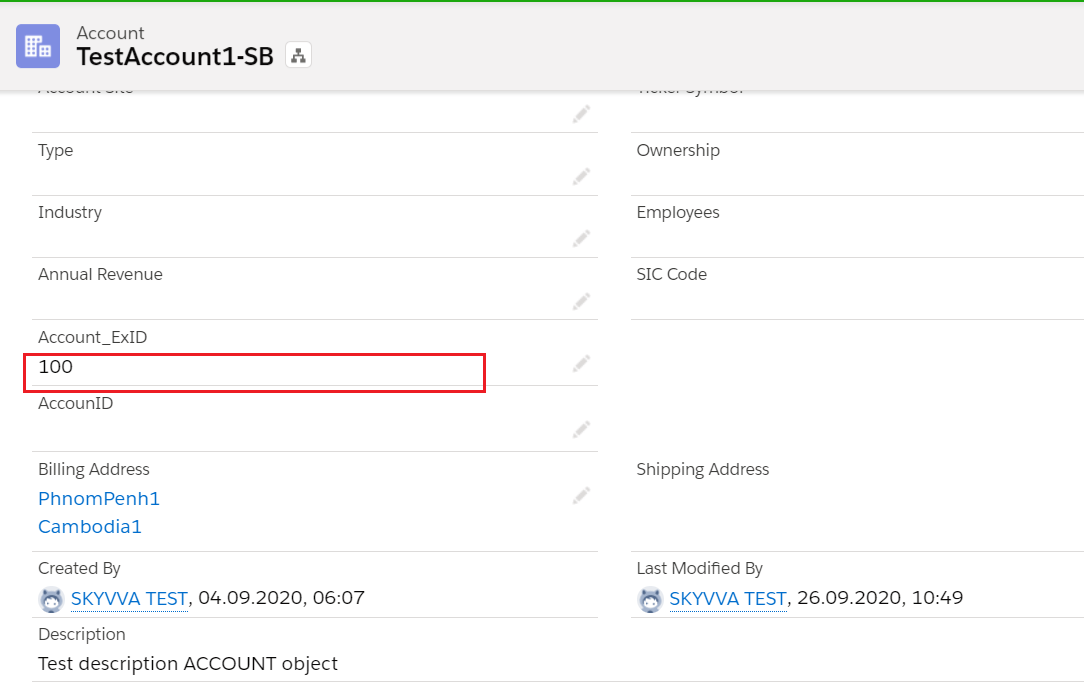
- Checking the result on the database, the record has been inserted correctly on the MYSQL database
In this example field “DB_AccountId” is the primary key of Table “tbl_account_db_atn”
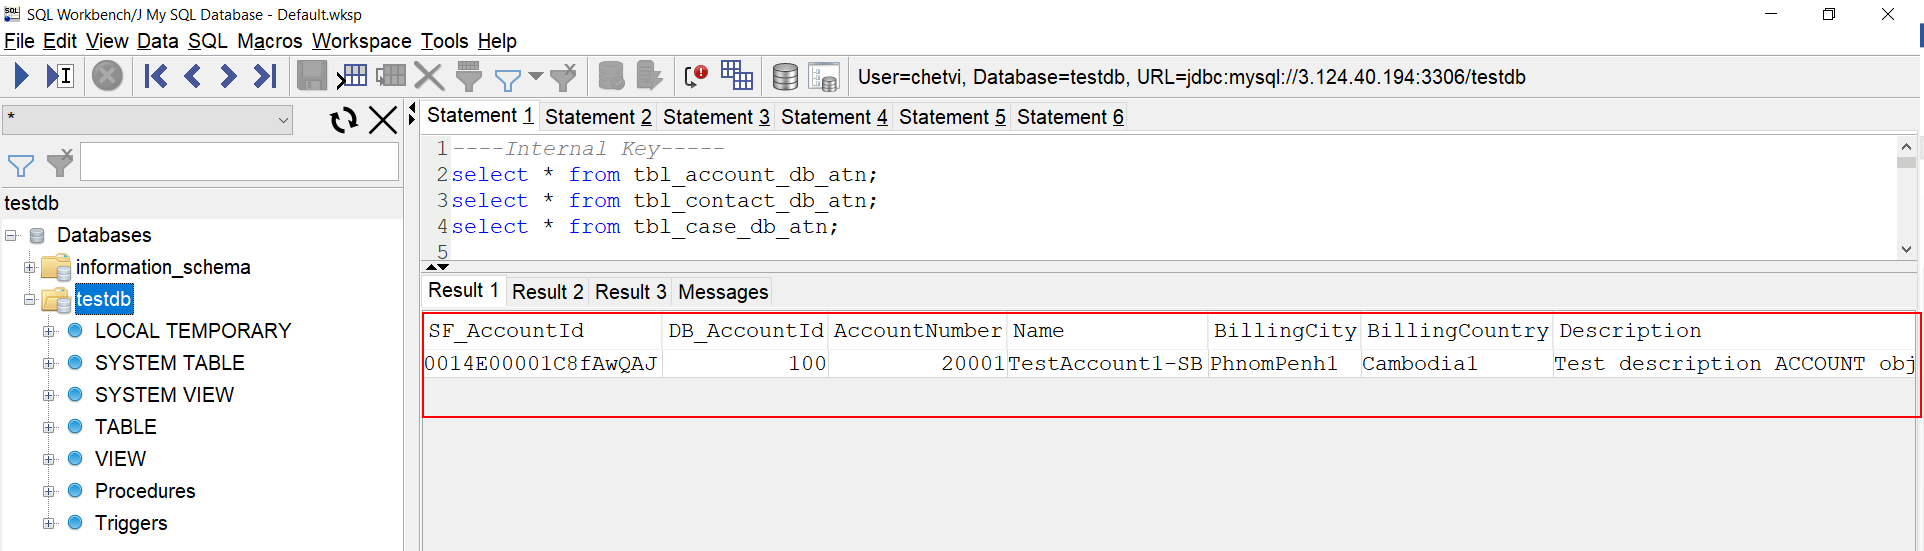
- field “DB_ContactId” is primary key of Table “tbl_contact_db_atn”

- field “DB_CaseId” is primary key of Table “tbl_case_db_atn”

How to do insert operation using an Asynchronous outbound interface?
#
In this example, we use the same Interface as we have practiced for the Synchronous scenario, just change the processing mode to Asynchronous on Interface then Callout v3.
- Request Interface

For example, in case we are sending 3 records Account’s id:
- If “Transfer Package Size=2”, it will execute 2 API call.
- If “Transfer Package Size=1”, it will execute 3 API call.
- Response Interface
We create another inbound Database Adapter that connects to the database as inbound direction then add it to the Response Interface
- Callout v3
Navigate to Setup gear icon => Developer Console => Debug menu => Open Execute Anonymous Window then put code for update Account object then click the Execute button.
[aux_code language=”javascript” theme=”tomorrow” extra_classes=””]
skyvvasolutions.CallOutControl c = new skyvvasolutions.CallOutControl();
c.returnJSONComplete=true;
c.actionDoIntegrate=true;
c.isCreateMessage=true;
String[] ids= new String[]{‘0011X00000hPU1iQAG’};//Account Id
skyvvasolutions.Iservices.invokeCalloutV3(‘Test MYSQL-Database Integration’,’MYSQL_Database_InternalKEY_Insert_SYNC_multiple table’,ids,’Auto’,c);
[/aux_code]
Insert operation and Transactional mode #
Normally, when we creating a new Interface the field “isTransactional” is unchecked it means that Non- Transactional Mode. If that field is checked then it is Transactional mode.
- Transactional Mode: If any error while insert of one message then the whole tree will be marked as Failed status.
- Non-transactional Mode: If any error while insert of one message then the respective message will be marked as Failed status
- These two modes are support both Interface processing Synchronous and Asynchronous.
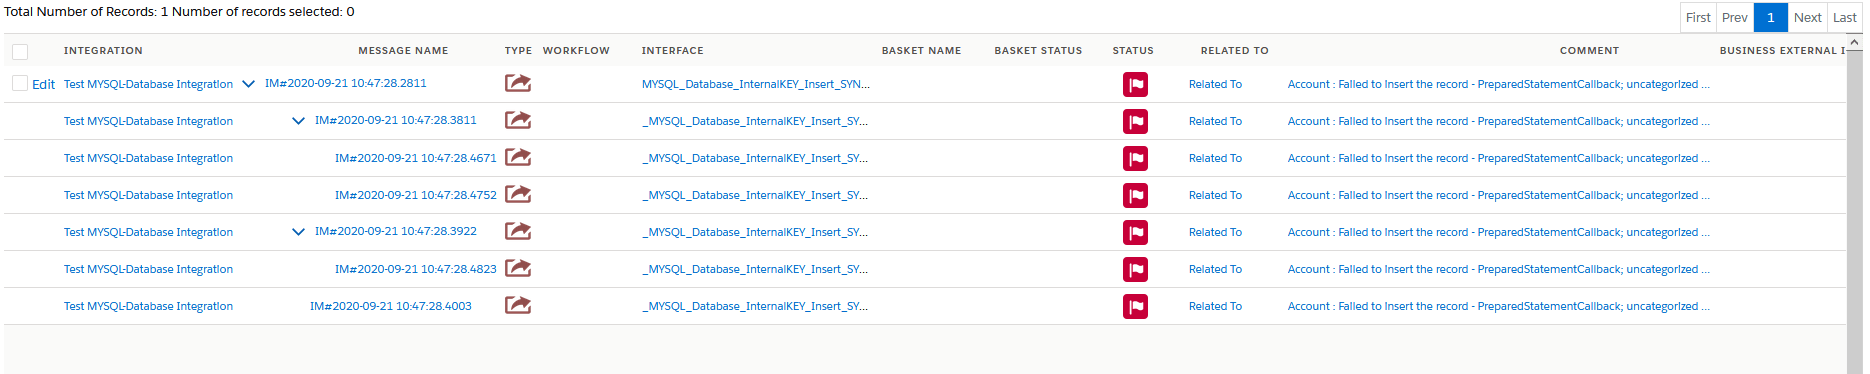
The example below has shown the Non-transactional Mode which is one message is failed to insert.

The example below is used the same message scenario for non-transactional Mode, it just switching to Transactional Mode. In Transactional Mode, when one message is unable to do any database operation then it makes another message which is complete to rollback and marked the whole tree as Failed status.
- For Synchronous mode, the Agent will return only the root message status.
- For Asynchronous mode, the Agent will return the whole tree message status.

Summary #
Finally, we have learned about how to do insert operation using Synchronous and Asynchronous outbound interface. We have understood how to create a Database Adapter, generate Message Type from the database table, Primary Key and Foreign Key on Mapping too, Internal Key and External Key Management, response Interface, and callout V3 to the Agent.


