- SKYVAA CONFIGURATION GENERIC DETAILS
- CONTENT:-
- Introduction
- Basic Configurations
- Note: Please check below link
- 4. Creating an IDOC-Interface SAP to SFDC
- 4.1 Introduction IDOC and IStructure
- 4.3 Maintain Fields
- 6. Defining Endpoint Access:-
- What is a session ID?
- LPort Enterprise and LPort Iservice are the names of logical Ports which has been configured in SOA-Manager (or in older versions in LPCONFIG).
SKYVAA CONFIGURATION GENERIC DETAILS #
CONTENT:- #
1. Introduction.
2. Basic Configurations.
3. Creating Interface in SAP.
4. Creating an IDOC-Interface SAP to SFDC.
4.1 Introduction IDOC and IStructure.
4.2 Preparation and design considerations.
4.3 Maintain Fields.
4.4 Download of created IStrucures as. XML-file.
5. Creating a BAPI-Interface SAP to SFDC.
6. Defining Endpoint Access.
7. Defining Routing to Interface/Integration.
Introduction #
To let the SKYVVA Integration Suite exchange Data between SAP and SFDC (Salesforce.com) it is necessary that both systems agree on one data format.
The leading system to create a common data structure here is the SKYVVA configuration environment in SAP. With creating a data structure, a communication interface for this specific message is also created on the SAP site. The created data structure will then be exported as an XML file and saved in SFDC as a so-called IStructure.
The focus of this document is to describe how to create such a Data structure in SAP, export it and import it as an IStructure in SFDC.
As pre-requisites, it is highly recommended that all necessary information about what BAPIs or IDOC, with what Tables, Segments and Fields that are needed, are gathered on beforehand.
Also, should the person developing on the Integration Suite on SFDC site contact the Responsible Person on the SAP site to get information about the data sent from SAP or to SAP. For one reason it is to get information about what field name has what meaning since the names in SAP are not always clear and may have multiple meanings, depending on the usage. Another reason is that SAP and SFDC are not treating all dates in the same way (e.g. date formats) and therefore some conversions have to be done in the mapping via formulas.
When using IDOC, you can define own IDOC-type, IDOC-Extensions Message Types. For your Message Types, you can also maintain relevant fields in Transaction BD52 for Master data like Material, Customer and so on. For document-based IDOCs like ORDRSP, DLVRVY, etc. you can customize own OutputControl-Messagetype and Output-Control-Conditions with the transaction NACE may be using the Transfer medium ALE-Processing. For the Distribution of Master data-IDOCs or Document-Idocs with ALE-Processing, you also have to maintain a logical System for your Salesforce-Instance in transaction SALE and a Distribution Model for your SAP-System in connection with your Salesforce-System for the exchange of the IDOCs. Please ask your ALE/IDOC-Administrator. These SAP-Standard-activities are not described here, we recommend reading SAP Documentations for this purpose.
Basic Configurations #
To establish the connectivity some basic settings have to be done first. With SOA MANAGER configure the logical port for the consumer-proxies and with WE21 the Port for IDOC-Processing has to be configured (Type ABAP-PI and assigning the actual ABAP_IDOC2SOAP_ADAPTER)
Note: Please check below link #
- https://docs.skyvva-dev.com/docs/sap-adapter-2/generic-inbound-configuration/
- https://docs.skyvva-dev.com/docs/sap-adapter-2/enterprise-service/
- https://docs.skyvva-dev.com/docs/sap-adapter-2/configure-iservice/
Creating Interface in SAP
After installing the Components of the SKYVVA Integration Suite in SAP, the interface configuration tool can be reached via the following transaction:
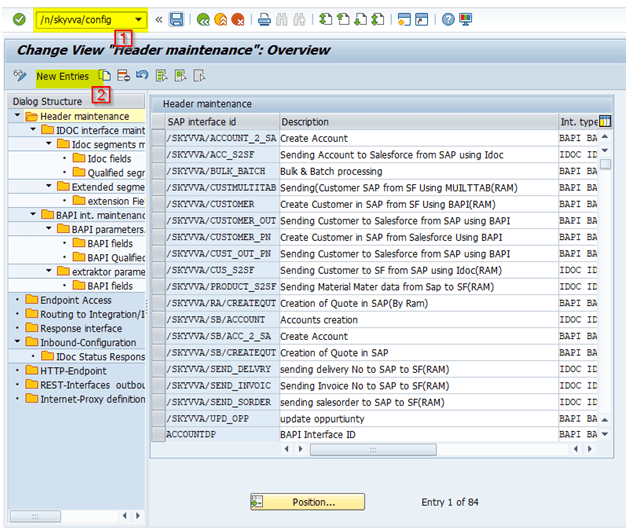
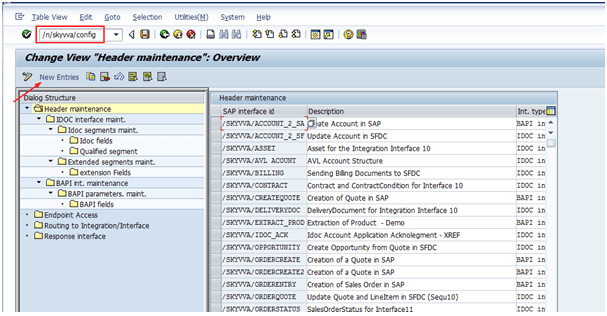
Run T-code – /n/SKYVVA/CONFIG
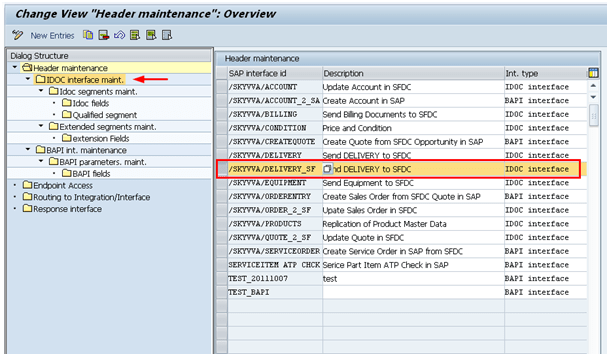
After calling the transaction /SKYVVA/CONFIG the SKYVVA configuration page appears.
Mark with the mouse the first tree branch with the name “Header maintenance“. Click on the button “New Entries” to create a new Interface. The screen below appears. If this Button is not visible change the window to edit mode by pressing the edit button or ctrl F4.
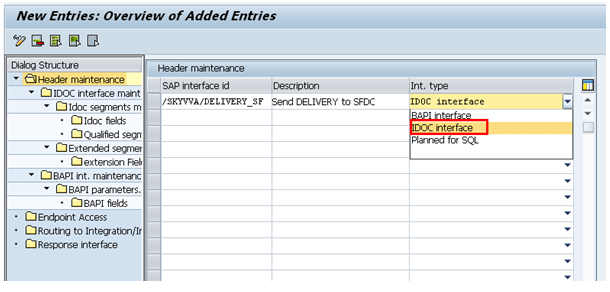
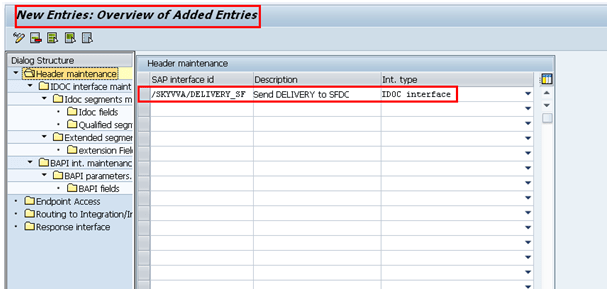
When entering a new interface a name and a description have to be entered. It also has to be decided whether the interface should communicate with an IDOC or a BAPI. This choice appears as a drop down field.
Press Save (ctrl + s).
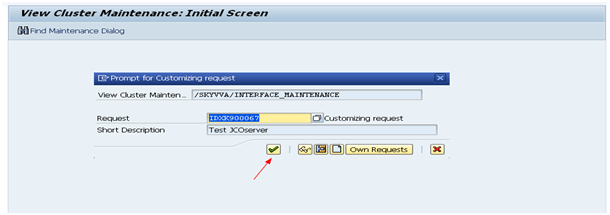
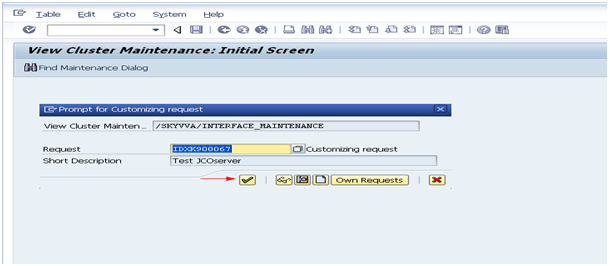
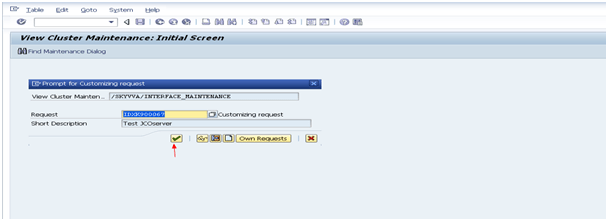
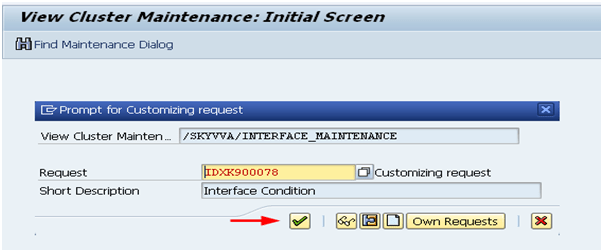
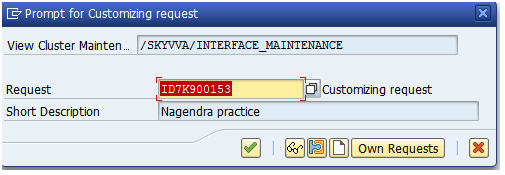
When saving a new interface SAP requires this to be maintained in a transport.
So here it should also be checked with the SAP Basis team what to use here.
4. Creating an IDOC-Interface SAP to SFDC #
4.1 Introduction IDOC and IStructure #
One way to interact with SAP and to invoke a business Process is via so called IDOC (Intermediate Document). An IDOC is working asynchronous and consists of many Segments, sometimes with child segments and qualifiers for single fields which can give these fields more than one meaning. Also it can the segments of which an IDOC consists of, have multiple child segments.
An IDOC can also contain data from more than one message type (e.g. Account and Contacts or header and items of a document). These Messages have to be sent to different interfaces in SFDC although they come from the same IDOC.
So in the configuration it has to be determined which Segment belongs to which message and which segments has to be sent together. In the configuration this is configured via the header (main) segment in that way that it is configurable what segment should be send with what message (main segment).
So to create an Interface it is necessary to rebuild the IDOC structure in a way that all data are correctly processed. The Interface is therefore always built from the top-level (interface) to the bottom (field level). And these configurations are used to generate a xml-structure for the IStructure-Generation in SFDC via file. upload.
So the metadata-exchange is implemented, to enable the mapping from SAP-fields to SFDC-Fields with the Mapping-functionality of the Integration Suite.
4.2 Preparation and design considerations:-have
When beginning the configuration you should have already defined the target-objects in SFDC and it is a good idea to collect the interface-details in the design phase in an excel-mapping-sheet.
On the top-level you have to identify the related IDOC-segments;
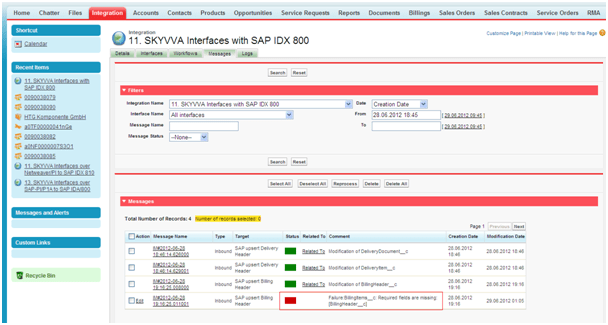
In our example in SFDC 2 objects have been created for the integration of delivery.
As result we will need at least 2 interfaces.
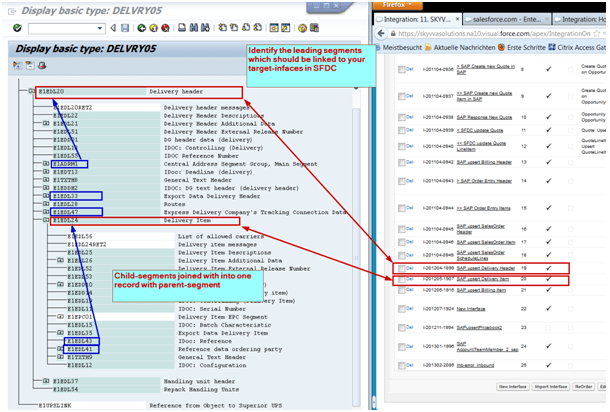
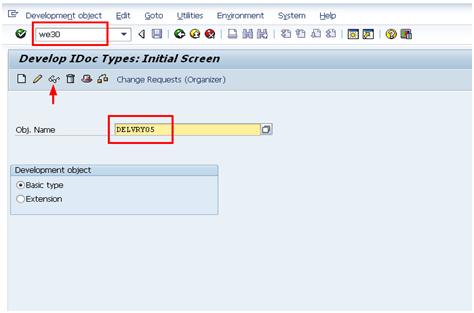
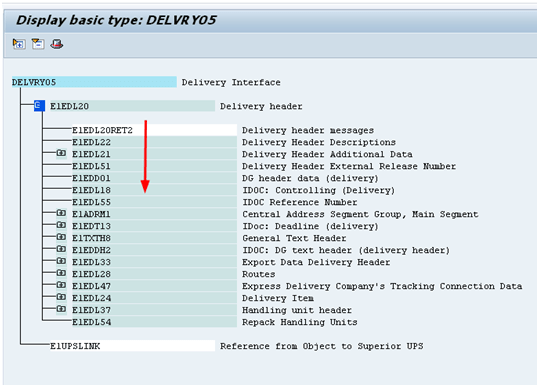
In SAP the IDOC-Type DELVRY05 has been identified as medium for the interface.
In the screenshot the WE30-transaction is on the left and the Interfaces in SFDC are displayed together. We identify the E1EDL20-segment as leading Segment for the Delivery header interface in SFDC and the E1EDL24 (Delivery Item) as the leading segment for the Deliver Item interface in SFDC.
The Steps are:
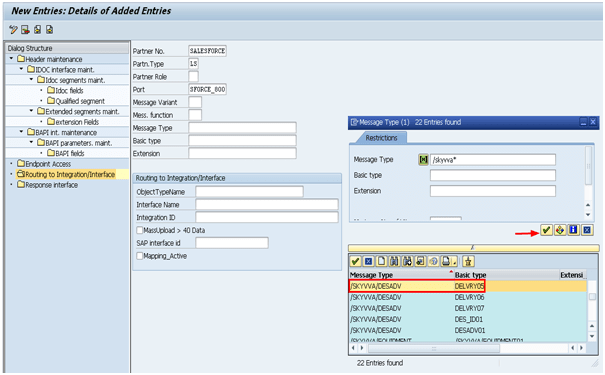
- Select an IDOC enabled Interface and mark it by hitting the field left of the
Interface name - Select the next level in the left pane (IDOC interface maintenance)
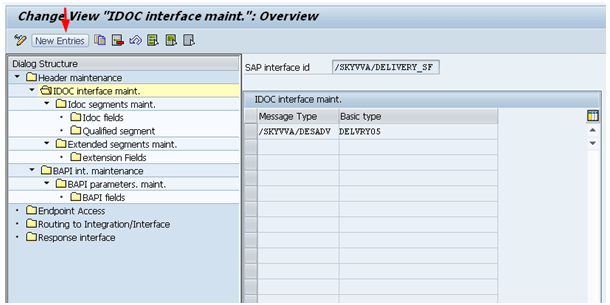
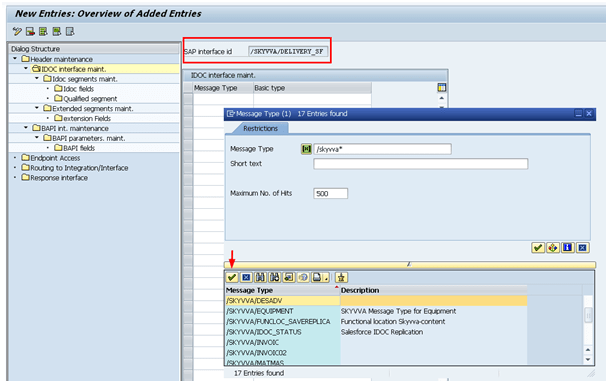
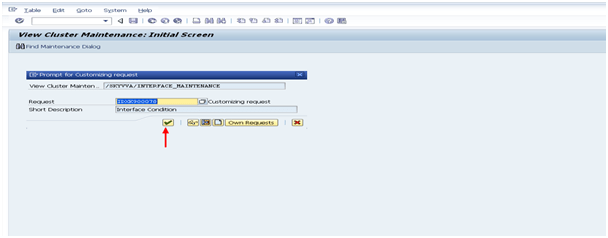
1. Press New Entries (F5)
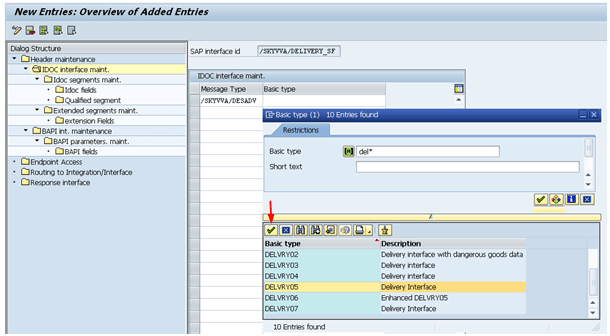
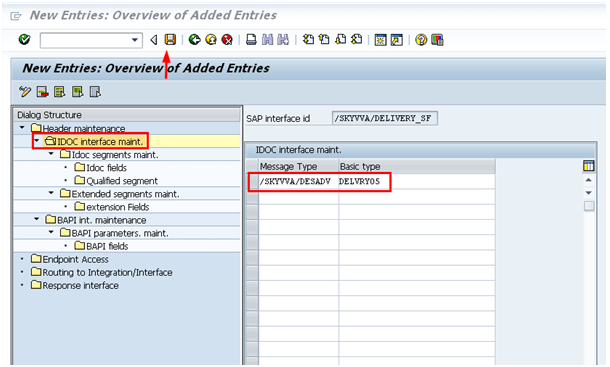
2. Fill in the message Type of the IDOC you want to use and its basic type.
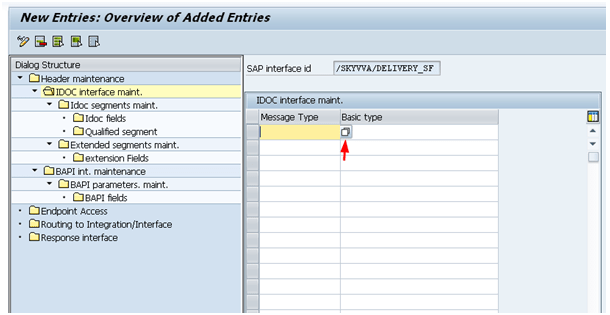
Press Save (or ctrl + s)
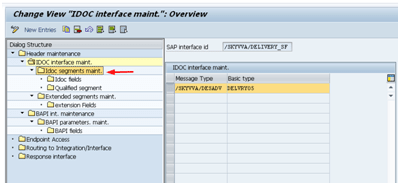
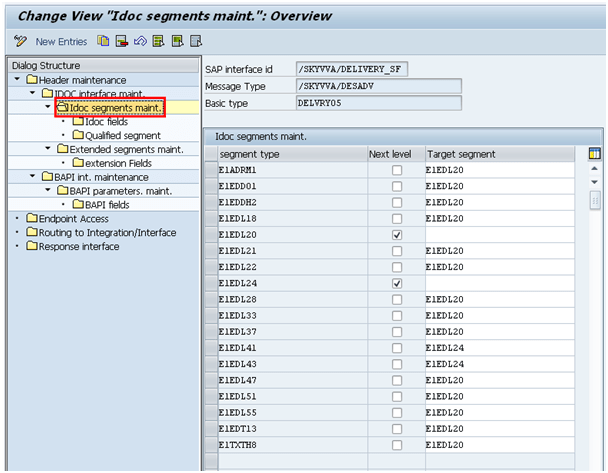
- Mark the message type as described before and choose the next level of the IDOC (IDOC Segments) in the left pane
- Press New Entries (F5) (If not visible press Change Button (ctrl + F4))
- Fill in all needed Segments which has to be processed (Segment Type)
- Determine from which segments the child segments has to be send also and check the corresponding check box (Next Level). (The main segment of a message type has to be checked in every case since each checked segment will spawn a message of its own!)
- Determine which segments has to be sent together with what main segment an fill in the name of this segment in the third column (Target Segment).
Mark the entry in the rigth pane and choose the below folder “IDOC-segments maint”.
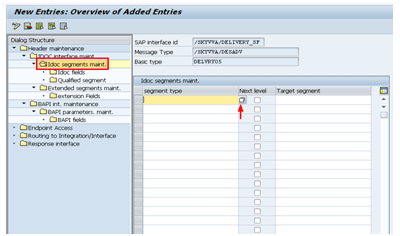
You can either paste the segment types from your Excel Mapping Sheet or search via F4-Search help.

Press Save (or ctrl + s)
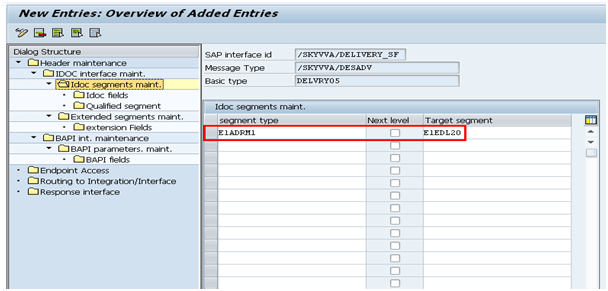
The following screen shows us two checked Next Level. i.e E1EDL20 as Header and E1EDL24 as Item and the belonging target segment of segment type.
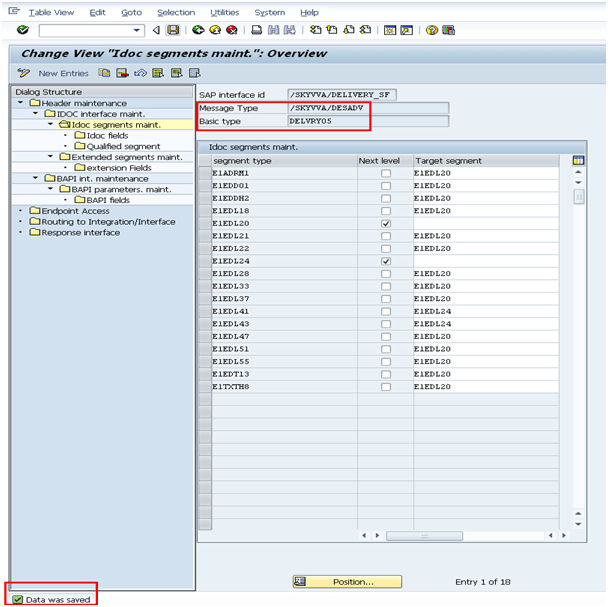
In this example the user maintained the target segment explicitely for all joined segments, but in most cases this is not necessary, because the default target-record is the identical to the last processed leading segment.
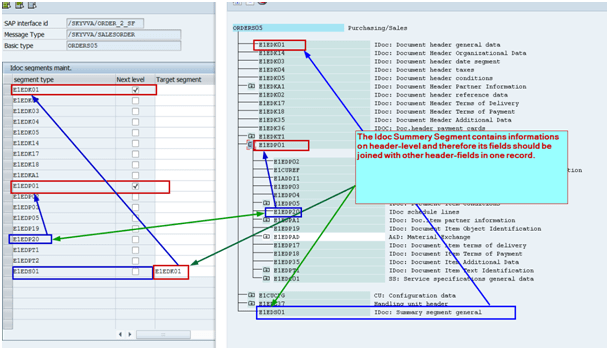
Here an example where target-object is needed, because the last segment should be linked to header because instead to the previous segment in the hierarchy which is the item-segment.
The E1EDP20 is joined with E1EDP01 by implicitly.
When the E1EDS01-segment will be processed the actual record will be a item record. To join the E1EDS01 with the E1EDK01-segment into one record, we specify the target-segment explicitly here.
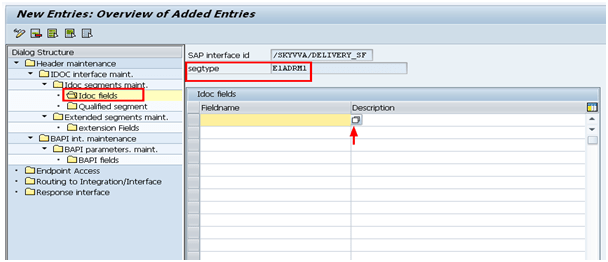
4.3 Maintain Fields #
- To select the needed IDOC Fields in the segments mark the segments as done before by checking the field left of the Segment Type you want to edit.
- The initial Field selection screen appears
- Press New Entries (F5) => Again, when this button is not visible press the Change Button (ctrl + F4)
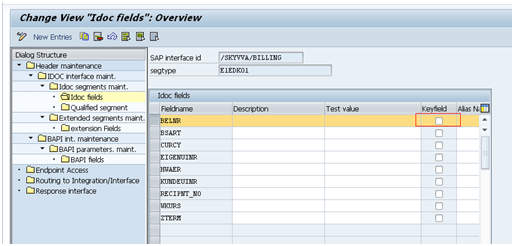
- The Screen for new entries appears. Fill in all needed field names for this IDOC segment. Save (ctrl + s) after every new entry.
- Depending on the Version of the software it may be necessary to press the Back Button (F3) to come back to enter new fields:

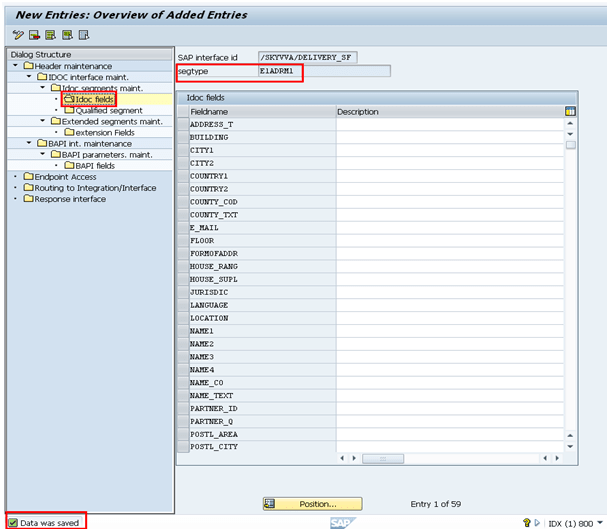
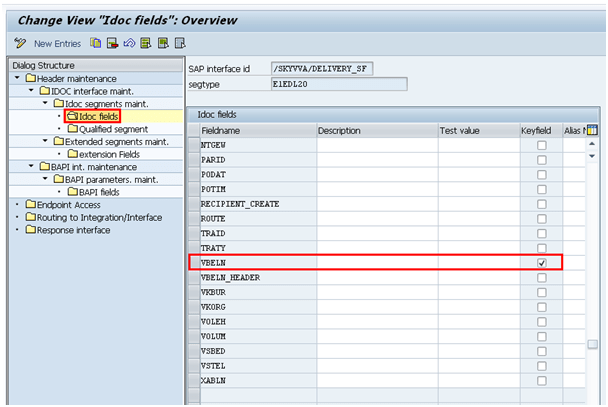
Press Save (or ctrl + s)
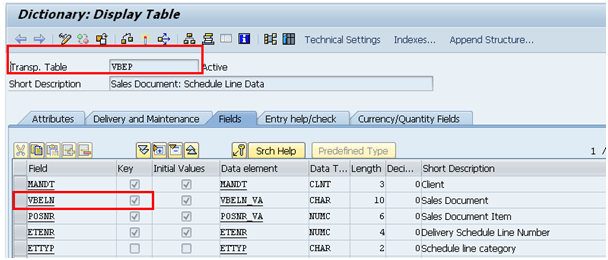
The following screen shows the IDOC fields „VBELN“ as Keyfield
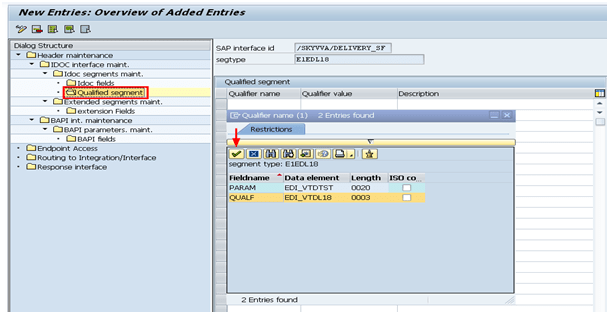
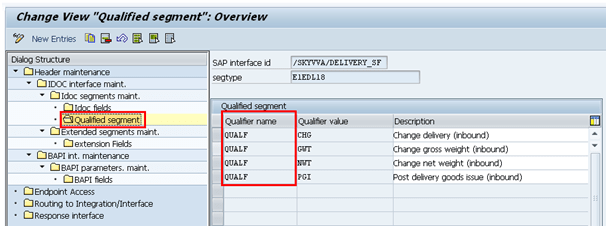
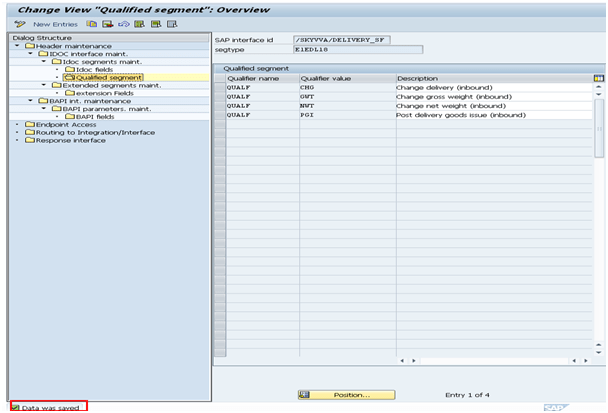
How to find a Qualifier?
The following screenshot steps show a qualifier
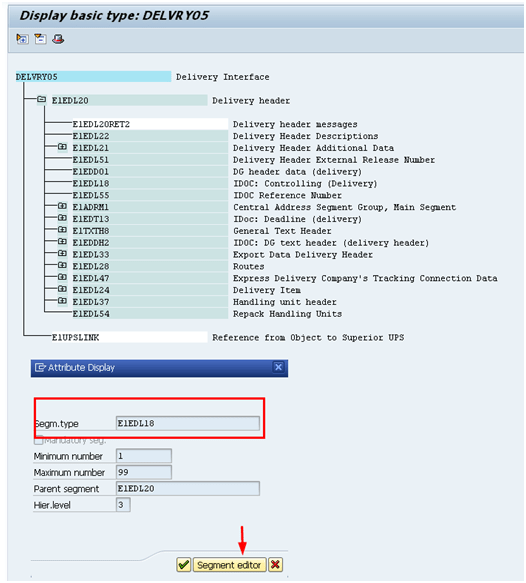
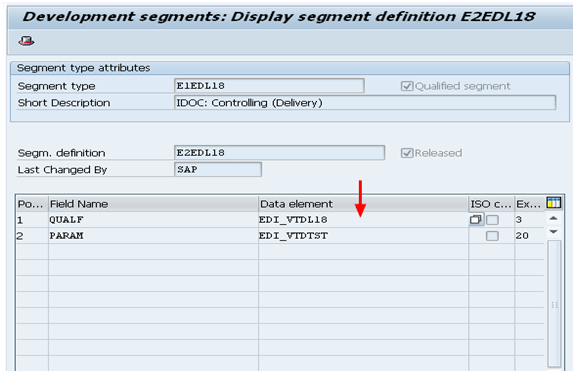
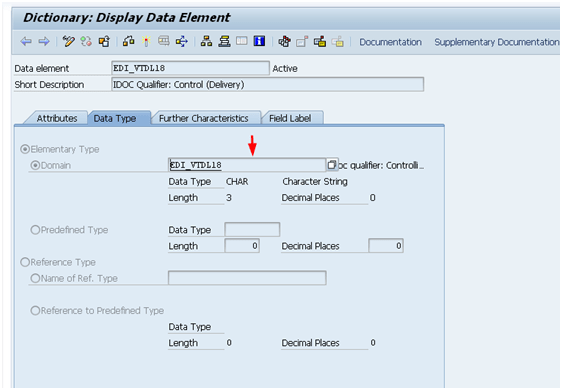
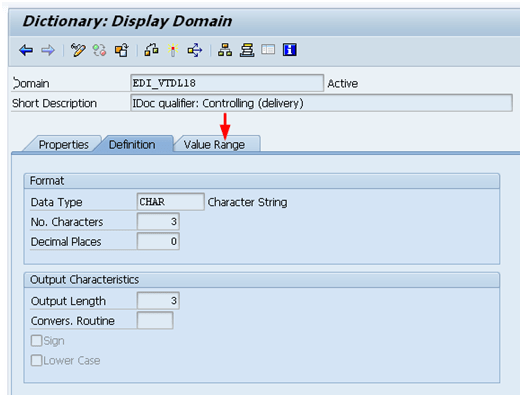
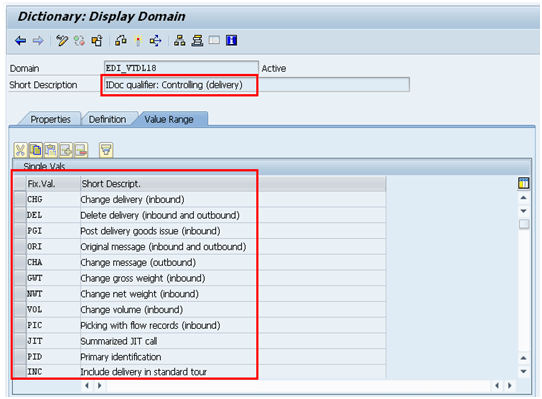
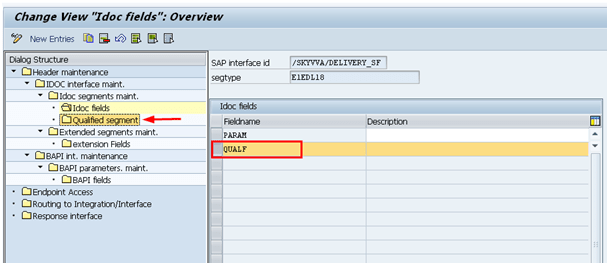
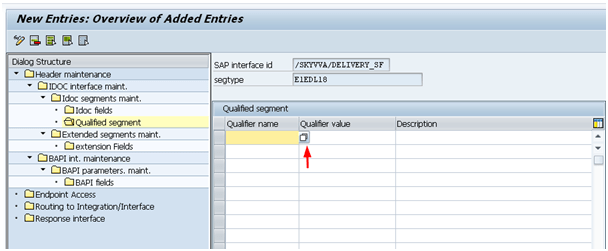
Now we can select qualifier for the following segment type. Click on Qualified Segment.
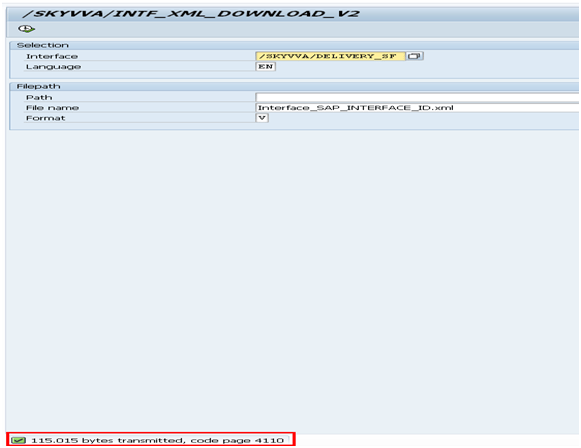
4.4 Download of created IStrucures as XML-file.
To interact with the interface of the SKYVVA Integration Suite on SAP site, it is necessary to have a corresponding IStructure in SFDC (Salesforce.com). This IStructure can be downloaded directly after the creation of the Interface from SAP and uploaded into Salesforce.
These are the Steps:
- Navigate to the following transaction:
- From the starting Page:
4.5 1. /n/SKYVVA/INTF_EXPORT
From any other Page in SAP:
4.6 2. /n/ SKYVVA/INTF_EXPORT (opens transaction in the same page)
4.7 3. /o/ SKYVVA/INTF_EXPORT (opens transaction in a new page)
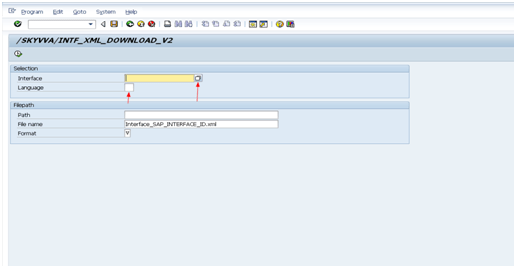
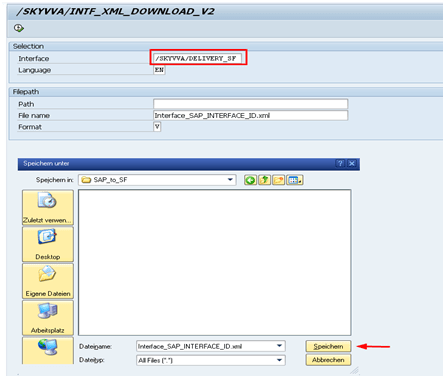
- The download page opens
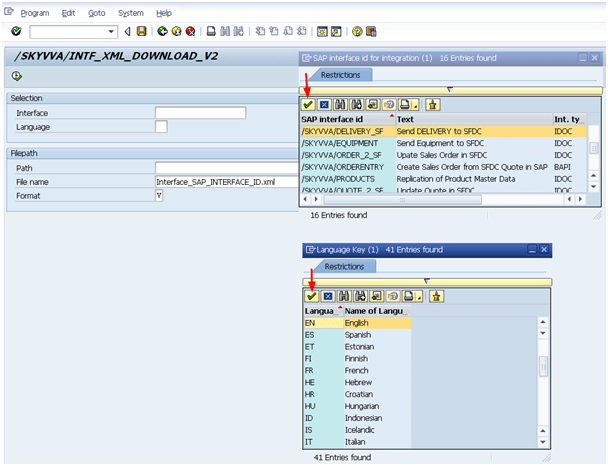
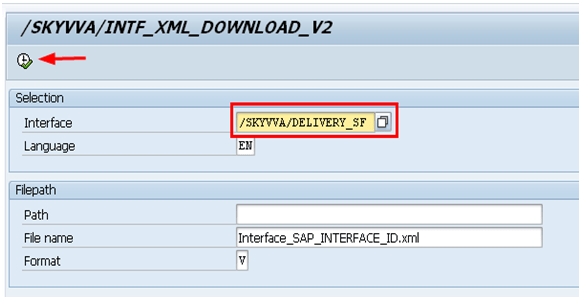
- Fill in the mandatory fields:
Interface: The exact name of the created Interface
Language: Depending on the language it may be possible to get the SAP field descriptions into the IStructure
Format: There are 4 different output formats:
D – Deployment Script
U – Format for XML upload
V – Format for XML upload (2)
C – CSV file (not yet supported)
The most common used formats of an IStructure to upload to SFDC are either D or V. they differ in the XML structure and how they are uploaded into the SKYVVA Integration Suite in SFDC. Structure V offers the possibility to get the SAP field description into the IStructure
5. Creating an BAPI-Interface SAP to SFDC
If you use BAPI or function module to send data out from SAP you have to define an interface which is based on BAPI type. Note that you have to develop your own BAPI/Function module beforehand or use SAP standard function module.
Call transaction /n/skyvva/config.
Mark with the mouse the first tree branch with the name “Header maintenance“. Click on button “New Entries” to create a new Interface. The screen below appear.

In this screen enter a name for the field SAP interface id. This is the name of your interface. Give a meaning full name for your interface. Then choose the value “BAPI interface” for the type.
Now save you editing with the save button. You might get a popup screen to record your change for later transport. Here just give an transport number of your choice. If you don’t know the transport number you can create a new one or contact your SAP basis admin and ask him for a valid SAP transport number to use.
As a result you will get a new line in the overview list like shown in the below screen.
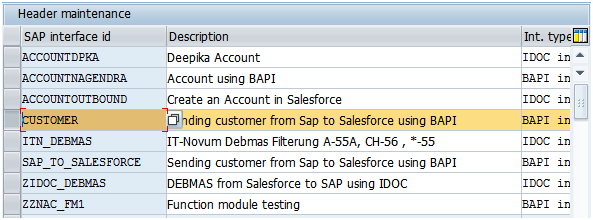
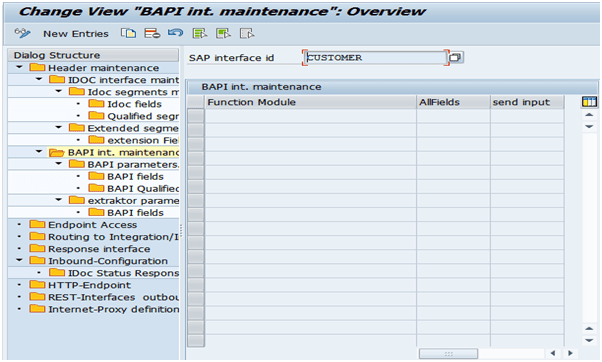
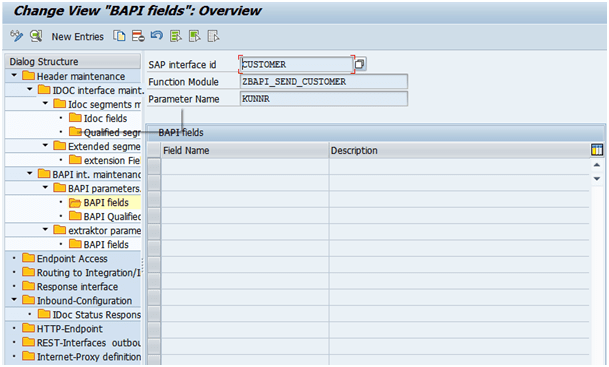
After this step you have created a interface with the name CUSTOMER. Now you need to specify the parameter and fields you want to transfer to Salesforce.
To define the Function module select the interface on the right side in the list (yellow highlighted). Now double click on the tree branch “BAPI int. maintenance” on the left side. You will get the screen below where the list on the right side is empty.
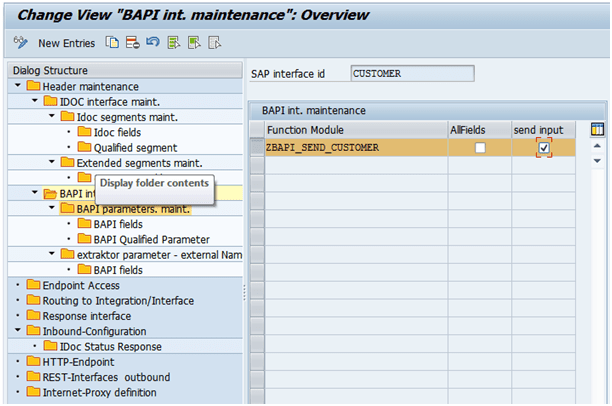
Now you have to choose the Function Module which is you developed in the Scenario1 step1 above. In this example the Function Module is ZBAPI_SEND_CUSTOMER.
Case1: BAPI and function module normally don’t have huge parameter and fields. Therefore there is an option to set that all parameters and fields of parameters of a BAPI/function module should be included in the xml file generation.
Because of this characteristic of a BAPI/function module we don’t describe the way how to add different parameters and fields but just use the option like shown in the screen below. Check the flag “All Fields” like shown in this screen.
A second flag you have to check when using function module is the flag “send input”. This flag indicate the runtime of Skyvva that the data should be send via function module call and not IDoc.
Now you are finish in defining the structure and fields for the xml file export. Now go to step 3 and export the BAPI structure.
Case 2: Should the BAPI/function module in some exceptional case has very large number of parameters and fields you can select parameters and fields individually.
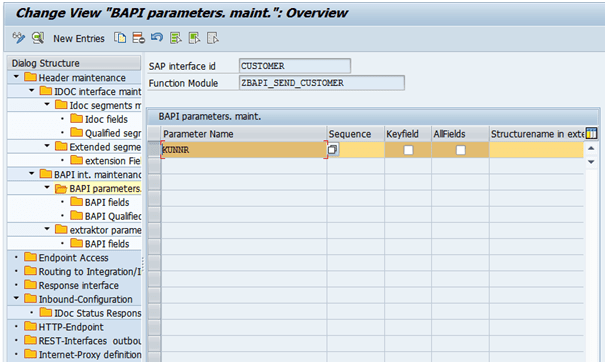
To define the parameters select the Function module and on the right side in the list (yellow highlighted). Now double click on the tree branch “BAPI parameters maint.” on the left side. You will get the screen below where the list on the right side is empty.

Click on new entries.
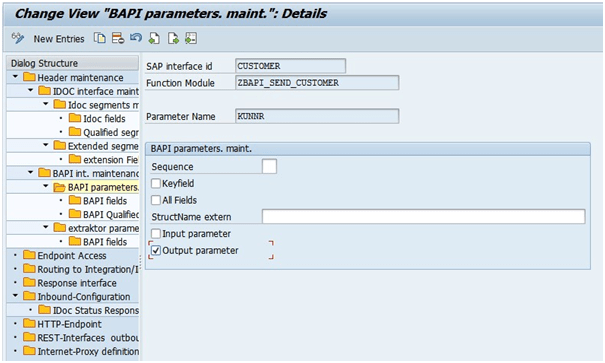
Here the field “parameter Name” you can choose from F4Help. Sequence you can mention the number if you are using the more parameters in the function module.
Because of this characteristic of a BAPI/function module parameters we don’t describe the way how to add different fields but just use the option like shown in the screen below. Check the flag “All Fields” like shown in this screen.
If the parameter is a field and that is key field then use the option like shown in the screen below. Check the flag “Keyfield” if it is an keyfield.
the field “StructName extern” we can give sObject name from Salesforce here it is an optional.
If the Parameter is an input parameter in interface. the flag “Input Parameter” you can see the option in the screen below.
If the parameter is an output parameter in interface check the flag “Output Parameter” like shown in the below screen.
after saving you can see like below.
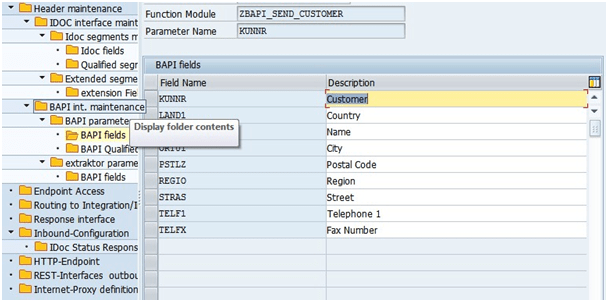
To define the fields select the parameter on the right side in the list (yellow highlighted). Now double click on the tree branch “BAPI fields” on the left side. You will get the screen below where the list on the right side is empty.
you can add the parameter fields like as functional parameters. Add all the required fields then after adding the screen look like below screen.
Now Interface is ready to export.
Follow the steps :
4.4 Download of created IStrucures as .XML-file
6. Defining Endpoint Access:- #
The Endpoint Access has to be setup to tell SAP where and how to connect to. It also defines the logical port over which all the internal communication with the SKYVVA Integration suite runs.
In our case the endpoint is needed to get the session id from Salesforce to use for subsequent webservice call. This connection has to create only one time and not for each interfaces.
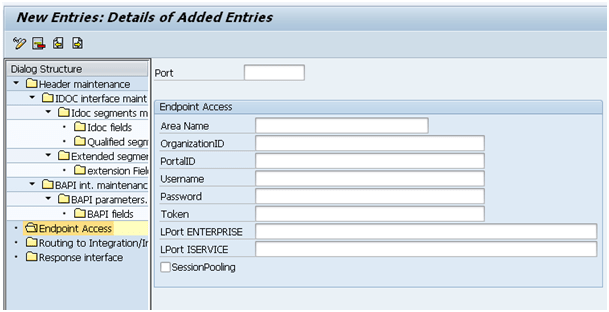
There are following fields:
Port
- Name of the defined physical Port for the connection
- Area Name
- SAP shared Objects: Name of the Objects in the shared memory. Needed if session pooling is used.
Organization ID
Portal ID
Optional: Specify only if user is a Customer Portal user. The ID of the portal for this Organization. The ID is available in the Salesforce user interface:
Username
Login Username for the external Salesforce system
Password
Login Password for the external Salesforce system
Token
Token used to connect to the Salesforce system
Logical Port ENTERPRISE
Logical Port used for internal communication
Logical Port ISERVICES
Logical Port used for internal communication
Session Pooling
Boolean. Enabling session pooling y/n
To define the endpoint access of an integration
- Go to the folder Endpoint Access on the left panePress
- New Entries (F5) (If not visible press Change Button (ctrl + F4))
- Fill in all the needed fields with the appropriate valuesPress
- Save (or ctrl + s)
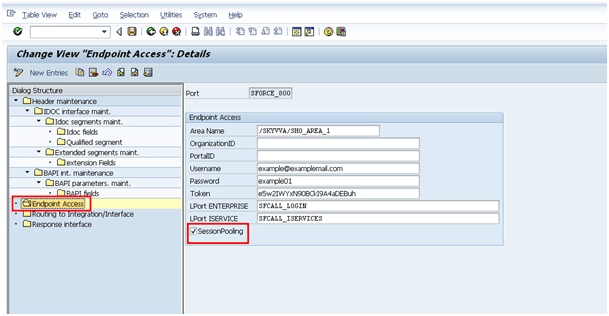
If check the flag „SessionPooling“ we activate the functionality that the session id is get one time and store in a abap shared memory. This stored session is use again for other webservice call. It perform better when using session pooling. So we recommend to always use this flag.
If this flag is not check each time a webservice from salesforce is called a separate login webservice is also called to get the session id. With every webservice call we use a new.
session id and this is not a good performance. It is not neccersary to get everytime a new session id. One session id is valid e.g. for 8 hour and can be use for many webservice call. So to increase performance session pooling should used e.g. the flag should tagged!
What is a session ID? #
A session ID is a unique number that a Web site’s server assigns a specific user for the duration of that user’s visit (session). The session ID can be stored as a cookie, form field, or URL (Uniform Resource Locator). Some Web servers generate session IDs by simply incrementing static numbers. However, most servers use algorithms that involve more complex methods, such as factoring in the date and time of the visit along with other variables defined by the server administrator.
In the following figure we see the Session Settings on Salesforce
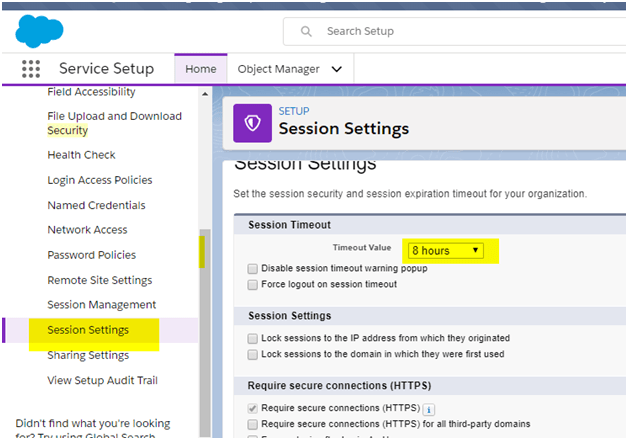
This screen show the validity of a session id. In this example a session id can last 8 hour.
LPort Enterprise and LPort Iservice are the names of logical Ports which has been configured in SOA-Manager (or in older versions in LPCONFIG). #
7. Defining Routing to Interface/Integration
Prerequisites: the integration is already created in SFDC and you have already created the interface within this integration or you have decided this to do in the next steps.
Double Click on Routing to Integration/Interface and after that Press Button New Entries
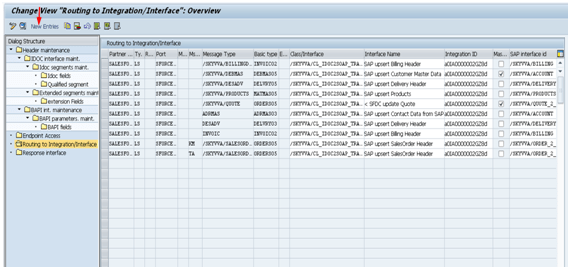
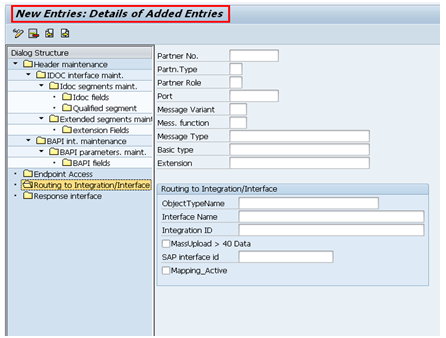
The Field ObjectTypeName has to be filled with /SKYVVA/CL_IDOC2SOAP_TRANSF_V1 for the actual version of the transformation class.
The values for Interface Name and Integration ID has to be retrieved from Salesforce.
For the SAP interface id please choose your previous configured interface name.